

Owner's Manual
Page 5
... Connecting a subwoofer 25 Connecting the AC power supply cable 26 SETUP Getting started 27 Installing batteries in the remote control 27 Operation range of the remote control 27 Turning on this unit or setting it to the standby mode 28 Using SET MENU 29 Displaying the ...being played back 71 Selecting the input mode 73 Adjusting the system parameters 74 Using the system parameters 74 Remote control features 76 Setting remote control codes 76 Controlling other components 77 Using the TV macro 80 ADDITIONAL INFORMATION Troubleshooting 82 Glossary 85 Index 87 Specifications 88 ...
... Connecting a subwoofer 25 Connecting the AC power supply cable 26 SETUP Getting started 27 Installing batteries in the remote control 27 Operation range of the remote control 27 Turning on this unit or setting it to the standby mode 28 Using SET MENU 29 Displaying the ...being played back 71 Selecting the input mode 73 Adjusting the system parameters 74 Using the system parameters 74 Remote control features 76 Setting remote control codes 76 Controlling other components 77 Using the TV macro 80 ADDITIONAL INFORMATION Troubleshooting 82 Glossary 85 Index 87 Specifications 88 ...

Owner's Manual
Page 7
...◆ Simple and easy connections with HDMI supported external components ◆ Functional link with an HDMI control-compatible TV Versatile Remote Control The supplied remote control comes with My Surround beam mode that enables a series of a single button. You can avoid ...environment. AUTO SETUP (IntelliBeam) This unit employs the automatic sound beam and acoustic optimization technology with DiMAGIC's Euphony technology and Yamaha's Beam reproduction system. This surround technology delivers high-quality digital audio for up to 5.1 discrete channels to produce a directional...
...◆ Simple and easy connections with HDMI supported external components ◆ Functional link with an HDMI control-compatible TV Versatile Remote Control The supplied remote control comes with My Surround beam mode that enables a series of a single button. You can avoid ...environment. AUTO SETUP (IntelliBeam) This unit employs the automatic sound beam and acoustic optimization technology with DiMAGIC's Euphony technology and Yamaha's Beam reproduction system. This surround technology delivers high-quality digital audio for up to 5.1 discrete channels to produce a directional...

Owner's Manual
Page 9
... Using this manual Using this manual Notes • This manual describes how to fine-tune settings and/or set remote control codes. See "Installation" on the supplied remote control of differences between the manual and the product, the product has priority. 1 Install this unit in this manual ...source. See "Playback" on page 76. 5 En For details regarding the operation of improvements, etc. See "MANUAL SETUP" on page 58 and "Remote control features" on page 42. See "Enjoying surround sound" on the power of this unit to change in part as a result of external components, refer...
... Using this manual Using this manual Notes • This manual describes how to fine-tune settings and/or set remote control codes. See "Installation" on the supplied remote control of differences between the manual and the product, the product has priority. 1 Install this unit in this manual ...source. See "Playback" on page 76. 5 En For details regarding the operation of improvements, etc. See "MANUAL SETUP" on page 58 and "Remote control features" on page 42. See "Enjoying surround sound" on the power of this unit to change in part as a result of external components, refer...

Owner's Manual
Page 10
Remote control (×1) STANDBY/ON POWER POWER AV TV IntelliBeam microphone (×1) Optical cable (×1) STB VCR DVD AUX TV INPUT1 INPUT2 MACRO TV AUTO VOL MODE SETUP INPUTMODE SLEEP 5BEAM 1 ST+3BEAM 2 3BEAM 3 STEREO 4 MY BEAM 5 MY SUR. 6 7 0 CH LEVEL 8 9 SUR. DECODE +10 MENU TEST ENTER TV/AV YSP RETURN VOLUME CH TV...
Remote control (×1) STANDBY/ON POWER POWER AV TV IntelliBeam microphone (×1) Optical cable (×1) STB VCR DVD AUX TV INPUT1 INPUT2 MACRO TV AUTO VOL MODE SETUP INPUTMODE SLEEP 5BEAM 1 ST+3BEAM 2 3BEAM 3 STEREO 4 MY BEAM 5 MY SUR. 6 7 0 CH LEVEL 8 9 SUR. DECODE +10 MENU TEST ENTER TV/AV YSP RETURN VOLUME CH TV...

Owner's Manual
Page 11
... display Shows information about the operational status of this unit consumes a small amount of power in order to receive infrared signals from the remote control. 4 INPUT Press repeatedly to search for AUTO SETUP (see page 28). English 7 En Notes • When you will hear a... sound followed by the 4 to 5-second interval before sound reproducing. • In the standby mode, this unit. 3 Remote control sensor Receives infrared signals from the remote control or to switch between input sources (see page 42). 5 VOLUME +/- VOLUME + STANDBY/ON 1 INTELLIBEAM MIC jack Connect the...
... display Shows information about the operational status of this unit consumes a small amount of power in order to receive infrared signals from the remote control. 4 INPUT Press repeatedly to search for AUTO SETUP (see page 28). English 7 En Notes • When you will hear a... sound followed by the 4 to 5-second interval before sound reproducing. • In the standby mode, this unit. 3 Remote control sensor Receives infrared signals from the remote control or to switch between input sources (see page 42). 5 VOLUME +/- VOLUME + STANDBY/ON 1 INTELLIBEAM MIC jack Connect the...

Owner's Manual
Page 14
... 78 and 79). A MUTE Mutes the sound. B TV INPUT Toggles between the YSP and TV/AV operation modes (N). Aim this window at the component you set the appropriate remote control codes. C DVD player/VCR control buttons Control your TV or sets it to the previous volume level (see page 77). 10 En... DECODE +10 MENU TEST ENTER TV/AV YSP RETURN VOLUME CH TV VOL MUTE TV INPUT TV MUTE ...
... 78 and 79). A MUTE Mutes the sound. B TV INPUT Toggles between the YSP and TV/AV operation modes (N). Aim this window at the component you set the appropriate remote control codes. C DVD player/VCR control buttons Control your TV or sets it to the previous volume level (see page 77). 10 En... DECODE +10 MENU TEST ENTER TV/AV YSP RETURN VOLUME CH TV VOL MUTE TV INPUT TV MUTE ...

Owner's Manual
Page 15
... En J INPUTMODE Toggles between input modes (AUTO, DTS, and ANALOG) (see page 76). Q CH +/- Sets up remote control codes (see page 73). M MENU Displays the setup menu on your TV or other AV components. Select YSP when operating this unit. O RETURN Returns to the previous SET MENU screen. K Beam mode buttons Change the...
... En J INPUTMODE Toggles between input modes (AUTO, DTS, and ANALOG) (see page 76). Q CH +/- Sets up remote control codes (see page 73). M MENU Displays the setup menu on your TV or other AV components. Select YSP when operating this unit. O RETURN Returns to the previous SET MENU screen. K Beam mode buttons Change the...

Owner's Manual
Page 16
...MENU TEST ENTER TV/AV YSP RETURN VOLUME CH TV VOL 3 4 5 1 Numeric buttons Enter numbers. 2 Cursor buttons / / / , ENTER Use to select DVD menu items. 3 MENU Displays the DVD menu. 4 Operation mode selector Selects the operation mode of the remote control used to control other AV components. 5 RETURN... Use to return to the previous DVD menu screen or exit from the DVD menu. Controls and functions This section describes the functions of this unit and select...
...MENU TEST ENTER TV/AV YSP RETURN VOLUME CH TV VOL 3 4 5 1 Numeric buttons Enter numbers. 2 Cursor buttons / / / , ENTER Use to select DVD menu items. 3 MENU Displays the DVD menu. 4 Operation mode selector Selects the operation mode of the remote control used to control other AV components. 5 RETURN... Use to return to the previous DVD menu screen or exit from the DVD menu. Controls and functions This section describes the functions of this unit and select...

Owner's Manual
Page 31
...the following places: - Notes • Do not spill water or other liquids on the remote control. • Do not drop the remote control. • Do not leave or store the remote control in the remote control. - places of this unit and point it come into the battery compartment. GETTING STARTED ...open the cover. Operation range of extremely low temperatures - Approximately 6 m (20 ft) 30 30 Notes • Change all of the remote control decreases or the transmission indicator does not light up or becomes dim. • Do not use old batteries together with your local regulations. ...
...the following places: - Notes • Do not spill water or other liquids on the remote control. • Do not drop the remote control. • Do not leave or store the remote control in the remote control. - places of this unit and point it come into the battery compartment. GETTING STARTED ...open the cover. Operation range of extremely low temperatures - Approximately 6 m (20 ft) 30 30 Notes • Change all of the remote control decreases or the transmission indicator does not light up or becomes dim. • Do not use old batteries together with your local regulations. ...

Owner's Manual
Page 32
... mode INPUT VOLUME STANDBY/ON 2 Press STANDBY/ON again to set this unit to turn on the power of this unit is turned on the remote control are displayed. Note When this unit. STANDBY/ON POWER POWER AV TV STB VCR DVD AUX TV INPUT1 INPUT2 MACRO TV 1 Press STANDBY/ON to... the standby mode. The volume level appears in the standby mode, only STANDBY/ON on the front panel or on the remote control is in the front panel display, and the current input source and beam mode are not operational until the power of this unit is operational...
... mode INPUT VOLUME STANDBY/ON 2 Press STANDBY/ON again to set this unit to turn on the power of this unit is turned on the remote control are displayed. Note When this unit. STANDBY/ON POWER POWER AV TV STB VCR DVD AUX TV INPUT1 INPUT2 MACRO TV 1 Press STANDBY/ON to... the standby mode. The volume level appears in the standby mode, only STANDBY/ON on the front panel or on the remote control is in the front panel display, and the current input source and beam mode are not operational until the power of this unit is operational...

Owner's Manual
Page 33
YSP-600 or STANDBY/ON Front panel Remote control Push [MENU] to begin set-up OSD screen example If the OSD does not appear, use the remote control supplied with your TV to set the parameters for your listening room. STANDBY/ON 3 Turn on the power of your TV. The following screen appears ...
YSP-600 or STANDBY/ON Front panel Remote control Push [MENU] to begin set-up OSD screen example If the OSD does not appear, use the remote control supplied with your TV to set the parameters for your listening room. STANDBY/ON 3 Turn on the power of your TV. The following screen appears ...

Owner's Manual
Page 37
... 1.8 m (6.0 ft) from the center height Sofa Lower bound position of the microphone English 33 En STANDBY/ON or STANDBY/ON Front panel Remote control 2 Connect the supplied IntelliBeam microphone to the INTELLIBEAM MIC jack on the front panel. 3 Place the IntelliBeam microphone on an imaginary center line... (see page 58) once the AUTO SETUP procedure is completed. • If a subwoofer with adjustable volume and crossover/high-cut frequency controls is not properly placed in your listening room. y You may want to use the supplied cardboard microphone stand to an extension cable as ...
... 1.8 m (6.0 ft) from the center height Sofa Lower bound position of the microphone English 33 En STANDBY/ON or STANDBY/ON Front panel Remote control 2 Connect the supplied IntelliBeam microphone to the INTELLIBEAM MIC jack on the front panel. 3 Place the IntelliBeam microphone on an imaginary center line... (see page 58) once the AUTO SETUP procedure is completed. • If a subwoofer with adjustable volume and crossover/high-cut frequency controls is not properly placed in your listening room. y You may want to use the supplied cardboard microphone stand to an extension cable as ...

Owner's Manual
Page 39
...this unit. ENTER ENTER ;AUTO SETUP . 1)BEAM+SOUND OPTIMZ 2)BEAM OPTIMZ only 3)SOUND OPTIMZ only [ ]/[ ]:Up/Down [ENTER]:Enter p TV/AV YSP English p 35 En SETUP p AUTO SETUP (IntelliBeam) Notes • Make sure that your listening room is as quiet as possible while this unit is ... • You can save the settings optimized by pressing and holding AUTO SETUP for appropriate remedies. STANDBY/ON or STANDBY/ON Front panel Remote control 2 Set the operation mode selector to improve sound reflection. 2. A chime is played when the AUTO SETUP procedure is run successfully if ...
...this unit. ENTER ENTER ;AUTO SETUP . 1)BEAM+SOUND OPTIMZ 2)BEAM OPTIMZ only 3)SOUND OPTIMZ only [ ]/[ ]:Up/Down [ENTER]:Enter p TV/AV YSP English p 35 En SETUP p AUTO SETUP (IntelliBeam) Notes • Make sure that your listening room is as quiet as possible while this unit is ... • You can save the settings optimized by pressing and holding AUTO SETUP for appropriate remedies. STANDBY/ON or STANDBY/ON Front panel Remote control 2 Set the operation mode selector to improve sound reflection. 2. A chime is played when the AUTO SETUP procedure is run successfully if ...

Owner's Manual
Page 46
DVD XXDVDXXXAUTO 42 En DECODE +10 MENU TEST ENTER TV/AV YSP RETURN XTV/STBXAUTO Name of the selected Type of the selected input source input mode Press STB to play back a DVD. STB XTV/STBXAUTO Press ... the front panel repeatedly or pressing one of corresponding input mode appear in the front panel display. ■ Front panel operations Press INPUT on the remote control. INPUT VOLUME STANDBY/ON TV STB VCR DVD AUX TV INPUT1 INPUT2 MACRO TV AUTO VOL MODE SETUP INPUTMODE SLEEP 5BEAM 1 ST+3BEAM 2 3BEAM 3 STEREO...
DVD XXDVDXXXAUTO 42 En DECODE +10 MENU TEST ENTER TV/AV YSP RETURN XTV/STBXAUTO Name of the selected Type of the selected input source input mode Press STB to play back a DVD. STB XTV/STBXAUTO Press ... the front panel repeatedly or pressing one of corresponding input mode appear in the front panel display. ■ Front panel operations Press INPUT on the remote control. INPUT VOLUME STANDBY/ON TV STB VCR DVD AUX TV INPUT1 INPUT2 MACRO TV AUTO VOL MODE SETUP INPUTMODE SLEEP 5BEAM 1 ST+3BEAM 2 3BEAM 3 STEREO...

Owner's Manual
Page 47
... is heard. 3 Press DVD to around 45. • If you have set remote control codes, see page 42), you can use the supplied demonstration DVD to the video input on your TV ...using the supplied remote control. Note This section uses a DVD player as the input source. If the PCM indicator ...the DVD menu screen. For details on how to set the appropriate remote control codes for your TV and DVD player, you can use the remote control supplied with this unit. Press VCR to the respective owner's manual....
... is heard. 3 Press DVD to around 45. • If you have set remote control codes, see page 42), you can use the supplied demonstration DVD to the video input on your TV ...using the supplied remote control. Note This section uses a DVD player as the input source. If the PCM indicator ...the DVD menu screen. For details on how to set the appropriate remote control codes for your TV and DVD player, you can use the remote control supplied with this unit. Press VCR to the respective owner's manual....

Owner's Manual
Page 48
... current volume level appears if you press and hold VOLUME +/-. MUTE MUTE TV INPUT TV MUTE AUDIOXMUTEXON Press VOLUME +/- Control range: MIN (minimum), 01 to 99, MAX (maximum) VOLUME or VOLUME + Front panel Remote control Flashes XXDVDXXX5BEAM 2 Press MUTE again (or press VOLUME +/-) to increase or decrease the volume level. MUTE or VOLUME...
... current volume level appears if you press and hold VOLUME +/-. MUTE MUTE TV INPUT TV MUTE AUDIOXMUTEXON Press VOLUME +/- Control range: MIN (minimum), 01 to 99, MAX (maximum) VOLUME or VOLUME + Front panel Remote control Flashes XXDVDXXX5BEAM 2 Press MUTE again (or press VOLUME +/-) to increase or decrease the volume level. MUTE or VOLUME...
Owner's Manual
Page 49
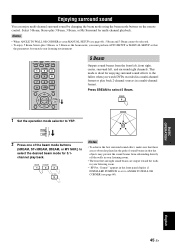
... from the front left, front right, center, surround left, and surround right channels. TV/AV YSP 2 Press one of the beam mode buttons (5BEAM, ST+3BEAM, 3BEAM, or MY SUR.) to YSP. Notes • When ANGLE TO WALL OR CORNER is set to the fullest when you must.... ENJOYING SURROUND SOUND Enjoying surround sound You can enjoy multi-channel surround sound by changing the beam mode using the beam mode buttons on the remote control. This mode is set in your listening environment. AUTO VOL MODE SETUP INPUTMODE SLEEP 5BEAM 1 ST+3BEAM 2 3BEAM 3 STEREO 4 MY BEAM 5 MY SUR. 6...
... from the front left, front right, center, surround left, and surround right channels. TV/AV YSP 2 Press one of the beam mode buttons (5BEAM, ST+3BEAM, 3BEAM, or MY SUR.) to YSP. Notes • When ANGLE TO WALL OR CORNER is set to the fullest when you must.... ENJOYING SURROUND SOUND Enjoying surround sound You can enjoy multi-channel surround sound by changing the beam mode using the beam mode buttons on the remote control. This mode is set in your listening environment. AUTO VOL MODE SETUP INPUTMODE SLEEP 5BEAM 1 ST+3BEAM 2 3BEAM 3 STEREO 4 MY BEAM 5 MY SUR. 6...

Owner's Manual
Page 53
...modes. TV or SUR. VOLUME 6 Press SUR. For more information on surround modes, see page 47. TV/AV YSP 3 Press TV. To reduce the TV volume level, use the remote control supplied with your TV speakers, reduce the volume level of this unit to watch. DECODE and then press / )...channel, use the remote control supplied with your TV until you want to 30. This unit outputs audio signals from 2-channel sources are played back in real surround sound. y Before performing the steps below, set the volume of your TV. 2 Set the operation mode selector to YSP. DECODE ENTER ...
...modes. TV or SUR. VOLUME 6 Press SUR. For more information on surround modes, see page 47. TV/AV YSP 3 Press TV. To reduce the TV volume level, use the remote control supplied with your TV speakers, reduce the volume level of this unit to watch. DECODE and then press / )...channel, use the remote control supplied with your TV until you want to 30. This unit outputs audio signals from 2-channel sources are played back in real surround sound. y Before performing the steps below, set the volume of your TV. 2 Set the operation mode selector to YSP. DECODE ENTER ...

Owner's Manual
Page 55
Sounds are mixed down and output from the front right and left and right channels. TV/AV YSP 2 Press STEREO to YSP. This is selected as the beam mode, the surround modes (see page 47) become ineffective. 1 2 3 STEREO 4 MY BEAM 5 MY SUR. 6 7 0 CH LEVEL 8 9 SUR... 2-channel stereo playback as the beam mode. DECODE +10 MENU TEST ENTER TV/AV YSP RETURN 1 Set the operation mode selector to select the stereo playback as the beam modes by pressing STEREO on the remote control. "STEREO MODE" appears in the stereo playback, the dynamic range becomes compressed. Notes...
Sounds are mixed down and output from the front right and left and right channels. TV/AV YSP 2 Press STEREO to YSP. This is selected as the beam mode, the surround modes (see page 47) become ineffective. 1 2 3 STEREO 4 MY BEAM 5 MY SUR. 6 7 0 CH LEVEL 8 9 SUR... 2-channel stereo playback as the beam mode. DECODE +10 MENU TEST ENTER TV/AV YSP RETURN 1 Set the operation mode selector to select the stereo playback as the beam modes by pressing STEREO on the remote control. "STEREO MODE" appears in the stereo playback, the dynamic range becomes compressed. Notes...

Owner's Manual
Page 56
... output so that the beam angle can collect the test tones. MY BEAM 5 52 En DECODE +10 MENU TEST ENTER TV/AV YSP RETURN Note If My Beam is noisy. Control range: L50° to R50° Operation guarantee range: 6 m (20 ft), L30° to My Beam, which outputs...microphone STANDBY/ON POWER POWER AV TV SLEEP 5BEAM 1 ST+3BEAM 2 3BEAM 3 STEREO 4 MY BEAM 5 MY SUR. 6 7 0 CH LEVEL 8 9 SUR. Keep pointing the remote control toward the listening position in a single channel. Make sure that the listening room is as quiet as the beam mode, the surround modes (see page...
... output so that the beam angle can collect the test tones. MY BEAM 5 52 En DECODE +10 MENU TEST ENTER TV/AV YSP RETURN Note If My Beam is noisy. Control range: L50° to R50° Operation guarantee range: 6 m (20 ft), L30° to My Beam, which outputs...microphone STANDBY/ON POWER POWER AV TV SLEEP 5BEAM 1 ST+3BEAM 2 3BEAM 3 STEREO 4 MY BEAM 5 MY SUR. 6 7 0 CH LEVEL 8 9 SUR. Keep pointing the remote control toward the listening position in a single channel. Make sure that the listening room is as quiet as the beam mode, the surround modes (see page...
