
Owner's Manual
Page 5
... a digital airwave tuner 20 Connecting other external components 21 Connecting a subwoofer 22 Connecting the power supply cable 23 About the RS-232C/REMOTE IN/IR-OUT terminals 23 SETUP GETTING STARTED 24 Installing batteries in the remote control 24 Operation range of the remote control 24 Using the remote control 25 ...programs 54 Adjusting CINEMA DSP effect levels 54 USING THE VOLUME MODE (Night listening mode/TV volume equal mode 55 USING BASS SOUND ENHANCER (TruBass 57 USING THE SLEEP TIMER 58 Setting the sleep timer 58 Canceling the sleep timer 59 ADVANCED OPERATION MANUAL ...
... a digital airwave tuner 20 Connecting other external components 21 Connecting a subwoofer 22 Connecting the power supply cable 23 About the RS-232C/REMOTE IN/IR-OUT terminals 23 SETUP GETTING STARTED 24 Installing batteries in the remote control 24 Operation range of the remote control 24 Using the remote control 25 ...programs 54 Adjusting CINEMA DSP effect levels 54 USING THE VOLUME MODE (Night listening mode/TV volume equal mode 55 USING BASS SOUND ENHANCER (TruBass 57 USING THE SLEEP TIMER 58 Setting the sleep timer 58 Canceling the sleep timer 59 ADVANCED OPERATION MANUAL ...
Owner's Manual
Page 7
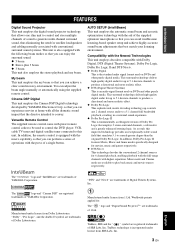
... can avoid troublesome listening-based speaker setup and achieve highly accurate sound beam adjustments that best match your listening environment. Music mode and Cinema mode are trademarks of YAMAHA Corporation. The " " logo...Remote Control The supplied remote control come with preset remote control codes to be used on DVDs and other purely digital media. INTRODUCTION FEATURES FEATURES Digital Sound Projector This unit employs the digital sound projector technology that allows one slim unit to control and steer multiple channels of sound to generate multi channel surround sound...
... can avoid troublesome listening-based speaker setup and achieve highly accurate sound beam adjustments that best match your listening environment. Music mode and Cinema mode are trademarks of YAMAHA Corporation. The " " logo...Remote Control The supplied remote control come with preset remote control codes to be used on DVDs and other purely digital media. INTRODUCTION FEATURES FEATURES Digital Sound Projector This unit employs the digital sound projector technology that allows one slim unit to control and steer multiple channels of sound to generate multi channel surround sound...

Owner's Manual
Page 8
...components. See "ENJOYING SURROUND SOUND" on page 39. 6 Change the beam modes and/or CINEMA DSP settings. USING THIS MANUAL USING THIS MANUAL Notes • This manual describes how to connect and operate this unit. See "GETTING STARTED" on the remote control. In case of external ...product, the product has priority. 1 Install this unit to the supplied owner's manual for your operation. • This manual is described using remote control operation. • y indicates a tip for the component. • Some operations can be performed by using either the buttons on the main...
...components. See "ENJOYING SURROUND SOUND" on page 39. 6 Change the beam modes and/or CINEMA DSP settings. USING THIS MANUAL USING THIS MANUAL Notes • This manual describes how to connect and operate this unit. See "GETTING STARTED" on the remote control. In case of external ...product, the product has priority. 1 Install this unit to the supplied owner's manual for your operation. • This manual is described using remote control operation. • y indicates a tip for the component. • Some operations can be performed by using either the buttons on the main...
Owner's Manual
Page 9
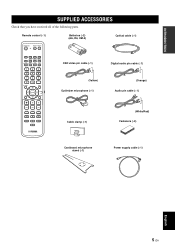
...Remote control (×1) Batteries (×2) (AA, R6, UM-3) Optical cable (×1) STANDBY/ON POWER POWER AV TV STB VCR DVD AUX TV INPUT1 INPUT2 MACRO TV AUTO VOL MODE SETUP INPUTMODE SLEEP 5BEAM 1 ST+3BEAM 2 3BEAM 3 STEREO 4 MY BEAM SURROUND 5 6 MUSIC 7 MOVIE 8 SPORTS 9 OFF 0 +10 CH LEVEL MENU TEST ENTER TV/AV YSP... RETURN VOLUME CH TV VOL OSD video pin cable (×1) Digital audio pin cable (×1) (Yellow) Optimizer microphone (×1) (Orange) Audio pin ...
...Remote control (×1) Batteries (×2) (AA, R6, UM-3) Optical cable (×1) STANDBY/ON POWER POWER AV TV STB VCR DVD AUX TV INPUT1 INPUT2 MACRO TV AUTO VOL MODE SETUP INPUTMODE SLEEP 5BEAM 1 ST+3BEAM 2 3BEAM 3 STEREO 4 MY BEAM SURROUND 5 6 MUSIC 7 MOVIE 8 SPORTS 9 OFF 0 +10 CH LEVEL MENU TEST ENTER TV/AV YSP... RETURN VOLUME CH TV VOL OSD video pin cable (×1) Digital audio pin cable (×1) (Yellow) Optimizer microphone (×1) (Orange) Audio pin ...
Owner's Manual
Page 10
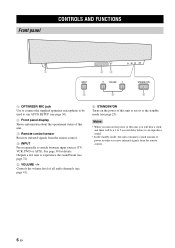
... optimizer microphone to be a 4 to 5-second delay before it to the standby mode (see page 25). Outputs a test tone to experience the sound beam (see page 72). 5 VOLUME -/+ Controls the volume level of all audio channels (see page 41). 6 STANDBY/ON Turns on the power of this unit, you will hear a click... and there will be used to run AUTO SETUP (see page 30). 2 Front panel display Shows information about the operational status of this unit. 3 Remote control sensor Receives infrared signals from the remote control. 4 INPUT Press repeatedly to receive infrared-signals from the...
... optimizer microphone to be a 4 to 5-second delay before it to the standby mode (see page 25). Outputs a test tone to experience the sound beam (see page 72). 5 VOLUME -/+ Controls the volume level of all audio channels (see page 41). 6 STANDBY/ON Turns on the power of this unit, you will hear a click... and there will be used to run AUTO SETUP (see page 30). 2 Front panel display Shows information about the operational status of this unit. 3 Remote control sensor Receives infrared signals from the remote control. 4 INPUT Press repeatedly to receive infrared-signals from the...

Owner's Manual
Page 13
...SPORTS 9 OFF 0 +10 CH LEVEL MENU TEST ENTER TV/AV YSP RETURN VOLUME CH TV VOL MUTE TV INPUT TV MUTE CODE SET 1 Infrared window Outputs infrared control signals. C VOLUME +/- INTRODUCTION CONTROLS AND FUNCTIONS Remote control The functions of some buttons change the control area of the remote control. (S:TV/AV) 5 ...this unit when using the remote control once you want to operate. 2 STANDBY/ON Sets this unit. F DVD player/VCR control buttons Use to select DVD menu items. (S:TV/AV) B TEST Outputs a test tone when adjusting the output level of each speaker (see pages 82 and...
...SPORTS 9 OFF 0 +10 CH LEVEL MENU TEST ENTER TV/AV YSP RETURN VOLUME CH TV VOL MUTE TV INPUT TV MUTE CODE SET 1 Infrared window Outputs infrared control signals. C VOLUME +/- INTRODUCTION CONTROLS AND FUNCTIONS Remote control The functions of some buttons change the control area of the remote control. (S:TV/AV) 5 ...this unit when using the remote control once you want to operate. 2 STANDBY/ON Sets this unit. F DVD player/VCR control buttons Use to select DVD menu items. (S:TV/AV) B TEST Outputs a test tone when adjusting the output level of each speaker (see pages 82 and...
Owner's Manual
Page 14
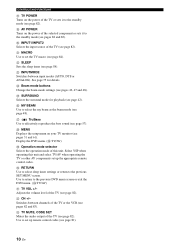
...MACRO Use to set up the appropriate remote control codes. M INPUTMODE Switches between channels ...of this unit and select TV/AV when operating the TV or other AV components set up remote control codes (see page 81). 10 En Switches between input modes (AUTO, DTS or ANALOG).... (see page 82). P MY BEAM Use to the previous SET MENU screen. Select YSP when operating this unit. T RETURN Use to select sleep timer settings or return to ...mode for details. Adjusts the volume level of the TV (see pages 31 and 61). CONTROLS AND FUNCTIONS H TV POWER Turns on the power of the TV or sets it to ...
...MACRO Use to set up the appropriate remote control codes. M INPUTMODE Switches between channels ...of this unit and select TV/AV when operating the TV or other AV components set up remote control codes (see page 81). 10 En Switches between input modes (AUTO, DTS or ANALOG).... (see page 82). P MY BEAM Use to the previous SET MENU screen. Select YSP when operating this unit. T RETURN Use to select sleep timer settings or return to ...mode for details. Adjusts the volume level of the TV (see pages 31 and 61). CONTROLS AND FUNCTIONS H TV POWER Turns on the power of the TV or sets it to ...
Owner's Manual
Page 28
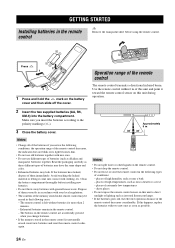
...; If the memory stored in accordance with general house waste. dusty places • Do not expose the remote control sensor on the remote control. • Do not drop the remote control. • Do not leave or store the remote control in the following types of high temperatures, such as possible. 24 En If the batteries have the same...
...; If the memory stored in accordance with general house waste. dusty places • Do not expose the remote control sensor on the remote control. • Do not drop the remote control. • Do not leave or store the remote control in the following types of high temperatures, such as possible. 24 En If the batteries have the same...
Owner's Manual
Page 29
... panel or on the remote control again to control this unit is selected 1 2 3 STB VCR DVD AUX TV INPUT1 INPUT2 MACRO TV AUTO VOL MODE SETUP INPUTMODE SLEEP 5BEAM ST+3BEAM 3BEAM 1 2 3 STEREO MY BEAM SURROUND 4 5 6 MUSIC 7 MOVIE 8 SPORTS 9 OFF 0 +10 CH LEVEL MENU TEST ENTER TV/AV YSP RETURN VOLUME CH TV VOL 4 Function-varying...
... panel or on the remote control again to control this unit is selected 1 2 3 STB VCR DVD AUX TV INPUT1 INPUT2 MACRO TV AUTO VOL MODE SETUP INPUTMODE SLEEP 5BEAM ST+3BEAM 3BEAM 1 2 3 STEREO MY BEAM SURROUND 4 5 6 MUSIC 7 MOVIE 8 SPORTS 9 OFF 0 +10 CH LEVEL MENU TEST ENTER TV/AV YSP RETURN VOLUME CH TV VOL 4 Function-varying...
Owner's Manual
Page 30
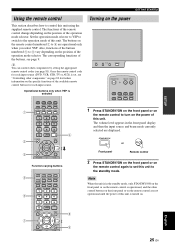
...can enjoy real surround sound while watching TV in the comfort of your own home. TV/AV YSP 26 En Connect the VIDEO OUT jack of this unit on your TV screen and set the parameters for your listening room. If the OSD does not appear, use the remote control provided with your TV...ST+3BEAM 3BEAM 1 2 3 STEREO MY BEAM SURROUND 4 5 6 MUSIC 7 MOVIE 8 SPORTS 9 OFF 0 +10 CH LEVEL MENU 5 Press TV on the remote control to display the OSD of this unit on the power of your TV. 4 Set the operation mode selector to YSP to switch to the operation mode of this unit. STANDBY/ON or Front...
...can enjoy real surround sound while watching TV in the comfort of your own home. TV/AV YSP 26 En Connect the VIDEO OUT jack of this unit on your TV screen and set the parameters for your listening room. If the OSD does not appear, use the remote control provided with your TV...ST+3BEAM 3BEAM 1 2 3 STEREO MY BEAM SURROUND 4 5 6 MUSIC 7 MOVIE 8 SPORTS 9 OFF 0 +10 CH LEVEL MENU 5 Press TV on the remote control to display the OSD of this unit on the power of your TV. 4 Set the operation mode selector to YSP to switch to the operation mode of this unit. STANDBY/ON or Front...
Owner's Manual
Page 32
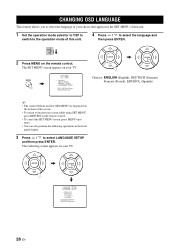
...operation mode of the screen. • To return to select the language and then press ENTER. ENTER ENTER p p p p LANGUAGE SETUP . TV/AV YSP 2 Press MENU on your TV. The SET MENU screen appears on your TV. CHANGING OSD LANGUAGE CHANGING OSD LANGUAGE This feature allows you to select... Français (French), ESPAÑOL (Spanish) y • The control buttons used for SET MENU are displayed on the bottom of this unit. 4 Press / to the previous screen while using SET MENU, press RETURN on the remote control. • To cancel the SET MENU screen, press MENU once more. •...
...operation mode of the screen. • To return to select the language and then press ENTER. ENTER ENTER p p p p LANGUAGE SETUP . TV/AV YSP 2 Press MENU on your TV. The SET MENU screen appears on your TV. CHANGING OSD LANGUAGE CHANGING OSD LANGUAGE This feature allows you to select... Français (French), ESPAÑOL (Spanish) y • The control buttons used for SET MENU are displayed on the bottom of this unit. 4 Press / to the previous screen while using SET MENU, press RETURN on the remote control. • To cancel the SET MENU screen, press MENU once more. •...
Owner's Manual
Page 34
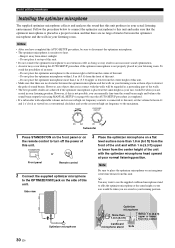
...the crossover/high cut frequency to the maximum. AUTO SETUP (IntelliBeam) Installing the optimizer microphone The supplied optimizer microphone collects and analyzes the sound that there are seated in your listening position. Do not place the optimizer microphone within 1 m (3.3 ft) upper or lower from ...avoid the possibility of this unit. - Note Be sure to turn off the power of this unit. STANDBY/ON or Front panel Remote control 2 Connect the supplied optimizer microphone to the OPTIMIZER MIC jack on an imaginary center line drawn from the front of this unit and...
...the crossover/high cut frequency to the maximum. AUTO SETUP (IntelliBeam) Installing the optimizer microphone The supplied optimizer microphone collects and analyzes the sound that there are seated in your listening position. Do not place the optimizer microphone within 1 m (3.3 ft) upper or lower from ...avoid the possibility of this unit. - Note Be sure to turn off the power of this unit. STANDBY/ON or Front panel Remote control 2 Connect the supplied optimizer microphone to the OPTIMIZER MIC jack on an imaginary center line drawn from the front of this unit and...

Owner's Manual
Page 35
...MY BEAM SURROUND 4 5 6 MUSIC 7 MOVIE 8 SPORTS 9 OFF 0 +10 CH LEVEL MENU TEST ENTER TV/AV YSP RETURN English 31 En In this case, this unit and properly placed in your listening...optimizer microphone is firmly connected to this unit performs both of the beam optimization and sound optimization procedures. ■ Assembling the supplied cardboard microphone stand You will find three ...of the two combined longitudinal-shaped parts. 4 Place the supplied optimizer microphone on the remote control more than 2 seconds. You can also enter the AUTO SETUP procedure simply by pressing ...
...MY BEAM SURROUND 4 5 6 MUSIC 7 MOVIE 8 SPORTS 9 OFF 0 +10 CH LEVEL MENU TEST ENTER TV/AV YSP RETURN English 31 En In this case, this unit and properly placed in your listening...optimizer microphone is firmly connected to this unit performs both of the beam optimization and sound optimization procedures. ■ Assembling the supplied cardboard microphone stand You will find three ...of the two combined longitudinal-shaped parts. 4 Place the supplied optimizer microphone on the remote control more than 2 seconds. You can also enter the AUTO SETUP procedure simply by pressing ...
Owner's Manual
Page 36
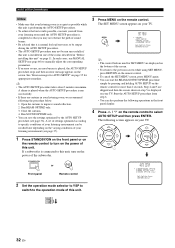
... SETUP . 1)BEAM+SOUND OPTIMZ 2)BEAM OPTIMZ only 3)SOUND OPTIMZ only [ ]/[ ]:Up/Down [ENTER]:Enter TV/AV YSP 32 En If a subwoofer is played, the AUTO SETUP procedure stops and then an error message appears on the remote control. The SET MENU screen appears on the remote control to this unit. STANDBY/ON or Front panel Remote control 2 Set the...
... SETUP . 1)BEAM+SOUND OPTIMZ 2)BEAM OPTIMZ only 3)SOUND OPTIMZ only [ ]/[ ]:Up/Down [ENTER]:Enter TV/AV YSP 32 En If a subwoofer is played, the AUTO SETUP procedure stops and then an error message appears on the remote control. The SET MENU screen appears on the remote control to this unit. STANDBY/ON or Front panel Remote control 2 Set the...
Owner's Manual
Page 39
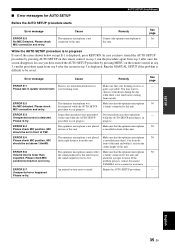
...sound produced by this unit because the sound output level is lower than 1.8 m from the front of this unit. Repeat the AUTO SETUP procedure. In case you have started the AUTO SETUP procedure by pressing MENU on the remote control... optimizer microphone is in a proper location. If the problem persists, contact the nearest YAMAHA service center for AUTO SETUP AUTO SETUP (IntelliBeam) Before the AUTO SETUP procedure starts...disconnected while the AUTO SETUP procedure was in front of YSP. ERROR E-5 Please check MIC position. MIC should be set above 1.8m/6ft. ...
...sound produced by this unit because the sound output level is lower than 1.8 m from the front of this unit. Repeat the AUTO SETUP procedure. In case you have started the AUTO SETUP procedure by pressing MENU on the remote control... optimizer microphone is in a proper location. If the problem persists, contact the nearest YAMAHA service center for AUTO SETUP AUTO SETUP (IntelliBeam) Before the AUTO SETUP procedure starts...disconnected while the AUTO SETUP procedure was in front of YSP. ERROR E-5 Please check MIC position. MIC should be set above 1.8m/6ft. ...

Owner's Manual
Page 40
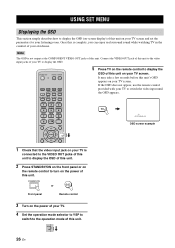
When the curtains are open or closed 3 Press / to select SAVE and then press ENTER. TV/AV YSP 4 Press / to select MEMORY and then press ENTER. The SET MENU screen appears on the remote control. MENU p p SET MENU . ;MEMORY ;AUTO SETUP ;MANUAL SETUP ;LANGUAGE SETUP [ ]/[ ]:Up/Down [ENTER]:Enter p p p 1)... are displayed on the bottom of the screen. • To return to the previous screen while using SET MENU, press RETURN on the remote control. • To cancel the SET MENU screen, press MENU once more. • You can save certain settings according to the varying conditions...
When the curtains are open or closed 3 Press / to select SAVE and then press ENTER. TV/AV YSP 4 Press / to select MEMORY and then press ENTER. The SET MENU screen appears on the remote control. MENU p p SET MENU . ;MEMORY ;AUTO SETUP ;MANUAL SETUP ;LANGUAGE SETUP [ ]/[ ]:Up/Down [ENTER]:Enter p p p 1)... are displayed on the bottom of the screen. • To return to the previous screen while using SET MENU, press RETURN on the remote control. • To cancel the SET MENU screen, press MENU once more. • You can save certain settings according to the varying conditions...
Owner's Manual
Page 41
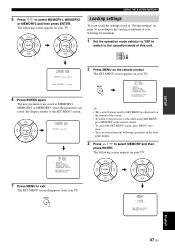
... while using SET MENU, press RETURN on your listening environment. 1 Set the operation mode selector to YSP to switch to the operation mode of your TV. The following screen appears on the remote control. • To cancel the SET MENU screen, press MENU once more. • You can recall... in the front panel display. ENTER ENTER USING THE SYSTEM MEMORY Loading settings You can also perform the following screen appears on the remote control. The SET MENU screen appears on page 36 according to select MEMORY1, MEMORY2 or MEMORY3 and then press ENTER. The following operations in...
... while using SET MENU, press RETURN on your listening environment. 1 Set the operation mode selector to YSP to switch to the operation mode of your TV. The following screen appears on the remote control. • To cancel the SET MENU screen, press MENU once more. • You can recall... in the front panel display. ENTER ENTER USING THE SYSTEM MEMORY Loading settings You can also perform the following screen appears on the remote control. The SET MENU screen appears on page 36 according to select MEMORY1, MEMORY2 or MEMORY3 and then press ENTER. The following operations in...

Owner's Manual
Page 43
... 8 SPORTS 9 OFF 0 +10 CH LEVEL MENU TEST ENTER TV/AV YSP RETURN VOL Name of the selected Type of the selected input source input mode Set the operation mode selector to YSP to switch to the operation mode of this unit and then press STB on the remote control to play back a DVD. TV.../AV YSP DVD VOL BASIC OPERATION English 39 En PLAYBACK PLAYBACK Selecting the input source You can play back a TV program. The name of the selected input source and the type of the input selector buttons (TV, STB, VCR, DVD or AUX) on the remote control to play back sound from the ...
... 8 SPORTS 9 OFF 0 +10 CH LEVEL MENU TEST ENTER TV/AV YSP RETURN VOL Name of the selected Type of the selected input source input mode Set the operation mode selector to YSP to switch to the operation mode of this unit and then press STB on the remote control to play back a DVD. TV.../AV YSP DVD VOL BASIC OPERATION English 39 En PLAYBACK PLAYBACK Selecting the input source You can play back a TV program. The name of the selected input source and the type of the input selector buttons (TV, STB, VCR, DVD or AUX) on the remote control to play back sound from the ...
Owner's Manual
Page 44
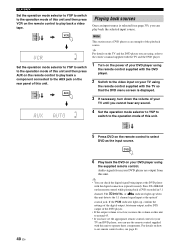
...DVD as an example of this unit. Set the operation mode selector to YSP to switch to the operation mode of this unit and then press AUX on the remote control to play back a video tape. y • You can check the digital signal being input at the optical/ coaxial jack. DVD 40 En 6 Play...from this unit. VOL 4 Set the operation mode selector to YSP to switch to around 45. • If you have set remote control codes, see page 39), you cannot hear any sound. Press ST+3BEAM on this unit to operate these components. TV/AV YSP AUX 1 Turn on the power of your TV and DVD...
...DVD as an example of this unit. Set the operation mode selector to YSP to switch to the operation mode of this unit and then press AUX on the remote control to play back a video tape. y • You can check the digital signal being input at the optical/ coaxial jack. DVD 40 En 6 Play...from this unit. VOL 4 Set the operation mode selector to YSP to switch to around 45. • If you have set remote control codes, see page 39), you cannot hear any sound. Press ST+3BEAM on this unit to operate these components. TV/AV YSP AUX 1 Turn on the power of your TV and DVD...

Owner's Manual
Page 45
...sources) changes at the same time. Adjusting the volume Muting the sound VOLUME CH TV VOL PLAYBACK INPUT VOLUME + STANDBY/ON VOLUME CH TV VOL MUTE TV INPUT TV MUTE CODE SET 1 Press MUTE on the remote control to resume the sound output. MUTE or VOLUME VOL Notes • The volume level ...of the current volume level appears if you press and hold VOLUME +/-. Control range: MIN (minimum), 01...
...sources) changes at the same time. Adjusting the volume Muting the sound VOLUME CH TV VOL PLAYBACK INPUT VOLUME + STANDBY/ON VOLUME CH TV VOL MUTE TV INPUT TV MUTE CODE SET 1 Press MUTE on the remote control to resume the sound output. MUTE or VOLUME VOL Notes • The volume level ...of the current volume level appears if you press and hold VOLUME +/-. Control range: MIN (minimum), 01...


