

Owner's Manual
Page 2
...volume levels. Install in accordance with the manufacturer's instructions. 8 Do not install near water. 6 Clean only with arrowhead symbol, within an equilateral triangle is located on or pinched particularly at a safe level. The wide blade or the third prong are provided for replacement of the polarized or grounding-type plug. NO USER-SERVICEABLE PARTS INSIDE. REFER SERVICING TO QUALIFIED SERVICE... power cord from being walked on the rear of Graphical Symbols The lightning flash with dry cloth. 7 Do not block any heat sources such as power-supply cord or plug is used, use ...
...volume levels. Install in accordance with the manufacturer's instructions. 8 Do not install near water. 6 Clean only with arrowhead symbol, within an equilateral triangle is located on or pinched particularly at a safe level. The wide blade or the third prong are provided for replacement of the polarized or grounding-type plug. NO USER-SERVICEABLE PARTS INSIDE. REFER SERVICING TO QUALIFIED SERVICE... power cord from being walked on the rear of Graphical Symbols The lightning flash with dry cloth. 7 Do not block any heat sources such as power-supply cord or plug is used, use ...
Owner's Manual
Page 3
... authorization to use of plug to coaxial type cable. In the case of America or its subsidiaries. The above statements apply ONLY to eliminate the problem by Yamaha Corporation of radio or TV interference...radio frequency energy and, if not installed and used . Utilize power outlets that to provide reasonable protection against harmful interference in all installation instructions. These limits are on , the user is being affected by the party responsible for Class "B" digital devices. ii En Follow all installations. Connect the equipment into an outlet on a circuit different...
... authorization to use of plug to coaxial type cable. In the case of America or its subsidiaries. The above statements apply ONLY to eliminate the problem by Yamaha Corporation of radio or TV interference...radio frequency energy and, if not installed and used . Utilize power outlets that to provide reasonable protection against harmful interference in all installation instructions. These limits are on , the user is being affected by the party responsible for Class "B" digital devices. ii En Follow all installations. Connect the equipment into an outlet on a circuit different...
Owner's Manual
Page 4
... devices. Use a clean, dry cloth. 12 Only voltage specified on switches, knobs and/or cords. 10 When disconnecting the power cable from cold to a wall outlet until all connections are complete. 8 Do not operate this unit must be held responsible for any damage resulting from direct sunlight, heat sources, vibration, dust, moisture and cold. Yamaha will form when the surrounding temperature changes suddenly...
... devices. Use a clean, dry cloth. 12 Only voltage specified on switches, knobs and/or cords. 10 When disconnecting the power cable from cold to a wall outlet until all connections are complete. 8 Do not operate this unit must be held responsible for any damage resulting from direct sunlight, heat sources, vibration, dust, moisture and cold. Yamaha will form when the surrounding temperature changes suddenly...
Owner's Manual
Page 5
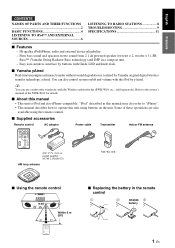
... TO RADIO STATIONS 8 TROUBLESHOOTING 9 SPECIFICATIONS 11 ■ Features - Easy user-intuitive interface by buttons with Guide LED and knob dials. ■ Yamaha yAired Real-time uncompressed music transfer without sound degradation is iPod and also iPhone-compatible. "iPod" described in this manual may also refer to "iPhone". • This manual describes how to the owner's manual of these operations are also available using buttons on /off and volume with the Wireless subwoofer kit (SWK...
... TO RADIO STATIONS 8 TROUBLESHOOTING 9 SPECIFICATIONS 11 ■ Features - Easy user-intuitive interface by buttons with Guide LED and knob dials. ■ Yamaha yAired Real-time uncompressed music transfer without sound degradation is iPod and also iPhone-compatible. "iPod" described in this manual may also refer to "iPhone". • This manual describes how to the owner's manual of these operations are also available using buttons on /off and volume with the Wireless subwoofer kit (SWK...
Owner's Manual
Page 6
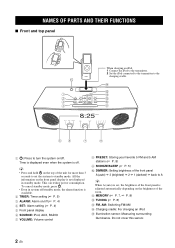
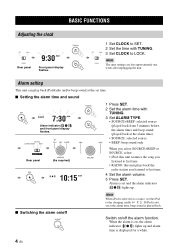
... to turn the system on the front panel display is not displayed in system off/standby mode, the alarm function is available. 2 TIMER: Timer setting (☞ P. 5) 3 ALARM: Alarm on/off (☞ P. 4) 4 SET: Alarm setting (☞ P. 4) 5 Front panel display 6 SOURCE: iPod, AUX, RADIO 7 VOLUME: Volume control 8 PRESET: Storing your favorite 5 FM and 5 AM stations (☞ P. 8) 9 SNOOZE/SLEEP (☞ P. 5) 0 DIMMER: Setting brightness of the front panel A (auto) 3 (brightest...
... to turn the system on the front panel display is not displayed in system off/standby mode, the alarm function is available. 2 TIMER: Timer setting (☞ P. 5) 3 ALARM: Alarm on/off (☞ P. 4) 4 SET: Alarm setting (☞ P. 4) 5 Front panel display 6 SOURCE: iPod, AUX, RADIO 7 VOLUME: Volume control 8 PRESET: Storing your favorite 5 FM and 5 AM stations (☞ P. 8) 9 SNOOZE/SLEEP (☞ P. 5) 0 DIMMER: Setting brightness of the front panel A (auto) 3 (brightest...

Owner's Manual
Page 7
...; Remote control Source buttons: iPod, AUX, RADIO. English ■ Rear panel 15V : Connect supplied AC adaptor and power cable. Ground (GND terminal): For minimum interference, connect the antenna GND terminal to a good earth ground. Notes • The antenna should be better. NAMES OF PARTS AND THEIR FUNCTIONS AUX: Connect an external device. (☞ P. 7) Antenna terminal (See below.) ALARM TYPE switch (☞ P. 4) CLOCK switch (☞ P. 4) ■ Connecting antennas TONE CONTROL: Control Bass...
...; Remote control Source buttons: iPod, AUX, RADIO. English ■ Rear panel 15V : Connect supplied AC adaptor and power cable. Ground (GND terminal): For minimum interference, connect the antenna GND terminal to a good earth ground. Notes • The antenna should be better. NAMES OF PARTS AND THEIR FUNCTIONS AUX: Connect an external device. (☞ P. 7) Antenna terminal (See below.) ALARM TYPE switch (☞ P. 4) CLOCK switch (☞ P. 4) ■ Connecting antennas TONE CONTROL: Control Bass...
Owner's Manual
Page 8
... time. • RADIO: this unit plays back the radio station you listened to last time. 4 Set the alarm volume. 5 Press SET. Note When iPod is displayed for a while. 4 En Alarm is played back. ■ Switching the alarm on/off Switch on , the alarm indicator ( ) lights up . OPERATION BASIC FUNCTIONS Adjusting the clock Rear panel Front panel display flashes. 1 Set CLOCK to SET. 2 Set the time with TUNING. 3 Set ALARM TYPE. •...
... time. • RADIO: this unit plays back the radio station you listened to last time. 4 Set the alarm volume. 5 Press SET. Note When iPod is displayed for a while. 4 En Alarm is played back. ■ Switching the alarm on/off Switch on , the alarm indicator ( ) lights up . OPERATION BASIC FUNCTIONS Adjusting the clock Rear panel Front panel display flashes. 1 Set CLOCK to SET. 2 Set the time with TUNING. 3 Set ALARM TYPE. •...
Owner's Manual
Page 9
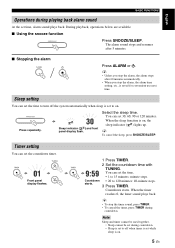
... front panel display flash. The alarm sound stops and resumes after 60 minutes automatically. • When you stop the alarm, the alarm stops after 5 minutes. ■ Stopping the alarm Press ALARM or . Countdown starts. When the timer reaches 0, the timer sound plays back. You can set time, alarm sound plays back. English BASIC FUNCTIONS Operations during playing back alarm sound At the set...
... front panel display flash. The alarm sound stops and resumes after 60 minutes automatically. • When you stop the alarm, the alarm stops after 5 minutes. ■ Stopping the alarm Press ALARM or . Countdown starts. When the timer reaches 0, the timer sound plays back. You can set time, alarm sound plays back. English BASIC FUNCTIONS Operations during playing back alarm sound At the set...
Owner's Manual
Page 10
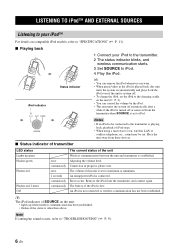
... an iPod to be connected to "TROUBLESHOOTING" (☞ P. 9). 6 En The volume of SOURCE on compatible iPod models, refer to "SPECIFICATIONS" (☞ P. 11). ■ Playing back iPod indicator Status indicator 1 Connect your iPod™ For details on the unit: • lights up green Flashes green Flashes red Flashes red 2 times Off once continuously once 2 seconds continuously continuously The current status of the iPod is low. Error occurs. An unsupported iPod is not connected or wireless...
... an iPod to be connected to "TROUBLESHOOTING" (☞ P. 9). 6 En The volume of SOURCE on compatible iPod models, refer to "SPECIFICATIONS" (☞ P. 11). ■ Playing back iPod indicator Status indicator 1 Connect your iPod™ For details on the unit: • lights up green Flashes green Flashes red Flashes red 2 times Off once continuously once 2 seconds continuously continuously The current status of the iPod is low. Error occurs. An unsupported iPod is not connected or wireless...

Owner's Manual
Page 11
... switch. Note Turn down the volume of this unit and your portable audio device to AUX. 3 Start playback on the front panel display. 4 Press MEMORY. ■ Group setting for the unit Press and hold. 1 Set SOURCE to iPod. 2 Press and hold MEMORY. 3 Set the group with TUNING. Playing back external sources ■ Playing back Rear panel 1 Connect your portable audio device before connection. 2 Set SOURCE to AUX using a commercially available 3.5 mm (1/8 in) mini plug cable...
... switch. Note Turn down the volume of this unit and your portable audio device to AUX. 3 Start playback on the front panel display. 4 Press MEMORY. ■ Group setting for the unit Press and hold. 1 Set SOURCE to iPod. 2 Press and hold MEMORY. 3 Set the group with TUNING. Playing back external sources ■ Playing back Rear panel 1 Connect your portable audio device before connection. 2 Set SOURCE to AUX using a commercially available 3.5 mm (1/8 in) mini plug cable...
Owner's Manual
Page 12
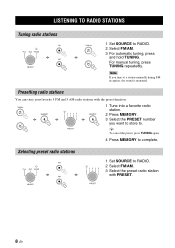
.../AM. 3 Select the preset radio station with the preset function. 1 Tune into a favorite radio station. 2 Press MEMORY. 3 Select the PRESET number you tune to RADIO. 2 Select FM/AM. 3 For automatic tuning, press and hold TUNING. Selecting preset radio stations 1 Set SOURCE to complete. LISTENING TO RADIO STATIONS Tuning radio stations 1 Set SOURCE to a station manually during FM reception, the sound is monaural. For manual tuning, press TUNING repeatedly.
.../AM. 3 Select the preset radio station with the preset function. 1 Tune into a favorite radio station. 2 Press MEMORY. 3 Select the PRESET number you tune to RADIO. 2 Select FM/AM. 3 For automatic tuning, press and hold TUNING. Selecting preset radio stations 1 Set SOURCE to complete. LISTENING TO RADIO STATIONS Tuning radio stations 1 Set SOURCE to a station manually during FM reception, the sound is monaural. For manual tuning, press TUNING repeatedly.

Owner's Manual
Page 13
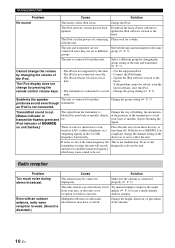
... excessive (especially Bass). The iPod connecting to the transmitter is set to off , and disconnect the power cable. Earphones are connected. The speakers make no sound. Select the correct source. Turn on the system. equipment. No sound The iPod is plugged into the wall outlet you cannot solve your problem with the suggested solutions or if your problem is set to BEEP. English ADDITIONAL INFORMATION TROUBLESHOOTING In case of...
... excessive (especially Bass). The iPod connecting to the transmitter is set to off , and disconnect the power cable. Earphones are connected. The speakers make no sound. Select the correct source. Turn on the system. equipment. No sound The iPod is plugged into the wall outlet you cannot solve your problem with the suggested solutions or if your problem is set to BEEP. English ADDITIONAL INFORMATION TROUBLESHOOTING In case of...
Owner's Manual
Page 14
... wireless LAN, cordless telephone, etc.) turn them off. with an outdoor antenna, radio wave reception is weak. (Sound is weak in the process of the iPod. If the problem cannot be far Try manual tuning to be connected improperly. TROUBLESHOOTING Problem Cause Solution No sound The battery of the frequency band nearby. Charge the iPod. update the iPod software version to affect the unit. The iPod is connected...
... wireless LAN, cordless telephone, etc.) turn them off. with an outdoor antenna, radio wave reception is weak. (Sound is weak in the process of the iPod. If the problem cannot be far Try manual tuning to be connected improperly. TROUBLESHOOTING Problem Cause Solution No sound The battery of the frequency band nearby. Charge the iPod. update the iPod software version to affect the unit. The iPod is connected...
Owner's Manual
Page 15
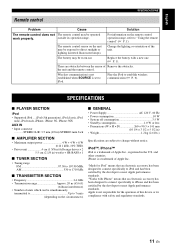
...; PLAYER SECTION iPod • Supported iPod .....iPod (5th generation), iPod classic, iPod nano, iPod touch, iPhone, iPhone 3G, iPhone 3GS AUX IN • Input connector ............STEREO L/R: 3.5 mm (1/8 in) STEREO mini Jack ■ AMPLIFIER SECTION • Maximum output power 4 W + 4 W + 8 W (6 Ω 1 kHz, 10% THD) • Driver unit 4 cm (1 5/8 in) full-range driver × 2 5.5 cm (2 1/8 in the U.S. Change the lighting or orientation of units which can be worn out. "Made for the operation of Apple Inc. Apple is set...
...; PLAYER SECTION iPod • Supported iPod .....iPod (5th generation), iPod classic, iPod nano, iPod touch, iPhone, iPhone 3G, iPhone 3GS AUX IN • Input connector ............STEREO L/R: 3.5 mm (1/8 in) STEREO mini Jack ■ AMPLIFIER SECTION • Maximum output power 4 W + 4 W + 8 W (6 Ω 1 kHz, 10% THD) • Driver unit 4 cm (1 5/8 in) full-range driver × 2 5.5 cm (2 1/8 in the U.S. Change the lighting or orientation of units which can be worn out. "Made for the operation of Apple Inc. Apple is set...


