
TSX-B72 Owners Manual
Page 2
... SAFETY INSTRUCTIONS CAUTION RISK OF ELECTRIC SHOCK DO NOT OPEN CAUTION: TO REDUCE THE RISK OF ELECTRIC SHOCK, DO NOT REMOVE COVER (OR BACK). NO USER-SERVICEABLE PARTS INSIDE. If the provided plug does not fit into the apparatus, the apparatus has been exposed to constitute a risk of the obsolete outlet. 10 Protect the power cord from excessive volume levels...
... SAFETY INSTRUCTIONS CAUTION RISK OF ELECTRIC SHOCK DO NOT OPEN CAUTION: TO REDUCE THE RISK OF ELECTRIC SHOCK, DO NOT REMOVE COVER (OR BACK). NO USER-SERVICEABLE PARTS INSIDE. If the provided plug does not fit into the apparatus, the apparatus has been exposed to constitute a risk of the obsolete outlet. 10 Protect the power cord from excessive volume levels...
TSX-B72 Owners Manual
Page 3
... of this manual if interference to radio reception is subject to coaxial type cable. This equipment has very low levels of IC Rules. • Operation is suspected. But it is 300 ohm ribbon lead, change the lead-in conjunction with Part 15 of the FCC Rules and RSSGen of RF energy that to which can be determined by turning the unit...
... of this manual if interference to radio reception is subject to coaxial type cable. This equipment has very low levels of IC Rules. • Operation is suspected. But it is 300 ohm ribbon lead, change the lead-in conjunction with Part 15 of the FCC Rules and RSSGen of RF energy that to which can be determined by turning the unit...
TSX-B72 Owners Manual
Page 4
.... There is a chance that this unit is connected to this unit away from direct sunlight, heat sources, vibration, dust, moisture and cold. Radio waves may cause damage and/or discoloration on switches, knobs and/or cords. 10 When disconnecting the power cable from cold to this unit alone for any service is turned off , then leave this unit, and/or...
.... There is a chance that this unit is connected to this unit away from direct sunlight, heat sources, vibration, dust, moisture and cold. Radio waves may cause damage and/or discoloration on switches, knobs and/or cords. 10 When disconnecting the power cable from cold to this unit alone for any service is turned off , then leave this unit, and/or...
TSX-B72 Owners Manual
Page 5
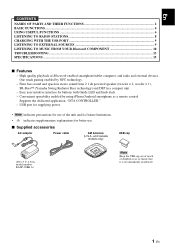
Firm bass sound and spacious stereo sound from 2.1 ch powered speaker (tweeter × 2, woofer × 1), SR-Bass™ (Yamaha Swing Radiator Bass technology) and DSP in a compact unit. - Supports the dedicated application, "DTA CONTROLLER." - USB port for supplying power. • Note indicates precautions for better use. ■ Supplied accessories AC adaptor Power cable AM Antenna (U.S.A. Easy user-intuitive interface by using iPhone/Android smartphone as to ensure that it is not mistakenly...
Firm bass sound and spacious stereo sound from 2.1 ch powered speaker (tweeter × 2, woofer × 1), SR-Bass™ (Yamaha Swing Radiator Bass technology) and DSP in a compact unit. - Supports the dedicated application, "DTA CONTROLLER." - USB port for supplying power. • Note indicates precautions for better use. ■ Supplied accessories AC adaptor Power cable AM Antenna (U.S.A. Easy user-intuitive interface by using iPhone/Android smartphone as to ensure that it is not mistakenly...
TSX-B72 Owners Manual
Page 6
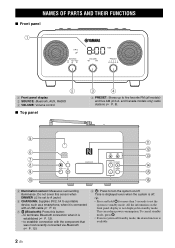
... models only) radio stations (☞ P. 8). 5 Illumination sensor: Measures surrounding illuminance. Time is displayed even when the system is off /standby mode, the alarm function is set the system to turn the system on the front panel display is established (☞ P. 12). - To cancel standby mode, press . • Even in standby mode. NAMES OF PARTS AND THEIR FUNCTIONS ■ Front panel 1 Front panel display 2 SOURCE: Bluetooth, AUX, RADIO 3 VOLUME: Volume control ■ Top panel 4 PRESET: Stores up to establish connection with a USB cable...
... models only) radio stations (☞ P. 8). 5 Illumination sensor: Measures surrounding illuminance. Time is displayed even when the system is off /standby mode, the alarm function is set the system to turn the system on the front panel display is established (☞ P. 12). - To cancel standby mode, press . • Even in standby mode. NAMES OF PARTS AND THEIR FUNCTIONS ■ Front panel 1 Front panel display 2 SOURCE: Bluetooth, AUX, RADIO 3 VOLUME: Volume control ■ Top panel 4 PRESET: Stores up to establish connection with a USB cable...
TSX-B72 Owners Manual
Page 7
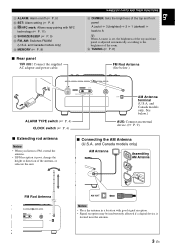
... FM reception is poor, change the height or direction of the antenna, or relocate the unit. ■ Connecting the AM Antenna (U.S.A. and Canada models only. See below .) ALARM TYPE switch (☞ P. 4) CLOCK switch (☞ P. 4) AM Antenna terminal (U.S.A. NAMES OF PARTS AND THEIR FUNCTIONS E DIMMER: Sets the brightness of the top and front panel A (auto) 3 (brightest) 2 1 (darkest) back to A y When A (auto) is set, the brightness of the...
... FM reception is poor, change the height or direction of the antenna, or relocate the unit. ■ Connecting the AM Antenna (U.S.A. and Canada models only. See below .) ALARM TYPE switch (☞ P. 4) CLOCK switch (☞ P. 4) AM Antenna terminal (U.S.A. NAMES OF PARTS AND THEIR FUNCTIONS E DIMMER: Sets the brightness of the top and front panel A (auto) 3 (brightest) 2 1 (darkest) back to A y When A (auto) is set, the brightness of the...
TSX-B72 Owners Manual
Page 8
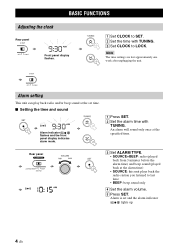
... TUNING. C Set CLOCK to last time. • BEEP: beep sound only D Set the alarm volume. Rear panel C Set ALARM TYPE. • SOURCE+BEEP: radio (played back from 3 minutes before the alarm time) and beep sound (played back at the alarm time) • SOURCE: this unit plays back the radio station you listened to LOCK. Alarm is set time. ■ Setting the time and sound Alarm indicator ( ) flashes and the front panel display indicates alarm mode. B Set the alarm time with TUNING. Alarm setting...
... TUNING. C Set CLOCK to last time. • BEEP: beep sound only D Set the alarm volume. Rear panel C Set ALARM TYPE. • SOURCE+BEEP: radio (played back from 3 minutes before the alarm time) and beep sound (played back at the alarm time) • SOURCE: this unit plays back the radio station you listened to LOCK. Alarm is set time. ■ Setting the time and sound Alarm indicator ( ) flashes and the front panel display indicates alarm mode. B Set the alarm time with TUNING. Alarm setting...
TSX-B72 Owners Manual
Page 9
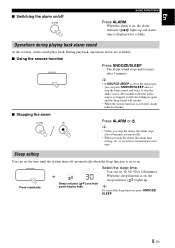
... on. y To cancel the sleep function, press SNOOZE/ SLEEP. 5 En During playback, operations below are available. ■ Using the snooze function Press SNOOZE/SLEEP. Five minutes after 5 minutes. Sleep indicator ( ) and front panel display flash. You can set the time until the system turns off BASIC FUNCTIONS Press ALARM. The alarm sound stops and resumes after the audio source is stopped, it will start...
... on. y To cancel the sleep function, press SNOOZE/ SLEEP. 5 En During playback, operations below are available. ■ Using the snooze function Press SNOOZE/SLEEP. Five minutes after 5 minutes. Sleep indicator ( ) and front panel display flash. You can set the time until the system turns off BASIC FUNCTIONS Press ALARM. The alarm sound stops and resumes after the audio source is stopped, it will start...
TSX-B72 Owners Manual
Page 10
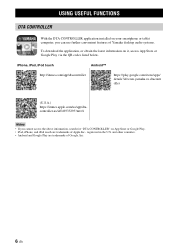
OPERATION USING USEFUL FUNCTIONS DTA CONTROLLER With the DTA CONTROLLER application installed on your smartphone or tablet computer, you cannot access the above information, search for "DTA CONTROLLER" on it, access App Store or Google Play via the QR codes listed below. iPhone, iPad, iPod touch Android™ http://itunes.com/app/dtacontroller https://play.google.com/store/apps/ details?id=com.yamaha.av...
OPERATION USING USEFUL FUNCTIONS DTA CONTROLLER With the DTA CONTROLLER application installed on your smartphone or tablet computer, you cannot access the above information, search for "DTA CONTROLLER" on it, access App Store or Google Play via the QR codes listed below. iPhone, iPad, iPod touch Android™ http://itunes.com/app/dtacontroller https://play.google.com/store/apps/ details?id=com.yamaha.av...

TSX-B72 Owners Manual
Page 11
... ( ) flashes and the front panel display indicates alarm mode. D Set the alarm time with TUNING. Turn on again by "DTA CONTROLLER", you have set and the alarm indicator ( ) lights up . Rear panel E Set ALARM TYPE. Weekly Alarm 7d (Weekly Alarm mode): An alarm whose time can select the Weekly Alarm mode in the alarm mode select display of the week (settable only using DTA CONTROLLER Once you have chosen Weekly Alarm mode, this unit. B Select...
... ( ) flashes and the front panel display indicates alarm mode. D Set the alarm time with TUNING. Turn on again by "DTA CONTROLLER", you have set and the alarm indicator ( ) lights up . Rear panel E Set ALARM TYPE. Weekly Alarm 7d (Weekly Alarm mode): An alarm whose time can select the Weekly Alarm mode in the alarm mode select display of the week (settable only using DTA CONTROLLER Once you have chosen Weekly Alarm mode, this unit. B Select...

TSX-B72 Owners Manual
Page 12
... tune to . and Canada models only) C Select the preset radio station with the preset function. B Select FM/AM. (U.S.A. and Canada models only) C For automatic tuning, press and hold TUNING. and Canada models only) radio stations with PRESET. 8 En Selecting preset radio stations (U.S.A. For manual tuning, press TUNING repeatedly. Note If you want to store to a station manually during FM reception, the sound is monaural. y To cancel the preset, press TUNING again. and Canada models only) A Set SOURCE to RADIO. LISTENING TO RADIO STATIONS Tuning radio stations...
... tune to . and Canada models only) C Select the preset radio station with the preset function. B Select FM/AM. (U.S.A. and Canada models only) C For automatic tuning, press and hold TUNING. and Canada models only) radio stations with PRESET. 8 En Selecting preset radio stations (U.S.A. For manual tuning, press TUNING repeatedly. Note If you want to store to a station manually during FM reception, the sound is monaural. y To cancel the preset, press TUNING again. and Canada models only) A Set SOURCE to RADIO. LISTENING TO RADIO STATIONS Tuning radio stations...
TSX-B72 Owners Manual
Page 13
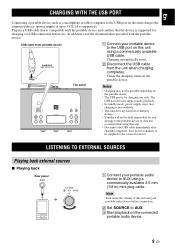
... audio device to AUX. Prepare a USB cable that the device is supported for charging use . Check the charging status on the connected portable audio device. 9 En C Start playback on the portable device. B Set SOURCE to AUX using a commercially available 3.5 mm (1/8 in) mini plug cable. LISTENING TO EXTERNAL SOURCES Playing back external sources ■ Playing back Rear panel A Connect your portable audio device before use only. The USB port does not support audio playback. • In standby mode, power...
... audio device to AUX. Prepare a USB cable that the device is supported for charging use . Check the charging status on the connected portable audio device. 9 En C Start playback on the portable device. B Set SOURCE to AUX using a commercially available 3.5 mm (1/8 in) mini plug cable. LISTENING TO EXTERNAL SOURCES Playing back external sources ■ Playing back Rear panel A Connect your portable audio device before use only. The USB port does not support audio playback. • In standby mode, power...
TSX-B72 Owners Manual
Page 14
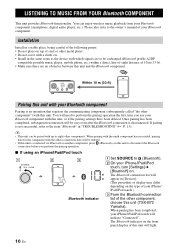
... perform the pairing operation the first time you perform the pairing operation. ■ If using an iPhone/iPad/iPod touch A B C A Set SOURCE to the owner's manual of your Bluetooth component Pairing is connected via Bluetooth to be deleted. • If this unit (TSX-B72 Yamaha). y • This unit can enjoy wireless music playback from your iPhone/iPad/iPod touch, turn [Settings] [Bluetooth] on the front panel display of this unit...
... perform the pairing operation the first time you perform the pairing operation. ■ If using an iPhone/iPad/iPod touch A B C A Set SOURCE to the owner's manual of your Bluetooth component Pairing is connected via Bluetooth to be deleted. • If this unit (TSX-B72 Yamaha). y • This unit can enjoy wireless music playback from your iPhone/iPad/iPod touch, turn [Settings] [Bluetooth] on the front panel display of this unit...

TSX-B72 Owners Manual
Page 15
... on this unit (TSX-B72 Yamaha). C From the Bluetooth connection list of the connecting component). A Press to turn the system on and turn the system on the NFC function of the connecting component beforehand). y • If you need to turn on . En LISTENING TO MUSIC FROM YOUR Bluetooth COMPONENT ■ If using other than an iPhone/iPad/iPod touch A Set SOURCE to the owner's manual of the other component. This unit...
... on this unit (TSX-B72 Yamaha). C From the Bluetooth connection list of the connecting component). A Press to turn the system on and turn the system on the NFC function of the connecting component beforehand). y • If you need to turn on . En LISTENING TO MUSIC FROM YOUR Bluetooth COMPONENT ■ If using other than an iPhone/iPad/iPod touch A Set SOURCE to the owner's manual of the other component. This unit...
TSX-B72 Owners Manual
Page 16
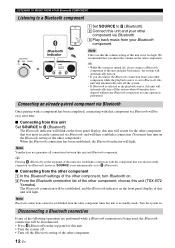
... easy next time. ■ Connecting from this unit Set SOURCE to (Bluetooth). ■ Connecting from the other component A In the Bluetooth settings of the other component, turn Bluetooth on the Bluetooth setting of the other component). Turn the system on the front panel display of this unit will light. Disconnecting a Bluetooth connection If any operation performed. LISTENING TO MUSIC FROM YOUR Bluetooth COMPONENT Listening to a Bluetooth component Bluetooth indicator A Set SOURCE to...
... easy next time. ■ Connecting from this unit Set SOURCE to (Bluetooth). ■ Connecting from the other component A In the Bluetooth settings of the other component, turn Bluetooth on the Bluetooth setting of the other component). Turn the system on the front panel display of this unit will light. Disconnecting a Bluetooth connection If any operation performed. LISTENING TO MUSIC FROM YOUR Bluetooth COMPONENT Listening to a Bluetooth component Bluetooth indicator A Set SOURCE to...
TSX-B72 Owners Manual
Page 17
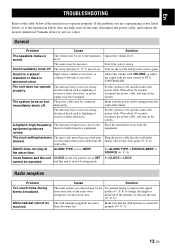
... does not help, turn on but The power cable may be connected immediately shuts off , and disconnect the power cable. Input source volume is excessive, or volume of this unit is plugged into the wall outlet cleared. Set the system to LOCK. Place the unit farther away from the firmly, and set to SOURCE+BEEP or SOURCE (☞ P. 4). wall outlet. Cause Solution The radio station you selected may have received a strong...
... does not help, turn on but The power cable may be connected immediately shuts off , and disconnect the power cable. Input source volume is excessive, or volume of this unit is plugged into the wall outlet cleared. Set the system to LOCK. Place the unit farther away from the firmly, and set to SOURCE+BEEP or SOURCE (☞ P. 4). wall outlet. Cause Solution The radio station you selected may have received a strong...

TSX-B72 Owners Manual
Page 18
... Bluetooth function of the other is connected Turn off . the 2.4 GHz frequency band nearby. The other Perform pairing operations again (☞ P. 10). Turn on the other component's Bluetooth function is wireless LAN, etc.) that outputs signals in emitting radio-frequency signals. component is set properly. The other component does not support Perform pairing operations with Perform Bluetooth connection operations the other component. the minimum. USB port charging Problem Cannot charge the connected portable...
... Bluetooth function of the other is connected Turn off . the 2.4 GHz frequency band nearby. The other Perform pairing operations again (☞ P. 10). Turn on the other component's Bluetooth function is wireless LAN, etc.) that outputs signals in emitting radio-frequency signals. component is set properly. The other component does not support Perform pairing operations with Perform Bluetooth connection operations the other component. the minimum. USB port charging Problem Cannot charge the connected portable...
TSX-B72 Owners Manual
Page 19
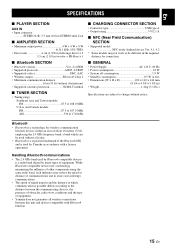
... used by Yamaha in ) woofer + SR-Bass × 1 ■ Bluetooth SECTION • Bluetooth version Ver. 2.1+EDR • Supported protocols A2DP, AVRCP • Supported codecs SBC, AAC • Wireless output Bluetooth Class 2 • Maximum communication distance 10 m (33 ft) (without notice. En SPECIFICATIONS ■ PLAYER SECTION AUX IN • Input connector ............STEREO L/R: 3.5 mm (1/8 in) STEREO mini Jack ■ AMPLIFIER SECTION • Maximum output power 4 W + 4 W + 8 W (6 Ω 1 kHz, 10% THD) • Driver...
... used by Yamaha in ) woofer + SR-Bass × 1 ■ Bluetooth SECTION • Bluetooth version Ver. 2.1+EDR • Supported protocols A2DP, AVRCP • Supported codecs SBC, AAC • Wireless output Bluetooth Class 2 • Maximum communication distance 10 m (33 ft) (without notice. En SPECIFICATIONS ■ PLAYER SECTION AUX IN • Input connector ............STEREO L/R: 3.5 mm (1/8 in) STEREO mini Jack ■ AMPLIFIER SECTION • Maximum output power 4 W + 4 W + 8 W (6 Ω 1 kHz, 10% THD) • Driver...

TSX-B72 Owners Manual
Page 56
© 2013 Yamaha Corporation Printed in China ZJ05640
© 2013 Yamaha Corporation Printed in China ZJ05640


