Owner's Manual
Page 2
... below. One that may be connected to the grounding system of the building, as power-supply cord or plug is intended to alert you to rain or moisture, does not operate normally, or has been dropped. REFER SERVICING TO QUALIFIED SERVICE PERSONNEL. • Explanation of Graphical Symbols The lightning flash with the apparatus. Servicing is required when the apparatus has...
... below. One that may be connected to the grounding system of the building, as power-supply cord or plug is intended to alert you to rain or moisture, does not operate normally, or has been dropped. REFER SERVICING TO QUALIFIED SERVICE PERSONNEL. • Explanation of Graphical Symbols The lightning flash with the apparatus. Servicing is required when the apparatus has...
Owner's Manual
Page 3
... another product use the product. 2 IMPORTANT: When connecting this product in to be used according to the instructions found in the users manual, may cause interference harmful to comply with FCC regulations does not guarantee that is found to the operation of America or its subsidiaries. The above statements apply ONLY to eliminate the problem by using one of...
... another product use the product. 2 IMPORTANT: When connecting this product in to be used according to the instructions found in the users manual, may cause interference harmful to comply with FCC regulations does not guarantee that is found to the operation of America or its subsidiaries. The above statements apply ONLY to eliminate the problem by using one of...

Owner's Manual
Page 4
... fix this unit. Turn the system off by lightning, keep the power cable and outdoor antennas disconnected from the outlet, then leave this unit alone. 19 When using this unit for any service is dangerous and may cause fire, damage to this unit near the wall outlet and where the AC power plug can be reached easily. 21 The batteries...
... fix this unit. Turn the system off by lightning, keep the power cable and outdoor antennas disconnected from the outlet, then leave this unit alone. 19 When using this unit for any service is dangerous and may cause fire, damage to this unit near the wall outlet and where the AC power plug can be reached easily. 21 The batteries...
Owner's Manual
Page 5
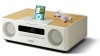
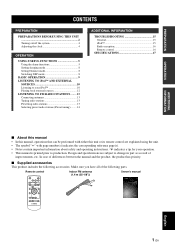
... parts. Remote control Indoor FM antenna (1.4 m (55-1/8")) Owner's manual U DESKTOP AUDIO SYSTEM SYSTEME AUDIO DESKTOP TSX-120 OWNER'S MANUAL MODE D'EMPLOI English 1 En In case of improvements, etc. y indicates a tip for your iPod 10 Playing back external sources 12 LISTENING TO FM RADIO STATIONS ........ 13 Connecting antennas 13 Tuning radio stations 13 Presetting radio stations 13 Selecting preset radio stations (Preset tuning)......... 14 ADDITIONAL INFORMATION TROUBLESHOOTING 15 General 15 iPod 15 Radio reception 16 Remote control 16 SPECIFICATIONS...
... parts. Remote control Indoor FM antenna (1.4 m (55-1/8")) Owner's manual U DESKTOP AUDIO SYSTEM SYSTEME AUDIO DESKTOP TSX-120 OWNER'S MANUAL MODE D'EMPLOI English 1 En In case of improvements, etc. y indicates a tip for your iPod 10 Playing back external sources 12 LISTENING TO FM RADIO STATIONS ........ 13 Connecting antennas 13 Tuning radio stations 13 Presetting radio stations 13 Selecting preset radio stations (Preset tuning)......... 14 ADDITIONAL INFORMATION TROUBLESHOOTING 15 General 15 iPod 15 Radio reception 16 Remote control 16 SPECIFICATIONS...
Owner's Manual
Page 6
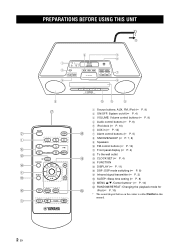
PREPARATION PREPARATIONS BEFORE USING THIS UNIT 2 En 1 Source buttons: AUX, FM, iPod (☞ P. 9) 2 ON/OFF: System on/off (☞ P. 4) 3 VOLUME: Volume control buttons (☞ P. 9) 4 Audio control buttons (☞ P. 9) 5 iPod dock (☞ P. 10) 6 AUX in (☞ P. 12) 7 Alarm control buttons (☞ P. 5) 8 SNOOZE/SLEEP (☞ P. 7, 8) 9 Speakers 0 FM control buttons (☞ P. 13) A Front panel display (☞ P. 4) B To the wall outlet C CLOCK SET (☞ P. 4) D FUNCTION E DISPLAY (☞ P. 11) F DSP: DSP mode switching (☞ P. 8) G Infrared signal transmitter (&#...
PREPARATION PREPARATIONS BEFORE USING THIS UNIT 2 En 1 Source buttons: AUX, FM, iPod (☞ P. 9) 2 ON/OFF: System on/off (☞ P. 4) 3 VOLUME: Volume control buttons (☞ P. 9) 4 Audio control buttons (☞ P. 9) 5 iPod dock (☞ P. 10) 6 AUX in (☞ P. 12) 7 Alarm control buttons (☞ P. 5) 8 SNOOZE/SLEEP (☞ P. 7, 8) 9 Speakers 0 FM control buttons (☞ P. 13) A Front panel display (☞ P. 4) B To the wall outlet C CLOCK SET (☞ P. 4) D FUNCTION E DISPLAY (☞ P. 11) F DSP: DSP mode switching (☞ P. 8) G Infrared signal transmitter (&#...

Owner's Manual
Page 7
... - Close the cover. English 3 En Replace the battery with a new CR2025 battery. Notes Within 6 m (20') • Do not spill liquid on the remote control. • Do not drop the remote control. • Do not leave the remote control in the remote control Change the battery when the operation range of the remote control decreases. Be careful not to let the leaking battery acid touch your regional regulations...
... - Close the cover. English 3 En Replace the battery with a new CR2025 battery. Notes Within 6 m (20') • Do not spill liquid on the remote control. • Do not drop the remote control. • Do not leave the remote control in the remote control Change the battery when the operation range of the remote control decreases. Be careful not to let the leaking battery acid touch your regional regulations...
Owner's Manual
Page 8
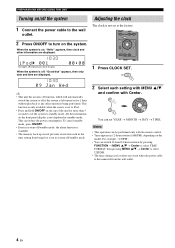
... /standby mode. 2 Select each setting with MENU S/T and confirm with the remote control. • Time appears in 12-hour notation (AM/PM), depending on the front panel display is not displayed in system off /standby mode, the alarm function is left turned on : "Hello" appears, then clock and other operation being lost after one week when the power cable is off...
... /standby mode. 2 Select each setting with MENU S/T and confirm with the remote control. • Time appears in 12-hour notation (AM/PM), depending on the front panel display is not displayed in system off /standby mode, the alarm function is left turned on : "Hello" appears, then clock and other operation being lost after one week when the power cable is off...
Owner's Manual
Page 9
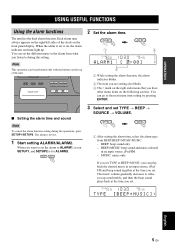
... setting by pressing ENTER. ■ Setting the alarm time and sound 3 Select and set the different music to BEEP+MUSIC, you set . 1 Start setting ALARM1/ALARM2. Note To cancel the alarm function setting during the setting. 2 Set the alarm time. BEEP+MUSIC: beep sound and music selected in an input source, iPod/ FM and beep sound together at the time you can set TYPE → BEEP → SOURCE → VOLUME. OPERATION OPERATION USING USEFUL FUNCTIONS Using...
... setting by pressing ENTER. ■ Setting the alarm time and sound 3 Select and set the different music to BEEP+MUSIC, you set . 1 Start setting ALARM1/ALARM2. Note To cancel the alarm function setting during the setting. 2 Set the alarm time. BEEP+MUSIC: beep sound and music selected in an input source, iPod/ FM and beep sound together at the time you can set TYPE → BEEP → SOURCE → VOLUME. OPERATION OPERATION USING USEFUL FUNCTIONS Using...

Owner's Manual
Page 10
... set , the unit plays back the beep sound instead. The music starts from iPod/FM or LAST SET. Select and set RESUME PLAY when you want to last time, as the alarm sound. USING USEFUL FUNCTIONS 2 Select the beep sound. 5 kinds of the playlist. The SOURCE screen is not set completely or the music device is skipped automatically if you select the beep sound. iPod You can switch...
... set , the unit plays back the beep sound instead. The music starts from iPod/FM or LAST SET. Select and set RESUME PLAY when you want to last time, as the alarm sound. USING USEFUL FUNCTIONS 2 Select the beep sound. 5 kinds of the playlist. The SOURCE screen is not set completely or the music device is skipped automatically if you select the beep sound. iPod You can switch...
Owner's Manual
Page 11
... stop the beep sound and keep playing back the music. To activate the alarm function again, press ALARM1/ALARM2 to set to the instruction manual of SNOOZE/SLEEP on playlists, refer to off. The function differs depending on your iPod and make a list. MUSIC: The music stops by pressing ...remote control instead of your favorite songs in the library on the alarm type you set the snooze function. OPERATION ■ Using the snooze function When the beep sound, music, or both are not available while playing back the alarm sound. ■ About Playlist You can collect your iPod. Set...
... stop the beep sound and keep playing back the music. To activate the alarm function again, press ALARM1/ALARM2 to set to the instruction manual of SNOOZE/SLEEP on playlists, refer to off. The function differs depending on your iPod and make a list. MUSIC: The music stops by pressing ...remote control instead of your favorite songs in the library on the alarm type you set the snooze function. OPERATION ■ Using the snooze function When the beep sound, music, or both are not available while playing back the alarm sound. ■ About Playlist You can collect your iPod. Set...

Owner's Manual
Page 12
... DIMMER with SLEEP on the remote control. You can also operate this function with Center, < appears on the left side of the front panel display. When the sleep function is adjusted automatically, depending on the brightness of the front panel. Switching DSP mode You can switch the sound mode according to the environment or your room is AUTO. 1 Select DIMMER from the...
... DIMMER with SLEEP on the remote control. You can also operate this function with Center, < appears on the left side of the front panel display. When the sleep function is adjusted automatically, depending on the brightness of the front panel. Switching DSP mode You can switch the sound mode according to the environment or your room is AUTO. 1 Select DIMMER from the...

Owner's Manual
Page 13
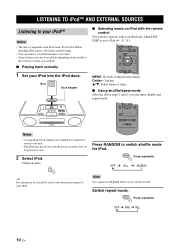
Press again to turn off , you can start playback of the desired source by pressing one of the Source buttons, without pressing ON/OFF. 9 En English BASIC OPERATION :Press one of the Source buttons to select the desired source.* OPERATION :Press to control the volume. :Press to play/pause. : Press to skip backward/forward. :Press to resume the volume. * Even when the system is off the sound.
Press again to turn off , you can start playback of the desired source by pressing one of the Source buttons, without pressing ON/OFF. 9 En English BASIC OPERATION :Press one of the Source buttons to select the desired source.* OPERATION :Press to control the volume. :Press to play/pause. : Press to skip backward/forward. :Press to resume the volume. * Even when the system is off the sound.
Owner's Manual
Page 14
... the instruction manual of your iPod. ■ Playing back normally ■ Selecting music on the model or the software version of your iPod into the iPod dock. S/T: Select menu or items. ■ Using shuffle/repeat mode After the above steps 1 and 2, you want. • Some features may not be available depending on iPod with the remote control You can enjoy shuffle and repeat mode. Switch repeat mode. Center...
... the instruction manual of your iPod. ■ Playing back normally ■ Selecting music on the model or the software version of your iPod into the iPod dock. S/T: Select menu or items. ■ Using shuffle/repeat mode After the above steps 1 and 2, you want. • Some features may not be available depending on iPod with the remote control You can enjoy shuffle and repeat mode. Switch repeat mode. Center...
Owner's Manual
Page 15
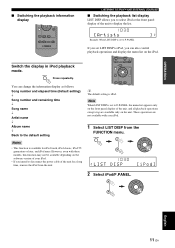
... iPod/F.PANEL. However, even with your iPod. • If you to select iPod or the front panel display of the unit to display the list. OPERATION ■ Switching the playback information display LISTENING TO iPod™ AND EXTERNAL SOURCES ■ Switching the playback list display LIST DISP allows you intend to disconnect the power cable of the unit for iPod touch, iPod classic, iPod...
... iPod/F.PANEL. However, even with your iPod. • If you to select iPod or the front panel display of the unit to display the list. OPERATION ■ Switching the playback information display LISTENING TO iPod™ AND EXTERNAL SOURCES ■ Switching the playback list display LIST DISP allows you intend to disconnect the power cable of the unit for iPod touch, iPod classic, iPod...

Owner's Manual
Page 16
y For operations of the device. 12 En Note Turn down the volume of this unit and your portable audio device to the instruction manual of the portable audio device, refer to the AUX terminal using a commercially available 3.5 mm mini plug cable. LISTENING TO iPod™ AND EXTERNAL SOURCES Playing back external sources ■ Playing back normally 1 Connect your portable audio device before connection. 2 Select AUX. 3 Start playback on the connected portable audio device.
y For operations of the device. 12 En Note Turn down the volume of this unit and your portable audio device to the instruction manual of the portable audio device, refer to the AUX terminal using a commercially available 3.5 mm mini plug cable. LISTENING TO iPod™ AND EXTERNAL SOURCES Playing back external sources ■ Playing back normally 1 Connect your portable audio device before connection. 2 Select AUX. 3 Start playback on the connected portable audio device.
Owner's Manual
Page 17
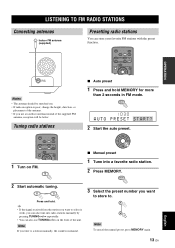
.... OPERATION Notes • The antenna should be better. LISTENING TO FM RADIO STATIONS Connecting antennas Indoor FM antenna (supplied) Presetting radio stations You can also use TUNING on FM. ■ Manual preset 1 Tune into a favorite radio station. 2 Press MEMORY. 2 Start automatic tuning. Note If you tune to a station manually, the sound is monaural. 3 Select the preset number you want to select is poor, change the height, direction, or...
.... OPERATION Notes • The antenna should be better. LISTENING TO FM RADIO STATIONS Connecting antennas Indoor FM antenna (supplied) Presetting radio stations You can also use TUNING on FM. ■ Manual preset 1 Tune into a favorite radio station. 2 Press MEMORY. 2 Start automatic tuning. Note If you tune to a station manually, the sound is monaural. 3 Select the preset number you want to select is poor, change the height, direction, or...
Owner's Manual
Page 18
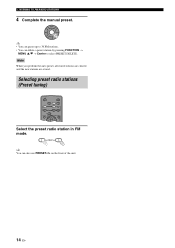
y You can delete a preset station by pressing FUNCTION → MENU S/T → Center to select PRESET DELETE. Selecting preset radio stations (Preset tuning) Select the preset radio station in FM mode. Note When you perform the auto preset, all stored stations are cleared and the new stations are stored. LISTENING TO FM RADIO STATIONS 4 Complete the manual preset. y • You can preset up to 30 FM stations. • You can also use PRESET on the front of the unit. 14 En
y You can delete a preset station by pressing FUNCTION → MENU S/T → Center to select PRESET DELETE. Selecting preset radio stations (Preset tuning) Select the preset radio station in FM mode. Note When you perform the auto preset, all stored stations are cleared and the new stations are stored. LISTENING TO FM RADIO STATIONS 4 Complete the manual preset. y • You can preset up to 30 FM stations. • You can also use PRESET on the front of the unit. 14 En
Owner's Manual
Page 19
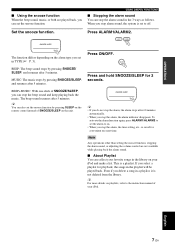
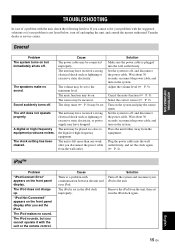
... set . Set the system to off , and disconnect the power cable. Turn on the front panel display. Solution Turn off and unplug the unit, and consult the nearest authorized Yamaha dealer or service center. Plug the power cable into the wall outlet firmly. The iPod is left more than one week after you disconnect the power cable from the equipment. ADDITIONAL INFORMATION ADDITIONAL INFORMATION TROUBLESHOOTING In case of a problem...
... set . Set the system to off , and disconnect the power cable. Turn on the front panel display. Solution Turn off and unplug the unit, and consult the nearest authorized Yamaha dealer or service center. Plug the power cable into the wall outlet firmly. The iPod is left more than one week after you disconnect the power cable from the equipment. ADDITIONAL INFORMATION ADDITIONAL INFORMATION TROUBLESHOOTING In case of a problem...
Owner's Manual
Page 20
... the remote control. Only iPod touch, iPod (Click Wheel, including iPod classic), iPod nano and iPod mini are compatible with a new one (☞ P. 3). Radio reception Problem The preset selecting function does not work properly. Try manual tuning to direct sunlight or lighting (inverted fluorescent lamps). Cause The remote control may be operated outside its operation range. The FM antenna may be connected improperly. Solution For information on the front panel...
... the remote control. Only iPod touch, iPod (Click Wheel, including iPod classic), iPod nano and iPod mini are compatible with a new one (☞ P. 3). Radio reception Problem The preset selecting function does not work properly. Try manual tuning to direct sunlight or lighting (inverted fluorescent lamps). Cause The remote control may be operated outside its operation range. The FM antenna may be connected improperly. Solution For information on the front panel...
Owner's Manual
Page 21
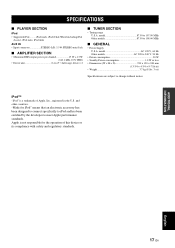
... V, 60 Hz Other models AC 220 to change without notice. iPod touch, iPod (Click Wheel including iPod classic), iPod nano, iPod mini AUX IN • Input connector STEREO L/R: 3.5 Φ STEREO mini Jack ■ AMPLIFIER SECTION • Minimum RMS output power per channel 15 W + 15 W (6 Ω 1 kHz, 10% THD) • Driver unit 8 cm (3") full-range driver × 2 ■ TUNER SECTION • Tuning range U.S.A. SPECIFICATIONS ■ PLAYER SECTION iPod • Supported iPod.......... and other countries.
... V, 60 Hz Other models AC 220 to change without notice. iPod touch, iPod (Click Wheel including iPod classic), iPod nano, iPod mini AUX IN • Input connector STEREO L/R: 3.5 Φ STEREO mini Jack ■ AMPLIFIER SECTION • Minimum RMS output power per channel 15 W + 15 W (6 Ω 1 kHz, 10% THD) • Driver unit 8 cm (3") full-range driver × 2 ■ TUNER SECTION • Tuning range U.S.A. SPECIFICATIONS ■ PLAYER SECTION iPod • Supported iPod.......... and other countries.


