
Owner's Manual
Page 5
...remote control 9 Installing batteries in the remote control 9 Using the remote control 9 Connections 10 Placing speakers 10 Connecting speakers 11 Information on jacks and cable plugs 13 Connecting a TV monitor or projector 14 Connecting other components 15 Connecting a Yamaha iPod universal dock or Bluetooth™ wireless audio receiver...Using iPod 30 Controlling iPod 30 Using Bluetooth™ components 32 Pairing the Bluetooth™ wireless audio receiver and your Bluetooth component 32 Playback of the Bluetooth™ component 32 ADVANCED OPERATION Setting the option menu...
...remote control 9 Installing batteries in the remote control 9 Using the remote control 9 Connections 10 Placing speakers 10 Connecting speakers 11 Information on jacks and cable plugs 13 Connecting a TV monitor or projector 14 Connecting other components 15 Connecting a Yamaha iPod universal dock or Bluetooth™ wireless audio receiver...Using iPod 30 Controlling iPod 30 Using Bluetooth™ components 32 Pairing the Bluetooth™ wireless audio receiver and your Bluetooth component 32 Playback of the Bluetooth™ component 32 ADVANCED OPERATION Setting the option menu...
Owner's Manual
Page 7
...the attached sheet or the pages at the end of this manual • y indicates a tip for the information about each position of Yamaha Corporation. Patent No's: 5,451,942;5,956,674;5,974,380;5,978,762;6,226,616;6,487,535 & other countries. and worldwide patents issued ... to change in accordance with a license agreement. and other U.S. Supplied accessories Check that you received all of Apple Inc., registered in parentheses. • This manual is a trademark of the following parts. • Remote control • Batteries (2) (AAA, R03, UM-4) • Optimizer microphone • AM...
...the attached sheet or the pages at the end of this manual • y indicates a tip for the information about each position of Yamaha Corporation. Patent No's: 5,451,942;5,956,674;5,974,380;5,978,762;6,226,616;6,487,535 & other countries. and worldwide patents issued ... to change in accordance with a license agreement. and other U.S. Supplied accessories Check that you received all of Apple Inc., registered in parentheses. • This manual is a trademark of the following parts. • Remote control • Batteries (2) (AAA, R03, UM-4) • Optimizer microphone • AM...
Owner's Manual
Page 10
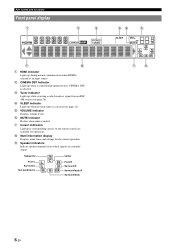
... normal communication when HDMI is selected. e VOLUME indicator Displays volume levels. g Cursor indicators Light up if corresponding cursors on the remote control are currently output. b CINEMA DSP indicator Lights up while receiving a radio broadcast signal from which signals are available for the current operation. Subwoofer Front L Surround L Surround back L SW L CR SL...
... normal communication when HDMI is selected. e VOLUME indicator Displays volume levels. g Cursor indicators Light up if corresponding cursors on the remote control are currently output. b CINEMA DSP indicator Lights up while receiving a radio broadcast signal from which signals are available for the current operation. Subwoofer Front L Surround L Surround back L SW L CR SL...

Owner's Manual
Page 11
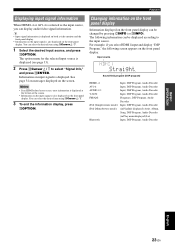
...video ENTER RETURN monitor, or change settings. To control external components using the rExternal component operation keys separately from the remote control. Selects a Yamaha iPod universal dock/ Bluetooth wireless audio receiver connected to the previous screen or ends the menu display. Selects a preset station. n Cursors k / n ... the operation mode of this unit (see page 33). Adjust the volume of external components (see page 22). Selects AV inputs 1 through 4. m OPTION Displays the option menu (see page 21). o VOLUME +/- r External component operation ...
...video ENTER RETURN monitor, or change settings. To control external components using the rExternal component operation keys separately from the remote control. Selects a Yamaha iPod universal dock/ Bluetooth wireless audio receiver connected to the previous screen or ends the menu display. Selects a preset station. n Cursors k / n ... the operation mode of this unit (see page 33). Adjust the volume of external components (see page 22). Selects AV inputs 1 through 4. m OPTION Displays the option menu (see page 21). o VOLUME +/- r External component operation ...
Owner's Manual
Page 12
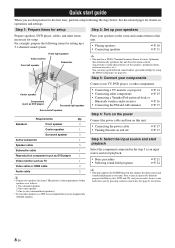
...;P. 24 y • This unit supports the SCENE function that you can enjoy good balanced sound without special knowledge by pressing a remote control key. Front right speaker Video monitor Front left speaker Requirements qty. Step 3: Connect your components Connect your TV, DVD player...8226; Connecting a TV monitor or projector ☞P. 14 • Connecting other components ☞P. 15 • Connecting a Yamaha iPod universal dock or Bluetooth wireless audio receiver ☞P. 16 • Connecting the FM and AM antennas ☞P. 17 Step 4: Turn on the power Connect the...
...;P. 24 y • This unit supports the SCENE function that you can enjoy good balanced sound without special knowledge by pressing a remote control key. Front right speaker Video monitor Front left speaker Requirements qty. Step 3: Connect your components Connect your TV, DVD player...8226; Connecting a TV monitor or projector ☞P. 14 • Connecting other components ☞P. 15 • Connecting a Yamaha iPod universal dock or Bluetooth wireless audio receiver ☞P. 16 • Connecting the FM and AM antennas ☞P. 17 Step 4: Turn on the power Connect the...
Owner's Manual
Page 13
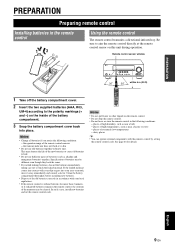
...batteries for details. Specification of high humidity, such as near a heater or stove - In such a case, install new batteries and set the remote control code. Notes • Change all batteries if you find leaking batteries, discard the batteries immediately, taking care not to leak. • Do...contact with this unit during operation. dusty places y • You can operate external components with your local regulations. • If the remote control is dim • Do not use different types of the new batteries or cause old batteries to touch the leaked material. See ...
...batteries for details. Specification of high humidity, such as near a heater or stove - In such a case, install new batteries and set the remote control code. Notes • Change all batteries if you find leaking batteries, discard the batteries immediately, taking care not to leak. • Do...contact with this unit during operation. dusty places y • You can operate external components with your local regulations. • If the remote control is dim • Do not use different types of the new batteries or cause old batteries to touch the leaked material. See ...
Owner's Manual
Page 19
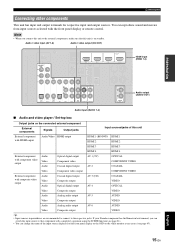
If your Yamaha component has the Remote in parentheses are recommended to connect to the external components, make sure that this unit External component with HDMI output Audio/Video HDMI output HDMI 1 (... output VIDEO Audio Analog audio output AV 6 AUDIO Video Composite output VIDEO y • Input sources in /out terminal, you connect this unit to the respective jacks. Note • When you can reproduce sound and movies from input sources selected with the front panel display or remote control. ADDITIONAL INFORMATION APPENDIX English 15...
If your Yamaha component has the Remote in parentheses are recommended to connect to the external components, make sure that this unit External component with HDMI output Audio/Video HDMI output HDMI 1 (... output VIDEO Audio Analog audio output AV 6 AUDIO Video Composite output VIDEO y • Input sources in /out terminal, you connect this unit to the respective jacks. Note • When you can reproduce sound and movies from input sources selected with the front panel display or remote control. ADDITIONAL INFORMATION APPENDIX English 15...
Owner's Manual
Page 21
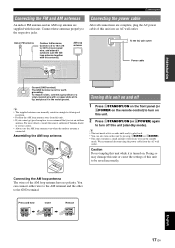
... be saved incorrectly. Connecting the AM loop antenna The wires of this unit into an AC wall outlet. For more details, consult the nearest authorized Yamaha dealer or service center. • Always use the AM loop antenna even when the outdoor antenna is not for earth grounding. Caution Do not unplug... antenna To the AC wall outlet Power cable Turning this unit on and off 1 Press ASTANDBY/ON on the front panel (or fPOWER on the remote control) to turn on this unit. 2 Press ASTANDBY/ON (or fPOWER) again to 33 ft) vinyl-covered wire, and extend it in the standby mode...
... be saved incorrectly. Connecting the AM loop antenna The wires of this unit into an AC wall outlet. For more details, consult the nearest authorized Yamaha dealer or service center. • Always use the AM loop antenna even when the outdoor antenna is not for earth grounding. Caution Do not unplug... antenna To the AC wall outlet Power cable Turning this unit on and off 1 Press ASTANDBY/ON on the front panel (or fPOWER on the remote control) to turn on this unit. 2 Press ASTANDBY/ON (or fPOWER) again to 33 ft) vinyl-covered wire, and extend it in the standby mode...

Owner's Manual
Page 25
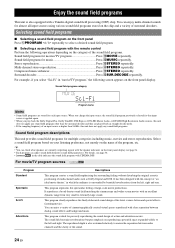
... While display in some conditions, which may cause a speaker malfunction. Switching remotely controlled external components linked to "DTS" (see page 33). Input source Sound field program BD/DVD TV CD RADIO HDMI 1 AV 1 AV 3 TUNER Straight Straight Straight 7ch Enhancer y • When this unit ...DVD player, etc.) connected to this unit. 2 Press NINPUT l / h (or gInput selection keys) to scene selections. 1 Register the remote control code of an iPod or Bluetooth component using this unit, see the following input sources and sound field programs are available for desired input...
... While display in some conditions, which may cause a speaker malfunction. Switching remotely controlled external components linked to "DTS" (see page 33). Input source Sound field program BD/DVD TV CD RADIO HDMI 1 AV 1 AV 3 TUNER Straight Straight Straight 7ch Enhancer y • When this unit ...DVD player, etc.) connected to this unit. 2 Press NINPUT l / h (or gInput selection keys) to scene selections. 1 Register the remote control code of an iPod or Bluetooth component using this unit, see the following input sources and sound field programs are available for desired input...
Owner's Manual
Page 26
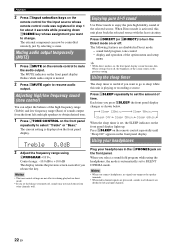
...and setup menu y • While direct mode is set the balance extremely off . Muting audio output temporarily (MUTE) 1 Press qMUTE on the remote control to the previous setting. Treble 0.0dB 2 Adjust the frequency range using the headphones, the mode is displayed on the front panel display. display... the sleep timer is on, the front panel display screen becomes dim. Adjusting high/low frequency sound (tone control) You can now be controlled remotely just by selecting a scene. Notes • The tone control settings are not effective during playback in direct mode. • If you set ...
...and setup menu y • While direct mode is set the balance extremely off . Muting audio output temporarily (MUTE) 1 Press qMUTE on the remote control to the previous setting. Treble 0.0dB 2 Adjust the frequency range using the headphones, the mode is displayed on the front panel display. display... the sleep timer is on, the front panel display screen becomes dim. Adjusting high/low frequency sound (tone control) You can now be controlled remotely just by selecting a scene. Notes • The tone control settings are not effective during playback in direct mode. • If you set ...
Owner's Manual
Page 27
..., DSP Program, Audio Decoder AUDIO1-2: Input, DSP Program, Audio Decoder V-AUX: Input, DSP Program, Audio Decoder FM/AM: Frequency, DSP Program, Audio Decoder iPod (Simple remote mode): Input, DSP Program, Audio Decoder iPod (Menu browse mode): (in PlayInfo displayed) Artist, Album, Song, DSP Program, Audio Decoder (in Play menu displayed) List...
..., DSP Program, Audio Decoder AUDIO1-2: Input, DSP Program, Audio Decoder V-AUX: Input, DSP Program, Audio Decoder FM/AM: Frequency, DSP Program, Audio Decoder iPod (Simple remote mode): Input, DSP Program, Audio Decoder iPod (Menu browse mode): (in PlayInfo displayed) Artist, Album, Song, DSP Program, Audio Decoder (in Play menu displayed) List...
Owner's Manual
Page 28
... large sound. For details, see page 6). • Each program can enjoy a variety of cinematographically created virtual spaces reproduced with the remote control Perform the following screen appears on the front panel display. It has been designed with the concept of "an ideal movie theater,"...jSTEREO repeatedly. Sound field program category Sci-Fi Program name Notes • Sound field programs are currently outputting signals with a Yamaha digital sound field processing (DSP) chip. You can check what speakers are stored for music Press jMUSIC repeatedly. Enjoy the ...
... large sound. For details, see page 6). • Each program can enjoy a variety of cinematographically created virtual spaces reproduced with the remote control Perform the following screen appears on the front panel display. It has been designed with the concept of "an ideal movie theater,"...jSTEREO repeatedly. Sound field program category Sci-Fi Program name Notes • Sound field programs are currently outputting signals with a Yamaha digital sound field processing (DSP) chip. You can check what speakers are stored for music Press jMUSIC repeatedly. Enjoy the ...
Owner's Manual
Page 32
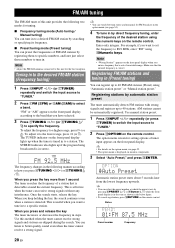
...) You can register up if the program being broadcasted is out of receivable range. y • You can listen to tune in . The TUNED indicator on the remote control. When you want to better quality sound even when the tuner cannot receive a strong signal. When you press HTUNING l / h (or hTUNING k / n). ...preset starts about 5 seconds later from the lowest frequency upwards. FM/AM tuning The FM/AM tuner of this method when the tuner cannot receive strong signals and stations are skipped during the search. To adjust the frequency to the lower range, press l (or n). This is ...
...) You can register up if the program being broadcasted is out of receivable range. y • You can listen to tune in . The TUNED indicator on the remote control. When you want to better quality sound even when the tuner cannot receive a strong signal. When you press HTUNING l / h (or hTUNING k / n). ...preset starts about 5 seconds later from the lowest frequency upwards. FM/AM tuning The FM/AM tuner of this method when the tuner cannot receive strong signals and stations are skipped during the search. To adjust the frequency to the lower range, press l (or n). This is ...

Owner's Manual
Page 33
... preset number. 3 Press EPRESET l / h (or hPRESET k / n) on the display. 01:FM 92.5 MHz Preset number of tuner input appears on the remote control. Clearing the preset station 1 Press NINPUT l / h repeatedly (or press gTUNER) to switch the input source to the desired FM/AM station (Frequency tuning)"...the nCursor k / n and press nENTER. y • By pressing down DMEMORY (or hMEMORY) for about 30 seconds. The following screen appears on the remote control to select the preset number to which the station will be skipped. • When "No Presets" or "No Presets in to "TUNER." 2 ...
... preset number. 3 Press EPRESET l / h (or hPRESET k / n) on the display. 01:FM 92.5 MHz Preset number of tuner input appears on the remote control. Clearing the preset station 1 Press NINPUT l / h repeatedly (or press gTUNER) to switch the input source to the desired FM/AM station (Frequency tuning)"...the nCursor k / n and press nENTER. y • By pressing down DMEMORY (or hMEMORY) for about 30 seconds. The following screen appears on the remote control to select the preset number to which the station will be skipped. • When "No Presets" or "No Presets in to "TUNER." 2 ...

Owner's Manual
Page 34
... menu displayed on the video monitor. You cannot directly control your iPod in simple remote mode You can perform basic iPod operations (play, stop, skip, etc.) using the supplied remote control without it in a Yamaha iPod universal dock (such as MP3 format) stored on your iPod (see page 16...Controlling iPod™ You can control your iPod or Yamaha iPod universal dock do not support the browser function for characters that appear on the front panel display and on the video monitor, see the "iPod" section on the remote control. The following screen appears on the video ...
... menu displayed on the video monitor. You cannot directly control your iPod in simple remote mode You can perform basic iPod operations (play, stop, skip, etc.) using the supplied remote control without it in a Yamaha iPod universal dock (such as MP3 format) stored on your iPod (see page 16...Controlling iPod™ You can control your iPod or Yamaha iPod universal dock do not support the browser function for characters that appear on the front panel display and on the video monitor, see the "iPod" section on the remote control. The following screen appears on the video ...
Owner's Manual
Page 36
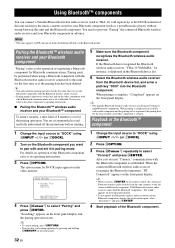
...remote control, the connected Bluetooth wireless audio receiver searches and connects to the operation of the Bluetooth profile. y • When you use the Bluetooth component with the Bluetooth component is cleared. If the Bluetooth have recognized the Bluetooth wireless audio receiver, "YBA-10 YAMAHA...which Bluetooth communications are recommended to select "Pairing" and press nENTER. y • The Yamaha Bluetooth wireless audio receiver can connect a Yamaha Bluetooth wireless audio receiver (such as a portable music player) without wiring between this unit and enjoy the music ...
...remote control, the connected Bluetooth wireless audio receiver searches and connects to the operation of the Bluetooth profile. y • When you use the Bluetooth component with the Bluetooth component is cleared. If the Bluetooth have recognized the Bluetooth wireless audio receiver, "YBA-10 YAMAHA...which Bluetooth communications are recommended to select "Pairing" and press nENTER. y • The Yamaha Bluetooth wireless audio receiver can connect a Yamaha Bluetooth wireless audio receiver (such as a portable music player) without wiring between this unit and enjoy the music ...
Owner's Manual
Page 37
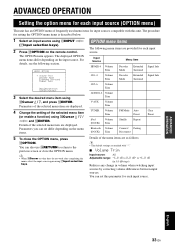
... Trim Decoder Mode Extended Surround Signal Info [ ]/[ ]:Up/Down [ENTER]:Select 3 Select the desired menu item using NINPUT l / h (gInput selection keys). 2 Press mOPTION on the remote control. Input Source Menu item HDMI1-4 Volume Trim Decoder Mode Extended Signal Info Surround AV1-4 Volume Trim Decoder Mode Extended Signal Info Surround AV5-6 Volume...
... Trim Decoder Mode Extended Surround Signal Info [ ]/[ ]:Up/Down [ENTER]:Select 3 Select the desired menu item using NINPUT l / h (gInput selection keys). 2 Press mOPTION on the remote control. Input Source Menu item HDMI1-4 Volume Trim Decoder Mode Extended Signal Info Surround AV1-4 Volume Trim Decoder Mode Extended Signal Info Surround AV5-6 Volume...

Owner's Manual
Page 40
... the monitor when you can be added). When the confirmation screen appears on the monitor. 3 Press nCursor k / n to cancel it to "Off." 1 Turn on the remote control. Sound field program Cursor MOVIE .
... the monitor when you can be added). When the confirmation screen appears on the monitor. 3 Press nCursor k / n to cancel it to "Off." 1 Turn on the remote control. Sound field program Cursor MOVIE .
Owner's Manual
Page 42
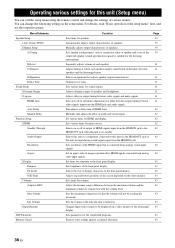
... menus. Operating various settings for this unit for reproducing sound signals input from analogy visual input signals. You can call the setup menu using the remote control and change the following settings in conjunction with the volume level. Generates test tones.
... menus. Operating various settings for this unit for reproducing sound signals input from analogy visual input signals. You can call the setup menu using the remote control and change the following settings in conjunction with the volume level. Generates test tones.

Owner's Manual
Page 43
... using nCursor l / h. One is "Auto Setup (YPAO)" for automatic adjustment and another is as connection status of speaker and a size of speakers based on the remote control. For details on operations, see page 18. 2 Manual Setup Adjusts output characteristics of the connected speaker (sound reproduction capacity), suitable for defining a speaker size...
... using nCursor l / h. One is "Auto Setup (YPAO)" for automatic adjustment and another is as connection status of speaker and a size of speakers based on the remote control. For details on operations, see page 18. 2 Manual Setup Adjusts output characteristics of the connected speaker (sound reproduction capacity), suitable for defining a speaker size...

