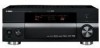

Owner's Manual
Page 4
... earphones and headphones can be set for any reasons. 15 When not planning to turn off this unit, the main room, Zone 2 and Zone 3 and then disconnect the AC power plug from the AC wall outlet. 19 VOLTAGE SELECTOR (Asia and General models only) ...of this unit with high humidity (i.e. away from cold to obstruct heat radiation. Containers with a newspaper, tablecloth, curtain, etc. Contact qualified Yamaha service personnel when any damage resulting from the wall outlet, grasp the plug; Burning objects (i.e. This Class B digital apparatus complies with chemical solvents...
... earphones and headphones can be set for any reasons. 15 When not planning to turn off this unit, the main room, Zone 2 and Zone 3 and then disconnect the AC power plug from the AC wall outlet. 19 VOLTAGE SELECTOR (Asia and General models only) ...of this unit with high humidity (i.e. away from cold to obstruct heat radiation. Containers with a newspaper, tablecloth, curtain, etc. Contact qualified Yamaha service personnel when any damage resulting from the wall outlet, grasp the plug; Burning objects (i.e. This Class B digital apparatus complies with chemical solvents...
Owner's Manual
Page 5
... other remote controls 104 Changing source names in the display window..... 105 Macro programming features 106 Clearing configurations 109 Using multi-zone configuration 111 Connecting the Zone 2 and Zone 3 components 111 Controlling Zone 2 or Zone 3 112 Advanced setup 117 Using the advanced setup menu 117 ADDITIONAL INFORMATION Troubleshooting 121 Resetting the system 129 Glossary 130...
... other remote controls 104 Changing source names in the display window..... 105 Macro programming features 106 Clearing configurations 109 Using multi-zone configuration 111 Connecting the Zone 2 and Zone 3 components 111 Controlling Zone 2 or Zone 3 112 Advanced setup 117 Using the advanced setup menu 117 ADDITIONAL INFORMATION Troubleshooting 121 Resetting the system 129 Glossary 130...
Owner's Manual
Page 7
...capability ◆ Remote control with preset remote control codes, learning and macro capability ◆ ZONE 2/ZONE 3 custom installation facility ◆ Zone switching capability between the main zone and ZONE 2/ZONE 3 using XM Mini-Tuner and Home Dock, sold separately), which supports iPod (Click ...and Wheel), iPod nano, and iPod mini Other features ◆ YPAO (Yamaha Parametric Room Acoustic Optimizer) for ...
...capability ◆ Remote control with preset remote control codes, learning and macro capability ◆ ZONE 2/ZONE 3 custom installation facility ◆ Zone switching capability between the main zone and ZONE 2/ZONE 3 using XM Mini-Tuner and Home Dock, sold separately), which supports iPod (Click ...and Wheel), iPod nano, and iPod mini Other features ◆ YPAO (Yamaha Parametric Room Acoustic Optimizer) for ...
Owner's Manual
Page 8
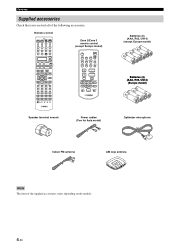
... AV STANDBY POWER XM AUDIO SEL SLEEP TUNER CD CD-R MULTI CH IN MD/TAPE DVD BD/HD DVD PHONO DTV/CBL DVR VCR V-AUX/DOCK SELECT ++ TV VOL CH -- + VOLUME - RETURN XM MEMORY 1 PARAMETER STRAIGHT DISPLAY EFFECT SYSTEM MEMORY 2 3 4 CLASSICAL LIVE/CLUB ENTERTAIN 5 6 7 MOVIE 8 STEREO ENHANCER SUR. ID1 ID2 NUMBER ZONE 2 ZONE... MUTE PRESET/CH SET MENU MENU SRCH MODE PURE DIRECT ENTER AUDIO A-E/CAT. DISPLAY PRESET/CH ALL PRESET CAT. Features Supplied accessories Check that you received all of the supplied accessories varies depending on the models. 4 En
... AV STANDBY POWER XM AUDIO SEL SLEEP TUNER CD CD-R MULTI CH IN MD/TAPE DVD BD/HD DVD PHONO DTV/CBL DVR VCR V-AUX/DOCK SELECT ++ TV VOL CH -- + VOLUME - RETURN XM MEMORY 1 PARAMETER STRAIGHT DISPLAY EFFECT SYSTEM MEMORY 2 3 4 CLASSICAL LIVE/CLUB ENTERTAIN 5 6 7 MOVIE 8 STEREO ENHANCER SUR. ID1 ID2 NUMBER ZONE 2 ZONE... MUTE PRESET/CH SET MENU MENU SRCH MODE PURE DIRECT ENTER AUDIO A-E/CAT. DISPLAY PRESET/CH ALL PRESET CAT. Features Supplied accessories Check that you received all of the supplied accessories varies depending on the models. 4 En
Owner's Manual
Page 9
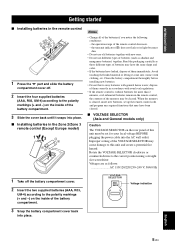
... 1 Take off . 2 Insert the four supplied batteries (AAA, R03, UM-4) according to the polarity markings (+ and -) on the rear panel of them correctly in the Zone 2/Zone 3 remote control (Except Europe model) 13 2 Notes • Change all of the memory may cause damage to the correct position using a straight slot screwdriver. the...
... 1 Take off . 2 Insert the four supplied batteries (AAA, R03, UM-4) according to the polarity markings (+ and -) on the rear panel of them correctly in the Zone 2/Zone 3 remote control (Except Europe model) 13 2 Notes • Change all of the memory may cause damage to the correct position using a straight slot screwdriver. the...
Owner's Manual
Page 11
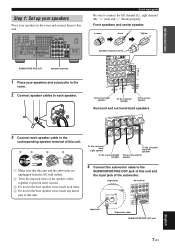
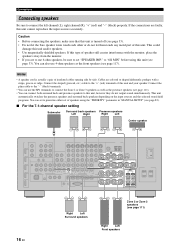
...room and connect them to the SUBWOOFER PRE OUT jack of this unit and the input jack of the subwoofer. Subwoofer AV receiver Input jack Subwoofer cable SUBWOOFER PRE OUT jack 7 En English Front speakers and center speaker Loosen Insert Tighten Speaker terminal ...IN OUT DTV/ CBL GND PHONO CD CD-R IN (PLAY) OUT (REC) MD/ TAPE L R CENTER FRONT(6CH) SURROUND CENTER FRONT SURROUND SINGLE(SB) ZONE 2 ZONE 3 VIDEO SPEAKERS SP1 R PRESENCE/ZONE 2/ZONE 3 L + + WRENCH HOLDER SURROUND BACK/ CENTER R BI-AMP L + SINGLE + + IN2 L DVD IN1 BD/ HD DVD OUT R DOCK R...
...room and connect them to the SUBWOOFER PRE OUT jack of this unit and the input jack of the subwoofer. Subwoofer AV receiver Input jack Subwoofer cable SUBWOOFER PRE OUT jack 7 En English Front speakers and center speaker Loosen Insert Tighten Speaker terminal ...IN OUT DTV/ CBL GND PHONO CD CD-R IN (PLAY) OUT (REC) MD/ TAPE L R CENTER FRONT(6CH) SURROUND CENTER FRONT SURROUND SINGLE(SB) ZONE 2 ZONE 3 VIDEO SPEAKERS SP1 R PRESENCE/ZONE 2/ZONE 3 L + + WRENCH HOLDER SURROUND BACK/ CENTER R BI-AMP L + SINGLE + + IN2 L DVD IN1 BD/ HD DVD OUT R DOCK R...
Owner's Manual
Page 12
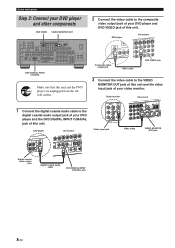
...FRONT L SP2 + ZONE 2/ZONE 3 R L + L + AC IN AC OUTLETS SWITCHED DVD DIGITAL INPUT COAXIAL Make sure that this unit and the DVD player are unplugged from the AC wall outlets. 2 Connect the video cable to the composite video output jack of your video monitor. DVD player AV receiver Composite video output ... jack 8 En Quick start guide Step 2: Connect your DVD player and the DVD DIGITAL INPUT COAXIAL jack of this unit. Video monitor AV receiver 1 Connect the digital coaxial audio cable to the VIDEO MONITOR OUT jack of this unit and the video input jack of your DVD player...
...FRONT L SP2 + ZONE 2/ZONE 3 R L + L + AC IN AC OUTLETS SWITCHED DVD DIGITAL INPUT COAXIAL Make sure that this unit and the DVD player are unplugged from the AC wall outlets. 2 Connect the video cable to the composite video output jack of your video monitor. DVD player AV receiver Composite video output ... jack 8 En Quick start guide Step 2: Connect your DVD player and the DVD DIGITAL INPUT COAXIAL jack of this unit. Video monitor AV receiver 1 Connect the digital coaxial audio cable to the VIDEO MONITOR OUT jack of this unit and the video input jack of your DVD player...
Owner's Manual
Page 14
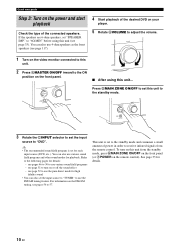
... pages 46 to 50 to use various sound field programs - To turn on or off the sound effect - See page 33 for playback. Press BMAIN ZONE ON/OFF to set this unit (see page 51 to turn on this unit... You can also set the input source to "TUNER" to use... source to "DVD". see page 33). Quick start guide Step 3: Turn on the power and start playback Check the type of power in order to receive infrared signals from the standby mode, press BMAIN ZONE ON/OFF on the front panel (or 8POWER on the remote control).
... pages 46 to 50 to use various sound field programs - To turn on or off the sound effect - See page 33 for playback. Press BMAIN ZONE ON/OFF to set this unit (see page 51 to turn on this unit... You can also set the input source to "TUNER" to use... source to "DVD". see page 33). Quick start guide Step 3: Turn on the power and start playback Check the type of power in order to receive infrared signals from the standby mode, press BMAIN ZONE ON/OFF on the front panel (or 8POWER on the remote control).
Owner's Manual
Page 15
...unit (SYSTEM MEMORY) ☞ P. 96 • Using headphones ☞ P. 43 • Using this unit in multiple rooms simultaneously (multi-zone configuration) ☞ P. 111 • Automatically turning off this unit ☞ P. 45 Manually adjusting various parameters of this unit • Setting ...to the video signals ☞ P. 92 • Protecting the various settings ☞ P. 93 • Setting the parameters of the multi-zone feature ☞ P. 94 Adjusting the advanced parameters • Setting the speaker impedance of the connected speakers ☞ P. 117 • ...
...unit (SYSTEM MEMORY) ☞ P. 96 • Using headphones ☞ P. 43 • Using this unit in multiple rooms simultaneously (multi-zone configuration) ☞ P. 111 • Automatically turning off this unit ☞ P. 45 Manually adjusting various parameters of this unit • Setting ...to the video signals ☞ P. 92 • Protecting the various settings ☞ P. 93 • Setting the parameters of the multi-zone feature ☞ P. 94 Adjusting the advanced parameters • Setting the speaker impedance of the connected speakers ☞ P. 117 • ...

Owner's Manual
Page 16
...DTV/ CBL GND PHONO CD CD-R IN (PLAY) OUT (REC) MD/ TAPE L R CENTER FRONT(6CH) SURROUND CENTER FRONT SURROUND SINGLE(SB) ZONE 2 ZONE 3 VIDEO SP1 SPEAKERS R PRESENCE/ZONE 2/ZONE 3 L + + WRENCH HOLDER SURROUND BACK/ CENTER R BI-AMP L + SINGLE + + IN2 L DVD IN1 BD/ HD DVD OUT R ... DVR 4 CD 5 BD/ HD DVD 6 DVD 7 DTV/ CBL 8 CD-R OPTICAL 9 MD/ TAPE R + 1 2 TRIGGER OUT RS-232C SURROUND FRONT L SP2 + ZONE 2/ZONE 3 R L + L + AC IN AC OUTLETS SWITCHED 89 0 A B Name Page 1 HDMI jacks 21 2 COMPONENT VIDEO jacks 24 - 27 3 Audio component jacks 28 ...
...DTV/ CBL GND PHONO CD CD-R IN (PLAY) OUT (REC) MD/ TAPE L R CENTER FRONT(6CH) SURROUND CENTER FRONT SURROUND SINGLE(SB) ZONE 2 ZONE 3 VIDEO SP1 SPEAKERS R PRESENCE/ZONE 2/ZONE 3 L + + WRENCH HOLDER SURROUND BACK/ CENTER R BI-AMP L + SINGLE + + IN2 L DVD IN1 BD/ HD DVD OUT R ... DVR 4 CD 5 BD/ HD DVD 6 DVD 7 DTV/ CBL 8 CD-R OPTICAL 9 MD/ TAPE R + 1 2 TRIGGER OUT RS-232C SURROUND FRONT L SP2 + ZONE 2/ZONE 3 R L + L + AC IN AC OUTLETS SWITCHED 89 0 A B Name Page 1 HDMI jacks 21 2 COMPONENT VIDEO jacks 24 - 27 3 Audio component jacks 28 ...
Owner's Manual
Page 20
...is actually a pair of this unit and your speaker. You can connect both surround back and presence speakers to connect the Zone 2 or Zone 3 speakers as well as the presence speakers (see page 111). • You can also use 6-ohm speakers, be ...Right Right Left Center speaker 16 En SUB WOOFER PRE OUT SPEAKERS SP1 R PRESENCE/ZONE 2/ZONE 3 L + + SURROUND BACK/ CENTER R BI-AMP L + SINGLE + + R SURROUND L SP2 + + ZONE 2/ZONE 3 R L + R FRONT L + + Right Left Surround speakers Zone 2 or Zone 3 speakers (see page 33). • Do not let the bare speaker ...
...is actually a pair of this unit and your speaker. You can connect both surround back and presence speakers to connect the Zone 2 or Zone 3 speakers as well as the presence speakers (see page 111). • You can also use 6-ohm speakers, be ...Right Right Left Center speaker 16 En SUB WOOFER PRE OUT SPEAKERS SP1 R PRESENCE/ZONE 2/ZONE 3 L + + SURROUND BACK/ CENTER R BI-AMP L + SINGLE + + R SURROUND L SP2 + + ZONE 2/ZONE 3 R L + R FRONT L + + Right Left Surround speakers Zone 2 or Zone 3 speakers (see page 33). • Do not let the bare speaker ...

Owner's Manual
Page 21
... setting Surround back speaker Subwoofer Presence speakers (see pages 15 and 16) SUB WOOFER PRE OUT SPEAKERS SP1 R PRESENCE/ZONE 2/ZONE 3 L + + SURROUND BACK/ CENTER R BI-AMP L + SINGLE + + R SURROUND L SP2 + + ZONE 2/ZONE 3 R L + R FRONT L + + Connections Center speaker Zone 2 or Zone 3 speakers (see page 111) Right Left Surround speakers Right Left Front speakers ■ For the 5.1-channel speaker setting...
... setting Surround back speaker Subwoofer Presence speakers (see pages 15 and 16) SUB WOOFER PRE OUT SPEAKERS SP1 R PRESENCE/ZONE 2/ZONE 3 L + + SURROUND BACK/ CENTER R BI-AMP L + SINGLE + + R SURROUND L SP2 + + ZONE 2/ZONE 3 R L + R FRONT L + + Connections Center speaker Zone 2 or Zone 3 speakers (see page 111) Right Left Surround speakers Right Left Front speakers ■ For the 5.1-channel speaker setting...

Owner's Manual
Page 22
Speaker terminal wrench ■ Connecting to the SP2 speaker terminals Connect Zone 2 or Zone 3 speakers to secure the wire using the supplied speaker terminal wrench. Red: positive (+) Black: negative (-) 2 Insert one bare wire into the hole on the rear ...
Speaker terminal wrench ■ Connecting to the SP2 speaker terminals Connect Zone 2 or Zone 3 speakers to secure the wire using the supplied speaker terminal wrench. Red: positive (+) Black: negative (-) 2 Insert one bare wire into the hole on the rear ...
Owner's Manual
Page 35
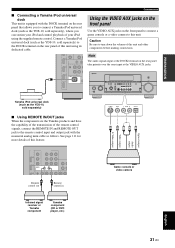
...ZONE ON/OFF ZONE CONTROLS ZONE 2 ZONE 3 SILENT CINEMA S VIDEO VIDEO L AUDIO R OPTICAL PROGRAM OPTIMIZER MIC PHONES VIDEO AUX SLEEP PURE DIRECT VOLUME S VIDEO VIDEO L AUDIO R OPTICAL S V L R O Optical output Audio output Video output S-Video output REMOTE IN OUT Remote control out Remote control in Infrared signal receiver or Yamaha component Yamaha... component (CD or DVD player, etc.) Game console or video camera English 31 En DOCK Yamaha iPod universal dock (such as the YDS...
...ZONE ON/OFF ZONE CONTROLS ZONE 2 ZONE 3 SILENT CINEMA S VIDEO VIDEO L AUDIO R OPTICAL PROGRAM OPTIMIZER MIC PHONES VIDEO AUX SLEEP PURE DIRECT VOLUME S VIDEO VIDEO L AUDIO R OPTICAL S V L R O Optical output Audio output Video output S-Video output REMOTE IN OUT Remote control out Remote control in Infrared signal receiver or Yamaha component Yamaha... component (CD or DVD player, etc.) Game console or video camera English 31 En DOCK Yamaha iPod universal dock (such as the YDS...
Owner's Manual
Page 37
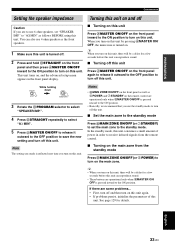
... unit. If there are some problems... • First, turn off and then turn on the main zone from the remote control. ■ Turning on this unit again. • If problems persist, initialize ... Setting the speaker impedance Turning this unit on and off Caution If you are to turn on the main zone. STRAIGHT EFFECT While holding down MASTER 3 Rotate the NPROGRAM selector to select "SPEAKER IMP.". 4 Press OSTRAIGHT... advanced setup menu appears in order to receive infrared signals from the standby mode Press BMAIN ZONE ON/OFF (or 8POWER) to use 6 ohm speakers, set the main...
... unit. If there are some problems... • First, turn off and then turn on the main zone from the remote control. ■ Turning on this unit again. • If problems persist, initialize ... Setting the speaker impedance Turning this unit on and off Caution If you are to turn on the main zone. STRAIGHT EFFECT While holding down MASTER 3 Rotate the NPROGRAM selector to select "SPEAKER IMP.". 4 Press OSTRAIGHT... advanced setup menu appears in order to receive infrared signals from the standby mode Press BMAIN ZONE ON/OFF (or 8POWER) to use 6 ohm speakers, set the main...
Owner's Manual
Page 39
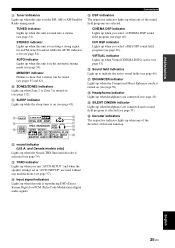
...AM or XM Satellite Radio tuning mode. C YPAO indicator Lights up while the sleep timer is active (see page 51). H Headphones indicator Lights up when Zone 2 or Zone 3 is selected (see page 112). F Sound field indicators Light up to show that a station can be stored (see pages 55 and 62). 0... 43). MEMORY indicator Flashes to indicate the active sound fields (see page 54). English 35 En STEREO indicator Lights up when this unit is receiving a strong signal for an FM stereo broadcast while the AUTO indicator is in the automatic tuning mode (see page 46). G ENHANCER indicator Lights...
...AM or XM Satellite Radio tuning mode. C YPAO indicator Lights up while the sleep timer is active (see page 51). H Headphones indicator Lights up when Zone 2 or Zone 3 is selected (see page 112). F Sound field indicators Light up to show that a station can be stored (see pages 55 and 62). 0... 43). MEMORY indicator Flashes to indicate the active sound fields (see page 54). English 35 En STEREO indicator Lights up when this unit is receiving a strong signal for an FM stereo broadcast while the AUTO indicator is in the automatic tuning mode (see page 46). G ENHANCER indicator Lights...
Owner's Manual
Page 41
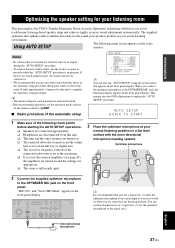
...the automatic setup procedure. Using AUTO SETUP The following display appears in your listening room This unit employs the YPAO (Yamaha Parametric Room Acoustic Optimizer) technology which lets you connect the optimizer microphone to the OPTIMIZER MIC jack, the following ...TONE SELECT CONTROL A/B/C/D/E CATEGORY STRAIGHT EFFECT YPAO PRESET/TUNING/CH PRESET/ TUNING EDIT SEARCH MODE MULTI ZONE MEMORY TUNING FM/AM MAN'L/AUTO FM MODE DISPLAY ZONE ON/OFF ZONE CONTROLS ZONE 2 ZONE 3 SILENT CINEMA S VIDEO VIDEO L AUDIO R OPTICAL PROGRAM OPTIMIZER MIC PHONES VIDEO AUX SLEEP ...
...the automatic setup procedure. Using AUTO SETUP The following display appears in your listening room This unit employs the YPAO (Yamaha Parametric Room Acoustic Optimizer) technology which lets you connect the optimizer microphone to the OPTIMIZER MIC jack, the following ...TONE SELECT CONTROL A/B/C/D/E CATEGORY STRAIGHT EFFECT YPAO PRESET/TUNING/CH PRESET/ TUNING EDIT SEARCH MODE MULTI ZONE MEMORY TUNING FM/AM MAN'L/AUTO FM MODE DISPLAY ZONE ON/OFF ZONE CONTROLS ZONE 2 ZONE 3 SILENT CINEMA S VIDEO VIDEO L AUDIO R OPTICAL PROGRAM OPTIMIZER MIC PHONES VIDEO AUX SLEEP ...
Owner's Manual
Page 47
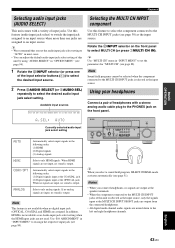
... Notes • When you select a sound field program, SILENT CINEMA mode activates automatically (see page 88). MAIN ZONE ON/OFF ON OFF MASTER INPUT AUDIO TONE SELECT CONTROL A/B/C/D/E CATEGORY STRAIGHT EFFECT YPAO PRESET/TUNING/CH PRESET/ TUNING EDIT SEARCH MODE... MULTI ZONE MEMORY TUNING FM/AM MAN'L/AUTO FM MODE DISPLAY ZONE ON/OFF ZONE CONTROLS ZONE 2 ZONE 3 SILENT CINEMA S VIDEO VIDEO L AUDIO R OPTICAL PROGRAM OPTIMIZER MIC PHONES VIDEO AUX SLEEP PURE...
... Notes • When you select a sound field program, SILENT CINEMA mode activates automatically (see page 88). MAIN ZONE ON/OFF ON OFF MASTER INPUT AUDIO TONE SELECT CONTROL A/B/C/D/E CATEGORY STRAIGHT EFFECT YPAO PRESET/TUNING/CH PRESET/ TUNING EDIT SEARCH MODE... MULTI ZONE MEMORY TUNING FM/AM MAN'L/AUTO FM MODE DISPLAY ZONE ON/OFF ZONE CONTROLS ZONE 2 ZONE 3 SILENT CINEMA S VIDEO VIDEO L AUDIO R OPTICAL PROGRAM OPTIMIZER MIC PHONES VIDEO AUX SLEEP PURE...
Owner's Manual
Page 49
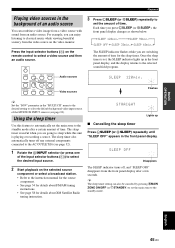
...audio source. SLEEP 60min. BASIC OPERATION Playback Playing video sources in the background of an audio source You can also be canceled by pressing BMAIN ZONE ON/OFF (or 7STANDBY) to select a video source and then an audio source. Press the input selector buttons (1) on the selected source ... station. • Refer to select the default background video input source of time. XM 3 Press LSLEEP (or 0SLEEP) repeatedly to set the main zone to the standby mode. Once the sleep timer is playing or recording a source. TUNER CD CD-R MULTI CH IN MD/TAPE DVD BD/HD DVD...
...audio source. SLEEP 60min. BASIC OPERATION Playback Playing video sources in the background of an audio source You can also be canceled by pressing BMAIN ZONE ON/OFF (or 7STANDBY) to select a video source and then an audio source. Press the input selector buttons (1) on the selected source ... station. • Refer to select the default background video input source of time. XM 3 Press LSLEEP (or 0SLEEP) repeatedly to set the main zone to the standby mode. Once the sleep timer is playing or recording a source. TUNER CD CD-R MULTI CH IN MD/TAPE DVD BD/HD DVD...
Owner's Manual
Page 80
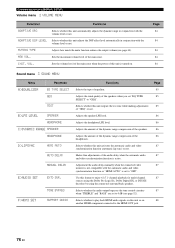
... OUT jack. Adjusts the tonal quality of the speakers when you set to "OFF". Adjusts the amount of the dynamic range compression of the main zone. Page 85 85 85 86 86 86 86 87 87 87 87 87 88 76 En F)HDMI SET TONE BYPASS SUPPORT AUDIO Functions Selects the.... Selects whether the audio output bypasses the tone control circuitry when "TREBLE" and "BASS" are set to "GEQ". Sets the volume level of the main zone when the power of this unit outputs the test tone while making adjustments of the audio delay when the automatic audio and video synchronization function...
... OUT jack. Adjusts the tonal quality of the speakers when you set to "OFF". Adjusts the amount of the dynamic range compression of the main zone. Page 85 85 85 86 86 86 86 87 87 87 87 87 88 76 En F)HDMI SET TONE BYPASS SUPPORT AUDIO Functions Selects the.... Selects whether the audio output bypasses the tone control circuitry when "TREBLE" and "BASS" are set to "GEQ". Sets the volume level of the main zone when the power of this unit outputs the test tone while making adjustments of the audio delay when the automatic audio and video synchronization function...


