
Owner's Manual
Page 3
...unit, and/or personal injury. 7 Do not plug in this unit to this unit. 6 Do not cover this unit upside-down. Contact qualified Yamaha service personnel when any reasons. 15 When not planning to hot, and do not pull the cable. 11 Do not clean this unit with a ... dripping or splashing. The cabinet should never be held responsible for your unit. 1 To assure the finest performance, please read the "Troubleshooting" section on switches, knobs and/or cords. 10 When disconnecting the power cable from direct sunlight, heat sources, vibration, dust, moisture, and/or cold. This Class B...
...unit, and/or personal injury. 7 Do not plug in this unit to this unit. 6 Do not cover this unit upside-down. Contact qualified Yamaha service personnel when any reasons. 15 When not planning to hot, and do not pull the cable. 11 Do not clean this unit with a ... dripping or splashing. The cabinet should never be held responsible for your unit. 1 To assure the finest performance, please read the "Troubleshooting" section on switches, knobs and/or cords. 10 When disconnecting the power cable from direct sunlight, heat sources, vibration, dust, moisture, and/or cold. This Class B...
Owner's Manual
Page 7
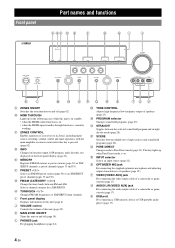
...the front panel display (page 24). R INPUT selector Selects an input source (page 22). L PHONES jack For plugging headphones (page 24). P SCENE Switches between the selected sound field program and straight decode mode (page 28). G FM/AM (CATEGORY l / h) Change the tuner bands between FM and AM...XM/ SIRIUS channels as preset channels (pages 35 and 39). M TONE CONTROL Adjusts high-frequency/low-frequency output of a receiver set in Zone2, including input source switching, volume control and tuner operation, with the main amplifier or remote control after this unit is on standby. • ...
...the front panel display (page 24). R INPUT selector Selects an input source (page 22). L PHONES jack For plugging headphones (page 24). P SCENE Switches between the selected sound field program and straight decode mode (page 28). G FM/AM (CATEGORY l / h) Change the tuner bands between FM and AM...XM/ SIRIUS channels as preset channels (pages 35 and 39). M TONE CONTROL Adjusts high-frequency/low-frequency output of a receiver set in Zone2, including input source switching, volume control and tuner operation, with the main amplifier or remote control after this unit is on standby. • ...
Owner's Manual
Page 10
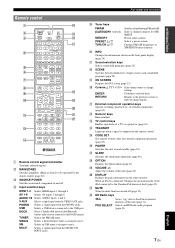
... a signal input from the VIDEO AUX jacks. DOCK Selects a Yamaha iPod universal dock/Bluetooth wireless audio receiver connected to the previous screen or ends the menu display. XM ... 2. f INFO Changes the information shown on the video monitor. l Numeric keys Enter numbers. AV 1-6 Selects AV inputs 1 through 4. g Sound selection keys Selects sound field programs (page 25). of this...24). e Tuner keys FM/AM (CATEGORY l / h) MEMORY PRESET k / n TUN./CH k / n Switches a band between linked sets of a TV or a projector (page 63). o CODE SET Sets remote control codes...
... a signal input from the VIDEO AUX jacks. DOCK Selects a Yamaha iPod universal dock/Bluetooth wireless audio receiver connected to the previous screen or ends the menu display. XM ... 2. f INFO Changes the information shown on the video monitor. l Numeric keys Enter numbers. AV 1-6 Selects AV inputs 1 through 4. g Sound selection keys Selects sound field programs (page 25). of this...24). e Tuner keys FM/AM (CATEGORY l / h) MEMORY PRESET k / n TUN./CH k / n Switches a band between linked sets of a TV or a projector (page 63). o CODE SET Sets remote control codes...
Owner's Manual
Page 17
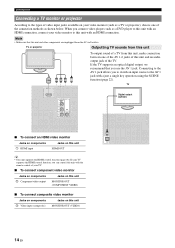
Note • Make sure that you to switch an input source to the AV 1 jack with a just a single key operation using the SCENE HDMI Y PB PR V function (page 22). If the TV supports an optical digital output, we recommend ... OUT (COMPONENT VIDEO) ■ To connect composite video monitor Jacks on components c Video input (composite) Jacks on this unit HDMI OUT OPTICAL ( TV ) AV 1 COAXIAL AV 2 COAXIAL (CD) AV 3 OPTICAL AV 4 AV 5 AV 6 AV OUT AUDIO1 AUD y • This unit supports the HDMI control function (page 46). When you can control this unit with an HDMI connection...
Note • Make sure that you to switch an input source to the AV 1 jack with a just a single key operation using the SCENE HDMI Y PB PR V function (page 22). If the TV supports an optical digital output, we recommend ... OUT (COMPONENT VIDEO) ■ To connect composite video monitor Jacks on components c Video input (composite) Jacks on this unit HDMI OUT OPTICAL ( TV ) AV 1 COAXIAL AV 2 COAXIAL (CD) AV 3 OPTICAL AV 4 AV 5 AV 6 AV OUT AUDIO1 AUD y • This unit supports the HDMI control function (page 46). When you can control this unit with an HDMI connection...
Owner's Manual
Page 18
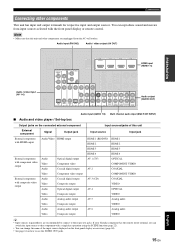
... use the ZONE2 OUT jacks. 15 En APPENDIX English FRONT TRIGGER OUT CENTER Audio output (AUDIO OUT) OPTICAL ( TV ) AV 1 COAXIAL AV 2 COAXIAL (CD) AV 3 OPTICAL AV 4 AV 5 AV 6 AV OUT AUDIO1 AUDIO2 FRONT SURROUND SUR.BACK SUBWOOFER AUDIO ZO MULTI CH INPUT OUT O Audio input (AUDIO 1/2) Multi channel audio input... as necessary (page 60). • See page 61 on how to the respective jacks. If your Yamaha component has the remote in/out terminal, you can switch the input source to that this unit Input source Input jack External component with HDMI output Audio/Video HDMI...
... use the ZONE2 OUT jacks. 15 En APPENDIX English FRONT TRIGGER OUT CENTER Audio output (AUDIO OUT) OPTICAL ( TV ) AV 1 COAXIAL AV 2 COAXIAL (CD) AV 3 OPTICAL AV 4 AV 5 AV 6 AV OUT AUDIO1 AUDIO2 FRONT SURROUND SUR.BACK SUBWOOFER AUDIO ZO MULTI CH INPUT OUT O Audio input (AUDIO 1/2) Multi channel audio input... as necessary (page 60). • See page 61 on how to the respective jacks. If your Yamaha component has the remote in/out terminal, you can switch the input source to that this unit Input source Input jack External component with HDMI output Audio/Video HDMI...

Owner's Manual
Page 26
... input source (page 63). ADDITIONAL INFORMATION APPENDIX English 23 En Select Scene BD/DVD TV CD RADIO 2 Use jCursor k / n repeatedly to switch the page and jCursor l / h repeatedly to adjust the frequency range. Treble 0.0dB 2 Rotate the NPROGRAM selector to select the desired input source.... y • If you want to select is muted. 2 Press uMUTE again to resume audio output. Switching remotely controlled external components linked to scene selections You can be remotely controllable just by setting a remote control code for the external ...
... input source (page 63). ADDITIONAL INFORMATION APPENDIX English 23 En Select Scene BD/DVD TV CD RADIO 2 Use jCursor k / n repeatedly to switch the page and jCursor l / h repeatedly to adjust the frequency range. Treble 0.0dB 2 Rotate the NPROGRAM selector to select the desired input source.... y • If you want to select is muted. 2 Press uMUTE again to resume audio output. Switching remotely controlled external components linked to scene selections You can be remotely controllable just by setting a remote control code for the external ...

Owner's Manual
Page 32
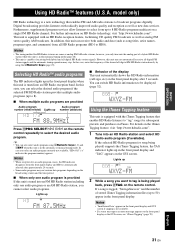
...preset number is detected. Use this feature, only the main audio program of the station (HD1) will be stored. y • You can receive strong signals without any interference. See page 31 for details about 5 seconds later from the lowest frequency upwards. model only) If you press the ... a station that the entered frequency is detectable around the current frequency. The Option menu for "TUNER" is effective when the tuner can switch between stereo and monaural for FM broadcast in steps. Tuning in to 40 stations. The STEREO indicator also lights up to a specific station...
...preset number is detected. Use this feature, only the main audio program of the station (HD1) will be stored. y • You can receive strong signals without any interference. See page 31 for details about 5 seconds later from the lowest frequency upwards. model only) If you press the ... a station that the entered frequency is detectable around the current frequency. The Option menu for "TUNER" is effective when the tuner can switch between stereo and monaural for FM broadcast in steps. Tuning in to 40 stations. The STEREO indicator also lights up to a specific station...
Owner's Manual
Page 34
... front panel display and "TAG" appears on the front panel display after approximately 20 seconds. • Some audio programs may not automatically receive all -digital HD Radio station signals. Notes • When reception for subsequent preview and purchase on a single FM HD Radio channel. Lights... up to broadcast programs digitally. This unit is automatically selected after 3 seconds. y • You can switch HD Radio information to "tag" songs for an audio program ceases, the HD indicator disappears from the front panel display and HD1 is ...
... front panel display and "TAG" appears on the front panel display after approximately 20 seconds. • Some audio programs may not automatically receive all -digital HD Radio station signals. Notes • When reception for subsequent preview and purchase on a single FM HD Radio channel. Lights... up to broadcast programs digitally. This unit is automatically selected after 3 seconds. y • You can switch HD Radio information to "tag" songs for an audio program ceases, the HD indicator disappears from the front panel display and HD1 is ...
Owner's Manual
Page 45
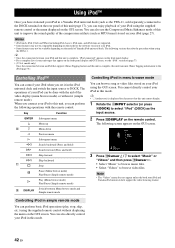
... e Pause (Menu browse mode) Play/Pause (Simple remote mode) p Play (Menu browse mode) Play/Pause (Simple remote mode) t DISPLAY Switch between your iPod and Yamaha iPod universal dock support the video browsing feature. You cannot directly control your iPod in simple remote mode You can be available depending... the model or the software version of your iPod using the YDS-11. Using iPod™ Once you have stationed your iPod in a Yamaha iPod universal dock (such as the YDS-11, sold separately) connected to browse video files. y • "_"(underscore) is complete, "iPod...
... e Pause (Menu browse mode) Play/Pause (Simple remote mode) p Play (Menu browse mode) Play/Pause (Simple remote mode) t DISPLAY Switch between your iPod and Yamaha iPod universal dock support the video browsing feature. You cannot directly control your iPod in simple remote mode You can be available depending... the model or the software version of your iPod using the YDS-11. Using iPod™ Once you have stationed your iPod in a Yamaha iPod universal dock (such as the YDS-11, sold separately) connected to browse video files. y • "_"(underscore) is complete, "iPod...
Owner's Manual
Page 46
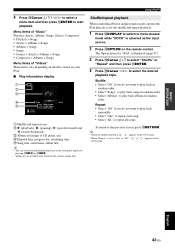
...Select "Off" if you do not want to menu browse mode while "DOCK" is set the shuffle and repeat playback. 1 Press tDISPLAY to switch to play back albums in simple remote mode, operate the iPod directly to set to repeat all songs. To return to select the desired playback...) c Album art (image of CD jacket, etc) d Elapsed time, progress bar, remaining time e Song title, artist name, album title y • You can switch the information displayed on the front panel display by pressing DINFO (or fINFO). • Album arts are available only when the file contains image data.
...Select "Off" if you do not want to menu browse mode while "DOCK" is set the shuffle and repeat playback. 1 Press tDISPLAY to switch to play back albums in simple remote mode, operate the iPod directly to set to repeat all songs. To return to select the desired playback...) c Album art (image of CD jacket, etc) d Elapsed time, progress bar, remaining time e Song title, artist name, album title y • You can switch the information displayed on the front panel display by pressing DINFO (or fINFO). • Album arts are available only when the file contains image data.

Owner's Manual
Page 50
...closing the Option menu, press dInput selection key to +6.0dB (in 0.5 dB steps) Reduces any change in volume when switching input sources by correcting volume differences between input sources. INTRODUCTION PREPARATION BASIC OPERATION ADVANCED OPERATION Setting the option menu for each ... jRETURN. Input Source Menu item HDMI1-4 Volume Decoder Trim Mode Extended Signal Info Surround AV1-4 Volume Decoder Trim Mode Extended Signal Info Surround AV 5-6 Volume Trim Input HDMI 1 DSP Straight AUDIO1/2 Volume Trim 3 Press jCursor k / n to select the desired input source. 2...
...closing the Option menu, press dInput selection key to +6.0dB (in 0.5 dB steps) Reduces any change in volume when switching input sources by correcting volume differences between input sources. INTRODUCTION PREPARATION BASIC OPERATION ADVANCED OPERATION Setting the option menu for each ... jRETURN. Input Source Menu item HDMI1-4 Volume Decoder Trim Mode Extended Signal Info Surround AV1-4 Volume Decoder Trim Mode Extended Signal Info Surround AV 5-6 Volume Trim Input HDMI 1 DSP Straight AUDIO1/2 Volume Trim 3 Press jCursor k / n to select the desired input source. 2...
Owner's Manual
Page 59
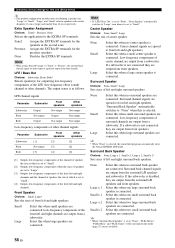
...of the front left and right channels. Note • If "LFE / Bass Out" is set to "Front", "Front Speaker" automatically switches to "Large" even when it is set to "Small". [4] Outputs low-frequency components of the front left and right channels and the channel... speakers are output from the surround L/R speakers and front speakers. Select this when a small center speaker is selected. "Surround Back Speaker" automatically switches to "Zone2" or "Presence", the surround back channel signals for the presence speakers. Large x 2 Select this when small speakers are output from...
...of the front left and right channels. Note • If "LFE / Bass Out" is set to "Front", "Front Speaker" automatically switches to "Large" even when it is set to "Small". [4] Outputs low-frequency components of the front left and right channels and the channel... speakers are output from the surround L/R speakers and front speakers. Select this when a small center speaker is selected. "Surround Back Speaker" automatically switches to "Zone2" or "Presence", the surround back channel signals for the presence speakers. Large x 2 Select this when small speakers are output from...
Owner's Manual
Page 60
..." is selected, press jCursor k / n to select the desired frequency band and then press jCursor l / h to adjust the signal level. ■ Test Tone Choices: Off*, On Switches between on and off of the low-frequency component output from a speaker with a size set "Test Tone" to "On" (on input signal information. Characteristics of...
..." is selected, press jCursor k / n to select the desired frequency band and then press jCursor l / h to adjust the signal level. ■ Test Tone Choices: Off*, On Switches between on and off of the low-frequency component output from a speaker with a size set "Test Tone" to "On" (on input signal information. Characteristics of...

Owner's Manual
Page 61
... automatic lip-sync function or you set to "On", this unit output signals input from 720p or 1080i analog video signals cannot be selected before switching to standby. • When "Standby Through" is on - Select this unit is converted from analog video input signals and output from the HDMI 1-4 jacks to...
... automatic lip-sync function or you set to "On", this unit output signals input from 720p or 1080i analog video signals cannot be selected before switching to standby. • When "Standby Through" is on - Select this unit is converted from analog video input signals and output from the HDMI 1-4 jacks to...

Owner's Manual
Page 63
... Max Volume" and "Zone2 Initial Volume", the setting of Zone2, so that the volume will not be accidentally increased. Note • When this parameter is switched to standby is set to +15.0dB, +16.5dB* (5.0 dB step) Sets the maximum volume level of "Zone2 Max Volume" becomes effective.
... Max Volume" and "Zone2 Initial Volume", the setting of Zone2, so that the volume will not be accidentally increased. Note • When this parameter is switched to standby is set to +15.0dB, +16.5dB* (5.0 dB step) Sets the maximum volume level of "Zone2 Max Volume" becomes effective.
Owner's Manual
Page 65
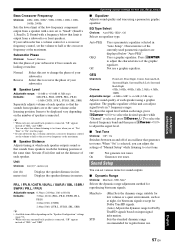
... source) • Tuning into the desired channel (when "XM" or "SIRIUS" is turned on the remote control, follow the procedure below to switch this unit returns to use the XM Satellite Radio features (page 33) in Zone2. 62 En The available operations are connected to use the USB... features (page 45) in Zone2. Switching to the Zone2 operation mode Before controlling Zone2 by using the control keys on the front panel or on the front panel display for approximately...
... source) • Tuning into the desired channel (when "XM" or "SIRIUS" is turned on the remote control, follow the procedure below to switch this unit returns to use the XM Satellite Radio features (page 33) in Zone2. 62 En The available operations are connected to use the USB... features (page 45) in Zone2. Switching to the Zone2 operation mode Before controlling Zone2 by using the control keys on the front panel or on the front panel display for approximately...

Owner's Manual
Page 66
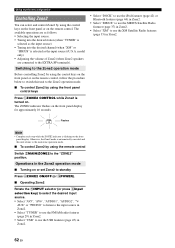
...selected input source with the remote control. If it fails, nTRANSMIT blinks six times. CD Yamaha 5013 - - - - - - - - - 1 Press oCODE SET on and off TV tDISPLAY Switches between the screens of selected input sources. • You need to set the remote ...all remote control codes [HDMI 4] - - - [AV 1] - - - The keys available for controls of TV regardless of external components. DOCK Yamaha 5011 Tuner Yamaha 5007 Tuner Yamaha 5017 Tuner Yamaha 5009 - - - mTV control keys INPUT Switches visual inputs of TV MUTE Mutes audio of this manual....
...selected input source with the remote control. If it fails, nTRANSMIT blinks six times. CD Yamaha 5013 - - - - - - - - - 1 Press oCODE SET on and off TV tDISPLAY Switches between the screens of selected input sources. • You need to set the remote ...all remote control codes [HDMI 4] - - - [AV 1] - - - The keys available for controls of TV regardless of external components. DOCK Yamaha 5011 Tuner Yamaha 5007 Tuner Yamaha 5017 Tuner Yamaha 5009 - - - mTV control keys INPUT Switches visual inputs of TV MUTE Mutes audio of this manual....
Owner's Manual
Page 67
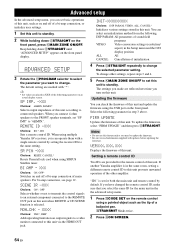
... the firmware You can check the firmware of this unit and update the firmware using multiple Yamaha AV receivers, you can operate them with updates before updating the firmware. If another Yamaha amplifier is selected. If you have changed the remote control ID, make sure that you select... read information supplied with a single remote control by default. FIRM UPDATE Updates the firmware of main speakers. XXX Choices: ON, OFF* Switches on and off of bi-amp connection of this unit. When you connect 4-ohm speakers to change other amplifier. To change the selected ...
... the firmware You can check the firmware of this unit and update the firmware using multiple Yamaha AV receivers, you can operate them with updates before updating the firmware. If another Yamaha amplifier is selected. If you have changed the remote control ID, make sure that you select... read information supplied with a single remote control by default. FIRM UPDATE Updates the firmware of main speakers. XXX Choices: ON, OFF* Switches on and off of bi-amp connection of this unit. When you connect 4-ohm speakers to change other amplifier. To change the selected ...

Owner's Manual
Page 68
Once the remote control code is set to "ID1". If it fails, nTRANSMIT blinks six times. y • If you initialize the settings of this unit, "REMOTE ID" (remote control code of this unit) is registered, nTRANSMIT blinks twice. INTRODUCTION PREPARATION 3 Enter the desired remote control ID code. Repeat from step 1. To switch to ID1: Press lNumeric keys to enter "5020". To switch to ID2: Press lNumeric keys to enter "5019". Advanced setup BASIC OPERATION ADVANCED OPERATION ADDITIONAL INFORMATION APPENDIX English 65 En
Once the remote control code is set to "ID1". If it fails, nTRANSMIT blinks six times. y • If you initialize the settings of this unit, "REMOTE ID" (remote control code of this unit) is registered, nTRANSMIT blinks twice. INTRODUCTION PREPARATION 3 Enter the desired remote control ID code. Repeat from step 1. To switch to ID1: Press lNumeric keys to enter "5020". To switch to ID2: Press lNumeric keys to enter "5019". Advanced setup BASIC OPERATION ADVANCED OPERATION ADDITIONAL INFORMATION APPENDIX English 65 En

Owner's Manual
Page 72
... or orientation, or place it can be reduced by direct frequency tuning. Tune in the Option menu is weak. Problem Cause Remedy This unit cannot receive the HD Radio signals of the HDMI components. Use a high-quality FM/AM antenna. See page 31 - - 48 ADVANCED OPERATION APPENDIX English 69 En Replace... other electrical equipment. The number of the connected HDMI components is distortion, and FM clear reception cannot be tuned into with the automatic tuning method. Switch to "Auto".
... or orientation, or place it can be reduced by direct frequency tuning. Tune in the Option menu is weak. Problem Cause Remedy This unit cannot receive the HD Radio signals of the HDMI components. Use a high-quality FM/AM antenna. See page 31 - - 48 ADVANCED OPERATION APPENDIX English 69 En Replace... other electrical equipment. The number of the connected HDMI components is distortion, and FM clear reception cannot be tuned into with the automatic tuning method. Switch to "Auto".


