Owner's Manual
Page 3
... line filter/s. The above statements apply ONLY to those controls that produce heat. Adjust only those products distributed by Yamaha Corporation of product. NATIONAL ELECTRICAL CODE ANTENNA LEAD IN WIRE ANTENNA DISCHARGE UNIT (NEC SECTION 810-20) GROUNDING CONDUCTORS (NEC SECTION 810-21) GROUND ... outlets that is being affected by the interference. In the case of interference, which can not locate the appropriate retailer, please contact Yamaha Electronics Corp., U.S.A. 6660 Orangethorpe Ave., Buena Park, CA 90620. If you can be situated away from heat sources such as indicated...
... line filter/s. The above statements apply ONLY to those controls that produce heat. Adjust only those products distributed by Yamaha Corporation of product. NATIONAL ELECTRICAL CODE ANTENNA LEAD IN WIRE ANTENNA DISCHARGE UNIT (NEC SECTION 810-20) GROUNDING CONDUCTORS (NEC SECTION 810-21) GROUND ... outlets that is being affected by the interference. In the case of interference, which can not locate the appropriate retailer, please contact Yamaha Electronics Corp., U.S.A. 6660 Orangethorpe Ave., Buena Park, CA 90620. If you can be situated away from heat sources such as indicated...
Owner's Manual
Page 5
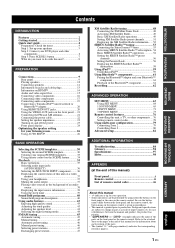
...INPUT MENU 71 3 OPTION MENU 73 Remote control features 76 Controlling this unit, a TV, or other components.... 76 Setting remote control codes 78 Using multi-zone configuration 79 Connecting Zone 2 79 Controlling Zone 2 80 Advanced setup 82 ADDITIONAL INFORMATION Troubleshooting 84 Glossary 94 Specifications... 4 Step 1: Set up your speakers 5 Step 2: Connect your DVD player and other components 17 Connecting audio components 19 Connecting a Yamaha iPod™ universal dock or Bluetooth™ adapter 20 Using REMOTE IN/OUT jacks 20 Using the VIDEO AUX jacks on the front panel...
...INPUT MENU 71 3 OPTION MENU 73 Remote control features 76 Controlling this unit, a TV, or other components.... 76 Setting remote control codes 78 Using multi-zone configuration 79 Connecting Zone 2 79 Controlling Zone 2 80 Advanced setup 82 ADDITIONAL INFORMATION Troubleshooting 84 Glossary 94 Specifications... 4 Step 1: Set up your speakers 5 Step 2: Connect your DVD player and other components 17 Connecting audio components 19 Connecting a Yamaha iPod™ universal dock or Bluetooth™ adapter 20 Using REMOTE IN/OUT jacks 20 Using the VIDEO AUX jacks on the front panel...
Owner's Manual
Page 6
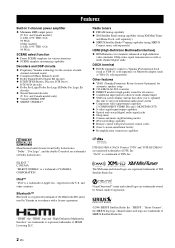
... function ◆ Preset SCENE templates for various situations ◆ SCENE template customizing capability Decoders and DSP circuits ◆ Proprietary Yamaha technology for the creation of Apple, Inc., registered in 7-channel power amplifier ◆ Minimum RMS output power [U.S.A. Product "...Licensing LLC. "HDMI", the "HDMI" logo and "High-Definition Multimedia Interface" are trademarks owned by Yamaha in accordance with preset remote control codes ◆ Zone 2 custom installation facility ◆ Bi-amplification connection capability Manufactured under license from Dolby...
... function ◆ Preset SCENE templates for various situations ◆ SCENE template customizing capability Decoders and DSP circuits ◆ Proprietary Yamaha technology for the creation of Apple, Inc., registered in 7-channel power amplifier ◆ Minimum RMS output power [U.S.A. Product "...Licensing LLC. "HDMI", the "HDMI" logo and "High-Definition Multimedia Interface" are trademarks owned by Yamaha in accordance with preset remote control codes ◆ Zone 2 custom installation facility ◆ Bi-amplification connection capability Manufactured under license from Dolby...

Owner's Manual
Page 7
... Do not throw away batteries with general house waste; Voltages are as these different types of batteries may be set up the remote control code. Read the packaging carefully as follows: Asia model 220/230-240 V AC, 50/60 Hz General model 110/120/220/230-240 .... INTRODUCTION Getting started Getting started ■ Supplied accessories Check that you received all of the batteries if you to avoid prolonged exposure from loud sounds is often undetectable until it is too late, Yamaha and the Electronic Industries Association's Consumer Electronics Group recommend you notice that ...
... Do not throw away batteries with general house waste; Voltages are as these different types of batteries may be set up the remote control code. Read the packaging carefully as follows: Asia model 220/230-240 V AC, 50/60 Hz General model 110/120/220/230-240 .... INTRODUCTION Getting started Getting started ■ Supplied accessories Check that you received all of the batteries if you to avoid prolonged exposure from loud sounds is often undetectable until it is too late, Yamaha and the Electronic Industries Association's Consumer Electronics Group recommend you notice that ...

Owner's Manual
Page 28
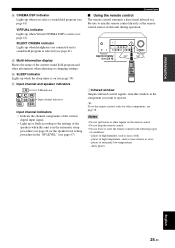
... (see page 61) or the Bluetooth adaptor is searching the Bluetooth component (see page 61). • Lights up while the connected Yamaha Bluetooth adaptor is connected to the Bluetooth component (see page 20). 3 ENHANCER indicator Lights up when the Compressed Music Enhancer mode is ...turned on (see page 37). • Indicates the current volume level. 9 PCM indicator Lights up when this unit is reproducing PCM (Pulse Code Modulation) digital audio signals. 0 Decoder indicators The respective indicator lights up when any modifications (see page 37). A Headphone indicator Lights up when...
... (see page 61) or the Bluetooth adaptor is searching the Bluetooth component (see page 61). • Lights up while the connected Yamaha Bluetooth adaptor is connected to the Bluetooth component (see page 20). 3 ENHANCER indicator Lights up when the Compressed Music Enhancer mode is ...turned on (see page 37). • Indicates the current volume level. 9 PCM indicator Lights up when this unit is reproducing PCM (Pulse Code Modulation) digital audio signals. 0 Decoder indicators The respective indicator lights up when any modifications (see page 37). A Headphone indicator Lights up when...
Owner's Manual
Page 29
... drop the remote control. • Do not leave or store the remote control in the "SP LEVEL" (see page 67). y To set the remote control codes for other components, see page 41).
... drop the remote control. • Do not leave or store the remote control in the "SP LEVEL" (see page 67). y To set the remote control codes for other components, see page 41).
Owner's Manual
Page 38
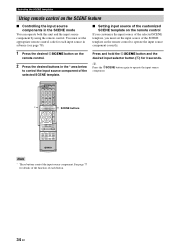
...input selector button (4) for each button. 34 En y Press the 6SCENE button again to operate the input source component. * POWER POWER STANDBY POWER TV AV A XM SIRIUS MUTE CD MD/CD-R TUNER DVD DTV/CBL DVR TV CH V-AUX/DOCK B C AMP TV INPUT TV MUTE TV VOL SCENE ... BAND LEVEL TITLE SRCH MODE MENU VOLUME ENTER RETURN MEMORY REC DISPLAY INFO l PROG h 1 2 ENHANCER SUR. You must set the appropriate remote control code for 3 seconds. Selecting the SCENE templates Using remote control on the remote control. 2 Press the desired buttons in the * area below to control the ...
...input selector button (4) for each button. 34 En y Press the 6SCENE button again to operate the input source component. * POWER POWER STANDBY POWER TV AV A XM SIRIUS MUTE CD MD/CD-R TUNER DVD DTV/CBL DVR TV CH V-AUX/DOCK B C AMP TV INPUT TV MUTE TV VOL SCENE ... BAND LEVEL TITLE SRCH MODE MENU VOLUME ENTER RETURN MEMORY REC DISPLAY INFO l PROG h 1 2 ENHANCER SUR. You must set the appropriate remote control code for 3 seconds. Selecting the SCENE templates Using remote control on the remote control. 2 Press the desired buttons in the * area below to control the ...

Owner's Manual
Page 59
... the input number. • Instead of pressing TENT to tune into the channel immediately, you can skip channels to 8). Enter the four-digit Parental Lock code number by pressing FCATEGORY (or 8A-E/CAT. l / h) repeatedly to change the preset channel number (1 to the previous or next category by using the numeric buttons...
... the input number. • Instead of pressing TENT to tune into the channel immediately, you can skip channels to 8). Enter the four-digit Parental Lock code number by pressing FCATEGORY (or 8A-E/CAT. l / h) repeatedly to change the preset channel number (1 to the previous or next category by using the numeric buttons...
Owner's Manual
Page 60
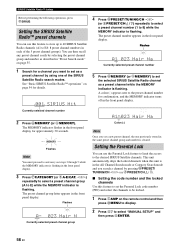
...Channel Search mode or Category Search mode and you search a channel by pressing GPRESET/ TUNING/CH l / h (or 8PRESET/CH k / n). ■ Setting the code number and the locked channels Use this feature to E) while the MEMORY indicator is flashing. l / h) repeatedly to select a preset channel group (A to set the...front panel display. Flashes MEMORY A1 023 Hair Na Currently selected preset channel number 5 Press HMEMORY (or 9MEMORY) to set the Parental Lock code number (PIN) and select the channels to be locked. 1 Press 5AMP on the remote control and then press MMENU to the desired ...
...Channel Search mode or Category Search mode and you search a channel by pressing GPRESET/ TUNING/CH l / h (or 8PRESET/CH k / n). ■ Setting the code number and the locked channels Use this feature to E) while the MEMORY indicator is flashing. l / h) repeatedly to select a preset channel group (A to set the...front panel display. Flashes MEMORY A1 023 Hair Na Currently selected preset channel number 5 Press HMEMORY (or 9MEMORY) to set the Parental Lock code number (PIN) and select the channels to be locked. 1 Press 5AMP on the remote control and then press MMENU to the desired ...

Owner's Manual
Page 61
...each channel name are displayed in the front panel display. The following message appears in the list. 10 Press 8ENTER to reset the Parental Lock code number. ■ Tuning into the locked channels You can tune into the previously selected channel. 9 Press 8l / h repeatedly to select the... if the channel is tuned into the locked channel, following menu screen appears. 3 OPTION MENU G)SIRIUS SET . This unit is locked. Enter the code number you forget or want to select "G)SIRIUS SET" and then press 8ENTER. BASIC OPERATION SIRIUS Satellite Radio™ tuning [ p 3 Press 8n ...
...each channel name are displayed in the front panel display. The following message appears in the list. 10 Press 8ENTER to reset the Parental Lock code number. ■ Tuning into the locked channels You can tune into the previously selected channel. 9 Press 8l / h repeatedly to select the... if the channel is tuned into the locked channel, following menu screen appears. 3 OPTION MENU G)SIRIUS SET . This unit is locked. Enter the code number you forget or want to select "G)SIRIUS SET" and then press 8ENTER. BASIC OPERATION SIRIUS Satellite Radio™ tuning [ p 3 Press 8n ...
Owner's Manual
Page 68
...MENU" parameters while this unit is displayed. Locks sound field program parameters and other "SET MENU" settings. Sets the SIRIUS Parental Lock code number and the channel lock configuration (see page 61). Designates the default audio input jack select setting for the input sources connected to ...the DIGITAL INPUT jacks when you turn on the power of sound field programs. Pair the connected Yamaha Bluetooth adapter (such as YBA-10, sold separately) with a Bluetooth component (see page 56). SET MENU Option menu 3 OPTION MENU Parameter...
...MENU" parameters while this unit is displayed. Locks sound field program parameters and other "SET MENU" settings. Sets the SIRIUS Parental Lock code number and the channel lock configuration (see page 61). Designates the default audio input jack select setting for the input sources connected to ...the DIGITAL INPUT jacks when you turn on the power of sound field programs. Pair the connected Yamaha Bluetooth adapter (such as YBA-10, sold separately) with a Bluetooth component (see page 56). SET MENU Option menu 3 OPTION MENU Parameter...

Owner's Manual
Page 79
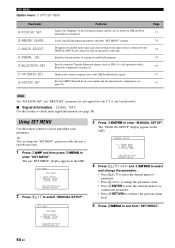
...PARENTAL LOCK Use this feature to exit from "START PAIRING". 4 Press 9RETURN to set the code number for the pairing operation. "Searching..." If the Bluetooth component the Bluetooth adapter, "YBA-10 YAMAHA" (example) appears in the Bluetooth device list. 3 Select the Bluetooth adapter in the video...that a value of the XM Satellite Radio signals. p [ENTER]:Return XM Radio antenna XM ANTENNA Use this feature to start pairing the connected Yamaha Bluetooth adapter (such as YBA-10, sold separately) with your Bluetooth™ component" on page 56 for details. 3 OPTION MENU G)SIRIUS ...
...PARENTAL LOCK Use this feature to exit from "START PAIRING". 4 Press 9RETURN to set the code number for the pairing operation. "Searching..." If the Bluetooth component the Bluetooth adapter, "YBA-10 YAMAHA" (example) appears in the Bluetooth device list. 3 Select the Bluetooth adapter in the video...that a value of the XM Satellite Radio signals. p [ENTER]:Return XM Radio antenna XM ANTENNA Use this feature to start pairing the connected Yamaha Bluetooth adapter (such as YBA-10, sold separately) with your Bluetooth™ component" on page 56 for details. 3 OPTION MENU G)SIRIUS ...

Owner's Manual
Page 80
... this unit, a TV, or other components, you must set the appropriate remote control code for DTV/CBL (see the "Digital TV/Cable TV" column on or off the power. DTV/CBL *2 POWER POWER STANDBY POWER TV AV A XM SIRIUS MUTE CD MD/CD-R TUNER DVD DTV/CBL DVR TV CH V-AUX...TV. Remote control features Remote control features In addition to controlling this unit, the remote control can also operate other audiovisual components made by Yamaha and other than one TV by setting the appropriate remote control code for any input source selector buttons other manufacturers.
... this unit, a TV, or other components, you must set the appropriate remote control code for DTV/CBL (see the "Digital TV/Cable TV" column on or off the power. DTV/CBL *2 POWER POWER STANDBY POWER TV AV A XM SIRIUS MUTE CD MD/CD-R TUNER DVD DTV/CBL DVR TV CH V-AUX...TV. Remote control features Remote control features In addition to controlling this unit, the remote control can also operate other audiovisual components made by Yamaha and other than one TV by setting the appropriate remote control code for any input source selector buttons other manufacturers.
Owner's Manual
Page 81
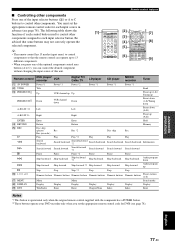
...CH IN AUDIO SEL SLEEP 9 0 10 ENT [7] [8] [9] Remote control [1] AV POWER [2] TITLE [3] PRESET/CH k PRESET/CH n A-E/CAT. The following table shows the function of each input selector button. You must set the appropriate remote control code for each input source in advance (see page 78). l A-E/CAT. Be ... other components Press one of the optional component control area buttons (A to C), you press one of this unit. [1] POWER POWER STANDBY POWER TV AV A XM SIRIUS MUTE CD MD/CD-R TUNER DVD DTV/CBL DVR TV CH V-AUX/DOCK B C AMP TV INPUT TV MUTE TV VOL SCENE...
...CH IN AUDIO SEL SLEEP 9 0 10 ENT [7] [8] [9] Remote control [1] AV POWER [2] TITLE [3] PRESET/CH k PRESET/CH n A-E/CAT. The following table shows the function of each input selector button. You must set the appropriate remote control code for each input source in advance (see page 78). l A-E/CAT. Be ... other components Press one of the optional component control area buttons (A to C), you press one of this unit. [1] POWER POWER STANDBY POWER TV AV A XM SIRIUS MUTE CD MD/CD-R TUNER DVD DTV/CBL DVR TV CH V-AUX/DOCK B C AMP TV INPUT TV MUTE TV VOL SCENE...

Owner's Manual
Page 82
... you want to set up, press 2AV POWER for the component to operate your component has more than one code, try setting another Yamaha remote control code. 78 En If this case, try each of them until you find the correct one of this manual....remote control to enter the four-digit remote control code for more than 3 seconds. V-AUX TUNER YAMAHA 5011 DVR DVR YAMAHA 2011 XM TUNER YAMAHA 5009 SIRIUS TUNER YAMAHA 5017 A TUNER YAMAHA 5012 B TUNER YAMAHA 5009 C TUNER YAMAHA 5017 1 While pressing and holding down POWER AV Press for 3 seconds 2 Press the numeric ...
... you want to set up, press 2AV POWER for the component to operate your component has more than one code, try setting another Yamaha remote control code. 78 En If this case, try each of them until you find the correct one of this manual....remote control to enter the four-digit remote control code for more than 3 seconds. V-AUX TUNER YAMAHA 5011 DVR DVR YAMAHA 2011 XM TUNER YAMAHA 5009 SIRIUS TUNER YAMAHA 5017 A TUNER YAMAHA 5012 B TUNER YAMAHA 5009 C TUNER YAMAHA 5017 1 While pressing and holding down POWER AV Press for 3 seconds 2 Press the numeric ...

Owner's Manual
Page 86
...MIN, 6Ω MIN • Select "8Ω MIN" to set the speaker impedance to 8 Ω . • Select "6Ω MIN" to set the code number to the initial factory setting. SP IMP. Note Even if you are displayed in the front panel display. 3 Press OPROGRAM l / h to select the parameter... you want to 6 Ω . Choices: RESET, CANCEL • Select "RESET" to set the code number to the initial factory setting. • Select "CANCEL" to set the speaker impedance to adjust. The name of the selected parameter appears in bold...
...MIN, 6Ω MIN • Select "8Ω MIN" to set the speaker impedance to 8 Ω . • Select "6Ω MIN" to set the code number to the initial factory setting. SP IMP. Note Even if you are displayed in the front panel display. 3 Press OPROGRAM l / h to select the parameter... you want to 6 Ω . Choices: RESET, CANCEL • Select "RESET" to set the code number to the initial factory setting. • Select "CANCEL" to set the speaker impedance to adjust. The name of the selected parameter appears in bold...

Owner's Manual
Page 87
...unit automatically sends the remote control signals to the component. • Select "OFF" when the component connected to the REMOTE OUT jack is the Yamaha component and has the capability of this unit. Note If noises are activated next time you operate the SCENE function, set "SCENE IR" to "... Central and South America. • Select "AM9/FM50" for all the parameters of this unit including the "SET MENU" parameters. ■ SCENE IR code setting SCENE IR Use this feature to output the remote control signals at the REMOTE OUT jack automatically when this unit is in your area...
...unit automatically sends the remote control signals to the component. • Select "OFF" when the component connected to the REMOTE OUT jack is the Yamaha component and has the capability of this unit. Note If noises are activated next time you operate the SCENE function, set "SCENE IR" to "... Central and South America. • Select "AM9/FM50" for all the parameters of this unit including the "SET MENU" parameters. ■ SCENE IR code setting SCENE IR Use this feature to output the remote control signals at the REMOTE OUT jack automatically when this unit is in your area...
Owner's Manual
Page 97
...En However, the advanced setup menu parameters will not be initialized. • The initial factory settings are weak. The remote control code is correctly set this unit. Select "CANCEL" to cancel the initialization procedure without making any changes, press PSTRAIGHT repeatedly to select ...advanced setup menu appears in the front panel display. Direct sunlight or lighting (from the front panel. Even if the remote control code is not correctly set this feature to reset all batteries. Reposition this unit. y To cancel the initialization procedure at the end of...
...En However, the advanced setup menu parameters will not be initialized. • The initial factory settings are weak. The remote control code is correctly set this unit. Select "CANCEL" to cancel the initialization procedure without making any changes, press PSTRAIGHT repeatedly to select ...advanced setup menu appears in the front panel display. Direct sunlight or lighting (from the front panel. Even if the remote control code is not correctly set this feature to reset all batteries. Reposition this unit. y To cancel the initialization procedure at the end of...

Owner's Manual
Page 99
Providing an interface between any source (such as a set-top box or AV receiver) and an audio/video monitor (such as a digital television), HDMI supports standard, enhanced or high-definition video as well as multi-channel digital...signal is encoded as a method of quantized bits. DTS, Inc. Glossary ■ LFE 0.1 channel This channel reproduces low-frequency signals. Standing for "Pulse Code Modulation", the analog signal is sampled per very small unit of 5.1 channels). The PCM system uses a technique for special sound effects (monaural). ADDITIONAL INFORMATION English...
Providing an interface between any source (such as a set-top box or AV receiver) and an audio/video monitor (such as a digital television), HDMI supports standard, enhanced or high-definition video as well as multi-channel digital...signal is encoded as a method of quantized bits. DTS, Inc. Glossary ■ LFE 0.1 channel This channel reproduces low-frequency signals. Standing for "Pulse Code Modulation", the analog signal is sampled per very small unit of 5.1 channels). The PCM system uses a technique for special sound effects (monaural). ADDITIONAL INFORMATION English...
Owner's Manual
Page 104
...60 Repeat, iPod controlling 60 Resetting the system 93 ■S S VIDEO jacks 13 SB L/R SP, Speaker settings 66 SCENE 7 SCENE IR code setting, Advanced setup 83 SCENE IR, Advanced setup 83 SCENE template selection 30 Searching..., Bluetooth status message 92 Selection, Audio input jacks 36 ...CH INPUT component ...... 36 Selection, Preset station, FM/AM tuning 47 Selection, SCENE template 30 SET MENU 63 Setting remote control codes 78 Setting SCENE template input source, Remote control 34 Set-top box connection 18 Shuffle, iPod controlling 60 SILENT CINEMA 41 SILENT CINEMA...
...60 Repeat, iPod controlling 60 Resetting the system 93 ■S S VIDEO jacks 13 SB L/R SP, Speaker settings 66 SCENE 7 SCENE IR code setting, Advanced setup 83 SCENE IR, Advanced setup 83 SCENE template selection 30 Searching..., Bluetooth status message 92 Selection, Audio input jacks 36 ...CH INPUT component ...... 36 Selection, Preset station, FM/AM tuning 47 Selection, SCENE template 30 SET MENU 63 Setting remote control codes 78 Setting SCENE template input source, Remote control 34 Set-top box connection 18 Shuffle, iPod controlling 60 SILENT CINEMA 41 SILENT CINEMA...

