
Owner's Manual
Page 2
... before the product is provided or the manufacturer's instructions have fallen into the outlet, try reversing the plug. Any mounting of power source indicated on the marking label. Quick stops, excessive force, and uneven surfaces may expose you to dangerous voltage or other similar...to constitute a risk of Graphical Symbols The lightning flash with them , paying particular attention to the operating instructions. 12 Grounding or Polarization - Power-supply cords should be fatal. 16 Overloading - This will fit into this product on a bed, sofa, rug, or other hazards. Do...
... before the product is provided or the manufacturer's instructions have fallen into the outlet, try reversing the plug. Any mounting of power source indicated on the marking label. Quick stops, excessive force, and uneven surfaces may expose you to dangerous voltage or other similar...to constitute a risk of Graphical Symbols The lightning flash with them , paying particular attention to the operating instructions. 12 Grounding or Polarization - Power-supply cords should be fatal. 16 Overloading - This will fit into this product on a bed, sofa, rug, or other hazards. Do...
Owner's Manual
Page 3
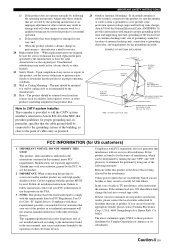
... measures do not produce satisfactory results, please contact the local retailer authorized to the instructions found to coaxial type cable. Utilize power outlets that are required, be sure the antenna or cable system is provided to call the CATV system installer's attention to ... parts are on different branch (circuit breaker or fuse) circuits or install AC line filter/s. Adjust only those products distributed by Yamaha Corporation of the NEC that provides guidelines for Class "B" digital devices. The product should be used replacement parts specified by the manufacturer...
... measures do not produce satisfactory results, please contact the local retailer authorized to the instructions found to coaxial type cable. Utilize power outlets that are required, be sure the antenna or cable system is provided to call the CATV system installer's attention to ... parts are on different branch (circuit breaker or fuse) circuits or install AC line filter/s. Adjust only those products distributed by Yamaha Corporation of the NEC that provides guidelines for Class "B" digital devices. The product should be used replacement parts specified by the manufacturer...
Owner's Manual
Page 4
...and General models only) The VOLTAGE SELECTOR on the rear panel of this unit must be exposed to liquid dripping or splashing. Contact qualified Yamaha service personnel when any reasons. 15 When not planning to use batteries of the same type. FOR CANADIAN CUSTOMERS To prevent electric shock,...et pousser jusqu'au fond. Burning objects (i.e. Voltages are incorrectly replaced. Retain this unit is designed to consume a very small quantity of power. Yamaha will not be held responsible for any damage resulting from use force on switches, knobs and/or cords. 10 When disconnecting the...
...and General models only) The VOLTAGE SELECTOR on the rear panel of this unit must be exposed to liquid dripping or splashing. Contact qualified Yamaha service personnel when any reasons. 15 When not planning to use batteries of the same type. FOR CANADIAN CUSTOMERS To prevent electric shock,...et pousser jusqu'au fond. Burning objects (i.e. Voltages are incorrectly replaced. Retain this unit is designed to consume a very small quantity of power. Yamaha will not be held responsible for any damage resulting from use force on switches, knobs and/or cords. 10 When disconnecting the...
Owner's Manual
Page 5
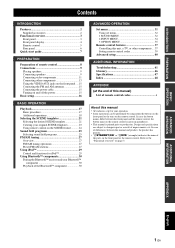
...13 Using the VIDEO AUX jacks on the front panel .... 15 Connecting the FM and AM antennas 15 Connecting the power cable 15 Turning on and off the power 15 Basic setup 16 BASIC OPERATION Playback 17 Basic procedure 17 Additional operations 18 Selecting the SCENE templates 21 Selecting the... 27 Preset FM/AM stations 27 Using iPod 29 Control and functions for iPod 29 Using Bluetooth™ components 30 Pairing the Bluetooth™ receiver and your Bluetooth™ component 30 Playback of the Bluetooth™ component 30 ADVANCED OPERATION Set menu 31 Using set menu 32 1 SOUND ...
...13 Using the VIDEO AUX jacks on the front panel .... 15 Connecting the FM and AM antennas 15 Connecting the power cable 15 Turning on and off the power 15 Basic setup 16 BASIC OPERATION Playback 17 Basic procedure 17 Additional operations 18 Selecting the SCENE templates 21 Selecting the... 27 Preset FM/AM stations 27 Using iPod 29 Control and functions for iPod 29 Using Bluetooth™ components 30 Pairing the Bluetooth™ receiver and your Bluetooth™ component 30 Playback of the Bluetooth™ component 30 ADVANCED OPERATION Set menu 31 Using set menu 32 1 SOUND ...
Owner's Manual
Page 6
...762;6,487,535 and other countries. iPod™ "iPod" is too late, Yamaha and the Electronic Industries Association's Consumer Electronics Group recommend you received all of your sensitive hearing. and other U.S. and, most out of the... following parts. ❏ Remote control ❏ Batteries (2) (AAA, R03, UM-4) ❏ AM loop antenna ❏ Indoor FM antenna 2 En Check that lets the sound come through loud and clear without affecting your equipment by Yamaha in 5-channel power...
...762;6,487,535 and other countries. iPod™ "iPod" is too late, Yamaha and the Electronic Industries Association's Consumer Electronics Group recommend you received all of your sensitive hearing. and other U.S. and, most out of the... following parts. ❏ Remote control ❏ Batteries (2) (AAA, R03, UM-4) ❏ AM loop antenna ❏ Indoor FM antenna 2 En Check that lets the sound come through loud and clear without affecting your equipment by Yamaha in 5-channel power...
Owner's Manual
Page 9
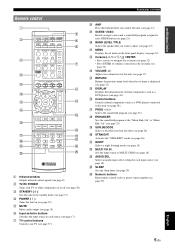
b TV/AV POWER Turns your TV (see page 37). c STANDBY ( ) Sets this ... mode (see page 17). v MULTI CH IN Sets the input source to adjust (see page 38). d POWER ( ) Turns this button before you want to MULTI CH IN (see page 15). f Input selector buttons ...u NIGHT Selects a night listening mode (see page 8). ADDITIONAL INFORMATION APPENDIX English 5 En INTRODUCTION PREPARATION BASIC OPERATION ADVANCED OPERATION Remote control a c b POWER POWER STANDBY POWER TV AV d A B C MUTE e CD MD/CD-R TUNER f DVD DTV/CBL DVR TV CH V-AUX/DOCK D E g h AMP TV INPUT TV...
b TV/AV POWER Turns your TV (see page 37). c STANDBY ( ) Sets this ... mode (see page 17). v MULTI CH IN Sets the input source to adjust (see page 38). d POWER ( ) Turns this button before you want to MULTI CH IN (see page 15). f Input selector buttons ...u NIGHT Selects a night listening mode (see page 8). ADDITIONAL INFORMATION APPENDIX English 5 En INTRODUCTION PREPARATION BASIC OPERATION ADVANCED OPERATION Remote control a c b POWER POWER STANDBY POWER TV AV d A B C MUTE e CD MD/CD-R TUNER f DVD DTV/CBL DVR TV CH V-AUX/DOCK D E g h AMP TV INPUT TV...

Owner's Manual
Page 10
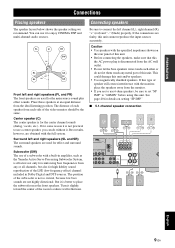
.... IN MD/ OUT (PLAY) CD-R (REC) OUTPUT SUB WOOFR FRONT A g h i a DOCK terminal Connect to the Yamaha iPod Universal Dock (such as YDS-11, sold separately) or Bluetooth Wireless Audio Receiver (such as YBA-10, sold separately) using its dedicated cable (see page 9). • FRONT A L/R • FRONT B...DVR IN jack • DVR OUT jack • MONITOR OUT jack e ANTENNA terminals Connect to a standard AC outlet (see page 15). 6 En k Power cable Connect to the supplied FM and AM antennas (see page 9). Functional overview Rear panel a b c d e f DOCK DIGITAL INPUT OPTICAL CD DTV/...
.... IN MD/ OUT (PLAY) CD-R (REC) OUTPUT SUB WOOFR FRONT A g h i a DOCK terminal Connect to the Yamaha iPod Universal Dock (such as YDS-11, sold separately) or Bluetooth Wireless Audio Receiver (such as YBA-10, sold separately) using its dedicated cable (see page 9). • FRONT A L/R • FRONT B...DVR IN jack • DVR OUT jack • MONITOR OUT jack e ANTENNA terminals Connect to a standard AC outlet (see page 15). 6 En k Power cable Connect to the supplied FM and AM antennas (see page 9). Functional overview Rear panel a b c d e f DOCK DIGITAL INPUT OPTICAL CD DTV/...

Owner's Manual
Page 11
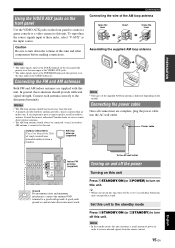
... video components ☞P. 13 • Connecting a multi-format player or an external decoder ☞P. 14 • Connecting a Yamaha iPod universal dock or Bluetooth Wireless Audio Receiver ☞P. 14 • Using the VIDEO AUX jacks on the front panel ☞P. 15 • Connecting the FM and ...AM antennas ☞P. 15 Step 4: Turn on the power Connect the power cable and turn on this unit. • Connecting the power cable •...
... video components ☞P. 13 • Connecting a multi-format player or an external decoder ☞P. 14 • Connecting a Yamaha iPod universal dock or Bluetooth Wireless Audio Receiver ☞P. 14 • Using the VIDEO AUX jacks on the front panel ☞P. 15 • Connecting the FM and ...AM antennas ☞P. 15 Step 4: Turn on the power Connect the power cable and turn on this unit. • Connecting the power cable •...
Owner's Manual
Page 13
... some reason it is disconnected from any metal part of this type of the LFE (low-frequency effect) channel included in amplifier, such as the Yamaha Active Servo Processing Subwoofer System, is not practical to use of the video monitor should be sure to place the subwoofer near the front speakers.... Subwoofer (SW) The use a center speaker, you are faulty, this the AC power plug is better to set "SP IMP." But it is effective not only for details on the rear panel of the room to connect the...
... some reason it is disconnected from any metal part of this type of the LFE (low-frequency effect) channel included in amplifier, such as the Yamaha Active Servo Processing Subwoofer System, is not practical to use of the video monitor should be sure to place the subwoofer near the front speakers.... Subwoofer (SW) The use a center speaker, you are faulty, this the AC power plug is better to set "SP IMP." But it is effective not only for details on the rear panel of the room to connect the...
Owner's Manual
Page 19
... at the PORTABLE mini jack take priority over the ones input at these antennas should provide sufficient signal strength. Connect each antenna correctly to receive infrared signals from this unit. Notes • The AM loop antenna should always be a 4 to 5-second delay before making connections....console or a video camera to this unit and other components before this unit consumes a small amount of power in order to the designated terminals. Consult the nearest authorized Yamaha dealer or service center about outdoor antennas. • The AM loop antenna should be placed away from ...
... at the PORTABLE mini jack take priority over the ones input at these antennas should provide sufficient signal strength. Connect each antenna correctly to receive infrared signals from this unit. Notes • The AM loop antenna should always be a 4 to 5-second delay before making connections....console or a video camera to this unit and other components before this unit consumes a small amount of power in order to the designated terminals. Consult the nearest authorized Yamaha dealer or service center about outdoor antennas. • The AM loop antenna should be placed away from ...
Owner's Manual
Page 28
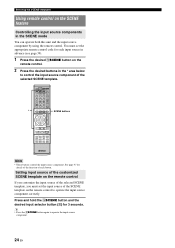
y • Press the iSCENE button again to control the input source component of the selected SCENE template. * POWER POWER STANDBY POWER TV AV A B C MUTE CD MD/CD-R TUNER DVD DTV/CBL DVR TV CH V-AUX/DOCK D E AMP TV INPUT TV MUTE TV VOL SCENE 1 2 3 4 BAND LEVEL TITLE MENU ...
y • Press the iSCENE button again to control the input source component of the selected SCENE template. * POWER POWER STANDBY POWER TV AV A B C MUTE CD MD/CD-R TUNER DVD DTV/CBL DVR TV CH V-AUX/DOCK D E AMP TV INPUT TV MUTE TV VOL SCENE 1 2 3 4 BAND LEVEL TITLE MENU ...
Owner's Manual
Page 29
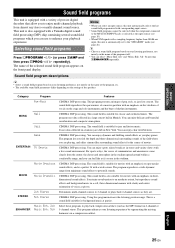
...channel or 5-channel stereo. CINEMA DSP processing. ADVANCED OPERATION ADDITIONAL INFORMATION APPENDIX English 25 En This unit is a perfect fit with a Yamaha digital sound field processing (DSP) chip containing several sound field programs which you play back compression artifacts (such as pivots. Sound field... and variety shows with clarity and center orientation of the field where you are playing, and offers cinema-like as you can use to powerful sounds. Selecting sound field programs Press LPROGRAM l / h (or press hAMP and then press qPROG l / h repeatedly). You can ...
...channel or 5-channel stereo. CINEMA DSP processing. ADVANCED OPERATION ADDITIONAL INFORMATION APPENDIX English 25 En This unit is a perfect fit with a Yamaha digital sound field processing (DSP) chip containing several sound field programs which you play back compression artifacts (such as pivots. Sound field... and variety shows with clarity and center orientation of the field where you are playing, and offers cinema-like as you can use to powerful sounds. Selecting sound field programs Press LPROGRAM l / h (or press hAMP and then press qPROG l / h repeatedly). You can ...
Owner's Manual
Page 33
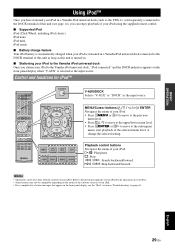
ADVANCED OPERATION ADDITIONAL INFORMATION APPENDIX English 29 En Refer to the instruction manuals of your iPod for iPod™ POWER POWER STANDBY POWER TV AV A B C MUTE CD MD/CD-R TUNER DVD DTV/CBL DVR TV CH V-AUX/DOCK D E AMP TV INPUT TV MUTE TV VOL SCENE 1 2 3 4...DOCK Selects "V-AUX" or "DOCK" as the input source. INTRODUCTION PREPARATION BASIC OPERATION Using iPod™ Once you have stationed your iPod in a Yamaha iPod universal dock (such as the YDS-11, sold separately) connected to the DOCK terminal of this unit (see the "iPod" section in "...
ADVANCED OPERATION ADDITIONAL INFORMATION APPENDIX English 29 En Refer to the instruction manuals of your iPod for iPod™ POWER POWER STANDBY POWER TV AV A B C MUTE CD MD/CD-R TUNER DVD DTV/CBL DVR TV CH V-AUX/DOCK D E AMP TV INPUT TV MUTE TV VOL SCENE 1 2 3 4...DOCK Selects "V-AUX" or "DOCK" as the input source. INTRODUCTION PREPARATION BASIC OPERATION Using iPod™ Once you have stationed your iPod in a Yamaha iPod universal dock (such as the YDS-11, sold separately) connected to the DOCK terminal of this unit (see the "iPod" section in "...
Owner's Manual
Page 35
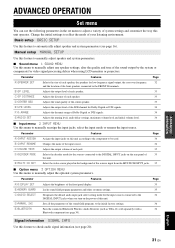
... unit operates. Sets all the parameters of the sound field programs to reflect the needs of your listening environment. Pairs the connected Bluetooth Wireless Audio Receiver (such as YBA-10, sold separately) with a Bluetooth component (see page 16). Change the initial settings to the initial factory settings. Adjusts the output level... from the MULTI CH INPUT jacks. 35 ■ Option menu 3 OPTION MENU Use this menu to the DIGITAL INPUT jacks when you turn on the power of this unit. Parameter A)DISPLAY SET B)MEMORY GUARD C)AUDIO SELECT D)PARAM.
... unit operates. Sets all the parameters of the sound field programs to reflect the needs of your listening environment. Pairs the connected Bluetooth Wireless Audio Receiver (such as YBA-10, sold separately) with a Bluetooth component (see page 16). Change the initial settings to the initial factory settings. Adjusts the output level... from the MULTI CH INPUT jacks. 35 ■ Option menu 3 OPTION MENU Use this menu to the DIGITAL INPUT jacks when you turn on the power of this unit. Parameter A)DISPLAY SET B)MEMORY GUARD C)AUDIO SELECT D)PARAM.
Owner's Manual
Page 38
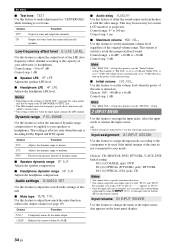
... HP LFE Adjusts the headphone LFE level. For example, if "INI.VOL." Use this feature to set to -30 dB when you turn on the power of this feature to adjust the output level of the LFE (lowfrequency effect) channel according to the capacity of the input source that appears on... name of your needs. Control range: 0* to +16 dB Control step: 1 dB Note • The "MAX VOL." is automatically set the volume level when the power of the original volume range. Choices: Off*, -80 dB to 160 ms Control step: 1 ms ■ Maximum volume MAX VOL. Choices: CD, MD/CD-R, DVD...
... HP LFE Adjusts the headphone LFE level. For example, if "INI.VOL." Use this feature to set to -30 dB when you turn on the power of this feature to adjust the output level of the LFE (lowfrequency effect) channel according to the capacity of the input source that appears on... name of your needs. Control range: 0* to +16 dB Control step: 1 dB Note • The "MAX VOL." is automatically set the volume level when the power of the original volume range. Choices: Off*, -80 dB to 160 ms Control step: 1 ms ■ Maximum volume MAX VOL. Choices: CD, MD/CD-R, DVD...
Owner's Manual
Page 41
... Notes *1 These buttons always control your TV. Changes the channel number. y • You can control more than one TV by Yamaha and other manufacturers. To control your TV only when fDTV/CBL is pressed. TV MUTE Mutes the audio output. *2 These buttons control... 1 2 ENHANCER SUR. TV VOL +/- Controlling this unit, a TV, or other components ■ Controlling this unit Press hAMP to control this unit. AMP *2 POWER POWER STANDBY POWER TV AV A B C MUTE CD MD/CD-R TUNER DVD DTV/CBL DVR TV CH V-AUX/DOCK D E AMP TV INPUT TV MUTE TV VOL SCENE 1 2 3...
... Notes *1 These buttons always control your TV. Changes the channel number. y • You can control more than one TV by Yamaha and other manufacturers. To control your TV only when fDTV/CBL is pressed. TV MUTE Mutes the audio output. *2 These buttons control... 1 2 ENHANCER SUR. TV VOL +/- Controlling this unit, a TV, or other components ■ Controlling this unit Press hAMP to control this unit. AMP *2 POWER POWER STANDBY POWER TV AV A B C MUTE CD MD/CD-R TUNER DVD DTV/CBL DVR TV CH V-AUX/DOCK D E AMP TV INPUT TV MUTE TV VOL SCENE 1 2 3...
Owner's Manual
Page 42
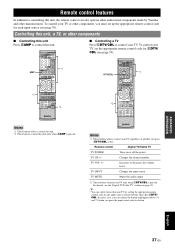
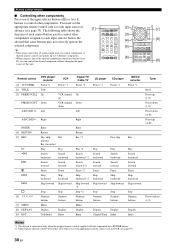
...component. Remote control features ■ Controlling other components. The following table shows the function of this unit. [1] POWER POWER STANDBY POWER TV AV A B C MUTE CD MD/CD-R TUNER DVD DTV/CBL DVR TV CH V-AUX/DOCK D E AMP ...6 7 8 MULTI CH IN AUDIO SEL 9 0 SLEEP 10 ENT [9] Remote control [1] AV POWER [2] TITLE [3] PRESET/CH k PRESET/CH n A/B/C/D/E l DVD player/ recorder VCR Power *1 Power *1 Title Up VCR channel up Down VCR channel down Left Digital TV/ Cable TV Power *2 Up Down Left A/B/C/D/E h Right Right ENTER [4] RETURN [5] REC p w f e...
...component. Remote control features ■ Controlling other components. The following table shows the function of this unit. [1] POWER POWER STANDBY POWER TV AV A B C MUTE CD MD/CD-R TUNER DVD DTV/CBL DVR TV CH V-AUX/DOCK D E AMP ...6 7 8 MULTI CH IN AUDIO SEL 9 0 SLEEP 10 ENT [9] Remote control [1] AV POWER [2] TITLE [3] PRESET/CH k PRESET/CH n A/B/C/D/E l DVD player/ recorder VCR Power *1 Power *1 Title Up VCR channel up Down VCR channel down Left Digital TV/ Cable TV Power *2 Up Down Left A/B/C/D/E h Right Right ENTER [4] RETURN [5] REC p w f e...
Owner's Manual
Page 43
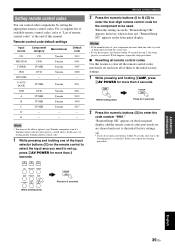
... can control other components by setting the appropriate remote control codes. Note • You may not be used. AMP POWER AV While holding one . • If you do not press any buttons within 30 seconds after step 1, the clearing process...settings Input source Component category Manufacturer Default code CD CD Yamaha 5013 MD/CD-R CD-R Yamaha 5001 TUNER TUNER Yamaha 5007 DVD DVD Yamaha 2000 DTV/CBL - - - V-AUX/ DOCK TUNER Yamaha 5011 DVR DVR Yamaha 2011 A TUNER Yamaha 5012 B TUNER Yamaha 5009 C TUNER Yamaha 5017 D - - - A B C 2 Press ...
... can control other components by setting the appropriate remote control codes. Note • You may not be used. AMP POWER AV While holding one . • If you do not press any buttons within 30 seconds after step 1, the clearing process...settings Input source Component category Manufacturer Default code CD CD Yamaha 5013 MD/CD-R CD-R Yamaha 5001 TUNER TUNER Yamaha 5007 DVD DVD Yamaha 2000 DTV/CBL - - - V-AUX/ DOCK TUNER Yamaha 5011 DVR DVR Yamaha 2011 A TUNER Yamaha 5012 B TUNER Yamaha 5009 C TUNER Yamaha 5017 D - - - A B C 2 Press ...
Owner's Manual
Page 45
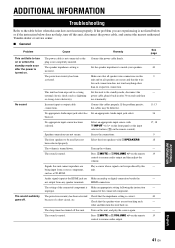
... OPERATION ADDITIONAL INFORMATION Troubleshooting Refer to the table below does not help, turn off this unit, disconnect the power cable, and contact the nearest authorized Yamaha dealer or service center. ■ General Problem Cause Remedy This unit fails to turn this unit back on.... Connect the power cable firmly. The sound is Make an appropriate setting following the instruction improper. Check that the...
... OPERATION ADDITIONAL INFORMATION Troubleshooting Refer to the table below does not help, turn off this unit, disconnect the power cable, and contact the nearest authorized Yamaha dealer or service center. ■ General Problem Cause Remedy This unit fails to turn this unit back on.... Connect the power cable firmly. The sound is Make an appropriate setting following the instruction improper. Check that the...
Owner's Manual
Page 46
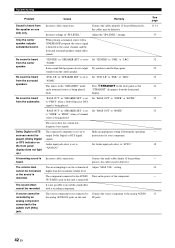
... speakers output effect sounds. No sound is not connected to Connect the source component to the analog AUDIO the analog AUDIO IN jacks on the power of the component. Some sound field programs do not output Try another sound field program. "BASS OUT" in "SPEAKER SET" is not possible to record...
... speakers output effect sounds. No sound is not connected to Connect the source component to the analog AUDIO the analog AUDIO IN jacks on the power of the component. Some sound field programs do not output Try another sound field program. "BASS OUT" in "SPEAKER SET" is not possible to record...


