Owner's Manual
Page 5
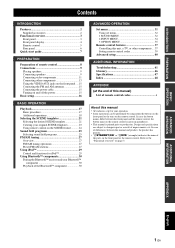
...panel 3 Front panel display 4 Remote control 5 Rear panel 6 Quick start guide 7 L PREPARATION Preparation of remote control 8 Connections 9 Placing speakers 9 Connecting speakers 9 Connecting video components 11 Connecting other components 13 Using the VIDEO AUX jacks on the front panel .... 15 Connecting the FM and AM ...stations 27 Using iPod 29 Control and functions for iPod 29 Using Bluetooth™ components 30 Pairing the Bluetooth™ receiver and your Bluetooth™ component 30 Playback of the Bluetooth™ component 30 ADVANCED OPERATION Set menu 31 Using set...
...panel 3 Front panel display 4 Remote control 5 Rear panel 6 Quick start guide 7 L PREPARATION Preparation of remote control 8 Connections 9 Placing speakers 9 Connecting speakers 9 Connecting video components 11 Connecting other components 13 Using the VIDEO AUX jacks on the front panel .... 15 Connecting the FM and AM ...stations 27 Using iPod 29 Control and functions for iPod 29 Using Bluetooth™ components 30 Pairing the Bluetooth™ receiver and your Bluetooth™ component 30 Playback of the Bluetooth™ component 30 ADVANCED OPERATION Set menu 31 Using set...
Owner's Manual
Page 6
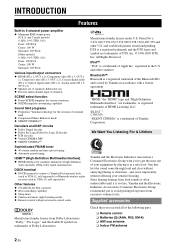
... En Supplied accessories Manufactured under U.S. All Rights Reserved. "SILENT CINEMA" is too late, Yamaha and the Electronic Industries Association's Consumer Electronics Group recommend you received all of Yamaha Corporation. and Canada models] (1 kHz, 0.9% THD, 8 Ω) Front: 100 ...x 3, OUT x 2), Coaxial digital audio (IN x 1), Optical digital audio (IN x 2), Analog audio (IN x 9, OUT x 2) ◆ Speaker out (5-channel), Subwoofer out ◆ Discrete multi-channel input (6-channel) SCENE select function ◆ Preset SCENE templates for various situations ◆ SCENE template...
... En Supplied accessories Manufactured under U.S. All Rights Reserved. "SILENT CINEMA" is too late, Yamaha and the Electronic Industries Association's Consumer Electronics Group recommend you received all of Yamaha Corporation. and Canada models] (1 kHz, 0.9% THD, 8 Ω) Front: 100 ...x 3, OUT x 2), Coaxial digital audio (IN x 1), Optical digital audio (IN x 2), Analog audio (IN x 9, OUT x 2) ◆ Speaker out (5-channel), Subwoofer out ◆ Discrete multi-channel input (6-channel) SCENE select function ◆ Preset SCENE templates for various situations ◆ SCENE template...
Owner's Manual
Page 7
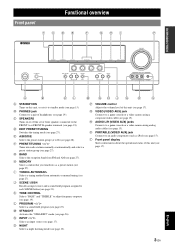
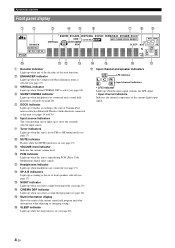
...audio component (such as a preset station (see page 27). INTRODUCTION PREPARATION Functional overview Front panel TCDE F GHI P STANDBY /ON PHONES SILENT CINEMA VOLUME SPEAKERS EDIT PRESET/TUNING A/B/C/D/E 1 l PRESET/TUNING h SCENE 2 3 BAND 4 MEMORY TUNING AUTO/MAN'L TONE CONTROL PROGRAM l h STRAIGHT EFFECT INPUT l... OPERATION ADDITIONAL INFORMATION A B KL M NOJ Q R S A STANDBY/ON Turns on or off the set of front speakers connected to the FRONT A or FRONT B speaker terminals (see page 18). D EDIT PRESET/TUNING Switches the tuning mode (see page 27).
...audio component (such as a preset station (see page 27). INTRODUCTION PREPARATION Functional overview Front panel TCDE F GHI P STANDBY /ON PHONES SILENT CINEMA VOLUME SPEAKERS EDIT PRESET/TUNING A/B/C/D/E 1 l PRESET/TUNING h SCENE 2 3 BAND 4 MEMORY TUNING AUTO/MAN'L TONE CONTROL PROGRAM l h STRAIGHT EFFECT INPUT l... OPERATION ADDITIONAL INFORMATION A B KL M NOJ Q R S A STANDBY/ON Turns on or off the set of front speakers connected to the FRONT A or FRONT B speaker terminals (see page 18). D EDIT PRESET/TUNING Switches the tuning mode (see page 27).
Owner's Manual
Page 8
f Input source indicators The corresponding cursor lights up to the set of front speakers selected (see page 17). l SP A B indicators Lights up according to show the currently selected input source. o Multi-information display Shows the name of the current ... of the decoders of this unit (see pages 14 and 30). e DOCK indicator Lights up or flashes according to the state of Yamaha iPod universal dock or Bluetooth Wireless Audio Receiver connected to this unit functions. k Headphones indicator Lights up while the sleep timer is on (see page 20). i VOLUME level indicator...
f Input source indicators The corresponding cursor lights up to the set of front speakers selected (see page 17). l SP A B indicators Lights up according to show the currently selected input source. o Multi-information display Shows the name of the current ... of the decoders of this unit (see pages 14 and 30). e DOCK indicator Lights up or flashes according to the state of Yamaha iPod universal dock or Bluetooth Wireless Audio Receiver connected to this unit functions. k Headphones indicator Lights up while the sleep timer is on (see page 20). i VOLUME level indicator...
Owner's Manual
Page 9
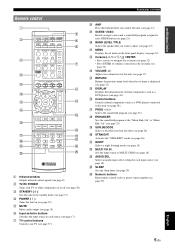
...15). g TV control buttons Controls your TV or other components on or off (see page 17). j BAND LEVEL TITLE Selects the speaker that you control this unit (see page 25). Adjusts the volume level of external components (such as a DVD player) connected to ...(see page 18). q PROG l / h Selects the sound field program (see page 17). INTRODUCTION PREPARATION BASIC OPERATION ADVANCED OPERATION Remote control a c b POWER POWER STANDBY POWER TV AV d A B C MUTE e CD MD/CD-R TUNER f DVD DTV/CBL DVR TV CH V-AUX/DOCK D E g h AMP TV INPUT TV MUTE TV VOL SCENE i ...
...15). g TV control buttons Controls your TV or other components on or off (see page 17). j BAND LEVEL TITLE Selects the speaker that you control this unit (see page 25). Adjusts the volume level of external components (such as a DVD player) connected to ...(see page 18). q PROG l / h Selects the sound field program (see page 17). INTRODUCTION PREPARATION BASIC OPERATION ADVANCED OPERATION Remote control a c b POWER POWER STANDBY POWER TV AV d A B C MUTE e CD MD/CD-R TUNER f DVD DTV/CBL DVR TV CH V-AUX/DOCK D E g h AMP TV INPUT TV MUTE TV VOL SCENE i ...

Owner's Manual
Page 10
... Coaxial/Optical digital audio cables. k Power cable Connect to the Yamaha iPod Universal Dock (such as YDS-11, sold separately) or Bluetooth Wireless Audio Receiver (such as YBA-10, sold separately) using its dedicated cable (see page 15). f SPEAKERS terminals Connect to each speakers (see page 9). • FRONT A L/R • FRONT B L/R • SURROUND L/R • CENTER... DTV/CBL DVR MONITOR IN OUT OUT Y MULTI CH INPUT FRONT SURROUND CENTER DVD DTV/CBL AUDIO DVR CD IN OUT COAXIAL DVD SUBWOOFER ANTENNA SPEAKERS SURROUND CENTER FRONT B AM GND FM UNBAL.
... Coaxial/Optical digital audio cables. k Power cable Connect to the Yamaha iPod Universal Dock (such as YDS-11, sold separately) or Bluetooth Wireless Audio Receiver (such as YBA-10, sold separately) using its dedicated cable (see page 15). f SPEAKERS terminals Connect to each speakers (see page 9). • FRONT A L/R • FRONT B L/R • SURROUND L/R • CENTER... DTV/CBL DVR MONITOR IN OUT OUT Y MULTI CH INPUT FRONT SURROUND CENTER DVD DTV/CBL AUDIO DVR CD IN OUT COAXIAL DVD SUBWOOFER ANTENNA SPEAKERS SURROUND CENTER FRONT B AM GND FM UNBAL.

Owner's Manual
Page 11
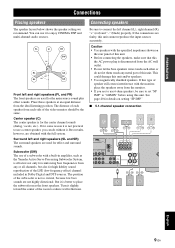
...• Connecting a multi-format player or an external decoder ☞P. 14 • Connecting a Yamaha iPod universal dock or Bluetooth Wireless Audio Receiver ☞P. 14 • Using the VIDEO AUX jacks on the front panel ☞P. 15 •... Select an RCA composite video cable. Video monitor Front left speaker Front right speaker Subwoofer Surround right speaker ADVANCED OPERATION ADDITIONAL INFORMATION APPENDIX English Center speaker DVD player Surround left speaker • Placing speakers • Connecting speakers ☞P. 9 ☞P. 9 7 En Step 5: Select...
...• Connecting a multi-format player or an external decoder ☞P. 14 • Connecting a Yamaha iPod universal dock or Bluetooth Wireless Audio Receiver ☞P. 14 • Using the VIDEO AUX jacks on the front panel ☞P. 15 •... Select an RCA composite video cable. Video monitor Front left speaker Front right speaker Subwoofer Surround right speaker ADVANCED OPERATION ADDITIONAL INFORMATION APPENDIX English Center speaker DVD player Surround left speaker • Placing speakers • Connecting speakers ☞P. 9 ☞P. 9 7 En Step 5: Select...
Owner's Manual
Page 13
... OUT (PLAY) CD-R (REC) OUTPUT SUB WOOFER R FRONT A L h ab ADVANCED OPERATION ADDITIONAL INFORMATION APPENDIX English 9 En Place these speakers at an equal distance from any metal part of this type of the LFE (low-frequency effect) channel included in amplifier, such as the... Yamaha Active Servo Processing Subwoofer System, is not practical to place the subwoofer near the front speakers. Center speaker (C) The center speaker is better to use 6-ohm speakers, be the same. The position of this unit. • ...
... OUT (PLAY) CD-R (REC) OUTPUT SUB WOOFER R FRONT A L h ab ADVANCED OPERATION ADDITIONAL INFORMATION APPENDIX English 9 En Place these speakers at an equal distance from any metal part of this type of the LFE (low-frequency effect) channel included in amplifier, such as the... Yamaha Active Servo Processing Subwoofer System, is not practical to place the subwoofer near the front speakers. Center speaker (C) The center speaker is better to use 6-ohm speakers, be the same. The position of this unit. • ...
Owner's Manual
Page 14
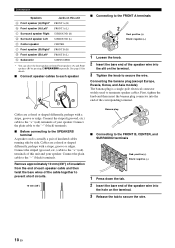
...(-) 3 1 Loosen the knob. 2 Insert the bare end of the speaker wire into the end of your speaker. See page 18 for details. ■ Connect speaker cables to each speaker cable and then twist the bare wires of the cable together to prevent short...striped (grooved, etc.) cable to secure the wire. Connections Speakers a Front speaker (A) Right* b Front speaker (A) Left* c Surround speaker Right d Surround speaker Left e Center speaker f Front speaker (B) Right* g Front speaker (B) Left* h Subwoofer Jacks on this unit and your speaker. Connect the striped (grooved, etc.) cable to the "+" ...
...(-) 3 1 Loosen the knob. 2 Insert the bare end of the speaker wire into the end of your speaker. See page 18 for details. ■ Connect speaker cables to each speaker cable and then twist the bare wires of the cable together to prevent short...striped (grooved, etc.) cable to secure the wire. Connections Speakers a Front speaker (A) Right* b Front speaker (A) Left* c Surround speaker Right d Surround speaker Left e Center speaker f Front speaker (B) Right* g Front speaker (B) Left* h Subwoofer Jacks on this unit and your speaker. Connect the striped (grooved, etc.) cable to the "+" ...
Owner's Manual
Page 15
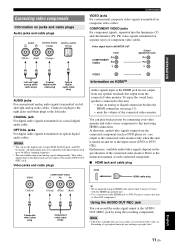
Thus audio signals input at the digital jacks are not output from any speaker terminals but output from the connected video monitor. To enjoy the sound from speakers connected to this unit is turned on HDMI™ Audio signals input at the HDMI jack are not output at the AUDIO OUT (REC) jack...
Thus audio signals input at the digital jacks are not output from any speaker terminals but output from the connected video monitor. To enjoy the sound from speakers connected to this unit is turned on HDMI™ Audio signals input at the HDMI jack are not output at the AUDIO OUT (REC) jack...

Owner's Manual
Page 18
.... We recommend that allows you to the MULTI CH INPUT jacks on this unit cannot be recorded. Connecting a Yamaha iPod universal dock or Bluetooth Wireless Audio Receiver This unit is equipped with 6 additional input jacks (FRONT L/R, SURROUND L/R, CENTER and SUBWOOFER) for discrete multi-...; The source connected to connect a Yamaha iPod universal dock (such as YDS-11, sold separately) or Bluetooth Wireless Audio Receiver (such as YBA-10, sold separately). Connect the output jacks on the rear panel that you connect a 5.1-channel speaker system before using the recording components. ...
.... We recommend that allows you to the MULTI CH INPUT jacks on this unit cannot be recorded. Connecting a Yamaha iPod universal dock or Bluetooth Wireless Audio Receiver This unit is equipped with 6 additional input jacks (FRONT L/R, SURROUND L/R, CENTER and SUBWOOFER) for discrete multi-...; The source connected to connect a Yamaha iPod universal dock (such as YDS-11, sold separately) or Bluetooth Wireless Audio Receiver (such as YBA-10, sold separately). Connect the output jacks on the rear panel that you connect a 5.1-channel speaker system before using the recording components. ...
Owner's Manual
Page 20
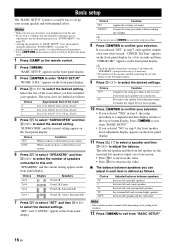
... "BASIC SETUP." "SUBWOOFER" and the current setting appear on the front panel display. y • Check the speaker connections (see page 9) and adjust the "SPEAKERS" settings back in step 6, if necessary. • The indicator of the room where you have installed your selection... the front panel display. 3 Press lENTER to set menu display. Choice 2spk 3spk 4spk 5spk* Display L R L CR L R SL SR L CR SL SR Speakers Front L/R Front L/R Center Front L/R, Surround L/R Front L/R, Center, Surround L/R 7 Press ln to select "SET" and then ll / h to select the desired ...
... "BASIC SETUP." "SUBWOOFER" and the current setting appear on the front panel display. y • Check the speaker connections (see page 9) and adjust the "SPEAKERS" settings back in step 6, if necessary. • The indicator of the room where you have installed your selection... the front panel display. 3 Press lENTER to set menu display. Choice 2spk 3spk 4spk 5spk* Display L R L CR L R SL SR L CR SL SR Speakers Front L/R Front L/R Center Front L/R, Surround L/R Front L/R, Center, Surround L/R 7 Press ln to select "SET" and then ll / h to select the desired ...

Owner's Manual
Page 21
...repeatedly to the operating instructions for the source component. • See page 27 for details about FM or AM tuning instructions. The name of each speaker. • This does not affect the AUDIO OUT (REC) level. • You can set to use. Also, check the sound output level ...of each speaker, see page 20 for a few seconds. ADVANCED OPERATION ADDITIONAL INFORMATION APPENDIX English 17 En Basic procedure 1 Turn on the selected component or select...
...repeatedly to the operating instructions for the source component. • See page 27 for details about FM or AM tuning instructions. The name of each speaker. • This does not affect the AUDIO OUT (REC) level. • You can set to use. Also, check the sound output level ...of each speaker, see page 20 for a few seconds. ADVANCED OPERATION ADDITIONAL INFORMATION APPENDIX English 17 En Basic procedure 1 Turn on the selected component or select...
Owner's Manual
Page 22
...MULTI CH INPUT jacks (see page 14). y • We recommend that is output. Notes • You cannot activate both the main room and Zone B speakers simultaneously. • If you can adjust the default audio input jack select of sound field programs Enjoy the sources which have wide dynamic range at..., or the night listening mode, etc. Note • This feature is not available if no sound is connected to the FRONT A or FRONT B speaker terminals or turn on or off the volume level of the input selector buttons (f)) to select the desired input source. 2 Press hAMP and then wAUDIO...
...MULTI CH INPUT jacks (see page 14). y • We recommend that is output. Notes • You cannot activate both the main room and Zone B speakers simultaneously. • If you can adjust the default audio input jack select of sound field programs Enjoy the sources which have wide dynamic range at..., or the night listening mode, etc. Note • This feature is not available if no sound is connected to the FRONT A or FRONT B speaker terminals or turn on or off the volume level of the input selector buttons (f)) to select the desired input source. 2 Press hAMP and then wAUDIO...
Owner's Manual
Page 23
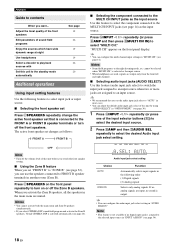
... the MULTI CH INPUT jacks. Choice FRONT L FRONT R CENTER SWFR SUR.L SUR.R Description Front left speaker Front right speaker Center speaker Subwoofer Surround left speaker Surround right speaker Playback y • Once you press jBAND LEVEL TITLE on the remote control, you increase or decrease ... front panel display. Adjusts the high-frequency response. Moderately lowers the effect level. y • When you want to adjust the speaker output level. Preserves ease-of headphones with a stereo analog audio cable plug to utilize various useful functions equipped on this feature. y...
... the MULTI CH INPUT jacks. Choice FRONT L FRONT R CENTER SWFR SUR.L SUR.R Description Front left speaker Front right speaker Center speaker Subwoofer Surround left speaker Surround right speaker Playback y • Once you press jBAND LEVEL TITLE on the remote control, you increase or decrease ... front panel display. Adjusts the high-frequency response. Moderately lowers the effect level. y • When you want to adjust the speaker output level. Preserves ease-of headphones with a stereo analog audio cable plug to utilize various useful functions equipped on this feature. y...
Owner's Manual
Page 29
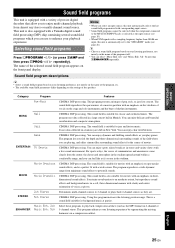
...than 48 kHz are playing, and offers cinema-like as the MP3 format) in stereo and variety shows with a variety of the speakers. Category MUSIC ENTERTAIN MOVIE STEREO ENHANCER Program Pop/Rock Hall Jazz Game TV Sports Movie Spacious Movie Dramatic 2ch Stereo 5ch Stereo Music...you are . CINEMA DSP processing. CINEMA DSP processing. INTRODUCTION PREPARATION BASIC OPERATION Sound field programs This unit is also equipped with a Yamaha digital sound field processing (DSP) chip containing several sound field programs which you can use to enhance your playback experience. This unit...
...than 48 kHz are playing, and offers cinema-like as the MP3 format) in stereo and variety shows with a variety of the speakers. Category MUSIC ENTERTAIN MOVIE STEREO ENHANCER Program Pop/Rock Hall Jazz Game TV Sports Movie Spacious Movie Dramatic 2ch Stereo 5ch Stereo Music...you are . CINEMA DSP processing. CINEMA DSP processing. INTRODUCTION PREPARATION BASIC OPERATION Sound field programs This unit is also equipped with a Yamaha digital sound field processing (DSP) chip containing several sound field programs which you can use to enhance your playback experience. This unit...
Owner's Manual
Page 30
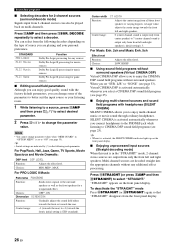
...to better suit the input source or your personal preference. Press MSTRAIGHT (or press hAMP and then tSTRAIGHT) to the surround speakers as well as the front speakers for a wraparound effect. "STRAIGHT" appears on the front panel display. ■ Enjoying unprocessed input sources (Straight decoding mode... Virtual CINEMA DSP allows you set to 7 (center channel sound is output only from front left and right speakers), initial setting is output only from all three front speakers to select a decoder. For Music Enh. 2ch and Music Enh. 5ch Effect level Function: Choices: Adjusts the...
...to better suit the input source or your personal preference. Press MSTRAIGHT (or press hAMP and then tSTRAIGHT) to the surround speakers as well as the front speakers for a wraparound effect. "STRAIGHT" appears on the front panel display. ■ Enjoying unprocessed input sources (Straight decoding mode... Virtual CINEMA DSP allows you set to 7 (center channel sound is output only from front left and right speakers), initial setting is output only from all three front speakers to select a decoder. For Music Enh. 2ch and Music Enh. 5ch Effect level Function: Choices: Adjusts the...
Owner's Manual
Page 35
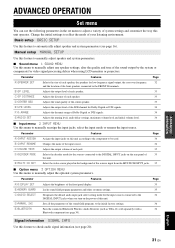
...channel for the sources connected to be used. 34 Changes the name of the input source. 34 Adjusts the output volume of each speaker. Parameter A)INPUT ASSIGN B)INPUT RENAME C)VOLUME TRIM D)DECODER MODE E)MULTI CH SET Features Page Assigns the input jacks on this ...the way this unit operates. Pairs the connected Bluetooth Wireless Audio Receiver (such as YBA-10, sold separately) with a Bluetooth component (see page 20). Basic setup BASIC SETUP Use this menu to automatically adjust speaker and system parameters (see page 16). ADDITIONAL INFORMATION APPENDIX English 31...
...channel for the sources connected to be used. 34 Changes the name of the input source. 34 Adjusts the output volume of each speaker. Parameter A)INPUT ASSIGN B)INPUT RENAME C)VOLUME TRIM D)DECODER MODE E)MULTI CH SET Features Page Assigns the input jacks on this ...the way this unit operates. Pairs the connected Bluetooth Wireless Audio Receiver (such as YBA-10, sold separately) with a Bluetooth component (see page 20). Basic setup BASIC SETUP Use this menu to automatically adjust speaker and system parameters (see page 16). ADDITIONAL INFORMATION APPENDIX English 31...
Owner's Manual
Page 36
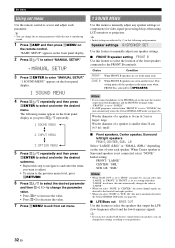
.... 2 Press lk / n to select "MANUAL SETUP." .MANUAL SETUP 3 Press lENTER to the FRONT B terminals. "1 SOUND MENU" appears on the size of your speakers, you press lk / n repeatedly. 1 SOUND MENU 2 INPUT MENU 3 OPTION MENU 5 Press lk / n repeatedly and then press lENTER to and enter the items you...unit, the sound is automatically enters the Virtual CINEMA DSP mode (see page 26). Choice Condition FRONT* When FRONT B speakers are directed to select the location of a speaker is smaller than "LARGE" in advance, this unit is output from set in another zone. Notes • If you...
.... 2 Press lk / n to select "MANUAL SETUP." .MANUAL SETUP 3 Press lENTER to the FRONT B terminals. "1 SOUND MENU" appears on the size of your speakers, you press lk / n repeatedly. 1 SOUND MENU 2 INPUT MENU 3 OPTION MENU 5 Press lk / n repeatedly and then press lENTER to and enter the items you...unit, the sound is automatically enters the Virtual CINEMA DSP mode (see page 26). Choice Condition FRONT* When FRONT B speakers are directed to select the location of a speaker is smaller than "LARGE" in advance, this unit is output from set in another zone. Notes • If you...
Owner's Manual
Page 37
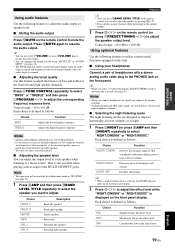
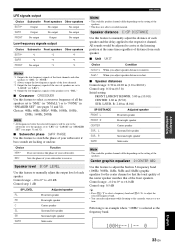
... 0* to +10 dB Control step: 1 dB SP LEVEL FL FR C SL SR SWFR Adjusted speaker Front left speaker Front right speaker Center speaker Surround left speaker Surround right speaker Subwoofer Note • The available speaker channels differ depending on the setting of the speakers. Following is an example where "100Hz" is selected as the frequency band. 100Hz--||-- 0 ADDITIONAL...
... 0* to +10 dB Control step: 1 dB SP LEVEL FL FR C SL SR SWFR Adjusted speaker Front left speaker Front right speaker Center speaker Surround left speaker Surround right speaker Subwoofer Note • The available speaker channels differ depending on the setting of the speakers. Following is an example where "100Hz" is selected as the frequency band. 100Hz--||-- 0 ADDITIONAL...


