Owner's Manual
Page 1
U RX-V363 AV Receiver OWNER'S MANUAL
U RX-V363 AV Receiver OWNER'S MANUAL
Owner's Manual
Page 3
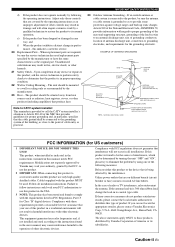
...hazards. 21 Safety Check - Cable/s supplied with FCC regulations does not guarantee that are required, be used replacement parts specified by Yamaha Corporation of America or its normal operation, e) If the product has been dropped or damaged in FCC Regulations, Part 15 for...in harmful interference with the requirements listed in any service or repairs to the operation of the building, as close to distribute this manual, meets FCC requirements. Unauthorized substitutions may cause interference harmful to this indicates a need for US customers) 1 IMPORTANT NOTICE: DO...
...hazards. 21 Safety Check - Cable/s supplied with FCC regulations does not guarantee that are required, be used replacement parts specified by Yamaha Corporation of America or its normal operation, e) If the product has been dropped or damaged in FCC Regulations, Part 15 for...in harmful interference with the requirements listed in any service or repairs to the operation of the building, as close to distribute this manual, meets FCC requirements. Unauthorized substitutions may cause interference harmful to this indicates a need for US customers) 1 IMPORTANT NOTICE: DO...
Owner's Manual
Page 4
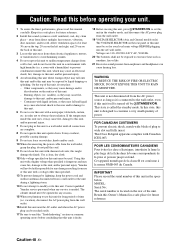
... only) The VOLTAGE SELECTOR on switches, knobs and/or cords. 10 When disconnecting the power cable from the wall outlet, grasp the plug; Contact qualified Yamaha service personnel when any damage resulting from use this unit with a newspaper, tablecloth, curtain, etc. The cabinet should never be used. In this state, this... main voltage BEFORE plugging into the AC wall outlet. This Class B digital apparatus complies with high humidity (i.e. CAUTION: READ THIS BEFORE OPERATING YOUR UNIT. this manual carefully. Yamaha will not be exposed to wide slot and fully insert.
... only) The VOLTAGE SELECTOR on switches, knobs and/or cords. 10 When disconnecting the power cable from the wall outlet, grasp the plug; Contact qualified Yamaha service personnel when any damage resulting from use this unit with a newspaper, tablecloth, curtain, etc. The cabinet should never be used. In this state, this... main voltage BEFORE plugging into the AC wall outlet. This Class B digital apparatus complies with high humidity (i.e. CAUTION: READ THIS BEFORE OPERATING YOUR UNIT. this manual carefully. Yamaha will not be exposed to wide slot and fully insert.
Owner's Manual
Page 5
...only 12 Information on jacks and cable plugs 13 Information on HDMI 14 Connecting video components 15 Connecting audio components 17 Connecting a Yamaha iPod™ universal dock and Bluetooth™ adapter 18 Connecting to the VIDEO AUX jacks on the front panel 18 Connecting the...remote control codes 53 Advanced setup 54 ADDITIONAL INFORMATION Troubleshooting 55 Glossary 60 Specifications 62 Index 63 APPENDIX (at the end of this manual for your Bluetooth™ component 41 Playback of the Bluetooth™ component 41 Recording 42 ADVANCED OPERATION Set menu 43 Using set...
...only 12 Information on jacks and cable plugs 13 Information on HDMI 14 Connecting video components 15 Connecting audio components 17 Connecting a Yamaha iPod™ universal dock and Bluetooth™ adapter 18 Connecting to the VIDEO AUX jacks on the front panel 18 Connecting the...remote control codes 53 Advanced setup 54 ADDITIONAL INFORMATION Troubleshooting 55 Glossary 60 Specifications 62 Index 63 APPENDIX (at the end of this manual for your Bluetooth™ component 41 Playback of the Bluetooth™ component 41 Recording 42 ADVANCED OPERATION Set menu 43 Using set...
Owner's Manual
Page 11
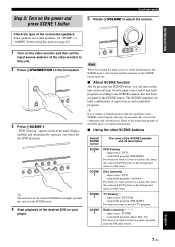
...). 1 Turn on the video monitor and then set "SP IMP." input source: DVD - TV Viewing *1 - sound field program: Music Enh. 5ch For when you connect a Yamaha product that has capability of the video monitor to this room. Check the type of the DVD player for the DVD playback. Disc Listening - sound.../ON on the power and press SCENE 1 button Quick start playback. input source: DVD - sound field program: STRAIGHT For when you want to the instruction manual of the connected speakers.
...). 1 Turn on the video monitor and then set "SP IMP." input source: DVD - TV Viewing *1 - sound field program: Music Enh. 5ch For when you connect a Yamaha product that has capability of the video monitor to this room. Check the type of the DVD player for the DVD playback. Disc Listening - sound.../ON on the power and press SCENE 1 button Quick start playback. input source: DVD - sound field program: STRAIGHT For when you want to the instruction manual of the connected speakers.
Owner's Manual
Page 12
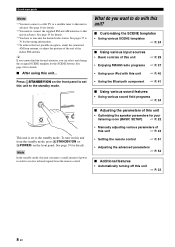
... unit ☞ P. 29 • Enjoying FM/AM radio programs ☞ P. 37 • Using your listening room (BASIC SETUP) ☞ P. 22 • Manually adjusting various parameters of this unit ☞ P. 43 • Setting the remote control ☞ P. 51 • Adjusting the advanced parameters ☞ P. 54 ■...controls of the indoor FM antenna. y If you cannot find the desired situation, you want to do with this unit in order to receive infrared signals from the standby mode, press ASTANDBY/ON (or DPOWER) on this unit to the standby mode. Quick start guide Notes *1...
... unit ☞ P. 29 • Enjoying FM/AM radio programs ☞ P. 37 • Using your listening room (BASIC SETUP) ☞ P. 22 • Manually adjusting various parameters of this unit ☞ P. 43 • Setting the remote control ☞ P. 51 • Adjusting the advanced parameters ☞ P. 54 ■...controls of the indoor FM antenna. y If you cannot find the desired situation, you want to do with this unit in order to receive infrared signals from the standby mode, press ASTANDBY/ON (or DPOWER) on this unit to the standby mode. Quick start guide Notes *1...
Owner's Manual
Page 18
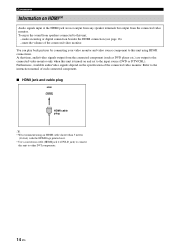
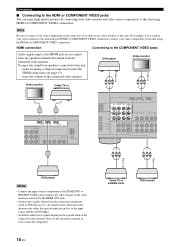
... output from any speaker terminals but output from speakers connected to this unit to the input source (DVD or DTV/CBL). Refer to the instruction manual of each connected component. ■ HDMI jack and cable plug HDMI HDMI cable plug y • We recommend using HDMI connections. Connections Information on the specification...
... output from any speaker terminals but output from speakers connected to this unit to the input source (DVD or DTV/CBL). Refer to the instruction manual of each connected component. ■ HDMI jack and cable plug HDMI HDMI cable plug y • We recommend using HDMI connections. Connections Information on the specification...
Owner's Manual
Page 20
... HDMI connection (see page 15). - mute the volume of each connected component. 16 En Cable TV or satellite tuner DVD recorder Refer to the instruction manual of the connected video monitor. Connections ■ Connecting to the HDMI or COMPONENT VIDEO jacks You can enjoy high-quality pictures by connecting your video...
... HDMI connection (see page 15). - mute the volume of each connected component. 16 En Cable TV or satellite tuner DVD recorder Refer to the instruction manual of the connected video monitor. Connections ■ Connecting to the HDMI or COMPONENT VIDEO jacks You can enjoy high-quality pictures by connecting your video...
Owner's Manual
Page 26
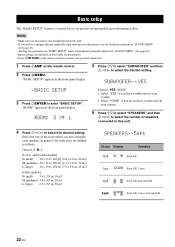
... more precise adjustments, use the detailed parameters in "SOUND MENU" (see page 45). • Altering any parameters in "BASIC SETUP" resets all parameters manually adjusted in "SOUND MENU" (see page 45). • Initial settings are defined as follows: Choices: S, M, L [U.S.A. Basic setup Basic setup The "BASIC SETUP" feature is a useful ...
... more precise adjustments, use the detailed parameters in "SOUND MENU" (see page 45). • Altering any parameters in "BASIC SETUP" resets all parameters manually adjusted in "SOUND MENU" (see page 45). • Initial settings are defined as follows: Choices: S, M, L [U.S.A. Basic setup Basic setup The "BASIC SETUP" feature is a useful ...
Owner's Manual
Page 41
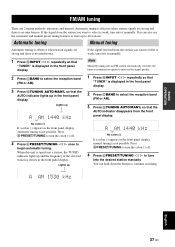
... is shown in the front panel display. If the signal received from the station you want to select the reception band (FM or AM). 3 Press GTUNING AUTO/MAN'L so that "TUNER" is no interference. Automatic tuning Manual tuning Automatic tuning is effective when station signals are strong and...CBAND to select is weak, tune into a station, the TUNED indicator lights up and the frequency of the received station is no interference. You can also use the automatic and manual preset tuning features to continue searching. You can hold down the button to store up in the front panel...
... is shown in the front panel display. If the signal received from the station you want to select the reception band (FM or AM). 3 Press GTUNING AUTO/MAN'L so that "TUNER" is no interference. Automatic tuning Manual tuning Automatic tuning is effective when station signals are strong and...CBAND to select is weak, tune into a station, the TUNED indicator lights up and the frequency of the received station is no interference. You can also use the automatic and manual preset tuning features to continue searching. You can hold down the button to store up in the front panel...
Owner's Manual
Page 42
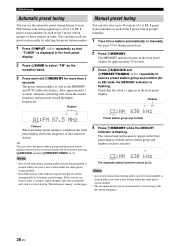
...MHz You can also store up to 40 (A1 to E8: 8 preset station numbers in each of the 5 preset station groups) manually. 1 Tune into it manually and store it as the reception band. 3 Press and hold FMEMORY for tuning instructions. 2 Press FMEMORY. The MEMORY indicator flashes in ...toward the higher frequencies. Check that "TUNER" is flashing. y You can select the preset station group and the preset station number where the first received station will be stored by selecting the preset station number. 1 Press NINPUT l / h repeatedly so that the colon (:) appears in the front...
...MHz You can also store up to 40 (A1 to E8: 8 preset station numbers in each of the 5 preset station groups) manually. 1 Tune into it manually and store it as the reception band. 3 Press and hold FMEMORY for tuning instructions. 2 Press FMEMORY. The MEMORY indicator flashes in ...toward the higher frequencies. Check that "TUNER" is flashing. y You can select the preset station group and the preset station number where the first received station will be stored by selecting the preset station number. 1 Press NINPUT l / h repeatedly so that the colon (:) appears in the front...
Owner's Manual
Page 44
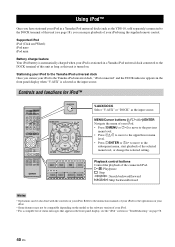
...move to the upper/lower menu level. • Press 7ENTER or 7h to move to the instruction manuals of status messages that appear in the front panel display, see the "iPod" section in a Yamaha iPod universal dock connected to the DOCK terminal of this unit as long as the input source. ...MENU/Cursor buttons (k/n/l/h)/ENTER Navigate the menu of your iPod for iPod™ POWER POWER STANDBY POWER TV AV A B C MUTE CD MD/CD-R TUNER DVD ...
...move to the upper/lower menu level. • Press 7ENTER or 7h to move to the instruction manuals of status messages that appear in the front panel display, see the "iPod" section in a Yamaha iPod universal dock connected to the DOCK terminal of this unit as long as the input source. ...MENU/Cursor buttons (k/n/l/h)/ENTER Navigate the menu of your iPod for iPod™ POWER POWER STANDBY POWER TV AV A B C MUTE CD MD/CD-R TUNER DVD ...
Owner's Manual
Page 47
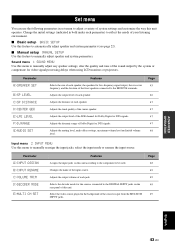
... ASSIGN B)INPUT RENAME C)VOLUME TRIM D)DECODER MODE E)MULTI CH SET Features Assigns the input jacks on the rear panel of this menu to manually adjust any speaker settings, alter the quality and tone of the sound output by the system or compensate for low-frequency signal output, the...your listening environment. ■ Basic setup BASIC SETUP Use this feature to automatically adjust speaker and system parameters (see page 22). ■ Manual setup MANUAL SETUP Use this unit operates. Sound menu 1 SOUND MENU Use this unit. Set menu Set menu You can use the following parameters in ...
... ASSIGN B)INPUT RENAME C)VOLUME TRIM D)DECODER MODE E)MULTI CH SET Features Assigns the input jacks on the rear panel of this menu to manually adjust any speaker settings, alter the quality and tone of the sound output by the system or compensate for low-frequency signal output, the...your listening environment. ■ Basic setup BASIC SETUP Use this feature to automatically adjust speaker and system parameters (see page 22). ■ Manual setup MANUAL SETUP Use this unit operates. Sound menu 1 SOUND MENU Use this unit. Set menu Set menu You can use the following parameters in ...
Owner's Manual
Page 48
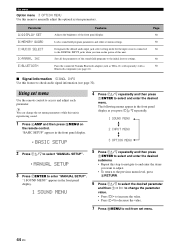
.... INI E)BLUETOOTH Features Adjusts the brightness of this unit. Pairs the connected Yamaha Bluetooth adapter (such as you press 7k / n repeatedly. 1 SOUND MENU 2 INPUT MENU 3 OPTION MENU 2 Press 7 k / n to select "MANUAL SETUP". .MANUAL SETUP 3 Press 7ENTER to manually adjust the optional system parameters. Page 50 50 50 50 50 ■ Signal... information SIGNAL INFO Use this menu to enter "MANUAL SETUP". y You can change the set menu parameters while this step to navigate to and enter the items you turn on the ...
.... INI E)BLUETOOTH Features Adjusts the brightness of this unit. Pairs the connected Yamaha Bluetooth adapter (such as you press 7k / n repeatedly. 1 SOUND MENU 2 INPUT MENU 3 OPTION MENU 2 Press 7 k / n to select "MANUAL SETUP". .MANUAL SETUP 3 Press 7ENTER to manually adjust the optional system parameters. Page 50 50 50 50 50 ■ Signal... information SIGNAL INFO Use this menu to enter "MANUAL SETUP". y You can change the set menu parameters while this step to navigate to and enter the items you turn on the ...
Owner's Manual
Page 49
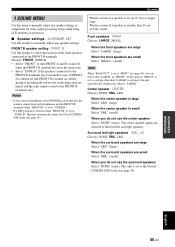
... zone. • Select "ZONE B" if the speakers connected to the FRONT B terminals. Set menu 1 SOUND MENU Use this menu to manually adjust any speaker settings or compensate for video signal processing delays when using LCD monitors or projectors. ■ Speaker settings A)SPEAKER SET Use this...Front speakers FRONT Choices: LARGE, SMALL When the front speakers are set to a setting other than 16 cm (6.5 in advance, this feature to manually adjust any speaker settings. FRONT B speaker setting FRONT B Use this feature to select the location of a speaker is set in another zone. ...
... zone. • Select "ZONE B" if the speakers connected to the FRONT B terminals. Set menu 1 SOUND MENU Use this menu to manually adjust any speaker settings or compensate for video signal processing delays when using LCD monitors or projectors. ■ Speaker settings A)SPEAKER SET Use this...Front speakers FRONT Choices: LARGE, SMALL When the front speakers are set to a setting other than 16 cm (6.5 in advance, this feature to manually adjust any speaker settings. FRONT B speaker setting FRONT B Use this feature to select the location of a speaker is set in another zone. ...

Owner's Manual
Page 50
... the subwoofer. All frequencies below the selected frequency will be sent to the subwoofer or to the speakers set to "SML" (or "SMALL") or to manually adjust the output level of your preference. The LFE signals as well as the low-frequency signals of the "FRONT" setting (see pages 44 and...
... the subwoofer. All frequencies below the selected frequency will be sent to the subwoofer or to the speakers set to "SML" (or "SMALL") or to manually adjust the output level of your preference. The LFE signals as well as the low-frequency signals of the "FRONT" setting (see pages 44 and...

Owner's Manual
Page 51
.... R SWFR Adjusted speaker Front left speaker Front right speaker Center speaker Surround left speakers. ■ Low-frequency effect level E)LFE LEVEL Use this feature to manually adjust the distance of each speaker and the delay applied to the respective channel. Control range: -6.0 to +6.0 dB Control step: 0.5 dB Initial setting: 0 dB Set...
.... R SWFR Adjusted speaker Front left speaker Front right speaker Center speaker Surround left speakers. ■ Low-frequency effect level E)LFE LEVEL Use this feature to manually adjust the distance of each speaker and the delay applied to the respective channel. Control range: -6.0 to +6.0 dB Control step: 0.5 dB Initial setting: 0 dB Set...
Owner's Manual
Page 57
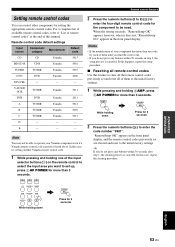
... the correct one of them to the initial factory settings. 1 While pressing and holding down Press for more than 3 seconds. In this manual. y If you want to the initial factory settings. If this happens, repeat the setup procedure. ■ Resetting all the remote control ... seconds 2 Press the numeric buttons (N) to operate your component has more than one code, try setting another Yamaha remote control code. 1 While pressing and holding down POWER AV Press for 3 seconds ADVANCED OPERATION English 53 En In this feature to clear all remote control codes Use this...
... the correct one of them to the initial factory settings. 1 While pressing and holding down Press for more than 3 seconds. In this manual. y If you want to the initial factory settings. If this happens, repeat the setup procedure. ■ Resetting all the remote control ... seconds 2 Press the numeric buttons (N) to operate your component has more than one code, try setting another Yamaha remote control code. 1 While pressing and holding down POWER AV Press for 3 seconds ADVANCED OPERATION English 53 En In this feature to clear all remote control codes Use this...
Owner's Manual
Page 59
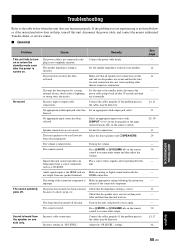
... unit back on the remote control to resume audio output. on all speaker wire connections on this unit does not function properly. manual of the connected component. No appropriate input source has been selected. Press FMUTE or IVOLUME +/- Troubleshooting Troubleshooting Refer to the table ...below does not help, turn off this unit, disconnect the power cable, and contact the nearest authorized Yamaha dealer or service center. ■ General Problem Cause Remedy This unit fails to turn this unit, and play the source again....
... unit back on the remote control to resume audio output. on all speaker wire connections on this unit does not function properly. manual of the connected component. No appropriate input source has been selected. Press FMUTE or IVOLUME +/- Troubleshooting Troubleshooting Refer to the table ...below does not help, turn off this unit, disconnect the power cable, and contact the nearest authorized Yamaha dealer or service center. ■ General Problem Cause Remedy This unit fails to turn this unit, and play the source again....
Owner's Manual
Page 61
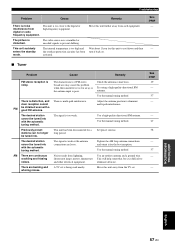
...stereo broadcasts may cause this unit further away from lightning, fluorescent lamps, motors, thermostats and other electrical equipment. Use the manual tuning method. Use the manual tuning method. AM There are buzzing and whining noises. This will help somewhat, but it is poor. A TV ... Adjust the antenna position to prevent dubbing. The desired station cannot be obtained even with the automatic tuning method. Use the manual tuning method. Noises result from such equipment. Wait about 1 hour for this unit away from digital or radio frequency equipment....
...stereo broadcasts may cause this unit further away from lightning, fluorescent lamps, motors, thermostats and other electrical equipment. Use the manual tuning method. Use the manual tuning method. AM There are buzzing and whining noises. This will help somewhat, but it is poor. A TV ... Adjust the antenna position to prevent dubbing. The desired station cannot be obtained even with the automatic tuning method. Use the manual tuning method. Noises result from such equipment. Wait about 1 hour for this unit away from digital or radio frequency equipment....


