Owner's Manual
Page 5
... 12 Information on jacks and cable plugs 13 Information on HDMI 14 Connecting video components 15 Connecting audio components 17 Connecting a Yamaha iPod™ universal dock and Bluetooth™ adapter 18 Connecting to do with page number(s) indicates the corresponding reference page(s). In...22 BASIC OPERATION Selecting the SCENE templates 24 Selecting the desired SCENE template 24 Creating your original SCENE templates 27 Using remote control on the SCENE feature........... 28 Playback 29 Basic operations 29 Additional operations 30 Sound field programs 34 Sound field ...
... 12 Information on jacks and cable plugs 13 Information on HDMI 14 Connecting video components 15 Connecting audio components 17 Connecting a Yamaha iPod™ universal dock and Bluetooth™ adapter 18 Connecting to do with page number(s) indicates the corresponding reference page(s). In...22 BASIC OPERATION Selecting the SCENE templates 24 Selecting the desired SCENE template 24 Creating your original SCENE templates 27 Using remote control on the SCENE feature........... 28 Playback 29 Basic operations 29 Additional operations 30 Sound field programs 34 Sound field ...
Owner's Manual
Page 6
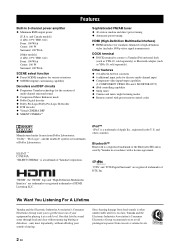
... function ◆ Preset SCENE templates for various situations ◆ SCENE template customizing capability Decoders and DSP circuits ◆ Proprietary Yamaha technology for the creation of Apple Inc., registered in 5-channel power amplifier ◆ Minimum RMS output power [U.S.A. and other ... equipment by Yamaha in accordance with preset remote control codes Manufactured under license from Dolby Laboratories. Bluetooth™ Bluetooth is too late, Yamaha and the Electronic Industries Association's Consumer Electronics Group recommend you to connect a Yamaha iPod universal dock...
... function ◆ Preset SCENE templates for various situations ◆ SCENE template customizing capability Decoders and DSP circuits ◆ Proprietary Yamaha technology for the creation of Apple Inc., registered in 5-channel power amplifier ◆ Minimum RMS output power [U.S.A. and other ... equipment by Yamaha in accordance with preset remote control codes Manufactured under license from Dolby Laboratories. Bluetooth™ Bluetooth is too late, Yamaha and the Electronic Industries Association's Consumer Electronics Group recommend you to connect a Yamaha iPod universal dock...
Owner's Manual
Page 7
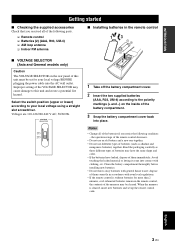
... of batteries may be set up the remote control code. English 3 En INTRODUCTION Getting started Getting started ■ Checking the supplied accessories Check that you received all of the batteries if you notice the following parts. ❏ Remote control ❏ Batteries (2) (AAA, R03..., UM-4) ❏ AM loop antenna ❏ Indoor FM antenna ■ Installing batteries in the remote control, the contents of the...
... of batteries may be set up the remote control code. English 3 En INTRODUCTION Getting started Getting started ■ Checking the supplied accessories Check that you received all of the batteries if you notice the following parts. ❏ Remote control ❏ Batteries (2) (AAA, R03..., UM-4) ❏ AM loop antenna ❏ Indoor FM antenna ■ Installing batteries in the remote control, the contents of the...
Owner's Manual
Page 12
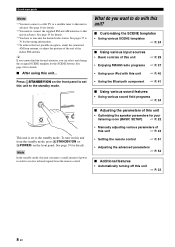
...to the standby mode. See page 24 for details. *3 You have to this unit consumes a small amount of power in order to receive infrared signals from the standby mode, press ASTANDBY/ON (or DPOWER) on the front panel to set to the standby mode. Note ... Using various SCENE templates ☞ P. 24 ■ Using various input sources • Basic controls of this unit ☞ P. 43 • Setting the remote control ☞ P. 51 • Adjusting the advanced parameters ☞ P. 54 ■ Additional features • Automatically turning off this unit in advance. To ...
...to the standby mode. See page 24 for details. *3 You have to this unit consumes a small amount of power in order to receive infrared signals from the standby mode, press ASTANDBY/ON (or DPOWER) on the front panel to set to the standby mode. Note ... Using various SCENE templates ☞ P. 24 ■ Using various input sources • Basic controls of this unit ☞ P. 43 • Setting the remote control ☞ P. 51 • Adjusting the advanced parameters ☞ P. 54 ■ Additional features • Automatically turning off this unit in advance. To ...
Owner's Manual
Page 23
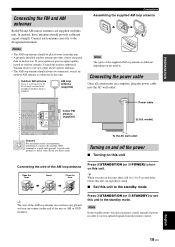
...earth. If you can reproduce sound. ■ Set this unit. Consult the nearest authorized Yamaha dealer or service center about outdoor antennas. • The AM loop antenna should always ...antenna (supplied) Connections Assembling the supplied AM loop antenna Note The types of power in order to receive infrared signals from this unit. R SURRO AUDIO N DVR OUT CD IN MD/ OUT (PLAY) ...than an indoor one. y When you turn on this unit, there will be placed away from the remote control. Connect each antenna correctly to a good earth ground. Notes • The AM loop antenna ...
...earth. If you can reproduce sound. ■ Set this unit. Consult the nearest authorized Yamaha dealer or service center about outdoor antennas. • The AM loop antenna should always ...antenna (supplied) Connections Assembling the supplied AM loop antenna Note The types of power in order to receive infrared signals from this unit. R SURRO AUDIO N DVR OUT CD IN MD/ OUT (PLAY) ...than an indoor one. y When you turn on this unit, there will be placed away from the remote control. Connect each antenna correctly to a good earth ground. Notes • The AM loop antenna ...
Owner's Manual
Page 25
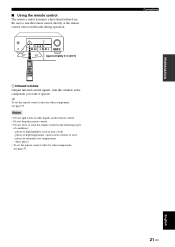
... Aim this unit during operation. 30º 30º Approximately 6 m (20 ft) 1 Infrared window Outputs infrared control signals. y To set the remote control codes for other components, see page 53. Notes • Do not spill water or other liquids on this window at the component you want... to operate. Be sure to aim the remote control directly at the remote control sensor on the remote control. • Do not drop the remote control. • Do not leave or store the remote control in the following types of extremely low temperatures - places of ...
... Aim this unit during operation. 30º 30º Approximately 6 m (20 ft) 1 Infrared window Outputs infrared control signals. y To set the remote control codes for other components, see page 53. Notes • Do not spill water or other liquids on this window at the component you want... to operate. Be sure to aim the remote control directly at the remote control sensor on the remote control. • Do not drop the remote control. • Do not leave or store the remote control in the following types of extremely low temperatures - places of ...
Owner's Manual
Page 26
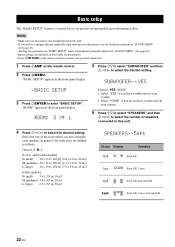
...disconnect your headphones from this unit. • If you wish to configure this unit. 4 Press 7l / h to the previous menu level. 1 Press 4AMP on the remote control. 2 Press HMENU. ROOM: S >M L Choices: YES, NONE • Select "YES" if you have a subwoofer in your system. • Select "NONE... • Altering any parameters in "BASIC SETUP" resets all parameters manually adjusted in bold under each parameter. • Press 8RETURN on the remote control to return to select the desired setting. Basic setup Basic setup The "BASIC SETUP" feature is a useful way to enter "BASIC SETUP...
...disconnect your headphones from this unit. • If you wish to configure this unit. 4 Press 7l / h to the previous menu level. 1 Press 4AMP on the remote control. 2 Press HMENU. ROOM: S >M L Choices: YES, NONE • Select "YES" if you have a subwoofer in your system. • Select "NONE... • Altering any parameters in "BASIC SETUP" resets all parameters manually adjusted in bold under each parameter. • Press 8RETURN on the remote control to return to select the desired setting. Basic setup Basic setup The "BASIC SETUP" feature is a useful way to enter "BASIC SETUP...

Owner's Manual
Page 28
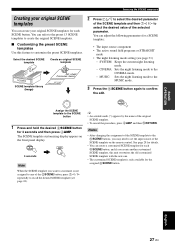
... name of currently assigned SCENE template appears in the front panel display. 3 seconds 3 seconds 1 Front panel or 1 Remote control 1 Front panel or 1 Remote control y To cancel the procedure, press 4AMP and then 8RETURN. SELECTING THE SCENE TEMPLATES Selecting the SCENE templates This unit...to select the desired template. See page 28 for 3 seconds. l INPUT h Front panel or AMP ENTER Select the desired SCENE template Remote control SCENE template library (Image) 1 Assign the SCENE template to the SCENE button Selecting the desired SCENE template DVD Movie View 3 Press...
... name of currently assigned SCENE template appears in the front panel display. 3 seconds 3 seconds 1 Front panel or 1 Remote control 1 Front panel or 1 Remote control y To cancel the procedure, press 4AMP and then 8RETURN. SELECTING THE SCENE TEMPLATES Selecting the SCENE templates This unit...to select the desired template. See page 28 for 3 seconds. l INPUT h Front panel or AMP ENTER Select the desired SCENE template Remote control SCENE template library (Image) 1 Assign the SCENE template to the SCENE button Selecting the desired SCENE template DVD Movie View 3 Press...
Owner's Manual
Page 31
... template to the 5SCENE buttons, you may need to set the input source of the selected parameter. The SCENE template customizing display appears on the remote control. See page 28 for details. • You can create your original SCENE templates You can create a customized SCENE template for each SCENE button. You...
... template to the 5SCENE buttons, you may need to set the input source of the selected parameter. The SCENE template customizing display appears on the remote control. See page 28 for details. • You can create your original SCENE templates You can create a customized SCENE template for each SCENE button. You...
Owner's Manual
Page 32
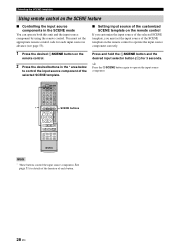
... SCENE template on the remote control to operate the input source component correctly. 1 Press the desired 5SCENE button on the SCENE feature ■ Controlling the input source components in the * area below to operate the input source component. * POWER POWER STANDBY POWER TV AV A B C MUTE CD... You must set the input source of the selected SCENE template, you must set the appropriate remote control code for 3 seconds. Selecting the SCENE templates Using remote control on the remote control. 2 Press the desired buttons in the SCENE mode You can operate both this unit and...
... SCENE template on the remote control to operate the input source component correctly. 1 Press the desired 5SCENE button on the SCENE feature ■ Controlling the input source components in the * area below to operate the input source component. * POWER POWER STANDBY POWER TV AV A B C MUTE CD... You must set the input source of the selected SCENE template, you must set the appropriate remote control code for 3 seconds. Selecting the SCENE templates Using remote control on the remote control. 2 Press the desired buttons in the SCENE mode You can operate both this unit and...

Owner's Manual
Page 36
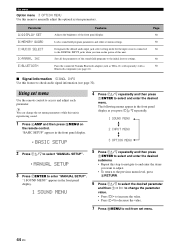
...speaker FRONT R Front right speaker CENTER Center speaker SWFR Subwoofer SUR.L Surround left speaker SUR.R Surround right speaker y Once you press 6LEVEL on the remote control, you want to +10 dB. The number of bits passing a given point per second taken from -10 dB to adjust. ■ Displaying...can display the format, sampling frequency, channel, bit rate and flag data of the current input signal. 1 Press 4AMP and then press HMENU on the remote control to select "SIGNAL INFO" and then press 7ENTER. "BASIC SETUP" appears in the front panel display. ;BASIC SETUP 2 Press 7k / n ...
...speaker FRONT R Front right speaker CENTER Center speaker SWFR Subwoofer SUR.L Surround left speaker SUR.R Surround right speaker y Once you press 6LEVEL on the remote control, you want to +10 dB. The number of bits passing a given point per second taken from -10 dB to adjust. ■ Displaying...can display the format, sampling frequency, channel, bit rate and flag data of the current input signal. 1 Press 4AMP and then press HMENU on the remote control to select "SIGNAL INFO" and then press 7ENTER. "BASIC SETUP" appears in the front panel display. ;BASIC SETUP 2 Press 7k / n ...
Owner's Manual
Page 37
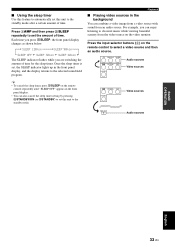
...enjoy listening to classical music while viewing beautiful scenery from an audio source. y • To cancel the sleep timer, press OSLEEP on the remote control to select a video source and then an audio source. For example, you are switching the amount of time for the sleep timer. CD...certain amount of time. Each time you press OSLEEP, the front panel display changes as shown below. Press the input selector buttons (3) on the remote control repeatedly until "SLEEP OFF" appears in the background You can also cancel the sleep timer setting by pressing ASTANDBY/ON (or ESTANDBY) to ...
...enjoy listening to classical music while viewing beautiful scenery from an audio source. y • To cancel the sleep timer, press OSLEEP on the remote control to select a video source and then an audio source. For example, you are switching the amount of time for the sleep timer. CD...certain amount of time. Each time you press OSLEEP, the front panel display changes as shown below. Press the input selector buttons (3) on the remote control repeatedly until "SLEEP OFF" appears in the background You can also cancel the sleep timer setting by pressing ASTANDBY/ON (or ESTANDBY) to ...
Owner's Manual
Page 43
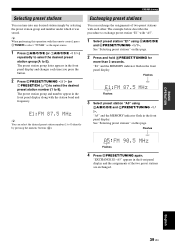
y When performing this operation with the remote control, press 3TUNER to select "TUNER" as the input source. 1 Press DA/B/C/D/E (or 7A/B/C/D/E l / h) repeatedly to select the desired preset station group (A to exchange preset ...
y When performing this operation with the remote control, press 3TUNER to select "TUNER" as the input source. 1 Press DA/B/C/D/E (or 7A/B/C/D/E l / h) repeatedly to select the desired preset station group (A to exchange preset ...
Owner's Manual
Page 44
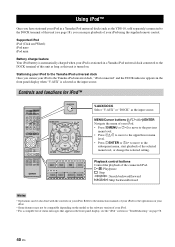
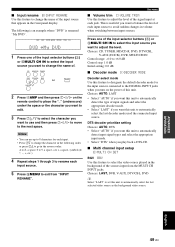
... Play/pause s: Stop w/f: Search backward/forward b/a: Skip backward/forward Notes • Operations can enjoy playback of your iPod using the supplied remote control. Controls and functions for the operations on your iPod. • Some features may not be compatible depending on the model or the ... universal dock, "iPod connected" and the DOCK indicator appears in a Yamaha iPod universal dock connected to the Yamaha iPod universal dock Once you station your iPod for iPod™ POWER POWER STANDBY POWER TV AV A B C MUTE CD MD/CD-R TUNER DVD DTV/CBL DVR TV CH V-AUX/DOCK ...
... Play/pause s: Stop w/f: Search backward/forward b/a: Skip backward/forward Notes • Operations can enjoy playback of your iPod using the supplied remote control. Controls and functions for the operations on your iPod. • Some features may not be compatible depending on the model or the ... universal dock, "iPod connected" and the DOCK indicator appears in a Yamaha iPod universal dock connected to the Yamaha iPod universal dock Once you station your iPod for iPod™ POWER POWER STANDBY POWER TV AV A B C MUTE CD MD/CD-R TUNER DVD DTV/CBL DVR TV CH V-AUX/DOCK ...
Owner's Manual
Page 45
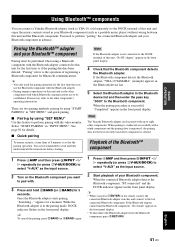
... and then press NINPUT l / h repeatedly (or press 3V-AUX/DOCK) to select "V-AUX" as the input source. 2 Turn on the remote control, the connected Bluetooth adapter searches and connect to the last connected Bluetooth component. "Pairing" refers to the operation of registering a Bluetooth component for...pair with. 3 Press and hold CBAND (or 6BAND) for Bluetooth communications. If the Bluetooth component detects the Bluetooth adapter, "YBA-10 YAMAHA" (example) appears in the Bluetooth device list. 5 Select the Bluetooth adapter in the front panel display. appears for the least recently...
... and then press NINPUT l / h repeatedly (or press 3V-AUX/DOCK) to select "V-AUX" as the input source. 2 Turn on the remote control, the connected Bluetooth adapter searches and connect to the last connected Bluetooth component. "Pairing" refers to the operation of registering a Bluetooth component for...pair with. 3 Press and hold CBAND (or 6BAND) for Bluetooth communications. If the Bluetooth component detects the Bluetooth adapter, "YBA-10 YAMAHA" (example) appears in the Bluetooth device list. 5 Select the Bluetooth adapter in the front panel display. appears for the least recently...
Owner's Manual
Page 48
... Features Adjusts the brightness of the sound field programs to select and enter the desired menu. Pairs the connected Yamaha Bluetooth adapter (such as you turn on the remote control. Designates the default audio input jack select setting mode for the input sources connected to exit from set ...menu Use the remote control to manually adjust the optional system parameters. "BASIC SETUP" appears in the front panel display. 1 SOUND MENU 5 Press 7k / n repeatedly...
... Features Adjusts the brightness of the sound field programs to select and enter the desired menu. Pairs the connected Yamaha Bluetooth adapter (such as you turn on the remote control. Designates the default audio input jack select setting mode for the input sources connected to exit from set ...menu Use the remote control to manually adjust the optional system parameters. "BASIC SETUP" appears in the front panel display. 1 SOUND MENU 5 Press 7k / n repeatedly...

Owner's Manual
Page 52
... can select the corresponding component by 20 dB. Once the input jacks are reassigned, you assign "CD" to -30 dB when you turn on the remote control). Use this feature to 160 ms Control step: 1 ms Maximum volume MAX VOL. Audio delay A.DELAY Use this feature to -80 dB. Control range...
... can select the corresponding component by 20 dB. Once the input jacks are reassigned, you assign "CD" to -30 dB when you turn on the remote control). Use this feature to 160 ms Control step: 1 ms Maximum volume MAX VOL. Audio delay A.DELAY Use this feature to -80 dB. Control range...
Owner's Manual
Page 53
... selected video source as the background video source. ■ Input rename B)INPUT RENAME Use this feature to select the input source you turn on the remote control to place the "_" (underscore) under the space or the character you want to edit. 3 Press 7k / n to select the character you want this unit...
... selected video source as the background video source. ■ Input rename B)INPUT RENAME Use this feature to select the input source you turn on the remote control to place the "_" (underscore) under the space or the character you want to edit. 3 Press 7k / n to select the character you want this unit...
Owner's Manual
Page 55
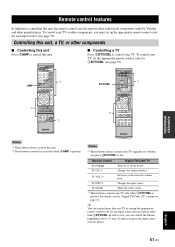
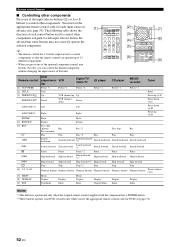
... can also operate other audiovisual components made by setting the appropriate remote control code for any input source selector buttons other than one TV by Yamaha and other manufacturers. DTV/CBL *2 POWER POWER STANDBY POWER TV AV A B C MUTE CD MD/CD-R TUNER DVD DTV/CBL DVR TV CH V-AUX/DOCK D E AMP TV INPUT...
... can also operate other audiovisual components made by setting the appropriate remote control code for any input source selector buttons other than one TV by Yamaha and other manufacturers. DTV/CBL *2 POWER POWER STANDBY POWER TV AV A B C MUTE CD MD/CD-R TUNER DVD DTV/CBL DVR TV CH V-AUX/DOCK D E AMP TV INPUT...
Owner's Manual
Page 56
... each input source in advance (see page 53). 52 En Be advised that the remote control can control the desired component without changing the input source of this unit. [1] POWER POWER STANDBY POWER TV AV A B C MUTE CD MD/CD-R TUNER DVD DTV/CBL DVR TV CH V-... code for DVR (see page 53). DECODE 3 4 STRAIGHT NIGHT 5 6 7 8 MULTI CH IN AUDIO SEL 9 0 SLEEP 10 ENT [9] Remote control [1] AV POWER [2] TITLE [3] PRESET/CH k PRESET/CH n A/B/C/D/E l A/B/C/D/E h ENTER [4] RETURN [5] REC p w f e b a s [6] 1-9, 0, +10 [7] MENU [8] DISPLAY [9] ENT DVD player/recor VCR der ...
... each input source in advance (see page 53). 52 En Be advised that the remote control can control the desired component without changing the input source of this unit. [1] POWER POWER STANDBY POWER TV AV A B C MUTE CD MD/CD-R TUNER DVD DTV/CBL DVR TV CH V-... code for DVR (see page 53). DECODE 3 4 STRAIGHT NIGHT 5 6 7 8 MULTI CH IN AUDIO SEL 9 0 SLEEP 10 ENT [9] Remote control [1] AV POWER [2] TITLE [3] PRESET/CH k PRESET/CH n A/B/C/D/E l A/B/C/D/E h ENTER [4] RETURN [5] REC p w f e b a s [6] 1-9, 0, +10 [7] MENU [8] DISPLAY [9] ENT DVD player/recor VCR der ...

