Owner's Manual
Page 5
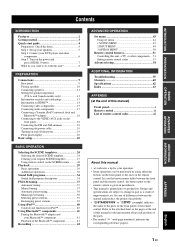
...ON" or "3DVD" (example) indicates the name of the parts on the power and press SCENE 1 button 7 What do with page number(s) indicates the corresponding reference page(s). ADDITIONAL INFORMATION APPENDIX ...™ component 41 Playback of the Bluetooth™ component 41 Recording 42 ADVANCED OPERATION Set menu 43 Using set menu 44 1 SOUND MENU 45 2 INPUT MENU 48 3 OPTION MENU 50 Remote ...13 Information on HDMI 14 Connecting video components 15 Connecting audio components 17 Connecting a Yamaha iPod™ universal dock and Bluetooth™ adapter 18 Connecting to change in ...
...ON" or "3DVD" (example) indicates the name of the parts on the power and press SCENE 1 button 7 What do with page number(s) indicates the corresponding reference page(s). ADDITIONAL INFORMATION APPENDIX ...™ component 41 Playback of the Bluetooth™ component 41 Recording 42 ADVANCED OPERATION Set menu 43 Using set menu 44 1 SOUND MENU 45 2 INPUT MENU 48 3 OPTION MENU 50 Remote ...13 Information on HDMI 14 Connecting video components 15 Connecting audio components 17 Connecting a Yamaha iPod™ universal dock and Bluetooth™ adapter 18 Connecting to change in ...
Owner's Manual
Page 8
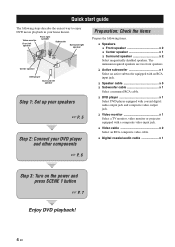
Video monitor Front left speaker Front right speaker Subwoofer Surround right speaker Center speaker DVD player Surround left speaker Step 1: Set up your speakers ☞ P. 5 Step 2: Connect your DVD player and other components Preparation: Check the items Prepare the following steps describe the easiest way to ... video input jack. ❏ Video cable x 2 Select an RCA composite video cable. ❏ Digital coaxial audio cable x 1 ☞ P. 6 Step 3: Turn on the power and press SCENE 1 button ☞ P. 7 Enjoy DVD playback! 4 En
Video monitor Front left speaker Front right speaker Subwoofer Surround right speaker Center speaker DVD player Surround left speaker Step 1: Set up your speakers ☞ P. 5 Step 2: Connect your DVD player and other components Preparation: Check the items Prepare the following steps describe the easiest way to ... video input jack. ❏ Video cable x 2 Select an RCA composite video cable. ❏ Digital coaxial audio cable x 1 ☞ P. 6 Step 3: Turn on the power and press SCENE 1 button ☞ P. 7 Enjoy DVD playback! 4 En
Owner's Manual
Page 11
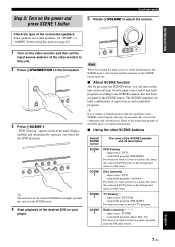
If the speakers are built combinations of input sources and sound field programs. y If you connect a Yamaha product that has been assigned to the SCENE button. Note When you want to listen to a music disc from the connected DVD player as the background music for this room. input... field program: STRAIGHT For when you can automatically activate the component and start guide 5 Rotate HVOLUME to adjust the volume. The SCENE templates are 6 ohm speakers, set the input source selector of the video monitor to this unit. 2 Press ASTANDBY/ON on this room. Refer to the instruction ...
If the speakers are built combinations of input sources and sound field programs. y If you connect a Yamaha product that has been assigned to the SCENE button. Note When you want to listen to a music disc from the connected DVD player as the background music for this room. input... field program: STRAIGHT For when you can automatically activate the component and start guide 5 Rotate HVOLUME to adjust the volume. The SCENE templates are 6 ohm speakers, set the input source selector of the video monitor to this unit. 2 Press ASTANDBY/ON on this room. Refer to the instruction ...
Owner's Manual
Page 12
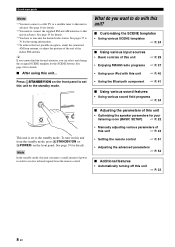
See page 16 for details. *2 You need to connect the supplied FM and AM antennas to this unit in order to receive infrared signals from the standby mode, press ASTANDBY/ON (or DPOWER) on the front panel. y If you cannot find the desired situation...Using various SCENE templates ☞ P. 24 ■ Using various input sources • Basic controls of this unit ☞ P. 29 • Enjoying FM/AM radio programs ☞ P. 37 • Using your listening room (BASIC SETUP) ☞ P. 22 • Manually adjusting various parameters of this unit ☞ P. 43 • Setting the ...
See page 16 for details. *2 You need to connect the supplied FM and AM antennas to this unit in order to receive infrared signals from the standby mode, press ASTANDBY/ON (or DPOWER) on the front panel. y If you cannot find the desired situation...Using various SCENE templates ☞ P. 24 ■ Using various input sources • Basic controls of this unit ☞ P. 29 • Enjoying FM/AM radio programs ☞ P. 37 • Using your listening room (BASIC SETUP) ☞ P. 22 • Manually adjusting various parameters of this unit ☞ P. 43 • Setting the ...

Owner's Manual
Page 28
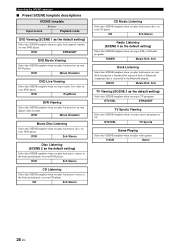
... the name of using this unit. Note Once the desired SCENE templates are assigned to each SCENE button: SCENE 1: DVD Viewing SCENE 2: Disc Listening SCENE 3: TV Viewing SCENE 4: Radio Listening If you want to use other SCENE templates, you may need to set the input source of the SCENE template on the front panel and the remote control. 2 Press...
... the name of using this unit. Note Once the desired SCENE templates are assigned to each SCENE button: SCENE 1: DVD Viewing SCENE 2: Disc Listening SCENE 3: TV Viewing SCENE 4: Radio Listening If you want to use other SCENE templates, you may need to set the input source of the SCENE template on the front panel and the remote control. 2 Press...
Owner's Manual
Page 30
...2ch Stereo Radio Listening (SCENE 4 as the back ground music on your iPod stationed in a Yamaha iPod universal dock or Bluetooth component that is connected to the Bluetooth adapter. DVD 2ch Stereo Disc Listening (SCENE 2 as the default setting) Select this SCENE template when you play back... music sources as the default setting) Select this SCENE template when you ...
...2ch Stereo Radio Listening (SCENE 4 as the back ground music on your iPod stationed in a Yamaha iPod universal dock or Bluetooth component that is connected to the Bluetooth adapter. DVD 2ch Stereo Disc Listening (SCENE 2 as the default setting) Select this SCENE template when you play back... music sources as the default setting) Select this SCENE template when you ...
Owner's Manual
Page 31
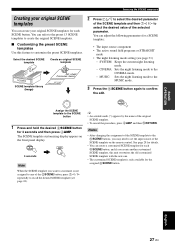
... for details. • You can create a customized SCENE template for each SCENE button. Select the desired SCENE template Create an original SCENE template SCENE : DVD Viewing INPUT : DVD SCENE : DVD Viewing SCENE template library (Image) 2 Press 7k / n to select the desired parameter of the SCENE template and then 7l / h to set the input source of the selected parameter. The...
... for details. • You can create a customized SCENE template for each SCENE button. Select the desired SCENE template Create an original SCENE template SCENE : DVD Viewing INPUT : DVD SCENE : DVD Viewing SCENE template library (Image) 2 Press 7k / n to select the desired parameter of the SCENE template and then 7l / h to set the input source of the selected parameter. The...
Owner's Manual
Page 32
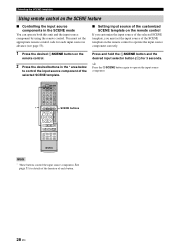
...you customize the input source of the selected SCENE template, you must set the input source of the selected SCENE template. Selecting the SCENE templates Using remote control on the SCENE feature ■ Controlling the input source ...components in the * area below to control the input source component of the SCENE template on the remote control to operate the input source component. * POWER POWER STANDBY POWER TV AV...
...you customize the input source of the selected SCENE template, you must set the input source of the selected SCENE template. Selecting the SCENE templates Using remote control on the SCENE feature ■ Controlling the input source ...components in the * area below to control the input source component of the SCENE template on the remote control to operate the input source component. * POWER POWER STANDBY POWER TV AV...

Owner's Manual
Page 34
The active front speaker set changes as follows: FRONT A FRONT B VOLUME STANDBY /ON PHONES SILENT CINEMA SPEAKERS A/B/OFF EDIT PRESET/TUNING BAND A/B/C/D/E 1 l PRESET/TUNING h SCENE 2 3 4 MEMORY TUNING AUTO/MAN'L TONE CONTROL l PROGRAM h STRAIGHT NIGHT l INPUT h AUDIO SELECT EFFECT VIDEO VIDEO AUX L AUDIO ...(or press 4AMP and then press BMULTI CH IN) so that "MULTI CH" appears in another room (Zone B). y Use "MULTI CH SET" menu in the front panel display when the audio output is automatically activated (see page 49). Notes • The input signals are output ...
The active front speaker set changes as follows: FRONT A FRONT B VOLUME STANDBY /ON PHONES SILENT CINEMA SPEAKERS A/B/OFF EDIT PRESET/TUNING BAND A/B/C/D/E 1 l PRESET/TUNING h SCENE 2 3 4 MEMORY TUNING AUTO/MAN'L TONE CONTROL l PROGRAM h STRAIGHT NIGHT l INPUT h AUDIO SELECT EFFECT VIDEO VIDEO AUX L AUDIO ...(or press 4AMP and then press BMULTI CH IN) so that "MULTI CH" appears in another room (Zone B). y Use "MULTI CH SET" menu in the front panel display when the audio output is automatically activated (see page 49). Notes • The input signals are output ...
Owner's Manual
Page 38
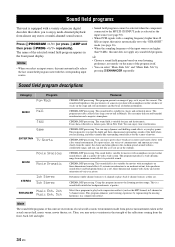
.... 5ch" by regenerating the missing harmonics in the front panel display. The program lets you feel like surrounding sound effects for the scenes of movies. This sound field is automatically set to the "STRAIGHT" mode (see page 30). • When PCM signals with a sampling frequency higher than 96 kHz, this program increases...
.... 5ch" by regenerating the missing harmonics in the front panel display. The program lets you feel like surrounding sound effects for the scenes of movies. This sound field is automatically set to the "STRAIGHT" mode (see page 30). • When PCM signals with a sampling frequency higher than 96 kHz, this program increases...
Owner's Manual
Page 44
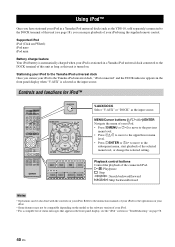
... source. Playback control buttons Control the playback of the selected menu level, or change the selected setting. Supported iPod iPod (Click and Wheel) iPod nano iPod mini Battery charge feature Your iPod battery...of this unit as long as the YDS-10, sold separately) connected to the Yamaha iPod universal dock, "iPod connected" and the DOCK indicator appears in the front ...iPod for iPod™ POWER POWER STANDBY POWER TV AV A B C MUTE CD MD/CD-R TUNER DVD DTV/CBL DVR TV CH V-AUX/DOCK D E AMP TV INPUT TV MUTE TV VOL SCENE 1 2 3 4 BAND LEVEL TITLE MENU VOLUME ENTER...
... source. Playback control buttons Control the playback of the selected menu level, or change the selected setting. Supported iPod iPod (Click and Wheel) iPod nano iPod mini Battery charge feature Your iPod battery...of this unit as long as the YDS-10, sold separately) connected to the Yamaha iPod universal dock, "iPod connected" and the DOCK indicator appears in the front ...iPod for iPod™ POWER POWER STANDBY POWER TV AV A B C MUTE CD MD/CD-R TUNER DVD DTV/CBL DVR TV CH V-AUX/DOCK D E AMP TV INPUT TV MUTE TV VOL SCENE 1 2 3 4 BAND LEVEL TITLE MENU VOLUME ENTER...

Owner's Manual
Page 51
... • Select "meters" to adjust speaker distances in meters. • Select "feet" to certain scenes. Headphone LFE HP LFE Adjusts the headphone LFE level. Control range: -6.0 to +6.0 dB Control step: 0.5 dB Initial setting: 0 dB Set menu y Press 7k / n to select a frequency band and 7l / h to 80.0 ft.... Speaker distances Control range: 0.30 to 24.00 m (1.0 to adjust the selected frequency band. L/SUR. Note Depending on the setting of the speakers. ■ Center graphic equalizer D)CENTER GEQ Use this feature to the respective channel. Headphone dynamic range HP D.R Adjusts...
... • Select "meters" to adjust speaker distances in meters. • Select "feet" to certain scenes. Headphone LFE HP LFE Adjusts the headphone LFE level. Control range: -6.0 to +6.0 dB Control step: 0.5 dB Initial setting: 0 dB Set menu y Press 7k / n to select a frequency band and 7l / h to 80.0 ft.... Speaker distances Control range: 0.30 to 24.00 m (1.0 to adjust the selected frequency band. L/SUR. Note Depending on the setting of the speakers. ■ Center graphic equalizer D)CENTER GEQ Use this feature to the respective channel. Headphone dynamic range HP D.R Adjusts...

Owner's Manual
Page 54
...and then press 7ENTER to start pairing the connected Yamaha Bluetooth adapter (such as YBA-10, sold separately) with your Bluetooth™ component" on the power of this feature to set all the parameters of 8 minutes is set for the input sources when you want this unit... the Bluetooth adapter, "YBA-10 YAMAHA" (example) appears in the Bluetooth device list. 3 Select the Bluetooth adapter in the front panel display. 2 Check that the Bluetooth component detects the Bluetooth adapter. SCENE template parameters Note When "MEM.GUARD" is set to this unit completes the pairing ...
...and then press 7ENTER to start pairing the connected Yamaha Bluetooth adapter (such as YBA-10, sold separately) with your Bluetooth™ component" on the power of this feature to set all the parameters of 8 minutes is set for the input sources when you want this unit... the Bluetooth adapter, "YBA-10 YAMAHA" (example) appears in the Bluetooth device list. 3 Select the Bluetooth adapter in the front panel display. 2 Check that the Bluetooth component detects the Bluetooth adapter. SCENE template parameters Note When "MEM.GUARD" is set to this unit completes the pairing ...
Owner's Manual
Page 55
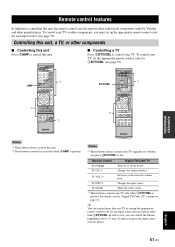
... other than 3DTV/CBL. To control your TV. DTV/CBL *2 POWER POWER STANDBY POWER TV AV A B C MUTE CD MD/CD-R TUNER DVD DTV/CBL DVR TV CH V-AUX/DOCK D E AMP TV INPUT TV MUTE TV VOL SCENE 1 2 3 4 BAND LEVEL TITLE MENU VOLUME ENTER RETURN REC DISPLAY l PROG h 1 2 ... more than one TV by Yamaha and other manufacturers. Controlling this unit, a TV, or other components ■ Controlling this unit Press 4AMP to control this unit. In such a case, you can control the buttons highlighted above (*1 and *2) when you must set the appropriate remote control code...
... other than 3DTV/CBL. To control your TV. DTV/CBL *2 POWER POWER STANDBY POWER TV AV A B C MUTE CD MD/CD-R TUNER DVD DTV/CBL DVR TV CH V-AUX/DOCK D E AMP TV INPUT TV MUTE TV VOL SCENE 1 2 3 4 BAND LEVEL TITLE MENU VOLUME ENTER RETURN REC DISPLAY l PROG h 1 2 ... more than one TV by Yamaha and other manufacturers. Controlling this unit, a TV, or other components ■ Controlling this unit Press 4AMP to control this unit. In such a case, you can control the buttons highlighted above (*1 and *2) when you must set the appropriate remote control code...
Owner's Manual
Page 56
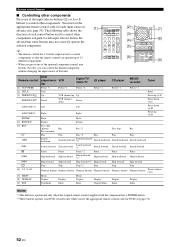
You must set the appropriate... used to control other components. DECODE 3 4 STRAIGHT NIGHT 5 6 7 8 MULTI CH IN AUDIO SEL 9 0 SLEEP 10 ENT [9] Remote control [1] AV POWER [2] TITLE [3] PRESET/CH k PRESET/CH n A/B/C/D/E l A/B/C/D/E h ENTER [4] RETURN [5] REC p w f e b a s [6] 1-9, 0,... down (A-E) Right Right Preset up to 13 different components. • When you set the appropriate remote control code for DVR (see page 53). Remote control features ■... of this unit. [1] POWER POWER STANDBY POWER TV AV A B C MUTE CD MD/CD-R TUNER DVD DTV/CBL DVR TV CH V-AUX...
You must set the appropriate... used to control other components. DECODE 3 4 STRAIGHT NIGHT 5 6 7 8 MULTI CH IN AUDIO SEL 9 0 SLEEP 10 ENT [9] Remote control [1] AV POWER [2] TITLE [3] PRESET/CH k PRESET/CH n A/B/C/D/E l A/B/C/D/E h ENTER [4] RETURN [5] REC p w f e b a s [6] 1-9, 0,... down (A-E) Right Right Preset up to 13 different components. • When you set the appropriate remote control code for DVR (see page 53). Remote control features ■... of this unit. [1] POWER POWER STANDBY POWER TV AV A B C MUTE CD MD/CD-R TUNER DVD DTV/CBL DVR TV CH V-AUX...
Owner's Manual
Page 67
...26 DVR Viewing 26 Dynamic range 47 ■E E)BLUETOOTH 50 E)LFE LEVEL 47 E)MULTI CH SET 49 Editing sound fields parameters .......... 35 ENHANCER indicator 20 Enjoying 2-channel sources using the standard decoders...19 Connecting the FM antennas 19 Connecting the power cable 19 Connecting the Yamaha Bluetooth adapter 18 Connecting the Yamaha iPod universal dock ...........18 Connecting to the CENTER terminals 12 Connecting to ...a TV 51 Controlling other components 52 Creating original SCENE templates .....27 CROSSOVER 46 Crossover 46 CT WIDTH 35 ■D D)CENTER GEQ 47 D)DECODER ...
...26 DVR Viewing 26 Dynamic range 47 ■E E)BLUETOOTH 50 E)LFE LEVEL 47 E)MULTI CH SET 49 Editing sound fields parameters .......... 35 ENHANCER indicator 20 Enjoying 2-channel sources using the standard decoders...19 Connecting the FM antennas 19 Connecting the power cable 19 Connecting the Yamaha Bluetooth adapter 18 Connecting the Yamaha iPod universal dock ...........18 Connecting to the CENTER terminals 12 Connecting to ...a TV 51 Controlling other components 52 Creating original SCENE templates .....27 CROSSOVER 46 Crossover 46 CT WIDTH 35 ■D D)CENTER GEQ 47 D)DECODER ...
Owner's Manual
Page 68
... 47 Speaker distance 47 Speaker distances 47 Speaker dynamic range 47 Speaker impedance 54 Speaker level 46 Speaker LFE 47 Speaker settings 45 SPEAKERS terminals 9 Specifications 62 START PAIRING 50 Start pairing 50 Straight mode 36 SUBWOOFER OUTPUT jack 9 Subwoofer phase ...■S SCENE 7 Searching..., Bluetooth status message 58 Selecting audio input jacks 31 Selecting preset stations 39 Selecting the MULTI CH INPUT component as the input source .........30 Selecting the night listening mode .......31 Selecting the SCENE templates ...........24 Set menu 43 Set this manual...
... 47 Speaker distance 47 Speaker distances 47 Speaker dynamic range 47 Speaker impedance 54 Speaker level 46 Speaker LFE 47 Speaker settings 45 SPEAKERS terminals 9 Specifications 62 START PAIRING 50 Start pairing 50 Straight mode 36 SUBWOOFER OUTPUT jack 9 Subwoofer phase ...■S SCENE 7 Searching..., Bluetooth status message 58 Selecting audio input jacks 31 Selecting preset stations 39 Selecting the MULTI CH INPUT component as the input source .........30 Selecting the night listening mode .......31 Selecting the SCENE templates ...........24 Set menu 43 Set this manual...


