Owner's Manual
Page 5
.... Refer to the attached sheet or the pages at the end of this manual) Front panel i Remote control ii List of remote control codes iii About this unit 8 PREPARATION Connections 9 Rear panel 9 Placing speakers 10 Connecting speakers 11 ...Setting the speaker impedance (U.S.A. and Canada models only 12 Information on jacks and cable plugs 13 Information on HDMI 14 Connecting video components 15 Connecting audio components 17 Connecting a Yamaha...
.... Refer to the attached sheet or the pages at the end of this manual) Front panel i Remote control ii List of remote control codes iii About this unit 8 PREPARATION Connections 9 Rear panel 9 Placing speakers 10 Connecting speakers 11 ...Setting the speaker impedance (U.S.A. and Canada models only 12 Information on jacks and cable plugs 13 Information on HDMI 14 Connecting video components 15 Connecting audio components 17 Connecting a Yamaha...
Owner's Manual
Page 6
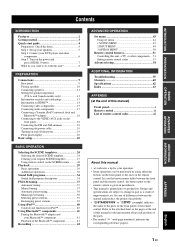
...your sensitive hearing. One that lets the sound come through loud and clear without affecting your equipment by Yamaha in accordance with preset remote control codes Manufactured under license from excessive volume levels. 2 En Since hearing damage from loud sounds is often...COMPONENT VIDEO INs and 1 MONITOR OUT) ◆ iPod controlling capability ◆ Sleep timer ◆ Cinema and music night listening modes ◆ Remote control with a license agreement. iPod™ "iPod" is too late, Yamaha and the Electronic Industries Association's Consumer Electronics Group recommend ...
...your sensitive hearing. One that lets the sound come through loud and clear without affecting your equipment by Yamaha in accordance with preset remote control codes Manufactured under license from excessive volume levels. 2 En Since hearing damage from loud sounds is often...COMPONENT VIDEO INs and 1 MONITOR OUT) ◆ iPod controlling capability ◆ Sleep timer ◆ Cinema and music night listening modes ◆ Remote control with a license agreement. iPod™ "iPod" is too late, Yamaha and the Electronic Industries Association's Consumer Electronics Group recommend ...
Owner's Manual
Page 7
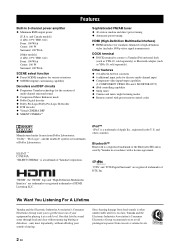
...memory may have the same shape and color. • If the batteries have leaked, dispose of the batteries if you received all of them correctly in the remote control, the contents of the VOLTAGE SELECTOR may cause damage to your local voltage BEFORE plugging the power cable into contact with... general house waste; the operation range of the remote control decreases. • Do not use an old battery and a new one together. • Do not use different types of batteries (such ...
...memory may have the same shape and color. • If the batteries have leaked, dispose of the batteries if you received all of them correctly in the remote control, the contents of the VOLTAGE SELECTOR may cause damage to your local voltage BEFORE plugging the power cable into contact with... general house waste; the operation range of the remote control decreases. • Do not use an old battery and a new one together. • Do not use different types of batteries (such ...
Owner's Manual
Page 12
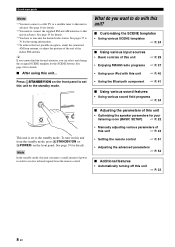
... • Using your listening room (BASIC SETUP) ☞ P. 22 • Manually adjusting various parameters of this unit ☞ P. 43 • Setting the remote control ☞ P. 51 • Adjusting the advanced parameters ☞ P. 54 ■ Additional features • Automatically turning off this unit ☞ P. 33 8 ... Notes *1 You must connect a cable TV or a satellite tuner to this unit consumes a small amount of power in order to receive infrared signals from the standby mode, press ASTANDBY/ON (or DPOWER) on the front panel. See page 19 for details. ■...
... • Using your listening room (BASIC SETUP) ☞ P. 22 • Manually adjusting various parameters of this unit ☞ P. 43 • Setting the remote control ☞ P. 51 • Adjusting the advanced parameters ☞ P. 54 ■ Additional features • Automatically turning off this unit ☞ P. 33 8 ... Notes *1 You must connect a cable TV or a satellite tuner to this unit consumes a small amount of power in order to receive infrared signals from the standby mode, press ASTANDBY/ON (or DPOWER) on the front panel. See page 19 for details. ■...
Owner's Manual
Page 23
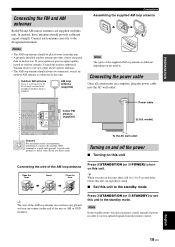
...cable (U.S.A. Consult the nearest authorized Yamaha dealer or service center about outdoor antennas. • The AM loop antenna should always be connected, even if an outdoor AM antenna is different depending on this unit, there will be placed away from the remote control. Connecting the power cable Once ... unit. In general, these antennas should be a 4 to 5-second delay before this unit can reproduce sound. ■ Set this unit to receive infrared signals from this unit. y When you turn on this unit. If you can connect either end of the wire to the standby mode ...
...cable (U.S.A. Consult the nearest authorized Yamaha dealer or service center about outdoor antennas. • The AM loop antenna should always be connected, even if an outdoor AM antenna is different depending on this unit, there will be placed away from the remote control. Connecting the power cable Once ... unit. In general, these antennas should be a 4 to 5-second delay before this unit can reproduce sound. ■ Set this unit to receive infrared signals from this unit. y When you turn on this unit. If you can connect either end of the wire to the standby mode ...
Owner's Manual
Page 25
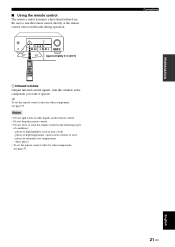
...near a heater or stove - PREPARATION ■ Using the remote control The remote control transmits a directional infrared ray. places of high humidity, such as near a bath - Connections English 21 En Be sure to aim the remote control directly at the component you want to operate. Notes &#...8226; Do not spill water or other liquids on this window at the remote control sensor on the remote control. • Do not drop the remote control. • Do not leave or store the remote control in the following types of extremely low temperatures - places of conditions: - ...
...near a heater or stove - PREPARATION ■ Using the remote control The remote control transmits a directional infrared ray. places of high humidity, such as near a bath - Connections English 21 En Be sure to aim the remote control directly at the component you want to operate. Notes &#...8226; Do not spill water or other liquids on this window at the remote control sensor on the remote control. • Do not drop the remote control. • Do not leave or store the remote control in the following types of extremely low temperatures - places of conditions: - ...
Owner's Manual
Page 26
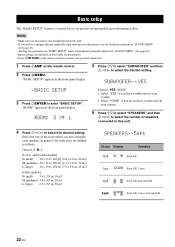
... any parameters in "BASIC SETUP" resets all parameters manually adjusted in bold under each parameter. • Press 8RETURN on the remote control to return to the previous menu level. 1 Press 4AMP on the remote control. 2 Press HMENU. Basic setup Basic setup The "BASIC SETUP" feature is a useful way to set up your speakers. ROOM...
... any parameters in "BASIC SETUP" resets all parameters manually adjusted in bold under each parameter. • Press 8RETURN on the remote control to return to the previous menu level. 1 Press 4AMP on the remote control. 2 Press HMENU. Basic setup Basic setup The "BASIC SETUP" feature is a useful way to set up your speakers. ROOM...

Owner's Manual
Page 28
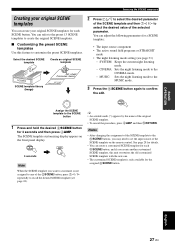
... the desired PSCENE (or 5SCENE) button for 3 seconds. l INPUT h Front panel or AMP ENTER Select the desired SCENE template Remote control SCENE template library (Image) 1 Assign the SCENE template to the SCENE button Selecting the desired SCENE template DVD Movie View 3 Press... source of currently assigned SCENE template appears in the front panel display. 3 seconds 3 seconds 1 Front panel or 1 Remote control 1 Front panel or 1 Remote control y To cancel the procedure, press 4AMP and then 8RETURN. The selected SCENE template is equipped with 13 preset SCENE templates...
... the desired PSCENE (or 5SCENE) button for 3 seconds. l INPUT h Front panel or AMP ENTER Select the desired SCENE template Remote control SCENE template library (Image) 1 Assign the SCENE template to the SCENE button Selecting the desired SCENE template DVD Movie View 3 Press... source of currently assigned SCENE template appears in the front panel display. 3 seconds 3 seconds 1 Front panel or 1 Remote control 1 Front panel or 1 Remote control y To cancel the procedure, press 4AMP and then 8RETURN. The selected SCENE template is equipped with 13 preset SCENE templates...
Owner's Manual
Page 31
... only available for the assigned 5SCENE button. You can create a customized SCENE template for each SCENE button. The SCENE template customizing display appears on the remote control. English 27 En
... only available for the assigned 5SCENE button. You can create a customized SCENE template for each SCENE button. The SCENE template customizing display appears on the remote control. English 27 En
Owner's Manual
Page 32
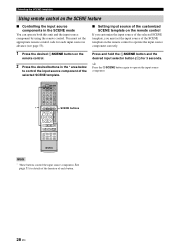
... the function of the selected SCENE template. y Press the 5SCENE button again to control the input source component of each button. 28 En Selecting the SCENE templates Using remote control on the remote control. 2 Press the desired buttons in the SCENE mode You can operate both this...STANDBY POWER TV AV A B C MUTE CD MD/CD-R TUNER DVD DTV/CBL DVR TV CH V-AUX/DOCK D E AMP TV INPUT TV MUTE TV VOL SCENE 1 2 3 4 BAND LEVEL TITLE MENU VOLUME SCENE buttons ENTER RETURN REC DISPLAY l PROG h 1 2 ENHANCER SUR. You must set the appropriate remote control code for 3 ...
... the function of the selected SCENE template. y Press the 5SCENE button again to control the input source component of each button. 28 En Selecting the SCENE templates Using remote control on the remote control. 2 Press the desired buttons in the SCENE mode You can operate both this...STANDBY POWER TV AV A B C MUTE CD MD/CD-R TUNER DVD DTV/CBL DVR TV CH V-AUX/DOCK D E AMP TV INPUT TV MUTE TV VOL SCENE 1 2 3 4 BAND LEVEL TITLE MENU VOLUME SCENE buttons ENTER RETURN REC DISPLAY l PROG h 1 2 ENHANCER SUR. You must set the appropriate remote control code for 3 ...

Owner's Manual
Page 36
...Front right speaker CENTER Center speaker SWFR Subwoofer SUR.L Surround left speaker SUR.R Surround right speaker y Once you press 6LEVEL on the remote control, you want to adjust. ■ Displaying the signal information You can also select the speaker by pressing 7k / n. 2 Press 7l / h ...on the remote control. The number of the current input signal. 1 Press 4AMP and then press HMENU on the remote control to adjust the speaker output level. Note This operation will override the level adjustment made in "SP...
...Front right speaker CENTER Center speaker SWFR Subwoofer SUR.L Surround left speaker SUR.R Surround right speaker y Once you press 6LEVEL on the remote control, you want to adjust. ■ Displaying the signal information You can also select the speaker by pressing 7k / n. 2 Press 7l / h ...on the remote control. The number of the current input signal. 1 Press 4AMP and then press HMENU on the remote control to adjust the speaker output level. Note This operation will override the level adjustment made in "SP...
Owner's Manual
Page 37
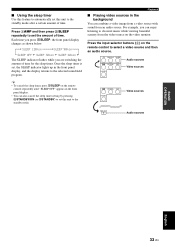
y • To cancel the sleep timer, press OSLEEP on the remote control repeatedly until "SLEEP OFF" appears in the front panel display. • You can also cancel the sleep timer setting by pressing ASTANDBY/ON (or ESTANDBY) ... 9 Audio sources BASIC OPERATION English 33 En For example, you can combine a video image from a video source with sound from the video source on the remote control to select a video source and then an audio source. ■ Using the sleep timer Use this feature to automatically set the amount of time.
y • To cancel the sleep timer, press OSLEEP on the remote control repeatedly until "SLEEP OFF" appears in the front panel display. • You can also cancel the sleep timer setting by pressing ASTANDBY/ON (or ESTANDBY) ... 9 Audio sources BASIC OPERATION English 33 En For example, you can combine a video image from a video source with sound from the video source on the remote control to select a video source and then an audio source. ■ Using the sleep timer Use this feature to automatically set the amount of time.
Owner's Manual
Page 43
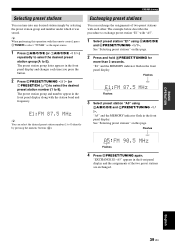
... group letter appears in the front panel display and changes each other. The example below describes the procedure to exchange preset station "E1" with the remote control, press 3TUNER to select "TUNER" as the input source. 1 Press DA/B/C/D/E (or 7A/B/C/D/E l / h) repeatedly to select the desired preset station group (A to 8). Flashes MEMORY E1...
... group letter appears in the front panel display and changes each other. The example below describes the procedure to exchange preset station "E1" with the remote control, press 3TUNER to select "TUNER" as the input source. 1 Press DA/B/C/D/E (or 7A/B/C/D/E l / h) repeatedly to select the desired preset station group (A to 8). Flashes MEMORY E1...
Owner's Manual
Page 44
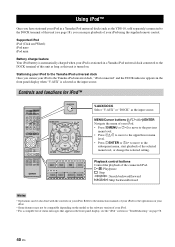
... on the model or the software version of your iPod. • For a complete list of your iPod for iPod™ POWER POWER STANDBY POWER TV AV A B C MUTE CD MD/CD-R TUNER DVD DTV/CBL DVR TV CH V-AUX/DOCK D E AMP TV INPUT TV MUTE TV VOL SCENE 1 2 .../lower menu level. • Press 7ENTER or 7h to move to the Yamaha iPod universal dock, "iPod connected" and the DOCK indicator appears in a Yamaha iPod universal dock connected to the instruction manuals of your iPod using the supplied remote control. Playback control buttons Control the playback of the connected iPod.
... on the model or the software version of your iPod. • For a complete list of your iPod for iPod™ POWER POWER STANDBY POWER TV AV A B C MUTE CD MD/CD-R TUNER DVD DTV/CBL DVR TV CH V-AUX/DOCK D E AMP TV INPUT TV MUTE TV VOL SCENE 1 2 .../lower menu level. • Press 7ENTER or 7h to move to the Yamaha iPod universal dock, "iPod connected" and the DOCK indicator appears in a Yamaha iPod universal dock connected to the instruction manuals of your iPod using the supplied remote control. Playback control buttons Control the playback of the connected iPod.
Owner's Manual
Page 45
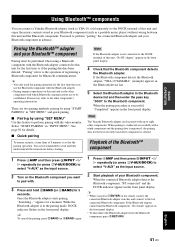
... y • When you use the Bluetooth component with the Bluetooth adapter. • Pairing requires operations on this unit and on the remote control, the connected Bluetooth adapter searches and connect to the operation of 8 minutes is not connected to be established. "Pairing" refers to the... are recommended to select "V-AUX" as a portable music player) without wiring between this feature to the Bluetooth component. Note The Yamaha Bluetooth adapter can connect a Yamaha Bluetooth adapter (such as YBA-10, sold separately) to pair with. 3 Press and hold CBAND (or 6BAND) for 3 ...
... y • When you use the Bluetooth component with the Bluetooth adapter. • Pairing requires operations on this unit and on the remote control, the connected Bluetooth adapter searches and connect to the operation of 8 minutes is not connected to be established. "Pairing" refers to the... are recommended to select "V-AUX" as a portable music player) without wiring between this feature to the Bluetooth component. Note The Yamaha Bluetooth adapter can connect a Yamaha Bluetooth adapter (such as YBA-10, sold separately) to pair with. 3 Press and hold CBAND (or 6BAND) for 3 ...
Owner's Manual
Page 48
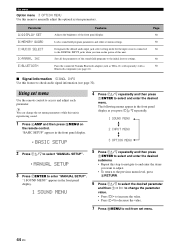
... this feature to check audio signal information (see page 41). Pairs the connected Yamaha Bluetooth adapter (such as you turn on the power of this unit is reproducing sound. 1 Press 4AMP and then press HMENU on the remote control. "BASIC SETUP" appears in the front panel display. 1 SOUND MENU 5...and then 7l / h to change the set menu parameters while this unit. Locks sound field program parameters and other set menu Use the remote control to exit from set menu. 44 En Parameter A)DISPLAY SET B)MEMORY GUARD C)AUDIO SELECT D)PARAM. Sets all the parameters of the front ...
... this feature to check audio signal information (see page 41). Pairs the connected Yamaha Bluetooth adapter (such as you turn on the power of this unit is reproducing sound. 1 Press 4AMP and then press HMENU on the remote control. "BASIC SETUP" appears in the front panel display. 1 SOUND MENU 5...and then 7l / h to change the set menu parameters while this unit. Locks sound field program parameters and other set menu Use the remote control to exit from set menu. 44 En Parameter A)DISPLAY SET B)MEMORY GUARD C)AUDIO SELECT D)PARAM. Sets all the parameters of the front ...

Owner's Manual
Page 52
...Once the input jacks are reassigned, you can select the corresponding component by using certain LCD monitors or projectors. Control range: 0 to delay the sound output and synchronize it with the video image. Use this feature to set... to both "IN (2)" and "IN (3)". However, when "MAX VOL." Choices: Off, -80 dB to +16 dB Control step: 1 dB 2 INPUT MENU Use this menu to reassign the input jacks, select the input mode or rename the input... the initial settings of this unit. For example, you turn on the remote control). Mute type MUTE TYP. Initial volume INI.VOL.
...Once the input jacks are reassigned, you can select the corresponding component by using certain LCD monitors or projectors. Control range: 0 to delay the sound output and synchronize it with the video image. Use this feature to set... to both "IN (2)" and "IN (3)". However, when "MAX VOL." Choices: Off, -80 dB to +16 dB Control step: 1 dB 2 INPUT MENU Use this menu to reassign the input jacks, select the input mode or rename the input... the initial settings of this unit. For example, you turn on the remote control). Mute type MUTE TYP. Initial volume INI.VOL.
Owner's Manual
Page 53
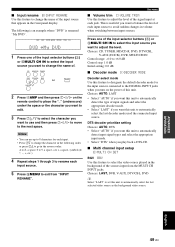
... the input source you want to use up to 8 characters for the input sources connected to the DIGITAL INPUT jacks when you turn on the remote control to place the "_" (underscore) under the space or the character you want to edit. 3 Press 7k / n to select the character you want ... this unit. This is renamed "My DVD". Choices: CD, TUNER, MD/CD-R, DVD, DTV/CBL, V-AUX (DOCK), DVR, MULTI CH IN Control range: -6.0 to +6.0 dB Control step: 1.0 dB Initial setting: 0.0 dB ■ Decoder mode D)DECODER MODE Decoder select mode Use this feature to designate the default decoder mode for ...
... the input source you want to use up to 8 characters for the input sources connected to the DIGITAL INPUT jacks when you turn on the remote control to place the "_" (underscore) under the space or the character you want to edit. 3 Press 7k / n to select the character you want ... this unit. This is renamed "My DVD". Choices: CD, TUNER, MD/CD-R, DVD, DTV/CBL, V-AUX (DOCK), DVR, MULTI CH IN Control range: -6.0 to +6.0 dB Control step: 1.0 dB Initial setting: 0.0 dB ■ Decoder mode D)DECODER MODE Decoder select mode Use this feature to designate the default decoder mode for ...
Owner's Manual
Page 55
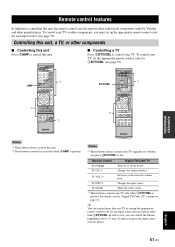
... the input source. Remote control features Remote control features In addition to controlling this unit. AMP *2 POWER POWER STANDBY POWER TV AV A B C MUTE...control your TV. y You can control the buttons highlighted above (*1 and *2) when you press 3DTV/CBL or not. Remote control Digital TV/Cable TV TV POWER Turns on page 52. To control your TV, set up the appropriate remote control... Notes *1 These buttons always control this unit. *2 These buttons control this unit only when 4AMP is pressed. Notes *1 These buttons always control your TV regardless of whether...
... the input source. Remote control features Remote control features In addition to controlling this unit. AMP *2 POWER POWER STANDBY POWER TV AV A B C MUTE...control your TV. y You can control the buttons highlighted above (*1 and *2) when you press 3DTV/CBL or not. Remote control Digital TV/Cable TV TV POWER Turns on page 52. To control your TV, set up the appropriate remote control... Notes *1 These buttons always control this unit. *2 These buttons control this unit only when 4AMP is pressed. Notes *1 These buttons always control your TV regardless of whether...
Owner's Manual
Page 56
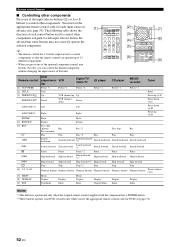
... so that some buttons may not correctly operate the selected component. DECODE 3 4 STRAIGHT NIGHT 5 6 7 8 MULTI CH IN AUDIO SEL 9 0 SLEEP 10 ENT [9] Remote control [1] AV POWER [2] TITLE [3] PRESET/CH k PRESET/CH n A/B/C/D/E l A/B/C/D/E h ENTER [4] RETURN [5] REC p w f e b a s [6] 1-9, 0, +10 [7] MENU [8] DISPLAY [9] ENT DVD player/recor VCR der Digital TV/ Cable TV LD player CD ...
... so that some buttons may not correctly operate the selected component. DECODE 3 4 STRAIGHT NIGHT 5 6 7 8 MULTI CH IN AUDIO SEL 9 0 SLEEP 10 ENT [9] Remote control [1] AV POWER [2] TITLE [3] PRESET/CH k PRESET/CH n A/B/C/D/E l A/B/C/D/E h ENTER [4] RETURN [5] REC p w f e b a s [6] 1-9, 0, +10 [7] MENU [8] DISPLAY [9] ENT DVD player/recor VCR der Digital TV/ Cable TV LD player CD ...


