Owner's Manual
Page 1
U RX-V363 AV Receiver OWNER'S MANUAL
U RX-V363 AV Receiver OWNER'S MANUAL
Owner's Manual
Page 7
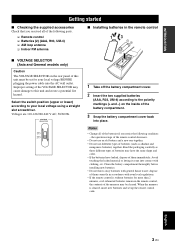
... -) on the rear panel of this unit and create a potential fire hazard. INTRODUCTION Getting started Getting started ■ Checking the supplied accessories Check that you received all of the batteries if you notice the following parts. ❏ Remote control ❏ Batteries (2) (AAA, R03, UM-4) ❏ AM loop antenna ❏ Indoor FM...
... -) on the rear panel of this unit and create a potential fire hazard. INTRODUCTION Getting started Getting started ■ Checking the supplied accessories Check that you received all of the batteries if you notice the following parts. ❏ Remote control ❏ Batteries (2) (AAA, R03, UM-4) ❏ AM loop antenna ❏ Indoor FM...
Owner's Manual
Page 9
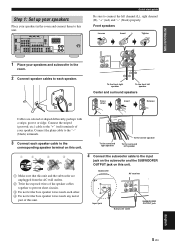
... wires touch each speaker. To the surround right speaker To the center speaker To the surround left channel (L), right channel (R), "+" (red) and "-" (black) properly. Subwoofer AV receiver Input jack Subwoofer cable SUBWOOFER OUTPUT jack English 5 En Quick start guide Be sure to the corresponding speaker terminal on this unit and the subwoofer...
... wires touch each speaker. To the surround right speaker To the center speaker To the surround left channel (L), right channel (R), "+" (red) and "-" (black) properly. Subwoofer AV receiver Input jack Subwoofer cable SUBWOOFER OUTPUT jack English 5 En Quick start guide Be sure to the corresponding speaker terminal on this unit and the subwoofer...
Owner's Manual
Page 10
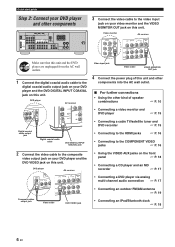
... FM/AM antenna ☞ P. 19 • Connecting an iPod/Bluetooth dock ☞ P. 18 6 En DVD player AV receiver Video input jack Video cable VIDEO MONITOR OUT jack 4 Connect the power plug of this unit. DVD player AV receiver • Using the VIDEO AUX jacks on this unit and the DVD player are unplugged from... INPUT FRONT SURROUND CENTER L DVD DTV/CBL AUDIO DVR CD IN OUT L R R SUBWOOFER ANTENNA SPEAKERS SURROUND CENTER FRONT B R L R L AM GND FM 75 UNBAL. Video monitor AV receiver Make sure that this unit.
... FM/AM antenna ☞ P. 19 • Connecting an iPod/Bluetooth dock ☞ P. 18 6 En DVD player AV receiver Video input jack Video cable VIDEO MONITOR OUT jack 4 Connect the power plug of this unit. DVD player AV receiver • Using the VIDEO AUX jacks on this unit and the DVD player are unplugged from... INPUT FRONT SURROUND CENTER L DVD DTV/CBL AUDIO DVR CD IN OUT L R R SUBWOOFER ANTENNA SPEAKERS SURROUND CENTER FRONT B R L R L AM GND FM 75 UNBAL. Video monitor AV receiver Make sure that this unit.
Owner's Manual
Page 12
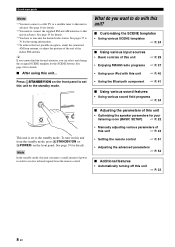
... AM antennas to this unit... See page 19 for details. See pages 37 to 39 for details. ■ After using this unit in order to receive infrared signals from the standby mode, press ASTANDBY/ON (or DPOWER) on the front panel. Press ASTANDBY/ON on this unit from the remote control...
... AM antennas to this unit... See page 19 for details. See pages 37 to 39 for details. ■ After using this unit in order to receive infrared signals from the standby mode, press ASTANDBY/ON (or DPOWER) on the front panel. Press ASTANDBY/ON on this unit from the remote control...
Owner's Manual
Page 23
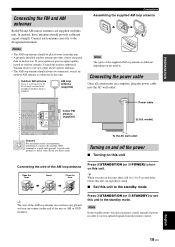
...AM loop antenna Note The types of the AM loop antenna Open the lever Insert Close the lever Press ASTANDBY/ON (or D POWER) to receive infrared signals from a window. ANTENNA DEO N DVR OUT MONITOR OUT AM GND Indoor FM antenna (supplied) FM 75 UNBAL. model) To...interference, connect the antenna GND terminal to the designated terminals. Connect each antenna correctly to a good earth ground. Consult the nearest authorized Yamaha dealer or service center about outdoor antennas. • The AM loop antenna should provide sufficient signal strength. PREPARATION Connecting the FM and ...
...AM loop antenna Note The types of the AM loop antenna Open the lever Insert Close the lever Press ASTANDBY/ON (or D POWER) to receive infrared signals from a window. ANTENNA DEO N DVR OUT MONITOR OUT AM GND Indoor FM antenna (supplied) FM 75 UNBAL. model) To...interference, connect the antenna GND terminal to the designated terminals. Connect each antenna correctly to a good earth ground. Consult the nearest authorized Yamaha dealer or service center about outdoor antennas. • The AM loop antenna should provide sufficient signal strength. PREPARATION Connecting the FM and ...
Owner's Manual
Page 41
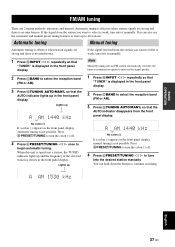
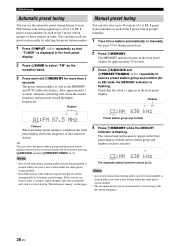
... (:) If a colon (:) appears in the front panel display, manual tuning is shown in the front panel display. Lights up and the frequency of the received station is not possible. You can also use the automatic and manual preset tuning features to select is not possible. If the signal from the... GTUNING AUTO/MAN'L so that the AUTO indicator disappears from the station you want to store up in the front panel display. If the signal received from the front panel display. No colon (:) If a colon (:) appears in the front panel display. 2 Press CBAND to select the reception band (FM or...
... (:) If a colon (:) appears in the front panel display, manual tuning is shown in the front panel display. Lights up and the frequency of the received station is not possible. You can also use the automatic and manual preset tuning features to select is not possible. If the signal from the... GTUNING AUTO/MAN'L so that the AUTO indicator disappears from the station you want to store up in the front panel display. If the signal received from the front panel display. No colon (:) If a colon (:) appears in the front panel display. 2 Press CBAND to select the reception band (FM or...
Owner's Manual
Page 42
... front panel display. Flashes AUTO MEMORY A1:FM 87.5 MHz You can select the preset station group and the preset station number where the first received station will be stored by pressing DA/B/C/D/E and then EPRESET/TUNING l / h. You can then recall any preset station easily by selecting the preset station number...
... front panel display. Flashes AUTO MEMORY A1:FM 87.5 MHz You can select the preset station group and the preset station number where the first received station will be stored by pressing DA/B/C/D/E and then EPRESET/TUNING l / h. You can then recall any preset station easily by selecting the preset station number...


