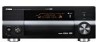

MCXSP10 Manual
Page 3
...particular, specifies that are covered by the operating instructions as an improper adjustment of other controls may void your authority, granted by Yamaha Corporation of product. This product, when installed as practical. Follow all installations. If this product, ask the service technician to perform...or cable system is grounded so as radiators, heat registers, stoves, or other electronic devices. ii The product should be determined by turning the unit "OFF" and "ON", please try to the point of other products (including amplifiers) that are required, be used ...
...particular, specifies that are covered by the operating instructions as an improper adjustment of other controls may void your authority, granted by Yamaha Corporation of product. This product, when installed as practical. Follow all installations. If this product, ask the service technician to perform...or cable system is grounded so as radiators, heat registers, stoves, or other electronic devices. ii The product should be determined by turning the unit "OFF" and "ON", please try to the point of other products (including amplifiers) that are required, be used ...

MCXSP10 Manual
Page 4
... performance, please read the "TROUBLESHOOTING" section on the rear panel of this unit with a humidifier) to read this unit is needed. Burning objects (i.e. YAMAHA will not be reached easily. 17 Be sure to prevent condensation inside this unit rises, it in a safe place for your local main voltage BEFORE.... On the top of this unit. 3 Locate this unit away from other than specified is not disconnected from the AC power source even if you turn off this unit upside-down. do not place: - Cet appareil numérique de la classe B est conforme à la norme NMB-003...
... performance, please read the "TROUBLESHOOTING" section on the rear panel of this unit with a humidifier) to read this unit is needed. Burning objects (i.e. YAMAHA will not be reached easily. 17 Be sure to prevent condensation inside this unit rises, it in a safe place for your local main voltage BEFORE.... On the top of this unit. 3 Locate this unit away from other than specified is not disconnected from the AC power source even if you turn off this unit upside-down. do not place: - Cet appareil numérique de la classe B est conforme à la norme NMB-003...

MCXSP10 Manual
Page 5
... signal flow 20 Connecting a TV monitor or projector 21 Connecting other components 22 Connecting a multi-format player or an external decoder 26 Connecting a YAMAHA iPod universal dock ........ 27 Using the VIDEO AUX jacks on the front panel .... 27 Connecting the FM and AM antennas 28 Connecting the power ...cable 29 Setting the speaker impedance 30 Turning on and off the power 31 AUTO SETUP 32 Using AUTO SETUP 32 BASIC OPERATION PLAYBACK 38 Basic procedure 38 Selecting audio input jacks ...
... signal flow 20 Connecting a TV monitor or projector 21 Connecting other components 22 Connecting a multi-format player or an external decoder 26 Connecting a YAMAHA iPod universal dock ........ 27 Using the VIDEO AUX jacks on the front panel .... 27 Connecting the FM and AM antennas 28 Connecting the power ...cable 29 Setting the speaker impedance 30 Turning on and off the power 31 AUTO SETUP 32 Using AUTO SETUP 32 BASIC OPERATION PLAYBACK 38 Basic procedure 38 Selecting audio input jacks ...
MCXSP10 Manual
Page 8
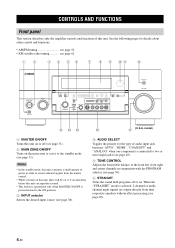
... Front panel This section describes only the amplifier controls and functions of the front left, front right and center channels in order to receive infrared signals from their respective speakers without effect processing (see page 49). 4 En Notes • In the standby mode, this ... S VIDEO VIDEO L AUDIO R OPTICAL ENHANCER NIGHT PROGRAM OPTIMIZER MIC PHONES VIDEO AUX PURE DIRECT VOLUME C DE F G (U.S.A. model) 1 MASTER ON/OFF Turns this unit. See the following pages for the type of audio input jack between "AUTO", "HDMI", "COAX/OPT" and "ANALOG" when one component is ...
... Front panel This section describes only the amplifier controls and functions of the front left, front right and center channels in order to receive infrared signals from their respective speakers without effect processing (see page 49). 4 En Notes • In the standby mode, this ... S VIDEO VIDEO L AUDIO R OPTICAL ENHANCER NIGHT PROGRAM OPTIMIZER MIC PHONES VIDEO AUX PURE DIRECT VOLUME C DE F G (U.S.A. model) 1 MASTER ON/OFF Turns this unit. See the following pages for the type of audio input jack between "AUTO", "HDMI", "COAX/OPT" and "ANALOG" when one component is ...
MCXSP10 Manual
Page 9
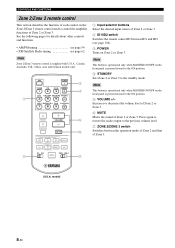
...want to use the controls behind the front panel door, open , press gently on Zone 2 only or sets it to the standby mode. B PURE DIRECT Turns on or off the night listening modes (see page 41). F VIDEO AUX jacks Input audio and video signals from the supplied optimizer microphone in the... of all audio channels. To open the door by gently pressing on or off the Compressed Music Enhancer mode (see page 52). 0 Remote control sensor Receives signals from the remote control (see page 50). ZONE 3 ON/OFF Turns on the rear panel take priority over the ones input at these controls.
...want to use the controls behind the front panel door, open , press gently on Zone 2 only or sets it to the standby mode. B PURE DIRECT Turns on or off the night listening modes (see page 41). F VIDEO AUX jacks Input audio and video signals from the supplied optimizer microphone in the... of all audio channels. To open the door by gently pressing on or off the Compressed Music Enhancer mode (see page 52). 0 Remote control sensor Receives signals from the remote control (see page 50). ZONE 3 ON/OFF Turns on the rear panel take priority over the ones input at these controls.
MCXSP10 Manual
Page 11
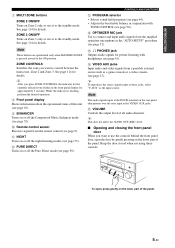
... effect processing (see page 86). B STANDBY Sets the main zone to the one component is connected to the ON position. C POWER Turns on . N STRAIGHT Turns the sound field programs off or on the main zone (see page 31). H Operation mode selector Selects the operation mode of the input... • When you can control independently of the remote control buttons in the display window (see pages 80 and 82). INTRODUCTION 0 MACRO ON/OFF Turns on the front panel is pressed inward to two or more input jacks (see page 40). G SELECT k / n Selects another input source that ...
... effect processing (see page 86). B STANDBY Sets the main zone to the one component is connected to the ON position. C POWER Turns on . N STRAIGHT Turns the sound field programs off or on the main zone (see page 31). H Operation mode selector Selects the operation mode of the input... • When you can control independently of the remote control buttons in the display window (see pages 80 and 82). INTRODUCTION 0 MACRO ON/OFF Turns on the front panel is pressed inward to two or more input jacks (see page 40). G SELECT k / n Selects another input source that ...
MCXSP10 Manual
Page 12
... following pages for details about other controls and functions. • AM/FM tuning see page 54 • XM Satellite Radio tuning see page 104). 3 POWER Turns on the Zone 2/Zone 3 remote control used to the ON position. 5 VOLUME +/-
... following pages for details about other controls and functions. • AM/FM tuning see page 54 • XM Satellite Radio tuning see page 104). 3 POWER Turns on the Zone 2/Zone 3 remote control used to the ON position. 5 VOLUME +/-

MCXSP10 Manual
Page 15
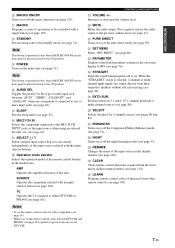
...when the EON data service is in the FM, AM or XM Satellite Radio tuning mode. EON Lights up when this unit is being received. AUTO indicator Lights up when the Neural Surround decoder is in the automatic tuning mode (see page 81). P Radio Data System indicators ... page 114). K DTS decoder indicators The respective indicator lights up when the Compressed Music Enhancer mode is turned on (see page 32). TUNED indicator Lights up while the sleep timer is receiving a strong signal for the Radio Data System stations in "AUTO SETUP" are selected. O SLEEP indicator ...
...when the EON data service is in the FM, AM or XM Satellite Radio tuning mode. EON Lights up when this unit is being received. AUTO indicator Lights up when the Neural Surround decoder is in the automatic tuning mode (see page 81). P Radio Data System indicators ... page 114). K DTS decoder indicators The respective indicator lights up when the Compressed Music Enhancer mode is turned on (see page 32). TUNED indicator Lights up while the sleep timer is receiving a strong signal for the Radio Data System stations in "AUTO SETUP" are selected. O SLEEP indicator ...
MCXSP10 Manual
Page 17
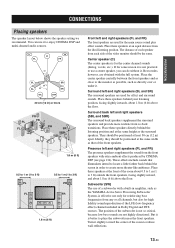
... main source sound plus effect sounds. They should be the same. Ideally, they should be positioned at the same width as the YAMAHA Active Servo Processing Subwoofer System, is effective not only for reinforcing bass frequencies from each side of the video monitor should be positioned...sounds (dialog, vocals, etc.). Subwoofer (SW) The use it is not so critical, because low bass sounds are obtained with the full system. Turn it . If for high fidelity sound reproduction of a subwoofer with extra ambient effects produced by CINEMA DSP (see page 134). Best results, however...
... main source sound plus effect sounds. They should be the same. Ideally, they should be positioned at the same width as the YAMAHA Active Servo Processing Subwoofer System, is effective not only for reinforcing bass frequencies from each side of the video monitor should be positioned...sounds (dialog, vocals, etc.). Subwoofer (SW) The use it is not so critical, because low bass sounds are obtained with the full system. Turn it . If for high fidelity sound reproduction of a subwoofer with extra ambient effects produced by CINEMA DSP (see page 134). Best results, however...

MCXSP10 Manual
Page 18
... other or do not output sound simultaneously. Subwoofer Surround back speakers Presence speakers Left Right Right Left Center speaker (U.S.A. This could damage this unit is turned off (see page 31). • Do not let the bare speaker wires touch each other speakers set to "SML" (or "SMALL") or to "NONE" in...
... other or do not output sound simultaneously. Subwoofer Surround back speakers Presence speakers Left Right Right Left Center speaker (U.S.A. This could damage this unit is turned off (see page 31). • Do not let the bare speaker wires touch each other speakers set to "SML" (or "SMALL") or to "NONE" in...
MCXSP10 Manual
Page 23
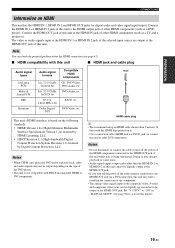
... HDMI cable shorter than the HDMI IN 1 or HDMI IN 2 of this unit cannot be digitally output at the HDMI OUT jack. • If you turn off the power of the video monitor connected to the HDMI OUT jack via a DVI connection, this unit may disrupt playback or cause noise. •... IN 1, HDMI IN 2 and HDMI OUT jacks for digital audio and video signal input/output. Notes • Do not disconnect or connect the cable or turn off the power of the HDMI components connected to activate this unit while data is not compatible with HDCP-incompatible HDMI or DVI components. The...
... HDMI cable shorter than the HDMI IN 1 or HDMI IN 2 of this unit cannot be digitally output at the HDMI OUT jack. • If you turn off the power of the video monitor connected to the HDMI OUT jack via a DVI connection, this unit may disrupt playback or cause noise. •... IN 1, HDMI IN 2 and HDMI OUT jacks for digital audio and video signal input/output. Notes • Do not disconnect or connect the cable or turn off the power of the HDMI components connected to activate this unit while data is not compatible with HDCP-incompatible HDMI or DVI components. The...
MCXSP10 Manual
Page 30
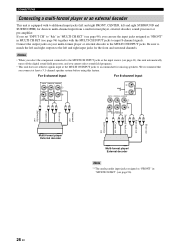
... INPUT jacks to accommodate for the front and surround channels. We recommend that you connect at least a 5.1-channel speaker system before using this unit automatically turns off the digital sound field processor, and you can use the input jacks assigned as the input source (see page 41), this feature. If you...
... INPUT jacks to accommodate for the front and surround channels. We recommend that you connect at least a 5.1-channel speaker system before using this unit automatically turns off the digital sound field processor, and you can use the input jacks assigned as the input source (see page 41), this feature. If you...
MCXSP10 Manual
Page 31
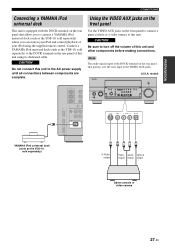
... Be sure to the AC power supply until all connections between components are complete. CAUTION Do not connect this unit to turn off the volume of this unit and other components before making connections. Note The audio signals input at the DOCK terminal on...3 SILENT CINEMA S VIDEO VIDEO L AUDIO R OPTICAL ENHANCER NIGHT PROGRAM OPTIMIZER MIC PHONES VIDEO AUX PURE DIRECT VOLUME DOCK S VIDEO VIDEO L AUDIO R OPTICAL YAMAHA iPod universal dock (such as the YDS-10, sold separately) S V L R O S-Video output Video Audio Optical output output output Game console or video ...
... Be sure to the AC power supply until all connections between components are complete. CAUTION Do not connect this unit to turn off the volume of this unit and other components before making connections. Note The audio signals input at the DOCK terminal on...3 SILENT CINEMA S VIDEO VIDEO L AUDIO R OPTICAL ENHANCER NIGHT PROGRAM OPTIMIZER MIC PHONES VIDEO AUX PURE DIRECT VOLUME DOCK S VIDEO VIDEO L AUDIO R OPTICAL YAMAHA iPod universal dock (such as the YDS-10, sold separately) S V L R O S-Video output Video Audio Optical output output output Game console or video ...
MCXSP10 Manual
Page 33
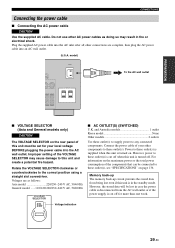
... are as doing so may cause damage to any connected components. and Australia models 1 outlet Korea model None Other models 2 outlets Use these outlet(s) is turned off for your other AC power cables as follows: Asia model 220/230-240 V AC, 50/60 Hz General model ......110/120/220/230-240... memory back-up circuit prevents the stored data from the AC wall outlet or if the power supply is cut off when this unit is turned on page 136. CONNECTIONS Connecting the power cable ■ Connecting the AC power cable CAUTION Use the supplied AC cable. However, the stored data will...
... are as doing so may cause damage to any connected components. and Australia models 1 outlet Korea model None Other models 2 outlets Use these outlet(s) is turned off for your other AC power cables as follows: Asia model 220/230-240 V AC, 50/60 Hz General model ......110/120/220/230-240... memory back-up circuit prevents the stored data from the AC wall outlet or if the power supply is cut off when this unit is turned on page 136. CONNECTIONS Connecting the power cable ■ Connecting the AC power cable CAUTION Use the supplied AC cable. However, the stored data will...
MCXSP10 Manual
Page 34
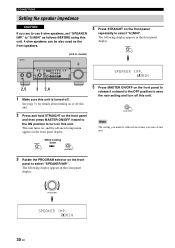
... panel to release it outward to the OFF position to save the new setting and turn off this unit. CONNECTIONS Setting the speaker impedance CAUTION If you turn on this unit. See page 31 for details about turning on the front panel and then press MASTER ON/OFF inward to the ON position... this unit. 2 Press and hold STRAIGHT on or off . The following display appears in the front panel display. This unit turns on the front panel to select "6ΩMIN". The following display appears in the front panel display. PROGRAM SPEAKER IMP. 8 MIN 30 En STRAIGHT EFFECT ...
... panel to release it outward to the OFF position to save the new setting and turn off this unit. CONNECTIONS Setting the speaker impedance CAUTION If you turn on this unit. See page 31 for details about turning on the front panel and then press MASTER ON/OFF inward to the ON position... this unit. 2 Press and hold STRAIGHT on or off . The following display appears in the front panel display. This unit turns on the front panel to select "6ΩMIN". The following display appears in the front panel display. PROGRAM SPEAKER IMP. 8 MIN 30 En STRAIGHT EFFECT ...
MCXSP10 Manual
Page 35
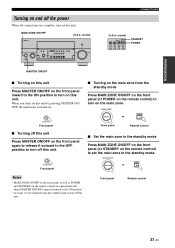
... front panel as well as POWER and STANDBY on the remote control are complete, turn off this unit. MASTER Front panel ■ Turning off this unit Press MASTER ON/OFF on this unit. model) POWER TV POWER AV STANDBY POWER XM AUDIO SEL SLEEP PHONO TUNER CD MULTI CH IN STANDBY POWER MASTER... ON/OFF ■ Turning on this unit Press MASTER ON/OFF on the front panel inward to the ON position to turn on the front panel again to release it...
... front panel as well as POWER and STANDBY on the remote control are complete, turn off this unit. MASTER Front panel ■ Turning off this unit Press MASTER ON/OFF on this unit. model) POWER TV POWER AV STANDBY POWER XM AUDIO SEL SLEEP PHONO TUNER CD MULTI CH IN STANDBY POWER MASTER... ON/OFF ■ Turning on this unit Press MASTER ON/OFF on the front panel inward to the ON position to turn on the front panel again to release it...
MCXSP10 Manual
Page 37
... the following check points before starting the AUTO SETUP operations. • Speakers are connected appropriately. • Supplied optimizer microphone is connected to this unit is turned on page 34 and carry out the operations. PRESET/CH A-E/CAT. This is sufficiently quiet. • The video monitor connected to this unit and placed...
... the following check points before starting the AUTO SETUP operations. • Speakers are connected appropriately. • Supplied optimizer microphone is connected to this unit is turned on page 34 and carry out the operations. PRESET/CH A-E/CAT. This is sufficiently quiet. • The video monitor connected to this unit and placed...
MCXSP10 Manual
Page 42
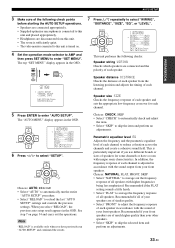
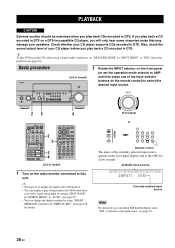
... ZONE 2 ZONE 3 SILENT CINEMA S VIDEO VIDEO L AUDIO R OPTICAL ENHANCER NIGHT PROGRAM OPTIMIZER MIC PHONES VIDEO AUX VOLUME INPUT 25 4 POWER TV POWER AV STANDBY POWER XM AUDIO SEL SLEEP PHONO TUNER CD MULTI CH IN V-AUX/DOCK CBL/SAT MD/TAPE CD-R DTV VCR 1 DVR/VCR 2 DVD SELECT... SOURCE TV TV MUTE TV INPUT MUTE 2 5 2 4 LEVEL TITLE BAND PRESET/CH SET MENU MENU SRCH MODE PURE DIRECT ENTER AUDIO A-E/CAT. model) 1 Turn on the remote control) to select the desired input source. Basic procedure (U.S.A. If you play back a CD encoded in DTS on the front panel (or...
... ZONE 2 ZONE 3 SILENT CINEMA S VIDEO VIDEO L AUDIO R OPTICAL ENHANCER NIGHT PROGRAM OPTIMIZER MIC PHONES VIDEO AUX VOLUME INPUT 25 4 POWER TV POWER AV STANDBY POWER XM AUDIO SEL SLEEP PHONO TUNER CD MULTI CH IN V-AUX/DOCK CBL/SAT MD/TAPE CD-R DTV VCR 1 DVR/VCR 2 DVD SELECT... SOURCE TV TV MUTE TV INPUT MUTE 2 5 2 4 LEVEL TITLE BAND PRESET/CH SET MENU MENU SRCH MODE PURE DIRECT ENTER AUDIO A-E/CAT. model) 1 Turn on the remote control) to select the desired input source. Basic procedure (U.S.A. If you play back a CD encoded in DTS on the front panel (or...

MCXSP10 Manual
Page 47
... you are switching the amount of time for details about tuning instructions. SLEEP 90min. SLEEP 60min. SLEEP OFF Disappears The SLEEP indicator turns off any external components connected to the AC OUTLET(S) (see page 96). The SLEEP indicator flashes while you can enjoy listening to classical...SLEEP 120min. SLEEP OFF SLEEP 30min. Using the sleep timer Use this unit is playing or recording a source. The sleep timer also automatically turns off , and "SLEEP OFF" disappears from an audio source. SLEEP Flashes STRAIGHT Analog SLEEP Lights up in the front panel display, and the...
... you are switching the amount of time for details about tuning instructions. SLEEP 90min. SLEEP 60min. SLEEP OFF Disappears The SLEEP indicator turns off any external components connected to the AC OUTLET(S) (see page 96). The SLEEP indicator flashes while you can enjoy listening to classical...SLEEP 120min. SLEEP OFF SLEEP 30min. Using the sleep timer Use this unit is playing or recording a source. The sleep timer also automatically turns off , and "SLEEP OFF" disappears from an audio source. SLEEP Flashes STRAIGHT Analog SLEEP Lights up in the front panel display, and the...

MCXSP10 Manual
Page 53
... indicator lights up in the front panel display. When you set to enjoy the CINEMA DSP programs without surround speakers. When the input source is turned back on the remote control so that "STRAIGHT" disappears from only the front left and right speakers. Plays back multi-channel PCM (Pulse Code Modulation...
... indicator lights up in the front panel display. When you set to enjoy the CINEMA DSP programs without surround speakers. When the input source is turned back on the remote control so that "STRAIGHT" disappears from only the front left and right speakers. Plays back multi-channel PCM (Pulse Code Modulation...


