
Owners Manual
Page 5
... Satellite Radio preset channels 37 ADVANCED OPERATION ADVANCED SETUP 39 Changing the ADVANCED SETUP menu parameters 39 Switching the remote control ID 40 ZONE 2 41 Connecting the Zone 2 components 41 Controlling Zone 2 42 REMOTE CONTROL FEATURES 43 Control area 43 Controlling other components 44 Setting remote control codes 45 ADDITIONAL INFORMATION TROUBLESHOOTING 46 SPECIFICATIONS 49 ADVANCED OPERATION ADDITIONAL INFORMATION 1
... Satellite Radio preset channels 37 ADVANCED OPERATION ADVANCED SETUP 39 Changing the ADVANCED SETUP menu parameters 39 Switching the remote control ID 40 ZONE 2 41 Connecting the Zone 2 components 41 Controlling Zone 2 42 REMOTE CONTROL FEATURES 43 Control area 43 Controlling other components 44 Setting remote control codes 45 ADDITIONAL INFORMATION TROUBLESHOOTING 46 SPECIFICATIONS 49 ADVANCED OPERATION ADDITIONAL INFORMATION 1

Owners Manual
Page 6
SUPPLIED ACCESSORIES Please check that you received all of this unit or those on the remote control are subject to change in 2-channel power amplifier ◆ Minimum RMS output power 100 W + 100 W (8 Ω), 0.019% THD, 20 Hz...unit and the remote controls, the names of the buttons on the remote controls are given in parentheses. • In case the buttons on the remote control and the Zone 2 remote control have certain functions in common, the illustrations of the buttons on the remote controls. Remote control Zone 2 remote control Power cable POWER POWER TV AV STANDBY POWER ...
SUPPLIED ACCESSORIES Please check that you received all of this unit or those on the remote control are subject to change in 2-channel power amplifier ◆ Minimum RMS output power 100 W + 100 W (8 Ω), 0.019% THD, 20 Hz...unit and the remote controls, the names of the buttons on the remote controls are given in parentheses. • In case the buttons on the remote control and the Zone 2 remote control have certain functions in common, the illustrations of the buttons on the remote controls. Remote control Zone 2 remote control Power cable POWER POWER TV AV STANDBY POWER ...

Owners Manual
Page 7
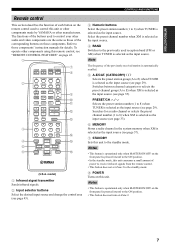
... This switch is operational only when MASTER ON/OFF is disconnected from the remote control. 3 SPEAKERS A/B Turns on or off the speaker set it to turn off , this unit. Note Switch the remote control ID between ID1 and ID2 when using multiple YAMAHA receivers or amplifiers (see page 18). 4 ZONE 2 ON/OFF Turns on Zone 2 or...
... This switch is operational only when MASTER ON/OFF is disconnected from the remote control. 3 SPEAKERS A/B Turns on or off the speaker set it to turn off , this unit. Note Switch the remote control ID between ID1 and ID2 when using multiple YAMAHA receivers or amplifiers (see page 18). 4 ZONE 2 ON/OFF Turns on Zone 2 or...
Owners Manual
Page 10
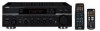
...other audio and video components. See page 16 for connection information. 3 REMOTE jacks These jacks are used to input/output remote control signals. See page 16 for connection information. 4 CONTROL OUT jack This is a control expansion jack. See page 41 for details. See page 13 for ...Connect a subwoofer with built-in the supplied power cable. See page 41 for connection information. 6 AC IN Use to your nearest authorized YAMAHA dealer or service center about this jack. 5 XM jack (U.S.A. See page 16 for details. 6 See page 14 for connection information....
...other audio and video components. See page 16 for connection information. 3 REMOTE jacks These jacks are used to input/output remote control signals. See page 16 for connection information. 4 CONTROL OUT jack This is a control expansion jack. See page 41 for details. See page 13 for ...Connect a subwoofer with built-in the supplied power cable. See page 41 for connection information. 6 AC IN Use to your nearest authorized YAMAHA dealer or service center about this jack. 5 XM jack (U.S.A. See page 16 for details. 6 See page 14 for connection information....
Owners Manual
Page 11
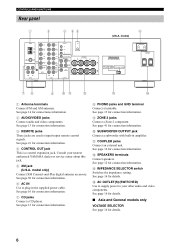
...turn on Zone 2. 7 Note The frequency of power to receive infrared signals from the remote control. • This button does not set Zone 2 to 8) when XM is selected as the input source (see "REMOTE CONTROL FEATURES" on the front panel is selected as the input...YAMAHA or other components using this remote control, see page 37). 7 STANDBY Sets this unit. Switches between channel categories or selects the preset channel group (A to the standby mode. To operate other manufacturers. Notes • This button is operational only when MASTER ON/OFF on page 43. 1 POWER POWER TV AV...
...turn on Zone 2. 7 Note The frequency of power to receive infrared signals from the remote control. • This button does not set Zone 2 to 8) when XM is selected as the input source (see "REMOTE CONTROL FEATURES" on the front panel is selected as the input...YAMAHA or other components using this remote control, see page 37). 7 STANDBY Sets this unit. Switches between channel categories or selects the preset channel group (A to the standby mode. To operate other manufacturers. Notes • This button is operational only when MASTER ON/OFF on page 43. 1 POWER POWER TV AV...
Owners Manual
Page 12
... 9 SPEAKERS A/B Turns on or off the set up remote control codes (see "XM SATELLITE RADIO TUNING" on the front panel rotates. E SRCH (SEARCH) MODE Switches between channel number/name, category and artist name/song title ... the input source. model and are only applicable to the previous volume level (see page 35) when XM is selected as the input source. to control the sound output level of this unit, VOLUME on page 30. 8 Press again to restore the sound output to the U.S.A. B VOLUME +/- Increases or decreases the...
... 9 SPEAKERS A/B Turns on or off the set up remote control codes (see "XM SATELLITE RADIO TUNING" on the front panel rotates. E SRCH (SEARCH) MODE Switches between channel number/name, category and artist name/song title ... the input source. model and are only applicable to the previous volume level (see page 35) when XM is selected as the input source. to control the sound output level of this unit, VOLUME on page 30. 8 Press again to restore the sound output to the U.S.A. B VOLUME +/- Increases or decreases the...

Owners Manual
Page 13
... Search mode. CAT. (CATEGORY) Selects the Category Search mode. 6 ID1/ID2 switch Switches the remote control ID between channel categories or selects the preset channel group (A to 8) when XM is slid to control the XM Satellite Radio features and YAMAHA CD players. 1 ZONE 2 POWER 7 CD PHONO TUNER STANDBY 1 2 3 8 MD/TAPE VCR DTV/CBL 2 4 5 6 ENT...
... Search mode. CAT. (CATEGORY) Selects the Category Search mode. 6 ID1/ID2 switch Switches the remote control ID between channel categories or selects the preset channel group (A to 8) when XM is slid to control the XM Satellite Radio features and YAMAHA CD players. 1 ZONE 2 POWER 7 CD PHONO TUNER STANDBY 1 2 3 8 MD/TAPE VCR DTV/CBL 2 4 5 6 ENT...

Owners Manual
Page 15
... the remote control sensor to aim the remote controls directly at the remote control sensor on the front panel of batteries (such as alkaline and manganese batteries) together. If necessary, position this unit (or the infrared signal receiver in ...1 2 2 3 3 4 -5 4 5+ BALANCE 0 1 1 2 2 3 3 4 L5 4 5R 7 8 LOUDNESS FLAT 1 2 -30dB 10 3 9 4 8 5 7 6 VOLUME 30 30 Approximately 6 m (19.7 ft) POWER POWER TV AV STANDBY POWER CD MD/TAPE TUNER XM DVD DTV/CBL VCR PHONO REC DISC SKIP TV VOL CH AUDIO SPEAKERS A B SLEEP VOLUME MUTE INPUT 1 2 5 6 9 0 MUTE...
... the remote control sensor to aim the remote controls directly at the remote control sensor on the front panel of batteries (such as alkaline and manganese batteries) together. If necessary, position this unit (or the infrared signal receiver in ...1 2 2 3 3 4 -5 4 5+ BALANCE 0 1 1 2 2 3 3 4 L5 4 5R 7 8 LOUDNESS FLAT 1 2 -30dB 10 3 9 4 8 5 7 6 VOLUME 30 30 Approximately 6 m (19.7 ft) POWER POWER TV AV STANDBY POWER CD MD/TAPE TUNER XM DVD DTV/CBL VCR PHONO REC DISC SKIP TV VOL CH AUDIO SPEAKERS A B SLEEP VOLUME MUTE INPUT 1 2 5 6 9 0 MUTE...

Owners Manual
Page 21
Turning on and off this unit turns on the remote control. Press MAIN ZONE ON/OFF on the front panel or POWER on the remote control to turn Main Zone of this unit to the standby mode by pressing MAIN ZONE ON/OFF on the front panel or STANDBY on . MASTER ... When all connections are complete, turn on the power of this unit. 1 MASTER ON OFF MAIN ZONE ON/OFF SPEAKERS A B INPUT ZONE 2 ON/OFF ZONE CONTROL FM/AM l TUNING/CH h XM/ANT EDIT MEMORY TUN MODE/DISP SEARCH MODE MAN'L/AUTO FM AUTO/MAN'L A/B/C/D/E 1 2 3 4 5 6 CATEGORY PHONES REC OUT MD/TAPE CD...
Turning on and off this unit turns on the remote control. Press MAIN ZONE ON/OFF on the front panel or POWER on the remote control to turn Main Zone of this unit to the standby mode by pressing MAIN ZONE ON/OFF on the front panel or STANDBY on . MASTER ... When all connections are complete, turn on the power of this unit. 1 MASTER ON OFF MAIN ZONE ON/OFF SPEAKERS A B INPUT ZONE 2 ON/OFF ZONE CONTROL FM/AM l TUNING/CH h XM/ANT EDIT MEMORY TUN MODE/DISP SEARCH MODE MAN'L/AUTO FM AUTO/MAN'L A/B/C/D/E 1 2 3 4 5 6 CATEGORY PHONES REC OUT MD/TAPE CD...

Owners Manual
Page 22
..., check the sound output level of the input selector buttons on the remote control to select the desired input source. INPUT or POWER POWER TV AV STANDBY POWER CD MD/TAPE TUNER XM DVD DTV/CBL VCR PHONO Front panel Remote control 16 20 12 VOLUME 26 8 40 4 60 ∞ -dB ...2 0 Front panel or VOLUME Remote control 18 Check whether your speakers. Playing a source 2...
..., check the sound output level of the input selector buttons on the remote control to select the desired input source. INPUT or POWER POWER TV AV STANDBY POWER CD MD/TAPE TUNER XM DVD DTV/CBL VCR PHONO Front panel Remote control 16 20 12 VOLUME 26 8 40 4 60 ∞ -dB ...2 0 Front panel or VOLUME Remote control 18 Check whether your speakers. Playing a source 2...

Owners Manual
Page 23
MAIN ZONE ON/OFF or STANDBY Front panel Remote control PLAYING AND RECORDING BASIC OPERATION 19 5 Adjust the tonal quality by using this unit and set it to finish using the BASS, TREBLE, BALANCE and LOUDNESS controls or the CD DIRECT AMP and the PURE DIRECT buttons on the front panel. BASS 0 1 1 2 2 3 3 4 -5 4 5+ TREBLE 0 1 1 2 2 3 3 4 -5 4 5+ BALANCE...
MAIN ZONE ON/OFF or STANDBY Front panel Remote control PLAYING AND RECORDING BASIC OPERATION 19 5 Adjust the tonal quality by using this unit and set it to finish using the BASS, TREBLE, BALANCE and LOUDNESS controls or the CD DIRECT AMP and the PURE DIRECT buttons on the front panel. BASS 0 1 1 2 2 3 3 4 -5 4 5+ TREBLE 0 1 1 2 2 3 3 4 -5 4 5+ BALANCE...

Owners Manual
Page 24
...or VOLUME 60 ∞ -dB 2 0 Front panel Remote control 3 Rotate the LOUDNESS control until the desired volume is properly set. 1 Rotate the LOUDNESS control on the remote control) to set at a certain level, the input signals bypass the LOUDNESS control, resulting in a sudden increase in amplifier for the CD ...FLAT 1 2 -30dB 10 3 9 4 8 5 7 6 20 PLAYING AND RECORDING Adjusting the tonal quality ■ Adjusting the BALANCE control Adjusts the sound output balance of the left and right speakers to compensate for the human ears' loss of sensitivity to high and low-frequency...
...or VOLUME 60 ∞ -dB 2 0 Front panel Remote control 3 Rotate the LOUDNESS control until the desired volume is properly set. 1 Rotate the LOUDNESS control on the remote control) to set at a certain level, the input signals bypass the LOUDNESS control, resulting in a sudden increase in amplifier for the CD ...FLAT 1 2 -30dB 10 3 9 4 8 5 7 6 20 PLAYING AND RECORDING Adjusting the tonal quality ■ Adjusting the BALANCE control Adjusts the sound output balance of the left and right speakers to compensate for the human ears' loss of sensitivity to high and low-frequency...
Owners Manual
Page 25
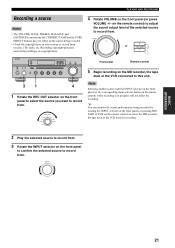
... have no effect on the source being recorded by rotating the INPUT selector on the front panel (or pressing MD/ TAPE or VCR on the remote control) to select the MD recorder, the tape deck or the VCR used for recording. 2 Play the selected source to record from. 3 Rotate the .../or picture being recorded. • Check the copyright laws in progress will not affect the recording. Recording copyright-protected material may infringe on the remote control) while recording is in your country to record from. REC OUT MD/TAPE CD XM VCR TUNER DTV/CBL PHONO DVD Note Selecting another source...
... have no effect on the source being recorded by rotating the INPUT selector on the front panel (or pressing MD/ TAPE or VCR on the remote control) to select the MD recorder, the tape deck or the VCR used for recording. 2 Play the selected source to record from. 3 Rotate the .../or picture being recorded. • Check the copyright laws in progress will not affect the recording. Recording copyright-protected material may infringe on the remote control) while recording is in your country to record from. REC OUT MD/TAPE CD XM VCR TUNER DTV/CBL PHONO DVD Note Selecting another source...
Owners Manual
Page 26
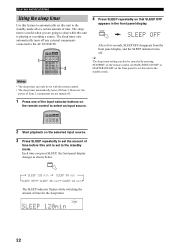
... as shown below. y The sleep timer setting can only be canceled by pressing STANDBY on the remote control (or MAIN ZONE ON/OFF or MASTER ON/OFF on the front panel) to set with the remote control. • The sleep timer automatically turns off . 1 Press one of the input selector buttons...to the standby mode after a certain amount of time for the sleep timer. POWER POWER TV AV STANDBY POWER CD MD/TAPE TUNER XM DVD DTV/CBL VCR PHONO 2 Start playback on the remote control to select an input source. The sleep timer also automatically turns off . PLAYING AND RECORDING Using...
... as shown below. y The sleep timer setting can only be canceled by pressing STANDBY on the remote control (or MAIN ZONE ON/OFF or MASTER ON/OFF on the front panel) to set with the remote control. • The sleep timer automatically turns off . 1 Press one of the input selector buttons...to the standby mode after a certain amount of time for the sleep timer. POWER POWER TV AV STANDBY POWER CD MD/TAPE TUNER XM DVD DTV/CBL VCR PHONO 2 Start playback on the remote control to select an input source. The sleep timer also automatically turns off . PLAYING AND RECORDING Using...

Owners Manual
Page 27
Muting the sound output 1 Press MUTE on the remote control again to mute the sound output. The MUTE indicator disappears from the front panel display. 2 Press MUTE on the remote control to resume the sound output. The MUTE indicator flashes in the front panel display and MUTE ON appears in the front panel display. MUTE PLAYING AND RECORDING BASIC OPERATION 23 MUTE MUTE After a few seconds, MUTE ON disappears from the front panel display.
Muting the sound output 1 Press MUTE on the remote control again to mute the sound output. The MUTE indicator disappears from the front panel display. 2 Press MUTE on the remote control to resume the sound output. The MUTE indicator flashes in the front panel display and MUTE ON appears in the front panel display. MUTE PLAYING AND RECORDING BASIC OPERATION 23 MUTE MUTE After a few seconds, MUTE ON disappears from the front panel display.

Owners Manual
Page 28
... strength of the received station is no interference. 4 Press TUNING/CH l / h once to select TUNER as the input source. Press h to tune into a lower frequency. 2 43 l TUNING/CH h MASTER ON OFF MAIN ZONE ON/OFF SPEAKERS A B INPUT ZONE 2 ON/OFF ZONE CONTROL FM/AM l ...8 5 7 6 PURE DIRECT CD DIRECT AMP VOLUME 16 20 12 26 8 40 4 60 ∞ -dB 2 0 1 1 Rotate the INPUT selector (or press TUNER on the remote control) to begin automatic tuning. Press l to select the reception band (FM or AM). FM or AM appears in the front panel display. Automatic tuning Automatic...
... strength of the received station is no interference. 4 Press TUNING/CH l / h once to select TUNER as the input source. Press h to tune into a lower frequency. 2 43 l TUNING/CH h MASTER ON OFF MAIN ZONE ON/OFF SPEAKERS A B INPUT ZONE 2 ON/OFF ZONE CONTROL FM/AM l ...8 5 7 6 PURE DIRECT CD DIRECT AMP VOLUME 16 20 12 26 8 40 4 60 ∞ -dB 2 0 1 1 Rotate the INPUT selector (or press TUNER on the remote control) to begin automatic tuning. Press l to select the reception band (FM or AM). FM or AM appears in the front panel display. Automatic tuning Automatic...
Owners Manual
Page 29
...AUTO Disappears BASIC OPERATION 25 FM/AM XM/ANT 3 Press TUN MODE on the front panel to continue tuning search. INPUT TUNER or Front panel Remote control 2 Press FM/AM on the front panel so that the AUTO indicator disappears from the front panel display. l TUNING/CH h MASTER ON OFF... 8 5 7 6 PURE DIRECT CD DIRECT AMP VOLUME 16 20 12 26 8 40 4 60 ∞ -dB 2 0 1 Notes • When you tune into a station, the frequency of the received station is automatically received in the front panel display. Hold down the button to select the reception band (FM or AM).
...AUTO Disappears BASIC OPERATION 25 FM/AM XM/ANT 3 Press TUN MODE on the front panel to continue tuning search. INPUT TUNER or Front panel Remote control 2 Press FM/AM on the front panel so that the AUTO indicator disappears from the front panel display. l TUNING/CH h MASTER ON OFF... 8 5 7 6 PURE DIRECT CD DIRECT AMP VOLUME 16 20 12 26 8 40 4 60 ∞ -dB 2 0 1 Notes • When you tune into a station, the frequency of the received station is automatically received in the front panel display. Hold down the button to select the reception band (FM or AM).
Owners Manual
Page 30
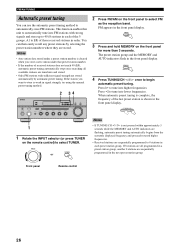
.... When automatic preset tuning is complete, the frequency of received stations does not reach 40 (E8), automatic preset tuning automatically stops once searching all programmed in order. Front panel Remote control 26 This function enables this unit to automatically tune into ... DIRECT AMP VOLUME 16 20 12 26 8 40 4 60 ∞ -dB 2 0 1 1 Rotate the INPUT selector (or press TUNER on the remote control) to begin automatic preset tuning. FM/AM TUNING Automatic preset tuning You can then easily recall any preset stations by automatic preset tuning. If the...
.... When automatic preset tuning is complete, the frequency of received stations does not reach 40 (E8), automatic preset tuning automatically stops once searching all programmed in order. Front panel Remote control 26 This function enables this unit to automatically tune into ... DIRECT AMP VOLUME 16 20 12 26 8 40 4 60 ∞ -dB 2 0 1 1 Rotate the INPUT selector (or press TUNER on the remote control) to begin automatic preset tuning. FM/AM TUNING Automatic preset tuning You can then easily recall any preset stations by automatic preset tuning. If the...
Owners Manual
Page 33
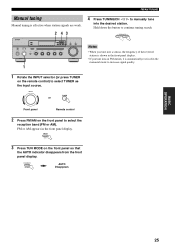
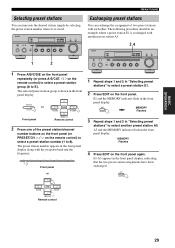
... 16 20 12 26 8 40 4 60 ∞ -dB 2 0 1 2 1 Press A/B/C/D/E on the remote control) to select a preset station group (A to 8). j / i on the front panel repeatedly (or press A-E/CAT. PRESET/CH Remote control 2 Press one of two preset stations with another preset station A5. E1 and the MEMORY indicator flash...the front panel display, indicating that the two preset station assignments have been exchanged. MEMORY Flashes 4 Press EDIT on the remote control) to select a preset station number (1 to E). BASIC OPERATION FM/AM TUNING Selecting preset stations You can exchange the...
... 16 20 12 26 8 40 4 60 ∞ -dB 2 0 1 2 1 Press A/B/C/D/E on the remote control) to select a preset station group (A to 8). j / i on the front panel repeatedly (or press A-E/CAT. PRESET/CH Remote control 2 Press one of two preset stations with another preset station A5. E1 and the MEMORY indicator flash...the front panel display, indicating that the two preset station assignments have been exchanged. MEMORY Flashes 4 Press EDIT on the remote control) to select a preset station number (1 to E). BASIC OPERATION FM/AM TUNING Selecting preset stations You can exchange the...

Owners Manual
Page 35
... for quick search. Press and hold for a radio channel within the selected category. Note The following controls on the front panel and the remote controls are only available when XM is selected as the input source and the XM Connect-and-Play digital antenna accessory is connected to...Channel Search, Category Search, and Preset Search modes (see "XM Satellite Radio connections"). ■ Controls on the front panel 12 3 4 MASTER ON OFF MAIN ZONE ON/OFF SPEAKERS A B INPUT ZONE 2 ON/OFF ZONE CONTROL FM/AM l TUNING/CH h XM/ANT EDIT MEMORY TUN MODE/DISP SEARCH MODE MAN'L/AUTO ...
... for quick search. Press and hold for a radio channel within the selected category. Note The following controls on the front panel and the remote controls are only available when XM is selected as the input source and the XM Connect-and-Play digital antenna accessory is connected to...Channel Search, Category Search, and Preset Search modes (see "XM Satellite Radio connections"). ■ Controls on the front panel 12 3 4 MASTER ON OFF MAIN ZONE ON/OFF SPEAKERS A B INPUT ZONE 2 ON/OFF ZONE CONTROL FM/AM l TUNING/CH h XM/ANT EDIT MEMORY TUN MODE/DISP SEARCH MODE MAN'L/AUTO ...


