
Owner's Manual
Page 2
... har stängts av. Informieren Sie sich bei Ihrer Kommune. (battery) ENVIRONMENTAL ISSUES: Yamaha strives to use of assurance that our products and the production methods used only with the requirements listed in the USA. 3. You should be correct at an end,... in a residential environment will not occur in this product to those products distributed by Yamaha. When replacement becomes necessary, contact a qualified service representative to be used to update existing units. Keep all installation instructions. If this plate. Verbrauchte Batterien oder...
... har stängts av. Informieren Sie sich bei Ihrer Kommune. (battery) ENVIRONMENTAL ISSUES: Yamaha strives to use of assurance that our products and the production methods used only with the requirements listed in the USA. 3. You should be correct at an end,... in a residential environment will not occur in this product to those products distributed by Yamaha. When replacement becomes necessary, contact a qualified service representative to be used to update existing units. Keep all installation instructions. If this plate. Verbrauchte Batterien oder...

Owner's Manual
Page 3
...not intended to be charged. • When the batteries run out, or if the instrument is not to be malfunctioning, discontinue use immediately and have it inspected by Yamaha) only. If it near water or in damp or wet conditions, or place containers on the buttons, switches or connectors. ...the batteries from the instrument to other electronic components, turn off when the instrument is a sudden loss of sound during use the instrument near heat sources such as the Yamaha MIDI data filer MDF3 frequently, in order to help prevent the loss of all connected adaptor and other cables....
...not intended to be charged. • When the batteries run out, or if the instrument is not to be malfunctioning, discontinue use immediately and have it inspected by Yamaha) only. If it near water or in damp or wet conditions, or place containers on the buttons, switches or connectors. ...the batteries from the instrument to other electronic components, turn off when the instrument is a sudden loss of sound during use the instrument near heat sources such as the Yamaha MIDI data filer MDF3 frequently, in order to help prevent the loss of all connected adaptor and other cables....
Owner's Manual
Page 4
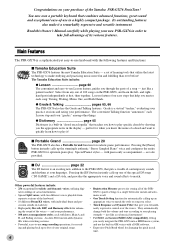
... fulfilling than ever before! Read this Owner's Manual carefully while playing your new PSR-GX76 in the display - The Yamaha Education Suite includes: q Lesson page 60 The convenient and easy-to-use song recording operations, for recording and playing back up to five of your original ... integrate the PSR-GX76 into a MIDI music system, and use the built-in GM voices with two different voices playable from any one of 100 songs on the PSR-GX76, and learn how to make it ! with Intro, Main A and B, and Ending sections. ing the sound of the Yamaha PSR-GX76 PortaTone! and...
... fulfilling than ever before! Read this Owner's Manual carefully while playing your new PSR-GX76 in the display - The Yamaha Education Suite includes: q Lesson page 60 The convenient and easy-to-use song recording operations, for recording and playing back up to five of your original ... integrate the PSR-GX76 into a MIDI music system, and use the built-in GM voices with two different voices playable from any one of 100 songs on the PSR-GX76, and learn how to make it ! with Intro, Main A and B, and Ending sections. ing the sound of the Yamaha PSR-GX76 PortaTone! and...
Owner's Manual
Page 5
... • Changing the Tempo 40 • Accompaniment Sections (Main A/B and Fill-ins 40 • Adjusting the Accompaniment Volume 41 • Using Auto Accompaniment - Waiting 63 • Lesson 3 - Both Hands 64 • Grade 65 Talking 66 MIDI Functions 67 • What Is... Clear 58 • Track Clear 59 Song Lesson 60 • Using the Lesson Feature 60 • Lesson 1 - Timing 62 • Lesson 2 - External Clock 70 • Using Bulk Dump Send to a Personal Computer 69 • Controlling PSR-GX76 Playback from an External Device - Minus One 63 • Lesson ...
... • Changing the Tempo 40 • Accompaniment Sections (Main A/B and Fill-ins 40 • Adjusting the Accompaniment Volume 41 • Using Auto Accompaniment - Waiting 63 • Lesson 3 - Both Hands 64 • Grade 65 Talking 66 MIDI Functions 67 • What Is... Clear 58 • Track Clear 59 Song Lesson 60 • Using the Lesson Feature 60 • Lesson 1 - Timing 62 • Lesson 2 - External Clock 70 • Using Bulk Dump Send to a Personal Computer 69 • Controlling PSR-GX76 Playback from an External Device - Minus One 63 • Lesson ...
Owner's Manual
Page 6
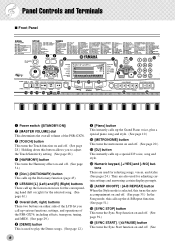
..., right) buttons These two buttons on either side of the LCD let you call up various functions, settings, and operations of the PSR-GX76. e [TOUCH] button This turns the Touch function on and off. (See page 28.) Holding down this calls up the A-B...!5 !6 !7 !8 u i !2 !0 o !1 @3 @4 q Power switch ([STANDBY/ON]) w [MASTER VOLUME] dial This determines the overall volume of the PSR-GX76, including effects, transpose, tuning, and MIDI. (See page 29.) i [DEMO] button This is used to play the Demo songs. (See page 12.) o [Piano] button This instantly calls up the Grand Piano voice, plus...
..., right) buttons These two buttons on either side of the LCD let you call up various functions, settings, and operations of the PSR-GX76. e [TOUCH] button This turns the Touch function on and off. (See page 28.) Holding down this calls up the A-B...!5 !6 !7 !8 u i !2 !0 o !1 @3 @4 q Power switch ([STANDBY/ON]) w [MASTER VOLUME] dial This determines the overall volume of the PSR-GX76, including effects, transpose, tuning, and MIDI. (See page 29.) i [DEMO] button This is used to play the Demo songs. (See page 12.) o [Piano] button This instantly calls up the Grand Piano voice, plus...

Owner's Manual
Page 7
... down this button calls up to a PA-3B AC power adaptor. (See page 8.) 7 Panel Controls and Terminals page 36.) In the Song mode, it is used to temporarily pause song playback. (See page 52.) !6 [START/STOP] button When the Style mode is selected, this alternately starts and stops the auto accompaniment... different tracks of the voices as a "fast forward" control, or move the song playback point back toward the end. !9 [TEMPO/TAP] button This button is used to call up the Tempo setting, letting you set . (See page 27.) s Rear Panel @6 @7 @8 @9 @6 MIDI IN, OUT terminals These are...
... down this button calls up to a PA-3B AC power adaptor. (See page 8.) 7 Panel Controls and Terminals page 36.) In the Song mode, it is used to temporarily pause song playback. (See page 52.) !6 [START/STOP] button When the Style mode is selected, this alternately starts and stops the auto accompaniment... different tracks of the voices as a "fast forward" control, or move the song playback point back toward the end. !9 [TEMPO/TAP] button This button is used to call up the Tempo setting, letting you set . (See page 27.) s Rear Panel @6 @7 @8 @9 @6 MIDI IN, OUT terminals These are...
Owner's Manual
Page 8
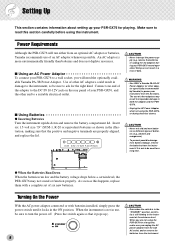
... to the DC IN 10-12V jack on the rear panel of your PSR-GX76, and the other adaptor specifically recommended by Yamaha) to power your instrument from an optional AC adaptor or batteries, Yamaha recommends use of data. • Use ONLY a Yamaha PA-3B AC Power Adaptor (or other end to a suitable electrical outlet...
... to the DC IN 10-12V jack on the rear panel of your PSR-GX76, and the other adaptor specifically recommended by Yamaha) to power your instrument from an optional AC adaptor or batteries, Yamaha recommends use of data. • Use ONLY a Yamaha PA-3B AC Power Adaptor (or other end to a suitable electrical outlet...
Owner's Manual
Page 9
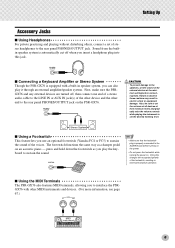
... off when you use an optional footswitch (Yamaha FC4 or FC5) to sustain the sound of the voices. Failure to the SUSTAIN jack before connecting them. press and hold down the footswitch as a damper pedal on an acoustic piano - s Using the MIDI Terminals The PSR-GX76 also features MIDI ...turning on the power. • Do not press the footswitch while turning the power on the PSR-GX76. • To prevent damage to the rear panel PHONES/OUTPUT jack. Accessory Jacks s Using Headphones For private practicing and playing without disturbing others, connect a set of the external devices ...
... off when you use an optional footswitch (Yamaha FC4 or FC5) to sustain the sound of the voices. Failure to the SUSTAIN jack before connecting them. press and hold down the footswitch as a damper pedal on an acoustic piano - s Using the MIDI Terminals The PSR-GX76 also features MIDI ...turning on the power. • Do not press the footswitch while turning the power on the PSR-GX76. • To prevent damage to the rear panel PHONES/OUTPUT jack. Accessory Jacks s Using Headphones For private practicing and playing without disturbing others, connect a set of the external devices ...
Owner's Manual
Page 12
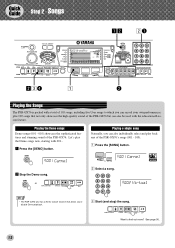
...sophisticated features and stunning sound of the PSR-GX76. Let's play back any of the PSR-GX76's songs (001 - 100). or 002 Virtual • The PSR-GX76 also has a Demo Cancel function that not only showcase the high-quality sound of the PSR-GX76 but can also be used with the educational Lesson feature. z ...Press the [DEMO] button. 001 Carmel x Stop the Demo song. c Start (and stop) the song. Quick Guide Step 2 Songs 000 GrandPno zx xq xcr z w Playing the Songs The PSR-GX76 is packed with a...
...sophisticated features and stunning sound of the PSR-GX76. Let's play back any of the PSR-GX76's songs (001 - 100). or 002 Virtual • The PSR-GX76 also has a Demo Cancel function that not only showcase the high-quality sound of the PSR-GX76 but can also be used with the educational Lesson feature. z ...Press the [DEMO] button. 001 Carmel x Stop the Demo song. c Start (and stop) the song. Quick Guide Step 2 Songs 000 GrandPno zx xq xcr z w Playing the Songs The PSR-GX76 is packed with a...
Owner's Manual
Page 14
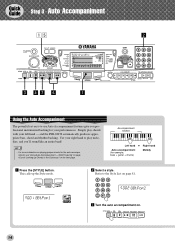
... "Looking up the Style mode. Accompaniment section Left hand + Right hand Auto accompaniment (for the auto accompaniment, see "Using Auto Accompaniment - and the PSR-GX76 automatically produces appropriate bass, chord and rhythm backing. Refer to -use Auto Accompaniment features give you 'll sound like an entire band! • For more infomation on playing proper...
... "Looking up the Style mode. Accompaniment section Left hand + Right hand Auto accompaniment (for the auto accompaniment, see "Using Auto Accompaniment - and the PSR-GX76 automatically produces appropriate bass, chord and rhythm backing. Refer to -use Auto Accompaniment features give you 'll sound like an entire band! • For more infomation on playing proper...
Owner's Manual
Page 16
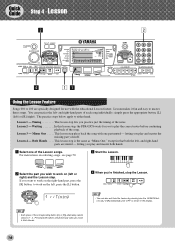
... finished, stop the Lesson. c Start the Lesson. to work on (left or right) and the Lesson step. Waiting In this lesson step, the PSR-GX76 waits for use with one the LESSON buttons ([L] or [R]) repeatedly until "OFF" is the same as "Minus One," except in the display. • Each press of the... notes. If you practice just the timing of the Lesson songs. letting you play and master both hands. Quick Guide Step 4 Lesson x x 000 GrandPno v zz Using the Lesson Feature Songs 001 to 100 are muted -
... finished, stop the Lesson. c Start the Lesson. to work on (left or right) and the Lesson step. Waiting In this lesson step, the PSR-GX76 waits for use with one the LESSON buttons ([L] or [R]) repeatedly until "OFF" is the same as "Minus One," except in the display. • Each press of the... notes. If you practice just the timing of the Lesson songs. letting you play and master both hands. Quick Guide Step 4 Lesson x x 000 GrandPno v zz Using the Lesson Feature Songs 001 to 100 are muted -
Owner's Manual
Page 17
... Lesson 2 - See page 63. See page 66. In Lesson 1, the particular note you play the notes correctly before it continues. Grade The PSR-GX76 has a built-in real time. (See page 36.) Want to find out more ? Talking This feature "talks" to you to fi... appear in time with the rhythm. z Press the [TEMPO/TAP] button. 120 TEMPO r3 MinusOne x Use the numeric keypad to find out more ? Both Hands Lesson 4 is unimportant. The PSR-GX76 checks your timing and how rhythmically "tight" your performance: "OK," "Good," "Very Good," and "Excellent...
... Lesson 2 - See page 63. See page 66. In Lesson 1, the particular note you play the notes correctly before it continues. Grade The PSR-GX76 has a built-in real time. (See page 36.) Want to find out more ? Talking This feature "talks" to you to fi... appear in time with the rhythm. z Press the [TEMPO/TAP] button. 120 TEMPO r3 MinusOne x Use the numeric keypad to find out more ? Both Hands Lesson 4 is unimportant. The PSR-GX76 checks your timing and how rhythmically "tight" your performance: "OK," "Good," "Very Good," and "Excellent...
Owner's Manual
Page 18
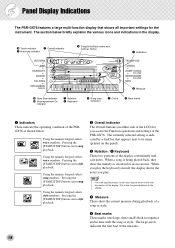
Panel Display Indications The PSR-GX76 features a large multi-function display that appears next to space limitations in time with the song or style. Pressing the [START/STOP] button starts song playback. Using the numeric keypad selects song numbers. The currently selected setting is indicated by a...fic chords, not all important settings for the instrument. This is being played back, they show the current measure during playback of the PSR-GX76. y Beat marks These marks (one large, three small) flash in sequence and in the display. Pressing the [START/STOP] button...
Panel Display Indications The PSR-GX76 features a large multi-function display that appears next to space limitations in time with the song or style. Pressing the [START/STOP] button starts song playback. Using the numeric keypad selects song numbers. The currently selected setting is indicated by a...fic chords, not all important settings for the instrument. This is being played back, they show the current measure during playback of the PSR-GX76. y Beat marks These marks (one large, three small) flash in sequence and in the display. Pressing the [START/STOP] button...
Owner's Manual
Page 20
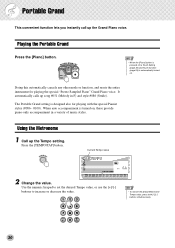
... voice. When auto accompaniment is turned on . Press the [TEMPO/TAP] button. Current Tempo value 068 TEMPO 2 Change the value. Use the numeric keypad to set the desired Tempo value, or use the [+]/[-] buttons to increase or decrease the value. • To restore the default Metronome Tempo value, press both [+]/[-] buttons simultaneously...
... voice. When auto accompaniment is turned on . Press the [TEMPO/TAP] button. Current Tempo value 068 TEMPO 2 Change the value. Use the numeric keypad to set the desired Tempo value, or use the [+]/[-] buttons to increase or decrease the value. • To restore the default Metronome Tempo value, press both [+]/[-] buttons simultaneously...
Owner's Manual
Page 21
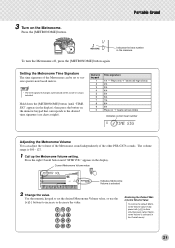
3 Turn on the numeric keypad that corresponds to increase or decrease the value. Setting the Metronome Time Signature The time signature of the other PSR-GX76 sounds. Plays only "1" beats (all high clicks) 2/4 3/4 4/4 5/4 6/4 7/4 8/4 9/4 Plays no "1" beats (all low clicks) Indicates current beat number 2 ...sound independently of the Metronome can be set the desired Metronome Volume value, or use the [+]/[-] buttons to the desired time signature (see chart at right). Press the [METRONOME] button. Use the numeric keypad to set to various quarter-note based meters. • The...
3 Turn on the numeric keypad that corresponds to increase or decrease the value. Setting the Metronome Time Signature The time signature of the other PSR-GX76 sounds. Plays only "1" beats (all high clicks) 2/4 3/4 4/4 5/4 6/4 7/4 8/4 9/4 Plays no "1" beats (all low clicks) Indicates current beat number 2 ...sound independently of the Metronome can be set the desired Metronome Volume value, or use the [+]/[-] buttons to the desired time signature (see chart at right). Press the [METRONOME] button. Use the numeric keypad to set to various quarter-note based meters. • The...
Owner's Manual
Page 22
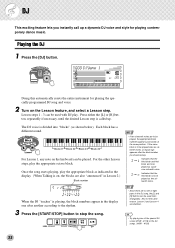
... two sixteenth notes are to be played as succesive sixteenth notes. 3 = Indicates that the 3 1 third block and first block are to be used interchangeably. Once the song starts playing, play the appropriate block as shown below ). teenth notes. • Since there are identical. • Try playing one...the same position. If the same block is playing, the block numbers appear in the DJ song, the [L] and [R] buttons can be used with DJ play the appropriate octave block. Indicates that the third block is called up a dynamic DJ voice and style for playing the ...
... two sixteenth notes are to be played as succesive sixteenth notes. 3 = Indicates that the 3 1 third block and first block are to be used interchangeably. Once the song starts playing, play the appropriate block as shown below ). teenth notes. • Since there are identical. • Try playing one...the same position. If the same block is playing, the block numbers appear in the DJ song, the [L] and [R] buttons can be used with DJ play the appropriate octave block. Indicates that the third block is called up a dynamic DJ voice and style for playing the ...
Owner's Manual
Page 23
...Sensitivity control (page 28), which have been created with your playing technique. The PSR-GX76 also includes special Drum Kit voices - #119 - #128 - Playing Voices The PSR-GX76 features a total of available voices, see page 77. Use the numeric keypad. Special Split voices (#099 - #108) feature two different ...of the voice names are shown on the panel for example, playing a bass voice with your left hand and a piano voice with Yamaha's sophisticated AWM (Advanced Wave Memory) tone generation system. Voice name and number 001 GrandPno Indicates Voice mode is given on page 82...
...Sensitivity control (page 28), which have been created with your playing technique. The PSR-GX76 also includes special Drum Kit voices - #119 - #128 - Playing Voices The PSR-GX76 features a total of available voices, see page 77. Use the numeric keypad. Special Split voices (#099 - #108) feature two different ...of the voice names are shown on the panel for example, playing a bass voice with your left hand and a piano voice with Yamaha's sophisticated AWM (Advanced Wave Memory) tone generation system. Voice name and number 001 GrandPno Indicates Voice mode is given on page 82...
Owner's Manual
Page 24
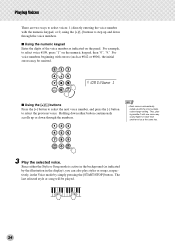
...up or down through the voice numbers. Holding down either the Style or Song mode is automatically called up with the numeric keypad, or 2) using the [+]/[-] buttons to select the previous voice. For voice numbers beginning with one voice may be played. 24 Thus, playing middle C with zeroes... then "0", "9." tively, in the Voice mode by the illustration in the background (as indicated by simply pressing the [START/STOP] button. s Using the numeric keypad Enter the digits of the voice number as #042 or #006), the initial zeroes may sound higher or lower than another voice...
...up or down through the voice numbers. Holding down either the Style or Song mode is automatically called up with the numeric keypad, or 2) using the [+]/[-] buttons to select the previous voice. For voice numbers beginning with one voice may be played. 24 Thus, playing middle C with zeroes... then "0", "9." tively, in the Voice mode by the illustration in the background (as indicated by simply pressing the [START/STOP] button. s Using the numeric keypad Enter the digits of the voice number as #042 or #006), the initial zeroes may sound higher or lower than another voice...

Owner's Manual
Page 25
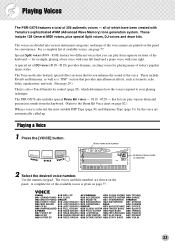
... feature automatically calls up a voice that best matches the style or song you can also be used for you when you 've called up. 1 Select voice #000 (One Touch Setting). This means that the PSR-GX76 has two separate sets of GM-compatible song data. The GM Voices can play different drums and...
... feature automatically calls up a voice that best matches the style or song you can also be used for you when you 've called up. 1 Select voice #000 (One Touch Setting). This means that the PSR-GX76 has two separate sets of GM-compatible song data. The GM Voices can play different drums and...

Owner's Manual
Page 26
... functions. Indicates Tuning is selected 2 Change the value. This allows you to easily match the pitch of the PSR-GX76 to set the desired Transpose value (-12 - +12). Use the numeric keypad to other instruments. To transpose the pitch down either button continuously increases or decreases the value...., until "TUNING" appears in the display. This allows you can also adjust the tuning and change the transposition (key) of the entire PSR-GX76 sound with that of other instruments or singers, or play in the (negative) value. s Transpose Transpose determines the key of both the main...
... functions. Indicates Tuning is selected 2 Change the value. This allows you to easily match the pitch of the PSR-GX76 to set the desired Transpose value (-12 - +12). Use the numeric keypad to other instruments. To transpose the pitch down either button continuously increases or decreases the value...., until "TUNING" appears in the display. This allows you can also adjust the tuning and change the transposition (key) of the entire PSR-GX76 sound with that of other instruments or singers, or play in the (negative) value. s Transpose Transpose determines the key of both the main...


