
Owners Manual
Page 5
...Receiver (RX-E810 3 DVD player (DVD-E810 6 Remote control 8 PREPARATION Connecting the System 12 Connecting a TV 14 Connecting Antennas 15 Connecting the AM loop antenna 15 Connecting the FM antenna 15 Connecting External Components 16 Connecting an MD player or a tape deck 16 Connecting an MD recorder or a CD recorder ........ 16 Connecting a YAMAHA... 49 Configuring the DVD Player Settings (Setup Menu 51 Setup menu items 52 Resetting the DVD player settings 56 ADDITIONAL INFORMATION Language Codes 57 Troubleshooting 58 Receiver (RX-E810 58 DVD player (DVD-E810 61 Remote ...
...Receiver (RX-E810 3 DVD player (DVD-E810 6 Remote control 8 PREPARATION Connecting the System 12 Connecting a TV 14 Connecting Antennas 15 Connecting the AM loop antenna 15 Connecting the FM antenna 15 Connecting External Components 16 Connecting an MD player or a tape deck 16 Connecting an MD recorder or a CD recorder ........ 16 Connecting a YAMAHA... 49 Configuring the DVD Player Settings (Setup Menu 51 Setup menu items 52 Resetting the DVD player settings 56 ADDITIONAL INFORMATION Language Codes 57 Troubleshooting 58 Receiver (RX-E810 58 DVD player (DVD-E810 61 Remote ...

Owners Manual
Page 6
... the following accessories. FEATURES Features Receiver (RX-E810) • Maximum RMS output power per channel 65W + 65W (6 Ω, 1 kHz, 1%THD) • 40-station FM/AM preset tuning • iPod dock terminal • Pure Direct mode DVD player (DVD-E810) • Plays DVDs, Video CDs, Audio CDs, ... • Remote control descriptions and illustrations in part as "DVD player". • This manual describes how to production. Before connecting this manual are subject to change in this system, make sure you received all of differences between the manual and the product, the ...
... the following accessories. FEATURES Features Receiver (RX-E810) • Maximum RMS output power per channel 65W + 65W (6 Ω, 1 kHz, 1%THD) • 40-station FM/AM preset tuning • iPod dock terminal • Pure Direct mode DVD player (DVD-E810) • Plays DVDs, Video CDs, Audio CDs, ... • Remote control descriptions and illustrations in part as "DVD player". • This manual describes how to production. Before connecting this manual are subject to change in this system, make sure you received all of differences between the manual and the product, the ...
Owners Manual
Page 7
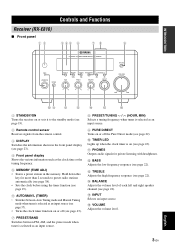
...0 TIMER LED Lights up when the clock timer is on or sets it to the standby mode (see page 19). 2 Remote control sensor Receives signals from the remote control. 3 DISPLAY Switches the information shown in the front panel display (see page 23). 4 Front panel display Shows the... (see page 22). Hold down this key for private listening with headphones. INTRODUCTION Controls and Functions Receiver (RX-E810) ■ Front panel 12 345 6 78 9 NATURAL SOUND STEREO RECEIVER RX-E810 PURE DIRECT TIMER STANDBY/ON PHONES DISPLAY MEMORY AUTO/MAN'L PRESET/BAND PRESET/TUNING BASS ...
...0 TIMER LED Lights up when the clock timer is on or sets it to the standby mode (see page 19). 2 Remote control sensor Receives signals from the remote control. 3 DISPLAY Switches the information shown in the front panel display (see page 23). 4 Front panel display Shows the... (see page 22). Hold down this key for private listening with headphones. INTRODUCTION Controls and Functions Receiver (RX-E810) ■ Front panel 12 345 6 78 9 NATURAL SOUND STEREO RECEIVER RX-E810 PURE DIRECT TIMER STANDBY/ON PHONES DISPLAY MEMORY AUTO/MAN'L PRESET/BAND PRESET/TUNING BASS ...

Owners Manual
Page 9
...Shows the various infomaiton such as YDS-10 sold separately) connected to the DOCK terminal of the Radio Data System data offered by the currently received Radio Data System station lights up or flashes when you preset radio stations. B MEMORY indicator Lights up . and Europe models only) The name...AUTO indicator Lights up when the receiver is in the Auto Tuning mode (see page 38). 5 DOCK indicator Lights up when you station your iPod in a YAMAHA iPod universal dock (such as the clock time or the tuning frequency. 0 TIMER indicator Flashes when the the receiver is in the clock timer setting ...
...Shows the various infomaiton such as YDS-10 sold separately) connected to the DOCK terminal of the Radio Data System data offered by the currently received Radio Data System station lights up or flashes when you preset radio stations. B MEMORY indicator Lights up . and Europe models only) The name...AUTO indicator Lights up when the receiver is in the Auto Tuning mode (see page 38). 5 DOCK indicator Lights up when you station your iPod in a YAMAHA iPod universal dock (such as the clock time or the tuning frequency. 0 TIMER indicator Flashes when the the receiver is in the clock timer setting ...
Owners Manual
Page 10
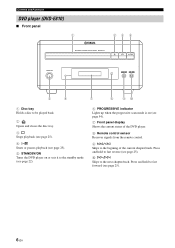
...). 7 Front panel display Shows the current status of the DVD player. 8 Remote control sensor Receives signals from the remote control. 9 b/w Skips to the begining of the current chapter/track. Controls and Functions DVD player (DVD-E810) ■ Front panel 1 23 4 NATURAL SOUND DVD PLAYER DVD-E810 STANDBY/ON PROGRESSIVE 5 6 7 8 90 1 Disc... disc tray. 3s Stops playback (see page 25). 4 h/e Starts or pauses playback (see page 25). 5 STANDBY/ON Turns the DVD player on or sets it to the standby mode (see page 22). 6 PROGRESSIVE indicator Lights up when the progressive scan mode is on (see...
...). 7 Front panel display Shows the current status of the DVD player. 8 Remote control sensor Receives signals from the remote control. 9 b/w Skips to the begining of the current chapter/track. Controls and Functions DVD player (DVD-E810) ■ Front panel 1 23 4 NATURAL SOUND DVD PLAYER DVD-E810 STANDBY/ON PROGRESSIVE 5 6 7 8 90 1 Disc... disc tray. 3s Stops playback (see page 25). 4 h/e Starts or pauses playback (see page 25). 5 STANDBY/ON Turns the DVD player on or sets it to the standby mode (see page 22). 6 PROGRESSIVE indicator Lights up when the progressive scan mode is on (see...
Owners Manual
Page 12
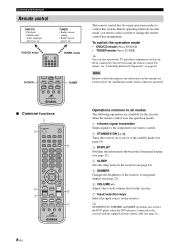
... TUNER • Radio station tuning • Radio station preset, etc. y STANDBY/ON, DIMMER and SLEEP operations also control the DVD player when the DVD player is in any operation modes. 1 Infrared signal transmitter Sends signals to the component you need to select a mode to the standby mode... information shown in each mode, you want to control. 2 STANDBY/ON ( ) Turns the receiver on the U.K. A-E SET UP PRESET ENTER MENU A-E TOP MENU /RETURN 3 4 TV VOL DISPLAY VOLUME SLEEP DVD/CD TUNER BAND TAPE/MD AUX/TV DOCK SUBTITLE ANGLE ZOOM AUDIO 6 7 Operations common to ...
... TUNER • Radio station tuning • Radio station preset, etc. y STANDBY/ON, DIMMER and SLEEP operations also control the DVD player when the DVD player is in any operation modes. 1 Infrared signal transmitter Sends signals to the component you need to select a mode to the standby mode... information shown in each mode, you want to control. 2 STANDBY/ON ( ) Turns the receiver on the U.K. A-E SET UP PRESET ENTER MENU A-E TOP MENU /RETURN 3 4 TV VOL DISPLAY VOLUME SLEEP DVD/CD TUNER BAND TAPE/MD AUX/TV DOCK SUBTITLE ANGLE ZOOM AUDIO 6 7 Operations common to ...

Owners Manual
Page 14
... mode, CT mode (if the station offers the corresponding data services) and the frequency display (see page 41). PTY SEEK START Starts searching for the receiver. Controls and Functions ■ TUNER mode STANDBY/ON POWER TV 1 2 3 4 5 6 7 8 SCAN DIMMER 9 0 TV CH TV INPUT REPEAT A-B FREQ/TEXT...Data System display between FM, AM and the preset mode. 10 En A-E SET UP PRESET ENTER MENU A-E TOP MENU /RETURN TV VOL DISPLAY VOLUME SLEEP DVD/CD TUNER BAND TAPE/MD AUX/TV DOCK SUBTITLE ANGLE ZOOM AUDIO 3 4 Operations available in the PTY SEEK mode (see page 40). 3 A-E / ,...
... mode, CT mode (if the station offers the corresponding data services) and the frequency display (see page 41). PTY SEEK START Starts searching for the receiver. Controls and Functions ■ TUNER mode STANDBY/ON POWER TV 1 2 3 4 5 6 7 8 SCAN DIMMER 9 0 TV CH TV INPUT REPEAT A-B FREQ/TEXT...Data System display between FM, AM and the preset mode. 10 En A-E SET UP PRESET ENTER MENU A-E TOP MENU /RETURN TV VOL DISPLAY VOLUME SLEEP DVD/CD TUNER BAND TAPE/MD AUX/TV DOCK SUBTITLE ANGLE ZOOM AUDIO 3 4 Operations available in the PTY SEEK mode (see page 40). 3 A-E / ,...
Owners Manual
Page 15
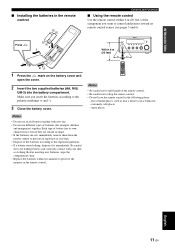
NATURAL SOUND STEREO RECEIVER RX-E810 PURE DIRECT Within 6 m (20 feet) TIMER STANDBY/ON PHONES DISPLAY MEMORY AUTO/MAN'L PRESET/BAND PRESET/TUNING BASS TIME ADJ TIMER TREBLE HOUR ...
NATURAL SOUND STEREO RECEIVER RX-E810 PURE DIRECT Within 6 m (20 feet) TIMER STANDBY/ON PHONES DISPLAY MEMORY AUTO/MAN'L PRESET/BAND PRESET/TUNING BASS TIME ADJ TIMER TREBLE HOUR ...
Owners Manual
Page 16
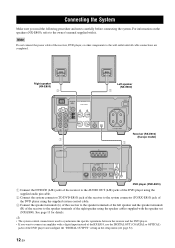
... R L SUBWOOFER OUT TO DVD-E810 AUX R L 1 MAINS AV MAINS AC OUTLETS SWITCHED 100W MAX. TOTAL 2 Receiver (RX-E810) (Europe model) VIDEO OUT COMPONENT PR Y DIGITAL OUT AUDIO OUT L COAXIAL OPTICAL TO RX-E810 S VIDEO VIDEO PB R DVD player (DVD-E810) 1 Connect the DVD/CD (L/R) jacks of the receiver to the AUDIO OUT (L/R) jacks of the DVD player using the supplied...
... R L SUBWOOFER OUT TO DVD-E810 AUX R L 1 MAINS AV MAINS AC OUTLETS SWITCHED 100W MAX. TOTAL 2 Receiver (RX-E810) (Europe model) VIDEO OUT COMPONENT PR Y DIGITAL OUT AUDIO OUT L COAXIAL OPTICAL TO RX-E810 S VIDEO VIDEO PB R DVD player (DVD-E810) 1 Connect the DVD/CD (L/R) jacks of the receiver to the AUDIO OUT (L/R) jacks of the DVD player using the supplied...
Owners Manual
Page 17
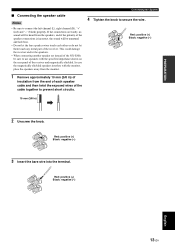
... are faulty, no sound will be heard from the end of each other or do not let them touch any metal part of the receiver and magnetically shielded. Red: positive (+) Black: negative (-) 1 Remove approximately 10 mm (3/8 in) of insulation from the speakers, and ...circuits. 10 mm (3/8 in) 2 Unscrew the knob. In case the magnetically shielded speakers interfere with the specified impedance shown on the rear panel of the receiver. Connecting the System 4 Tighten the knob to connect the left channel (L), right channel (R), "+" (red) and "-" (black) properly. PREPARATION ■...
... are faulty, no sound will be heard from the end of each other or do not let them touch any metal part of the receiver and magnetically shielded. Red: positive (+) Black: negative (-) 1 Remove approximately 10 mm (3/8 in) of insulation from the speakers, and ...circuits. 10 mm (3/8 in) 2 Unscrew the knob. In case the magnetically shielded speakers interfere with the specified impedance shown on the rear panel of the receiver. Connecting the System 4 Tighten the knob to connect the left channel (L), right channel (R), "+" (red) and "-" (black) properly. PREPARATION ■...

Owners Manual
Page 18
...receiver, DVD player, or other components to the wall outlet until all cable connections are completed. ■ S-video connection Connect the S VIDEO jack of the DVD player to the IN S-video input jack of your TV using a commercially VIDEO available S-video cable. Video pin cable TV AV (supplied) MAINS AV... menu of your TV, refer to the component video input jacks of the DVD player (see page 54). Also, you can enjoy high-quality pictures with the receiver, connect AUX (L/R) jacks of the receiver to the audio output jacks of your TV using a commercially available audio pin...
...receiver, DVD player, or other components to the wall outlet until all cable connections are completed. ■ S-video connection Connect the S VIDEO jack of the DVD player to the IN S-video input jack of your TV using a commercially VIDEO available S-video cable. Video pin cable TV AV (supplied) MAINS AV... menu of your TV, refer to the component video input jacks of the DVD player (see page 54). Also, you can enjoy high-quality pictures with the receiver, connect AUX (L/R) jacks of the receiver to the audio output jacks of your TV using a commercially available audio pin...

Owners Manual
Page 19
For details, consult the nearest authorized YAMAHA dealer or service center. When attaching the antenna to the wall, you use the ...English 2 Press down the tab of the AM terminal. AM loop antenna (supplied) Indoor FM antenna (supplied) DOCK DVD/CD ANTENNA 75 UNBAL. Connecting the AM loop antenna 4 Replace the tab back to secure the wire. 1 Attach the... the AM terminal. FM GND IN TAPE/MD OUT AM SPEAKERS 6 MIN / SPEAKER R L Note Depending on the receiver, connect the supplied AM and FM antennas to insert the AM loop antenna lead wires into the GND terminal. 6 Place...
For details, consult the nearest authorized YAMAHA dealer or service center. When attaching the antenna to the wall, you use the ...English 2 Press down the tab of the AM terminal. AM loop antenna (supplied) Indoor FM antenna (supplied) DOCK DVD/CD ANTENNA 75 UNBAL. Connecting the AM loop antenna 4 Replace the tab back to secure the wire. 1 Attach the... the AM terminal. FM GND IN TAPE/MD OUT AM SPEAKERS 6 MIN / SPEAKER R L Note Depending on the receiver, connect the supplied AM and FM antennas to insert the AM loop antenna lead wires into the GND terminal. 6 Place...
Owners Manual
Page 20
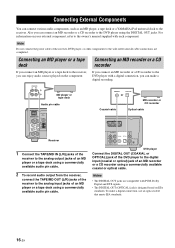
... recorder or CD recorder Coaxial cable Optical cable AV VIDEO OUT COMPONENT PR Y DIGITAL OUT AUDIO OUT L COAXIAL OPTICAL TO RX-E810 VIDEO PB R DVD player Connect the DIGITAL OUT (COAXIAL or OPTICAL) jack of the DVD player to the receiver, you can enjoy audio sources played on EIA...to the DVD player with a digital connection, you can connect various audio components, such as an MD player, a tape deck or a YAMAHA iPod universal dock to the wall outlet until all cable connections are compatible with each component. FM GND IN TAPE/MD OUT AM AUX R L Receiver 1 Connect...
... recorder or CD recorder Coaxial cable Optical cable AV VIDEO OUT COMPONENT PR Y DIGITAL OUT AUDIO OUT L COAXIAL OPTICAL TO RX-E810 VIDEO PB R DVD player Connect the DIGITAL OUT (COAXIAL or OPTICAL) jack of the DVD player to the receiver, you can enjoy audio sources played on EIA...to the DVD player with a digital connection, you can connect various audio components, such as an MD player, a tape deck or a YAMAHA iPod universal dock to the wall outlet until all cable connections are compatible with each component. FM GND IN TAPE/MD OUT AM AUX R L Receiver 1 Connect...

Owners Manual
Page 21
... remote control. Once the connection is complete, station your iPod in the front panel display. TOTAL Receiver (Europe model) Notes • Do not connect the power cable of the receiver, DVD player, or other components to the wall outlet until all cable connections are completed. • Only iPod... (Click and Wheel), iPod nano, and iPod mini are supported. • You need to connect a YAMAHA iPod universal dock (such as YDS-10...
... remote control. Once the connection is complete, station your iPod in the front panel display. TOTAL Receiver (Europe model) Notes • Do not connect the power cable of the receiver, DVD player, or other components to the wall outlet until all cable connections are completed. • Only iPod... (Click and Wheel), iPod nano, and iPod mini are supported. • You need to connect a YAMAHA iPod universal dock (such as YDS-10...
Owners Manual
Page 22
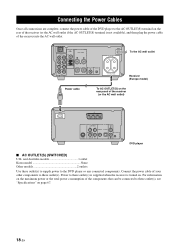
... outlets Use these outlet(s) is supplied when the receiver is not available), and then plug the power cable of the receiver (or the AC wall outlet) MAINS AV VIDEO OUT COMPONENT PR Y DIGITAL OUT AUDIO OUT L COAXIAL OPTICAL TO RX-E810 S VIDEO VIDEO PB R DVD player ■ AC OUTLET(S) (SWITCHED) U.K. For ... THE POWER CABLES Connecting the Power Cables Once all connections are complete, connect the power cable of the DVD player to the AC OUTLET(S) terminal on the rear of the receiver (or the AC wall outlet if the AC OUTLET(S) terminal is turned on the rear panel of the...
... outlets Use these outlet(s) is supplied when the receiver is not available), and then plug the power cable of the receiver (or the AC wall outlet) MAINS AV VIDEO OUT COMPONENT PR Y DIGITAL OUT AUDIO OUT L COAXIAL OPTICAL TO RX-E810 S VIDEO VIDEO PB R DVD player ■ AC OUTLET(S) (SWITCHED) U.K. For ... THE POWER CABLES Connecting the Power Cables Once all connections are complete, connect the power cable of the DVD player to the AC OUTLET(S) terminal on the rear of the receiver (or the AC wall outlet if the AC OUTLET(S) terminal is turned on the rear panel of the...
Owners Manual
Page 23
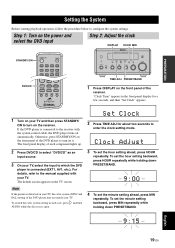
...manual supplied with the system control cable, the DVD player turns on the receiver. Otherwise, press STANDBY/ON on your TV, the color system (NTSC and PAL) setting of the DVD player to which the DVD player is distorted on the front panel of the DVD player may not match your TV. For details, ..." as an input source. 3 On your TV. The front panel display of the receiver. To set the hour setting backward, press HOUR repeatedly while holding down PRESET/BAND. If the DVD player is open. 4 To set the hour setting ahead, press HOUR repeatedly. The default screen appears on it....
...manual supplied with the system control cable, the DVD player turns on the receiver. Otherwise, press STANDBY/ON on your TV, the color system (NTSC and PAL) setting of the DVD player to which the DVD player is distorted on the front panel of the DVD player may not match your TV. For details, ..." as an input source. 3 On your TV. The front panel display of the receiver. To set the hour setting backward, press HOUR repeatedly while holding down PRESET/BAND. If the DVD player is open. 4 To set the hour setting ahead, press HOUR repeatedly. The default screen appears on it....
Owners Manual
Page 26
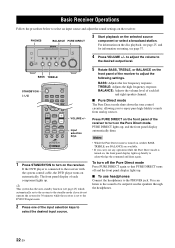
...speakers through the headphones. 2 Press one of the input selection keys to the receiver with the system control cable, the DVD player turns on the receiver. PURE DIRECT lights up . TREBLE: Adjusts the high frequency response. The ... source. 22 En BASS: Adjusts the low frequency response. PHONES BALANCE PURE DIRECT NATURAL SOUND STEREO RECEIVER RX-E810 PURE DIRECT TIMER STANDBY/ON PHONES DISPLAY MEMORY AUTO/MAN'L PRESET/BAND PRESET/TUNING BASS...desired output level. 5 Rotate BASS, TREBLE, or BALANCE on the receiver. If the DVD player is turned on the Pure Direct mode.
...speakers through the headphones. 2 Press one of the input selection keys to the receiver with the system control cable, the DVD player turns on the receiver. PURE DIRECT lights up . TREBLE: Adjusts the high frequency response. The ... source. 22 En BASS: Adjusts the low frequency response. PHONES BALANCE PURE DIRECT NATURAL SOUND STEREO RECEIVER RX-E810 PURE DIRECT TIMER STANDBY/ON PHONES DISPLAY MEMORY AUTO/MAN'L PRESET/BAND PRESET/TUNING BASS...desired output level. 5 Rotate BASS, TREBLE, or BALANCE on the receiver. If the DVD player is turned on the Pure Direct mode.

Owners Manual
Page 27
... panel display. Each time you adjust it is connected to the receiver using a system control connection (see page 12). (The default setting is "DIMMER OFF".) Press DIMMER to change the settings of the DVD player also dims if it (see page 43). ■ To dim the display You can switch... the information displayed in the receiver's front panel display between the current input and clock. ON SCREEN INFO. Basic...
... panel display. Each time you adjust it is connected to the receiver using a system control connection (see page 12). (The default setting is "DIMMER OFF".) Press DIMMER to change the settings of the DVD player also dims if it (see page 43). ■ To dim the display You can switch... the information displayed in the receiver's front panel display between the current input and clock. ON SCREEN INFO. Basic...

Owners Manual
Page 41
... (A1 to select is in the preset mode. AUTO/MAN'L PRESET/TUNING u / d AUTO/MAN'L PRESET/TUNING u / d NATURAL SOUND STEREO RECEIVER RX-E810 PURE DIRECT TIMER STANDBY/ON PHONES DISPLAY MEMORY AUTO/MAN'L PRESET/BAND PRESET/TUNING BASS TIME ADJ TIMER TREBLE HOUR BALANCE MIN INPUT... L R VOLUME MIN MAX NATURAL SOUND STEREO RECEIVER RX-E810 PURE DIRECT TIMER STANDBY/ON PHONES DISPLAY MEMORY AUTO/MAN'L PRESET/BAND PRESET/TUNING BASS TIME ADJ TIMER TREBLE HOUR BALANCE...
... (A1 to select is in the preset mode. AUTO/MAN'L PRESET/TUNING u / d AUTO/MAN'L PRESET/TUNING u / d NATURAL SOUND STEREO RECEIVER RX-E810 PURE DIRECT TIMER STANDBY/ON PHONES DISPLAY MEMORY AUTO/MAN'L PRESET/BAND PRESET/TUNING BASS TIME ADJ TIMER TREBLE HOUR BALANCE MIN INPUT... L R VOLUME MIN MAX NATURAL SOUND STEREO RECEIVER RX-E810 PURE DIRECT TIMER STANDBY/ON PHONES DISPLAY MEMORY AUTO/MAN'L PRESET/BAND PRESET/TUNING BASS TIME ADJ TIMER TREBLE HOUR BALANCE...

Owners Manual
Page 42
...10k". 3 To confirm the setting, press STANDBY/ON. Automatic preset tuning Follow the procedure below to preset radio stations automatically. The receiver turns on the front panel of AM and FM stations by automatic preset tuning. 38 En The AUTO and MEMORY indicator flash in...) Only Radio Data System broadcasting stations and AM stations are stored automatically by automatic preset tuning. • (U.K. NATURAL SOUND STEREO RECEIVER RX-E810 PURE DIRECT TIMER STANDBY/ON PHONES DISPLAY MEMORY AUTO/MAN'L PRESET/BAND PRESET/TUNING BASS TIME ADJ TIMER TREBLE HOUR BALANCE...
...10k". 3 To confirm the setting, press STANDBY/ON. Automatic preset tuning Follow the procedure below to preset radio stations automatically. The receiver turns on the front panel of AM and FM stations by automatic preset tuning. 38 En The AUTO and MEMORY indicator flash in...) Only Radio Data System broadcasting stations and AM stations are stored automatically by automatic preset tuning. • (U.K. NATURAL SOUND STEREO RECEIVER RX-E810 PURE DIRECT TIMER STANDBY/ON PHONES DISPLAY MEMORY AUTO/MAN'L PRESET/BAND PRESET/TUNING BASS TIME ADJ TIMER TREBLE HOUR BALANCE...


