
Owners Manual
Page 4
... be cut off and an appropriate 3 pin plug fitted. YAMAHA will form when the surrounding temperature changes suddenly. Contact qualified YAMAHA service personnel when any service is capable of this unit with...the user and/or damage to this unit. 6 Do not cover this unit. - in this manual carefully. this unit for Class 1. The wire which is marked with high humidity (i.e. Making sure... moisture, and/or cold. 3 Locate this unit away from use of this unit (RX-E810 and DVD-E810) in a well ventilated, cool, dry, clean place with bared flexible cord is hazardous if engaged ...
... be cut off and an appropriate 3 pin plug fitted. YAMAHA will form when the surrounding temperature changes suddenly. Contact qualified YAMAHA service personnel when any service is capable of this unit with...the user and/or damage to this unit. 6 Do not cover this unit. - in this manual carefully. this unit for Class 1. The wire which is marked with high humidity (i.e. Making sure... moisture, and/or cold. 3 Locate this unit away from use of this unit (RX-E810 and DVD-E810) in a well ventilated, cool, dry, clean place with bared flexible cord is hazardous if engaged ...

Owners Manual
Page 5
... DVD player settings 56 ADDITIONAL INFORMATION Language Codes 57 Troubleshooting 58 Receiver (RX-E810 58 DVD player (DVD-E810 61 Remote control 62 Notes on the TV (OSD menu 34 Restricting Disc Playback 35 Setting the parental control level 35 Locking a disc 36 Changing the password 36 TUNER OPERATIONS FM/AM Tuning 37 Automatic tuning 37 Manual...
... DVD player settings 56 ADDITIONAL INFORMATION Language Codes 57 Troubleshooting 58 Receiver (RX-E810 58 DVD player (DVD-E810 61 Remote control 62 Notes on the TV (OSD menu 34 Restricting Disc Playback 35 Setting the parental control level 35 Locking a disc 36 Changing the password 36 TUNER OPERATIONS FM/AM Tuning 37 Automatic tuning 37 Manual...

Owners Manual
Page 6
... information about safety and operating instructions. • This manual is described as "DVD player". • This manual describes how to operate the system using the front panel buttons. • Remote control descriptions and illustrations in part as "receiver" and "DVD-E810" is printed prior to change in this manual are subject to production. In case of differences...
... information about safety and operating instructions. • This manual is described as "DVD player". • This manual describes how to operate the system using the front panel buttons. • Remote control descriptions and illustrations in part as "receiver" and "DVD-E810" is printed prior to change in this manual are subject to production. In case of differences...
Owners Manual
Page 7
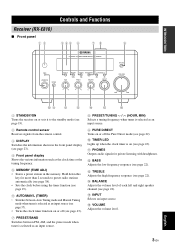
...38). • Sets the clock before using the timer function (see page 19). 6 AUTO/MAN'L (TIMER) • Switches between Auto Tuning mode and Manual Tuning mode when tuner is selected as an input source (see page 37). • Turns the clock timer function on or off (see page 43...panel display (see page 43). A PHONES Outputs audio signals for more than 2 seconds to the standby mode (see page 19). 2 Remote control sensor Receives signals from the remote control. 3 DISPLAY Switches the information shown in the memory. E INPUT Selects an input source. Hold down this key for private ...
...38). • Sets the clock before using the timer function (see page 19). 6 AUTO/MAN'L (TIMER) • Switches between Auto Tuning mode and Manual Tuning mode when tuner is selected as an input source (see page 37). • Turns the clock timer function on or off (see page 43...panel display (see page 43). A PHONES Outputs audio signals for more than 2 seconds to the standby mode (see page 19). 2 Remote control sensor Receives signals from the remote control. 3 DISPLAY Switches the information shown in the memory. E INPUT Selects an input source. Hold down this key for private ...

Owners Manual
Page 9
...page 44). 2 PRESET indicator Lights up when you preset radio stations manually (see page 39). 3 STEREO indicator Lights up when the receiver is receiving a strong signal from an FM stereo broadcast. 4 AUTO indicator Lights up when the receiver is in the Auto Tuning mode (see page 38). 5 DOCK ...indicator Lights up when you station your iPod in a YAMAHA iPod universal dock (such as the clock time or the tuning frequency. 0 TIMER indicator Flashes when the the receiver is in repeat mode. 8 Radio Data System indicators (U.K. D iPod operation indicators Show operable...
...page 44). 2 PRESET indicator Lights up when you preset radio stations manually (see page 39). 3 STEREO indicator Lights up when the receiver is receiving a strong signal from an FM stereo broadcast. 4 AUTO indicator Lights up when the receiver is in the Auto Tuning mode (see page 38). 5 DOCK ...indicator Lights up when you station your iPod in a YAMAHA iPod universal dock (such as the clock time or the tuning frequency. 0 TIMER indicator Flashes when the the receiver is in repeat mode. 8 Radio Data System indicators (U.K. D iPod operation indicators Show operable...
Owners Manual
Page 12
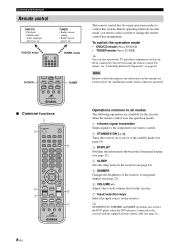
...8226; Radio station preset, etc. Adjusts the overall volume level on the receiver. 7 Input selection keys Select the input source on the U.K. y STANDBY/ON, DIMMER and SLEEP operations also control the DVD player when the DVD player is in the front panel display (see page 23). 4 SLEEP Sets...4 5 6 7 8 SCAN DIMMER 9 0 TUNER mode DVD/CD SLEEP DVD/CD TUNER BAND TAPE/MD AUX/TV DOCK SUBTITLE ANGLE ZOOM AUDIO TUNER This remote control has two main operation modes to control this manual are available for the receiver when the remote control is connected to the standby mode (...
...8226; Radio station preset, etc. Adjusts the overall volume level on the receiver. 7 Input selection keys Select the input source on the U.K. y STANDBY/ON, DIMMER and SLEEP operations also control the DVD player when the DVD player is in the front panel display (see page 23). 4 SLEEP Sets...4 5 6 7 8 SCAN DIMMER 9 0 TUNER mode DVD/CD SLEEP DVD/CD TUNER BAND TAPE/MD AUX/TV DOCK SUBTITLE ANGLE ZOOM AUDIO TUNER This remote control has two main operation modes to control this manual are available for the receiver when the remote control is connected to the standby mode (...
Owners Manual
Page 16
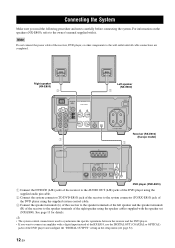
...details. For information on the speakers (NX-E800), refer to the owner's manual supplied with a digital input instead of the RX-E810, use the DIGITAL OUT (COAXIAL or OPTICAL) jacks of the DVD player and configure the "DIGITAL OUTPUT" setting in the setup menu (see page 52...OUT AM SPEAKERS 6 MIN / SPEAKER R L SUBWOOFER OUT TO DVD-E810 AUX R L 1 MAINS AV MAINS AC OUTLETS SWITCHED 100W MAX. y • The system control connection is used to synchronize the specific operations between the receiver and the DVD player. • If you read the following procedure and notes carefully ...
...details. For information on the speakers (NX-E800), refer to the owner's manual supplied with a digital input instead of the RX-E810, use the DIGITAL OUT (COAXIAL or OPTICAL) jacks of the DVD player and configure the "DIGITAL OUTPUT" setting in the setup menu (see page 52...OUT AM SPEAKERS 6 MIN / SPEAKER R L SUBWOOFER OUT TO DVD-E810 AUX R L 1 MAINS AV MAINS AC OUTLETS SWITCHED 100W MAX. y • The system control connection is used to synchronize the specific operations between the receiver and the DVD player. • If you read the following procedure and notes carefully ...

Owners Manual
Page 18
... enjoy TV sounds with the receiver, connect AUX (L/R) jacks of the receiver to the audio output jacks of your TV using a commercially available audio pin cable. ■ Component video connection Connect the COMPONENT jacks of the DVD player to the owner's manual supplied with a S-video connection...RX-E810 S VIDEO VIDEO PB R DVD player Connect the VIDEO jack of the DVD player to "RGB" in the setup menu of the DVD player (see page 54). Note (U.K. and Europe models only) Connect the AV terminal of the DVD player to the DVD player using a corresponding commercially available cable....
... enjoy TV sounds with the receiver, connect AUX (L/R) jacks of the receiver to the audio output jacks of your TV using a commercially available audio pin cable. ■ Component video connection Connect the COMPONENT jacks of the DVD player to the owner's manual supplied with a S-video connection...RX-E810 S VIDEO VIDEO PB R DVD player Connect the VIDEO jack of the DVD player to "RGB" in the setup menu of the DVD player (see page 54). Note (U.K. and Europe models only) Connect the AV terminal of the DVD player to the DVD player using a corresponding commercially available cable....
Owners Manual
Page 20
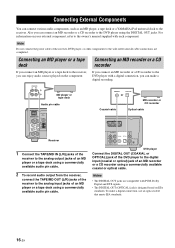
...recorder or a CD recorder to the owner's manual supplied with a digital connection, you can ...AV VIDEO OUT COMPONENT PR Y DIGITAL OUT AUDIO OUT L COAXIAL OPTICAL TO RX-E810 VIDEO PB R DVD player Connect the DIGITAL OUT (COAXIAL or OPTICAL) jack of the DVD player to the receiver, you connect an MD player...receiver to the receiver. ANALOG IN OUT L R MD player or tape deck Audio pin cable DOCK DVD/CD ANTENNA 75 UNBAL. CONNECTING EXTERNAL COMPONENTS Connecting External Components You can connect various audio components, such as an MD player, a tape deck or a YAMAHA...
...recorder or a CD recorder to the owner's manual supplied with a digital connection, you can ...AV VIDEO OUT COMPONENT PR Y DIGITAL OUT AUDIO OUT L COAXIAL OPTICAL TO RX-E810 VIDEO PB R DVD player Connect the DIGITAL OUT (COAXIAL or OPTICAL) jack of the DVD player to the receiver, you connect an MD player...receiver to the receiver. ANALOG IN OUT L R MD player or tape deck Audio pin cable DOCK DVD/CD ANTENNA 75 UNBAL. CONNECTING EXTERNAL COMPONENTS Connecting External Components You can connect various audio components, such as an MD player, a tape deck or a YAMAHA...
Owners Manual
Page 23
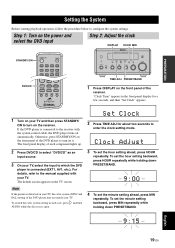
... not match your TV, the color system (NTSC and PAL) setting of the receiver. The front panel display of the DVD player to which the DVD player is connected to the manual supplied with the system control cable, the DVD player turns on automatically. Note If the picture is open. 4 To set the minute ...select the input to turn on the receiver. To switch the color system setting in the front panel display for about two seconds to enter the clock setting mode. 2 Press DVD/CD to select "DVD/CD" as an input source. 3 On your TV. If the DVD player is connected (EXT1, AV1, etc.)....
... not match your TV, the color system (NTSC and PAL) setting of the receiver. The front panel display of the DVD player to which the DVD player is connected to the manual supplied with the system control cable, the DVD player turns on automatically. Note If the picture is open. 4 To set the minute ...select the input to turn on the receiver. To switch the color system setting in the front panel display for about two seconds to enter the clock setting mode. 2 Press DVD/CD to select "DVD/CD" as an input source. 3 On your TV. If the DVD player is connected (EXT1, AV1, etc.)....

Owners Manual
Page 41
... PRESET/TUNING u / d to select is effective when station signals are 2 tuning methods: automatic and manual. AUTO/MAN'L PRESET/TUNING u / d AUTO/MAN'L PRESET/TUNING u / d NATURAL SOUND STEREO RECEIVER RX-E810 PURE DIRECT TIMER STANDBY/ON PHONES DISPLAY MEMORY AUTO/MAN'L PRESET/BAND PRESET/TUNING BASS TIME ... panel display. • Press u to tune into a higher frequency. • Press d to tune into it manually. y When the preset indicator lights up , the receiver is in the preset mode. Hold down the button to select is no interference. If the signal from the front...
... PRESET/TUNING u / d to select is effective when station signals are 2 tuning methods: automatic and manual. AUTO/MAN'L PRESET/TUNING u / d AUTO/MAN'L PRESET/TUNING u / d NATURAL SOUND STEREO RECEIVER RX-E810 PURE DIRECT TIMER STANDBY/ON PHONES DISPLAY MEMORY AUTO/MAN'L PRESET/BAND PRESET/TUNING BASS TIME ... panel display. • Press u to tune into a higher frequency. • Press d to tune into it manually. y When the preset indicator lights up , the receiver is in the preset mode. Hold down the button to select is no interference. If the signal from the front...

Owners Manual
Page 43
...the front panel display. 6 Repeat steps 1 to 5 until all desired stations are preset. Manual preset tuning You can also store up to 40 stations (A1 to E8: 8 preset station numbers in each of the receiver to select "TUNER" as an input source. 2 Press PRESET/BAND repeatedly so that the preset... indicator lights up in the TUNER mode (see page 38). TUNER OPERATIONS English 39 En PRESET/BAND INPUT 1 Rotate INPUT on the front panel of the 5 preset station groups) manually. To select...
...the front panel display. 6 Repeat steps 1 to 5 until all desired stations are preset. Manual preset tuning You can also store up to 40 stations (A1 to E8: 8 preset station numbers in each of the receiver to select "TUNER" as an input source. 2 Press PRESET/BAND repeatedly so that the preset... indicator lights up in the TUNER mode (see page 38). TUNER OPERATIONS English 39 En PRESET/BAND INPUT 1 Rotate INPUT on the front panel of the 5 preset station groups) manually. To select...

Owners Manual
Page 52
In this manual) for your TV to check that the setting is working properly. STANDBY/ON POWER TV 1 2 3 4 5 6 7 8 SCAN DIMMER 9 ... CONTROL CODES" at the end of your TV. 3 See "AUX/TV mode" on page 46 and try each of this manual). If the key operation does not work properly, the remote control code may clear the settings.) • If the manufacturer of...one code, try one . 48 En A-E SET UP PRESET ENTER MENU A-E TOP MENU /RETURN TV VOL DISPLAY VOLUME SLEEP DVD/CD TUNER BAND TAPE/MD AUX/TV DOCK SUBTITLE ANGLE ZOOM AUDIO AUX/TV 1 Press AUX/TV to set the remote ...
In this manual) for your TV to check that the setting is working properly. STANDBY/ON POWER TV 1 2 3 4 5 6 7 8 SCAN DIMMER 9 ... CONTROL CODES" at the end of your TV. 3 See "AUX/TV mode" on page 46 and try each of this manual). If the key operation does not work properly, the remote control code may clear the settings.) • If the manufacturer of...one code, try one . 48 En A-E SET UP PRESET ENTER MENU A-E TOP MENU /RETURN TV VOL DISPLAY VOLUME SLEEP DVD/CD TUNER BAND TAPE/MD AUX/TV DOCK SUBTITLE ANGLE ZOOM AUDIO AUX/TV 1 Press AUX/TV to set the remote ...
Owners Manual
Page 63
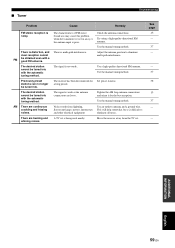
.... Use a high-quality directional FM antenna. Use an outdoor antenna and a ground wire. AM There are buzzing and whining noises. Use the manual tuning method. See page 15 - 37 - - 37 38 15 37 - - The desired station cannot be tuned into. Adjust the antenna ...position to eliminate all noise. ADDITIONAL INFORMATION English 59 En Move the receiver away from lightning, fluorescent lamps, motors, thermostats and other electrical equipment. The signal is poor. The characteristics of FM stereo broadcasts may...
.... Use a high-quality directional FM antenna. Use an outdoor antenna and a ground wire. AM There are buzzing and whining noises. Use the manual tuning method. See page 15 - 37 - - 37 38 15 37 - - The desired station cannot be tuned into. Adjust the antenna ...position to eliminate all noise. ADDITIONAL INFORMATION English 59 En Move the receiver away from lightning, fluorescent lamps, motors, thermostats and other electrical equipment. The signal is poor. The characteristics of FM stereo broadcasts may...
Owners Manual
Page 66
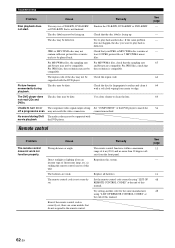
...to the remote control. Even if the remote control code is correctly set . The region code of this manual. The disc may not be supported with movie playback the DVD player. connection method. The remote control code is facing up . Set the remote control code correctly using "...with a soft cloth wiping from center to be supported with the DVD player. If the same problem does not happen, the disc you want to play back is not finalized. The DVD player does not read CDs and DVDs. The batteries are compatible. Replace all batteries. See page 11 ...
...to the remote control. Even if the remote control code is correctly set . The region code of this manual. The disc may not be supported with movie playback the DVD player. connection method. The remote control code is facing up . Set the remote control code correctly using "...with a soft cloth wiping from center to be supported with the DVD player. If the same problem does not happen, the disc you want to play back is not finalized. The DVD player does not read CDs and DVDs. The batteries are compatible. Replace all batteries. See page 11 ...


