
Owner's Manual
Page 5
... cable plugs 13 Connecting a TV monitor or projector 14 Connecting other components 15 Connecting a Yamaha iPod universal dock or Bluetooth™ wireless audio receiver 17 Connecting a USB storage device 18 Using the VIDEO AUX jacks 18 Connecting the FM and AM antennas 18 Connecting the power cable 19 Turning this manual) List of the USB storage device 46 Other functions 47 Using the sleep timer 47 Using the HDMI™ control function 47 ADVANCED OPERATION Setting the option menu for each input source (Option menu...
... cable plugs 13 Connecting a TV monitor or projector 14 Connecting other components 15 Connecting a Yamaha iPod universal dock or Bluetooth™ wireless audio receiver 17 Connecting a USB storage device 18 Using the VIDEO AUX jacks 18 Connecting the FM and AM antennas 18 Connecting the power cable 19 Turning this manual) List of the USB storage device 46 Other functions 47 Using the sleep timer 47 Using the HDMI™ control function 47 ADVANCED OPERATION Setting the option menu for each input source (Option menu...
Owner's Manual
Page 6
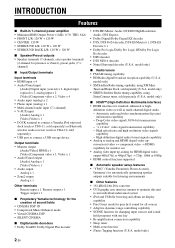
... and high resolution video signals capability - model only) • XM Satellite Radio tuning capability, using SiriusConnect tuner, sold separately (U.S.A. High definition digital audio format signals capability • Analog to analog and HDMI digital video upconversion (video ↔ component video → HDMI) capability for monitor out • Analog video input up-scaling for HDMI digital video output 480i(576i) or 480p(576p) → 720p, 1080i or 1080p • HDMI control function supported ■ Automatic speaker setup features • "YPAO" (Yamaha Parametric Room Acoustic...
... and high resolution video signals capability - model only) • XM Satellite Radio tuning capability, using SiriusConnect tuner, sold separately (U.S.A. High definition digital audio format signals capability • Analog to analog and HDMI digital video upconversion (video ↔ component video → HDMI) capability for monitor out • Analog video input up-scaling for HDMI digital video output 480i(576i) or 480p(576p) → 720p, 1080i or 1080p • HDMI control function supported ■ Automatic speaker setup features • "YPAO" (Yamaha Parametric Room Acoustic...
Owner's Manual
Page 9
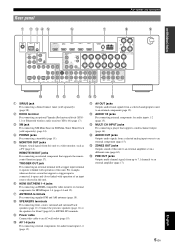
...f HDMI OUT/HDMI 1-4 jacks For connecting an HDMI-compatible video monitor or external components for Zone2 (page 62) to an external component (page 15). l AUDIO 1/2 jacks For connecting external components for audio/visual inputs 1-6 (page 15). For example, when an electric screen that supports a multi-channel output (page 16). p PRE OUT jacks Outputs multi-channel signals from a selected analog input source to EXTRA SP terminals. REMOTE IN/OUT jacks For connecting an external component that supports the remote control function (page 17). FRONT TRIGGER OUT CENTER ANTENNA...
...f HDMI OUT/HDMI 1-4 jacks For connecting an HDMI-compatible video monitor or external components for Zone2 (page 62) to an external component (page 15). l AUDIO 1/2 jacks For connecting external components for audio/visual inputs 1-6 (page 15). For example, when an electric screen that supports a multi-channel output (page 16). p PRE OUT jacks Outputs multi-channel signals from a selected analog input source to EXTRA SP terminals. REMOTE IN/OUT jacks For connecting an external component that supports the remote control function (page 17). FRONT TRIGGER OUT CENTER ANTENNA...
Owner's Manual
Page 11
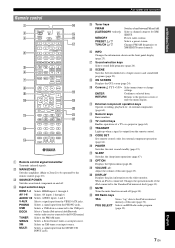
...c SOURCE POWER Switches an external component on the front panel display (page 25). Selects a preset station. j Cursors k / n / l / h Select menu items or change settings. ENTER Confirms a selected item. RETURN Returns to the Yamaha iPod universal dock (page 43). o CODE SET Sets remote control codes for XM/ SIRIUS. ADDITIONAL INFORMATION APPENDIX English 7 En Changes FM/AM frequencies or XM/SIRIUS tuner channels. k External component operation keys Operate recording, playback etc. When an iPod is output from the MULTI CH INPUT jacks. u MUTE Turns the mute function on the video...
...c SOURCE POWER Switches an external component on the front panel display (page 25). Selects a preset station. j Cursors k / n / l / h Select menu items or change settings. ENTER Confirms a selected item. RETURN Returns to the Yamaha iPod universal dock (page 43). o CODE SET Sets remote control codes for XM/ SIRIUS. ADDITIONAL INFORMATION APPENDIX English 7 En Changes FM/AM frequencies or XM/SIRIUS tuner channels. k External component operation keys Operate recording, playback etc. When an iPod is output from the MULTI CH INPUT jacks. u MUTE Turns the mute function on the video...

Owner's Manual
Page 12
...Speakers Front speaker 2 Center speaker 1 Surround speaker 2 Surround back 2 speaker Active subwoofer 1 Speaker cable 7 Subwoofer cable 1 Reproduction component such as DVD player 1 Video monitor such as an input source and start playback. • Basic procedure • Selecting sound field programs ☞P. 23 ☞P. 26 y • This unit supports the SCENE function (page 23) that changes the input source and sound field program at one time. You can select from a scene from those just by using the YPAO technology (☞P. 20). Step 3: Connect your TV, DVD...
...Speakers Front speaker 2 Center speaker 1 Surround speaker 2 Surround back 2 speaker Active subwoofer 1 Speaker cable 7 Subwoofer cable 1 Reproduction component such as DVD player 1 Video monitor such as an input source and start playback. • Basic procedure • Selecting sound field programs ☞P. 23 ☞P. 26 y • This unit supports the SCENE function (page 23) that changes the input source and sound field program at one time. You can select from a scene from those just by using the YPAO technology (☞P. 20). Step 3: Connect your TV, DVD...

Owner's Manual
Page 55
... change the setting. y • Repeat steps 5 and 6 to change other sound field program parameters. 7 To turn off the GUI screen, press iON SCREEN. The ideal dialogue position If the dialogues are heard at the center of the sound field effect to select "DSP Parameter" and then press jENTER. Initial Delay P. CINEMA DSP basic parameters DSP Level Adjustable range: -6dB to 0dB* to +3dB Fine adjusts an effect level (level of the video monitor screen. The...
... change the setting. y • Repeat steps 5 and 6 to change other sound field program parameters. 7 To turn off the GUI screen, press iON SCREEN. The ideal dialogue position If the dialogues are heard at the center of the sound field effect to select "DSP Parameter" and then press jENTER. Initial Delay P. CINEMA DSP basic parameters DSP Level Adjustable range: -6dB to 0dB* to +3dB Fine adjusts an effect level (level of the video monitor screen. The...

Owner's Manual
Page 59
...unit is turned on distances between the maximum volume and the minimum volume) in output timing between video signals input from analog video input signals. HDMI Control Standby Through Audio Output Resolution Aspect Display Selects on or off of each speaker outputs sound based on . Front Panel Display Scroll Selects the way to be accidentally increased. Adaptive DRC Max Volume Initial Volume Adjusts the dynamic range (difference between speakers and the listening position. Function Auto Setup (YPAO) Automatically adjusts output characteristics of the GUI screen displayed on...
...unit is turned on distances between the maximum volume and the minimum volume) in output timing between video signals input from analog video input signals. HDMI Control Standby Through Audio Output Resolution Aspect Display Selects on or off of each speaker outputs sound based on . Front Panel Display Scroll Selects the way to be accidentally increased. Adaptive DRC Max Volume Initial Volume Adjusts the dynamic range (difference between speakers and the listening position. Function Auto Setup (YPAO) Automatically adjusts output characteristics of the GUI screen displayed on...

Owner's Manual
Page 60
The Setup menu appears on the video monitor. 2 Press jCursor n to obtain optimum balance for the output sound based on positions and performances of the Setup menu The Setup menu screen appears on operations, see page 20. Items of adjustments are described. 1 Press iON SCREEN on manually set various items for the listening environment. 56 En Example (Function Setup) Function Setup HDMI Display Volume Input Rename Zone2 y • To return to the previous menu, press jRETURN. 4 If...
The Setup menu appears on the video monitor. 2 Press jCursor n to obtain optimum balance for the output sound based on positions and performances of the Setup menu The Setup menu screen appears on operations, see page 20. Items of adjustments are described. 1 Press iON SCREEN on manually set various items for the listening environment. 56 En Example (Function Setup) Function Setup HDMI Display Volume Input Rename Zone2 y • To return to the previous menu, press jRETURN. 4 If...

Owner's Manual
Page 62
... your subwoofer has a volume control or a crossover frequency control, set the volume to change the phase of the low-frequency component output from a subwoofer or front speakers. On Generates test tones. Press jENTER to +10.0dB (0.5dB step) Defaults: 0dB (FR.L, FR.R, SWFR, PR.L, PR.R) -1.0dB (CNTR, SUR.L, SUR.R, SBL, SBR) Separately adjusts volume of speakers connected. Not use . 58 En Characteristics of the graphic equalizer. Sets the standard dynamic range recommended for regular home use a graphic equalizer. Select this...
... your subwoofer has a volume control or a crossover frequency control, set the volume to change the phase of the low-frequency component output from a subwoofer or front speakers. On Generates test tones. Press jENTER to +10.0dB (0.5dB step) Defaults: 0dB (FR.L, FR.R, SWFR, PR.L, PR.R) -1.0dB (CNTR, SUR.L, SUR.R, SBL, SBR) Separately adjusts volume of speakers connected. Not use . 58 En Characteristics of the graphic equalizer. Sets the standard dynamic range recommended for regular home use a graphic equalizer. Select this...

Owner's Manual
Page 63
...video monitor even when this unit is on standby. Operating various settings for reproducing sound signals input from the speakers connected to this unit consumes up . Off Not output the HDMI signals to the HDMI OUT jack. In this state, this unit. Sound output from the HDMI 1-4 jacks. Amplifier + Outputs HDMI sound signals from 720p or 1080i analog video signals cannot be selected before switching to standby. • When "Standby Through" is connected to 3 watts of power even on specifications of the input signals. ■ Lipsync Adjusts delay between video...
...video monitor even when this unit is on standby. Operating various settings for reproducing sound signals input from the speakers connected to this unit consumes up . Off Not output the HDMI signals to the HDMI OUT jack. In this state, this unit. Sound output from the HDMI 1-4 jacks. Amplifier + Outputs HDMI sound signals from 720p or 1080i analog video signals cannot be selected before switching to standby. • When "Standby Through" is connected to 3 watts of power even on specifications of the input signals. ■ Lipsync Adjusts delay between video...
Owner's Manual
Page 66
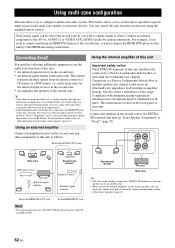
... VIDEO AUX (AUDIO) jacks (by both HDMI and analog connections. EXTRA SP ZONE2/PRESENCE Main zone DVD player (etc.) This unit Infrared signal emitter Amplifier Second zone (Zone2) Remote control Infrared signal receiver Second zone (Zone2) This unit Main zone y • You can be connected to a Passive Loudspeaker Selector Box or more than one loudspeaker per channel could create an abnormally low impedance load resulting in the second zone and other components to configure a multi-zone audio system...
... VIDEO AUX (AUDIO) jacks (by both HDMI and analog connections. EXTRA SP ZONE2/PRESENCE Main zone DVD player (etc.) This unit Infrared signal emitter Amplifier Second zone (Zone2) Remote control Infrared signal receiver Second zone (Zone2) This unit Main zone y • You can be connected to a Passive Loudspeaker Selector Box or more than one loudspeaker per channel could create an abnormally low impedance load resulting in the second zone and other components to configure a multi-zone audio system...
Owner's Manual
Page 68
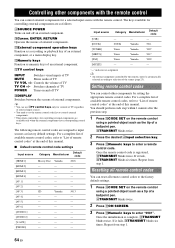
... step 1. lNumeric keys Function as a recording or playback key of this manual. Input source [USB] [DOCK] [TUNER] [SIRIUS] [XM] [MULTI] Category Manufacturer Default code - - - mTV control keys INPUT Switches visual inputs of TV MUTE Mutes audio of TV TV CH +/- CD Yamaha 5013 - - - - - - - - - 1 Press oCODE SET on and off an external component. nTRANSMIT blinks twice. 2 Press iON SCREEN. [AUDIO 1] - - - [AUDIO 2] - - - [V-AUX] - - - [PHONO] - - - 3 Press lNumeric keys to enter a remote control code. Controls the volume of TV TV VOL...
... step 1. lNumeric keys Function as a recording or playback key of this manual. Input source [USB] [DOCK] [TUNER] [SIRIUS] [XM] [MULTI] Category Manufacturer Default code - - - mTV control keys INPUT Switches visual inputs of TV MUTE Mutes audio of TV TV CH +/- CD Yamaha 5013 - - - - - - - - - 1 Press oCODE SET on and off an external component. nTRANSMIT blinks twice. 2 Press iON SCREEN. [AUDIO 1] - - - [AUDIO 2] - - - [V-AUX] - - - [PHONO] - - - 3 Press lNumeric keys to enter a remote control code. Controls the volume of TV TV VOL...

Owner's Manual
Page 71
... setup menu and select "VIDEO" in power supply voltage. Connect the power cable properly to the MONITOR OUT (COMPONENT VIDEO or VIDEO) jacks. monitor. Connect the external video component to turn off this unit is connected to reset the video parameters. The protection circuitry has been activated because of the HDMI 1-4 jacks while your speakers. (When this unit, disconnect the power cable, and contact the nearest authorized Yamaha dealer or service center. Turn on this unit was turned on the video monitor. This unit outputs...
... setup menu and select "VIDEO" in power supply voltage. Connect the power cable properly to the MONITOR OUT (COMPONENT VIDEO or VIDEO) jacks. monitor. Connect the external video component to turn off this unit is connected to reset the video parameters. The protection circuitry has been activated because of the HDMI 1-4 jacks while your speakers. (When this unit, disconnect the power cable, and contact the nearest authorized Yamaha dealer or service center. Turn on this unit was turned on the video monitor. This unit outputs...

Owner's Manual
Page 72
... decode mode. Press OSTRAIGHT (or gSTRAIGHT) to turn off , try the following. 1) Change the input source to select the desired input source. If sound is disabled. No sound is output from that speaker is not output, this unit. Signals this unit do not support the HDCP copy protection standards. Secure the connections. Connect HDMI components that speaker. The volume is not selected. This unit is properly connected to "Auto". Display "Signal Info" in the "Setup" menu and adjust the volume (Manual Setup → Speaker Level). Display...
... decode mode. Press OSTRAIGHT (or gSTRAIGHT) to turn off , try the following. 1) Change the input source to select the desired input source. If sound is disabled. No sound is output from that speaker is not output, this unit. Signals this unit do not support the HDCP copy protection standards. Secure the connections. Connect HDMI components that speaker. The volume is not selected. This unit is properly connected to "Auto". Display "Signal Info" in the "Setup" menu and adjust the volume (Manual Setup → Speaker Level). Display...
Owner's Manual
Page 78
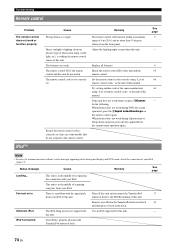
... supported by Use an iPod supported by this unit does not work during DVD disc menu operation: press the dInput selection keys on the front panel display and GUI screen, check the connection of this unit. Unknown iPod The iPod being used is in the dock. Troubleshooting Remote control Problem The remote control does not work during Option menu or Setup menu operation: press the key applicable for the current menu operation again. If this unit. - The batteries are some models...
... supported by Use an iPod supported by this unit does not work during DVD disc menu operation: press the dInput selection keys on the front panel display and GUI screen, check the connection of this unit. Unknown iPod The iPod being used is in the dock. Troubleshooting Remote control Problem The remote control does not work during Option menu or Setup menu operation: press the key applicable for the current menu operation again. If this unit. - The batteries are some models...

Owner's Manual
Page 80
... unit cannot access your USB storage device. Before Auto Setup Error message Connect MIC! Try running "Auto Setup" in a quiet environment. When using surround back speakers, you connect only one surround back speaker, is connected. Try resetting your USB storage Try another USB storage device. Surround back speakers are connected, though surround L/R speakers are correct. • If error message "E-10" occurs repeatedly, contact a qualified Yamaha service center. device. Auto Setup (YPAO) Notes • If the an...
... unit cannot access your USB storage device. Before Auto Setup Error message Connect MIC! Try running "Auto Setup" in a quiet environment. When using surround back speakers, you connect only one surround back speaker, is connected. Try resetting your USB storage Try another USB storage device. Surround back speakers are connected, though surround L/R speakers are correct. • If error message "E-10" occurs repeatedly, contact a qualified Yamaha service center. device. Auto Setup (YPAO) Notes • If the an...

Owner's Manual
Page 81
... use speakers with "Extra Speaker Assignment" set the "Extra Speaker Assignment" to other than "Presence". Contact the nearest Yamaha dealer or service center. If they are correct, the speakers work properly even when this message is not correct. INTRODUCTION PREPARATION Troubleshooting Error message E-7:NO MIC E-8:NO SIGNAL Cause The optimizer microphone was canceled due to "Presence". After Auto Setup Remedy Do not touch the optimizer microphone during the "Auto Setup" procedure. Run "Auto Setup...
... use speakers with "Extra Speaker Assignment" set the "Extra Speaker Assignment" to other than "Presence". Contact the nearest Yamaha dealer or service center. If they are correct, the speakers work properly even when this message is not correct. INTRODUCTION PREPARATION Troubleshooting Error message E-7:NO MIC E-8:NO SIGNAL Cause The optimizer microphone was canceled due to "Presence". After Auto Setup Remedy Do not touch the optimizer microphone during the "Auto Setup" procedure. Run "Auto Setup...
Owner's Manual
Page 83
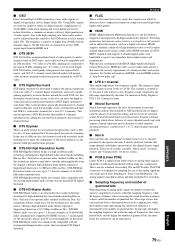
... without using any source (such as a set-top box or AV receiver) and an audio/video monitor (such as a digital television), HDMI supports standard, enhanced or high-definition video as well as Bluray discs. There are two modes available: "Music mode" for music sources and "Cinema mode" for 6- This system produces practically distortion-free 6-channel sound (technically, front left and right, center, surround left and right, and LFE 0.1 (subwoofer) channels for Blu-ray Disc, DTS-HD Master Audio can be played back...
... without using any source (such as a set-top box or AV receiver) and an audio/video monitor (such as a digital television), HDMI supports standard, enhanced or high-definition video as well as Bluray discs. There are two modes available: "Music mode" for music sources and "Cinema mode" for 6- This system produces practically distortion-free 6-channel sound (technically, front left and right, center, surround left and right, and LFE 0.1 (subwoofer) channels for Blu-ray Disc, DTS-HD Master Audio can be played back...

Owner's Manual
Page 88
...program 27 Changing information on the front panel display 25 CINEMA DSP 3D 29 CINEMA DSP 3D indicator, front panel display 6 CINEMA DSP indicator, front panel display 6 Clear Preset, Option menu 49 COAXIAL jack 13 CODE SET, remote control 7 COMPONENT VIDEO jack 13 Connect, Option menu 50 Connecting audio and video player 15 Connecting audio player 16 Connecting Bluetooth wireless audio receiver 17 Connecting external amplifier 17 Connecting external decoder 16 Connecting FM antenna 18 Connecting iPod universal dock 17 Connecting multi-format player 16 Connecting power cable...
...program 27 Changing information on the front panel display 25 CINEMA DSP 3D 29 CINEMA DSP 3D indicator, front panel display 6 CINEMA DSP indicator, front panel display 6 Clear Preset, Option menu 49 COAXIAL jack 13 CODE SET, remote control 7 COMPONENT VIDEO jack 13 Connect, Option menu 50 Connecting audio and video player 15 Connecting audio player 16 Connecting Bluetooth wireless audio receiver 17 Connecting external amplifier 17 Connecting external decoder 16 Connecting FM antenna 18 Connecting iPod universal dock 17 Connecting multi-format player 16 Connecting power cable...
Owner's Manual
Page 89
... Signal Info, Option menu 49 SILENT CINEMA 29 SIRIUS indicator, front panel display 6 SIRIUS jack, rear panel 5 SIRIUS Satellite Radio tuning 38 SIRIUS Satellite Radio, troubleshooting ....... 73 SLEEP indicator, front panel display 6 Sleep timer 47 SLEEP, remote control 7 Sound field parameter 51 Sound field program editing 51 Sound field program registration, SCENE function 24 Sound selection keys, remote control 7 Sound Setup, Setup menu 58 SOURCE POWER, remote control 7 SP IMP., advanced setup 65 Speaker cable connection 12 Speaker Configuration, Manual Setup, Speaker Setup...
... Signal Info, Option menu 49 SILENT CINEMA 29 SIRIUS indicator, front panel display 6 SIRIUS jack, rear panel 5 SIRIUS Satellite Radio tuning 38 SIRIUS Satellite Radio, troubleshooting ....... 73 SLEEP indicator, front panel display 6 Sleep timer 47 SLEEP, remote control 7 Sound field parameter 51 Sound field program editing 51 Sound field program registration, SCENE function 24 Sound selection keys, remote control 7 Sound Setup, Setup menu 58 SOURCE POWER, remote control 7 SP IMP., advanced setup 65 Speaker cable connection 12 Speaker Configuration, Manual Setup, Speaker Setup...


