

Owner's Manual
Page 5
... to change in parentheses. • This manual is given in part as a result of the parts on the front panel or the remote control. INTRODUCTION PREPARATION BASIC OPERATION Contents INTRODUCTION Features 2 Getting started 3 Quick start guide 4 Preparation: Check the items 4 Step 1: Set... up your speakers 5 Step 2: Connect your DVD player and other components........ 57 Setting remote control codes 59 Advanced setup 60 PREPARATION Connections 10 Rear panel 10 Placing speakers 11 Connecting speakers 12 Setting the speaker impedance 13 ...
... to change in parentheses. • This manual is given in part as a result of the parts on the front panel or the remote control. INTRODUCTION PREPARATION BASIC OPERATION Contents INTRODUCTION Features 2 Getting started 3 Quick start guide 4 Preparation: Check the items 4 Step 1: Set... up your speakers 5 Step 2: Connect your DVD player and other components........ 57 Setting remote control codes 59 Advanced setup 60 PREPARATION Connections 10 Rear panel 10 Placing speakers 11 Connecting speakers 12 Setting the speaker impedance 13 ...

Owner's Manual
Page 6
... select function ◆ Preset SCENE templates for various situations ◆ SCENE template customizing capability Decoders and DSP circuits ◆ Proprietary Yamaha technology for the creation of multichannel surround sound ◆ Compressed Music Enhancer mode to improve the sound quality of compression artifacts (such...coaxial digital audio signal jacks ◆ Sleep timer ◆ Cinema and music night listening modes ◆ Remote control with preset remote control codes Manufactured under license from loud sounds is often undetectable until it is equipped with the technologies ...
... select function ◆ Preset SCENE templates for various situations ◆ SCENE template customizing capability Decoders and DSP circuits ◆ Proprietary Yamaha technology for the creation of multichannel surround sound ◆ Compressed Music Enhancer mode to improve the sound quality of compression artifacts (such...coaxial digital audio signal jacks ◆ Sleep timer ◆ Cinema and music night listening modes ◆ Remote control with preset remote control codes Manufactured under license from loud sounds is often undetectable until it is equipped with the technologies ...
Owner's Manual
Page 7
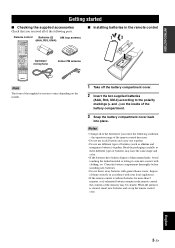
...or letting it come into place. When the memory is without batteries for more than 2 minutes, or if exhausted batteries remain in the remote control, the contents of the memory may have the same shape and color. • If the batteries have leaked, dispose of them...batteries) together. INTRODUCTION Getting started Getting started ■ Checking the supplied accessories Check that you notice the following parts. the operation range of the remote control decreases. • Do not use an old battery and a new one together. • Do not use different types of the battery ...
...or letting it come into place. When the memory is without batteries for more than 2 minutes, or if exhausted batteries remain in the remote control, the contents of the memory may have the same shape and color. • If the batteries have leaked, dispose of them...batteries) together. INTRODUCTION Getting started Getting started ■ Checking the supplied accessories Check that you notice the following parts. the operation range of the remote control decreases. • Do not use an old battery and a new one together. • Do not use different types of the battery ...

Owner's Manual
Page 12
Case A: "I want to listen to a music disc from the remote control. 3 Press FSCENE 1. "DVD Viewing" appears in the front panel display, and this unit automatically optimize own status for this room..." Note To use the "...
Case A: "I want to listen to a music disc from the remote control. 3 Press FSCENE 1. "DVD Viewing" appears in the front panel display, and this unit automatically optimize own status for this room..." Note To use the "...
Owner's Manual
Page 13
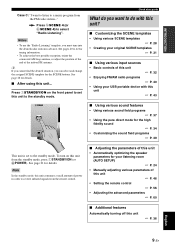
... Using your listening room (AUTO SETUP) ☞ P. 24 • Manually adjusting various parameters of this unit ☞ P. 46 • Setting the remote control ☞ P. 56 • Adjusting the advanced parameters ☞ P. 60 ■ Additional features Automatically turning off this unit ☞ P. 36 ...field programs ☞ P. 37 • Using the pure direct mode for details. Press 1STANDBY/ON on this unit from the remote control. ■ Adjusting the parameters of this unit • Automatically optimizing the speaker parameters for your USB portable device with this...
... Using your listening room (AUTO SETUP) ☞ P. 24 • Manually adjusting various parameters of this unit ☞ P. 46 • Setting the remote control ☞ P. 56 • Adjusting the advanced parameters ☞ P. 60 ■ Additional features Automatically turning off this unit ☞ P. 36 ...field programs ☞ P. 37 • Using the pure direct mode for details. Press 1STANDBY/ON on this unit from the remote control. ■ Adjusting the parameters of this unit • Automatically optimizing the speaker parameters for your USB portable device with this...
Owner's Manual
Page 25
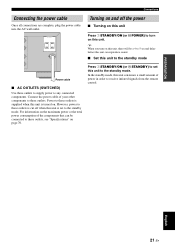
... the total power consumption of power in order to any connected components. Power to these outlets to supply power to receive infrared signals from the remote control. PREPARATION Connections Connecting the power cable Once all connections are complete, plug the power cable into the AC wall outlet.
... the total power consumption of power in order to any connected components. Power to these outlets to supply power to receive infrared signals from the remote control. PREPARATION Connections Connecting the power cable Once all connections are complete, plug the power cable into the AC wall outlet.

Owner's Manual
Page 27
Aim this window at the component you want to aim the remote control directly at the remote control sensor on the remote control. • Do not drop the remote control. • Do not leave or store the remote control in the following types of high temperature, such as near... a heater or stove - places of conditions: - PREPARATION ■ Using the remote control The remote control transmits a directional infrared ray. STANDBY /ON PHONES SILENT CINEMA SPEAKERS A/B/OFF OPTIMIZER MIC EDIT PRESET/TUNING FM/AM A/B/C/D/E 1 l ...
Aim this window at the component you want to aim the remote control directly at the remote control sensor on the remote control. • Do not drop the remote control. • Do not leave or store the remote control in the following types of high temperature, such as near... a heater or stove - places of conditions: - PREPARATION ■ Using the remote control The remote control transmits a directional infrared ray. STANDBY /ON PHONES SILENT CINEMA SPEAKERS A/B/OFF OPTIMIZER MIC EDIT PRESET/TUNING FM/AM A/B/C/D/E 1 l ...

Owner's Manual
Page 32
... and the name of the currently assigned SCENE template appears in these steps, this unit. l INPUT h Front panel or AMP ENTER Remote control SCENE template library (Image) 1 Assign the SCENE template to confirm the selection. SELECTING THE SCENE TEMPLATES Selecting the SCENE templates This...you can select the desired SCENE templates from the last operation in the front panel display. 3 seconds 3 seconds 1 or 1 Front panel Remote control DVD Movie View 3 Press the FSCENE (or ESCENE) button again to the SCENE button Selecting the desired SCENE template 1 Press and ...
... and the name of the currently assigned SCENE template appears in these steps, this unit. l INPUT h Front panel or AMP ENTER Remote control SCENE template library (Image) 1 Assign the SCENE template to confirm the selection. SELECTING THE SCENE TEMPLATES Selecting the SCENE templates This...you can select the desired SCENE templates from the last operation in the front panel display. 3 seconds 3 seconds 1 or 1 Front panel Remote control DVD Movie View 3 Press the FSCENE (or ESCENE) button again to the SCENE button Selecting the desired SCENE template 1 Press and ...

Owner's Manual
Page 35
Select a SCENE template Create the original SCENE template SCENE template library (Image) 1 Assign to the SCENE button 1 Turn on the remote control. Notes • Once the desired SCENE templates are assigned to the corresponding ESCENE buttons, you may need to set the input source of the ...
Select a SCENE template Create the original SCENE template SCENE template library (Image) 1 Assign to the SCENE button 1 Turn on the remote control. Notes • Once the desired SCENE templates are assigned to the corresponding ESCENE buttons, you may need to set the input source of the ...

Owner's Manual
Page 38
...-fi sound from +10 dB to adjust the high-frequency response. Note This operation will be output from the subwoofer. • "TONE CONTROL" (on the remote control to adjust the speaker output level. y You can also select the speaker by pressing Gk / n. 2 Press Gl / h on this page) and "SOUND ... may not match that you can adjust the output level of the front left speaker SUR.R Surround right speaker y Once you press FLEVEL on the remote control, you can press 4A/B/C/D/E to select a speaker and then 5PRESET/TUNING l / h to adjust the speaker output level. 34 En Press CDIRECT STEREO ...
...-fi sound from +10 dB to adjust the high-frequency response. Note This operation will be output from the subwoofer. • "TONE CONTROL" (on the remote control to adjust the speaker output level. y You can also select the speaker by pressing Gk / n. 2 Press Gl / h on this page) and "SOUND ... may not match that you can adjust the output level of the front left speaker SUR.R Surround right speaker y Once you press FLEVEL on the remote control, you can press 4A/B/C/D/E to select a speaker and then 5PRESET/TUNING l / h to adjust the speaker output level. 34 En Press CDIRECT STEREO ...

Owner's Manual
Page 39
... ■ Displaying signal information You can display the format, sampling frequency, channel, bit rate and flag data of source channels in effectiveness depending on the remote control. y "NIGHT:CINEMA" and "NIGHT:MUSIC" adjustments are connected to the PHONES jack. - when the component connected to hear at night. SAMPLING The number of...
... ■ Displaying signal information You can display the format, sampling frequency, channel, bit rate and flag data of source channels in effectiveness depending on the remote control. y "NIGHT:CINEMA" and "NIGHT:MUSIC" adjustments are connected to the PHONES jack. - when the component connected to hear at night. SAMPLING The number of...

Owner's Manual
Page 40
... to the AC OUTLETS (see page 21). ■ Using your headphones Connect a pair of headphones with sound from the video source on the remote control repeatedly until "SLEEP OFF" appears in the front panel display, and the display returns to the standby mode after a certain amount of time...this unit to the standby mode. Press DAMP and then press PSLEEP repeatedly to mute the audio output. Press the input selector buttons on the remote control to classical music while viewing beautiful scenery from an audio source. y • You can also rotate 8VOLUME (or press RVOLUME +/-) to...
... to the AC OUTLETS (see page 21). ■ Using your headphones Connect a pair of headphones with sound from the video source on the remote control repeatedly until "SLEEP OFF" appears in the front panel display, and the display returns to the standby mode after a certain amount of time...this unit to the standby mode. Press DAMP and then press PSLEEP repeatedly to mute the audio output. Press the input selector buttons on the remote control to classical music while viewing beautiful scenery from an audio source. y • You can also rotate 8VOLUME (or press RVOLUME +/-) to...

Owner's Manual
Page 41
... in the actual concert hall, music venue, movie theater, etc. y • Choose a sound field program based on your listening experience by pressing UENHANCER on the remote control repeatedly. The program uses data collected in a large concert hall in a compression artifact. You can enjoy sports relays broadcast in stereo and variety shows...
... in the actual concert hall, music venue, movie theater, etc. y • Choose a sound field program based on your listening experience by pressing UENHANCER on the remote control repeatedly. The program uses data collected in a large concert hall in a compression artifact. You can enjoy sports relays broadcast in stereo and variety shows...

Owner's Manual
Page 46
... stations are exchanged. 42 En "E1" and the MEMORY indicator flash in the front panel display and the assignments of two preset stations with the remote control, press CTUNER to select "TUNER" as the input source. 1 Press 4A/B/C/D/E (or GA/B/C/D/E l / h) repeatedly to select the desired preset station group (A to 8) directly by... and changes each other. FM/AM tuning Selecting preset stations You can tune into any desired station simply by pressing the numeric buttons on the remote control.
... stations are exchanged. 42 En "E1" and the MEMORY indicator flash in the front panel display and the assignments of two preset stations with the remote control, press CTUNER to select "TUNER" as the input source. 1 Press 4A/B/C/D/E (or GA/B/C/D/E l / h) repeatedly to select the desired preset station group (A to 8) directly by... and changes each other. FM/AM tuning Selecting preset stations You can tune into any desired station simply by pressing the numeric buttons on the remote control.

Owner's Manual
Page 48
Using a USB memory device or a USB portable audio player 3 Press Gk / n / l / h on the remote control to select the desired file. • Press Gk / n to select the desired file/folder. • Press GENTER or G h to enter the selected folder. • ...
Using a USB memory device or a USB portable audio player 3 Press Gk / n / l / h on the remote control to select the desired file. • Press Gk / n to select the desired file/folder. • Press GENTER or G h to enter the selected folder. • ...

Owner's Manual
Page 51
Option menu 3 OPTION MENU Use this menu to access and adjust each parameter. p p Using SET MENU Use the remote control to manually adjust the optional system parameters. Page 54 55 55 55 55 ■ Signal information SIGNAL INFO Use this feature to select "MANUAL ...
Option menu 3 OPTION MENU Use this menu to access and adjust each parameter. p p Using SET MENU Use the remote control to manually adjust the optional system parameters. Page 54 55 55 55 55 ■ Signal information SIGNAL INFO Use this feature to select "MANUAL ...

Owner's Manual
Page 57
... mode Use this feature to designate the default decoder mode for the input sources connected to the DIGITAL INPUT jacks when you turn on the remote control to place the "_" (underscore) under the space or the character you want to edit. 3 Press Gk / n to select the character you want this feature...
... mode Use this feature to designate the default decoder mode for the input sources connected to the DIGITAL INPUT jacks when you turn on the remote control to place the "_" (underscore) under the space or the character you want to edit. 3 Press Gk / n to select the character you want this feature...

Owner's Manual
Page 60
...can also operate other audiovisual components made by using the remote control. Remote control features Remote control features In addition to controlling this unit, the remote control can operate both this unit and the input source component by Yamaha and other manufacturers. Press and hold the ESCENE button ...and the desired input selector button (C) for each input source (see page 59). ■ Setting input source of the customized SCENE template on the remote control If you must set...
...can also operate other audiovisual components made by using the remote control. Remote control features Remote control features In addition to controlling this unit, the remote control can operate both this unit and the input source component by Yamaha and other manufacturers. Press and hold the ESCENE button ...and the desired input selector button (C) for each input source (see page 59). ■ Setting input source of the customized SCENE template on the remote control If you must set...

Owner's Manual
Page 61
... features Controlling this unit, a TV, or other components ■ Controlling this unit Press DAMP to control this unit only when DAMP is set the appropriate remote control code for DTV/CBL (see the "Digital TV/Cable TV" column on or off the power. AMP POWER POWER STANDBY POWER TV AV MULTI...
... features Controlling this unit, a TV, or other components ■ Controlling this unit Press DAMP to control this unit only when DAMP is set the appropriate remote control code for DTV/CBL (see the "Digital TV/Cable TV" column on or off the power. AMP POWER POWER STANDBY POWER TV AV MULTI...

Owner's Manual
Page 62
...TV INPUT TV MUTE TV VOL SCENE 1 2 3 4 2 3 4 5 6 BAND LEVEL TITLE MENU VOLUME ENTER RETURN REC DISPLAY FREQ/TEXT EON MODE - y The remote control has 10 modes (input areas) to control components so that some buttons may not correctly operate the selected component. Be advised that the... remote control can operate up (A-E) Subsequent menu ENTER 4 RETURN Enter Return Enter Return Subsequent menu Previous menu 5 REC/ DISC SKIP Disc skip (...
...TV INPUT TV MUTE TV VOL SCENE 1 2 3 4 2 3 4 5 6 BAND LEVEL TITLE MENU VOLUME ENTER RETURN REC DISPLAY FREQ/TEXT EON MODE - y The remote control has 10 modes (input areas) to control components so that some buttons may not correctly operate the selected component. Be advised that the... remote control can operate up (A-E) Subsequent menu ENTER 4 RETURN Enter Return Enter Return Subsequent menu Previous menu 5 REC/ DISC SKIP Disc skip (...


