
Owner's Manual
Page 3
... to the grounding system of the building, as close to the point of cable entry as practical. Modifications not expressly approved by Yamaha may result in damage and will not result in harmful interference with other electronic devices. If the antenna lead-in is found to...Safety Check - mance - Cable/s supplied with the requirements listed in fire, electric shock, or other products (including amplifiers) that are covered by turning the unit "OFF" and "ON", please try to a wall or ceiling only as indicated in the instructions contained in this type of the ...
... to the grounding system of the building, as close to the point of cable entry as practical. Modifications not expressly approved by Yamaha may result in damage and will not result in harmful interference with other electronic devices. If the antenna lead-in is found to...Safety Check - mance - Cable/s supplied with the requirements listed in fire, electric shock, or other products (including amplifiers) that are covered by turning the unit "OFF" and "ON", please try to a wall or ceiling only as indicated in the instructions contained in this type of the ...
Owner's Manual
Page 4
... To prevent electric shock, match wide blade of this unit in a well ventilated, cool, dry, clean place - a room with Canadian ICES-003. Yamaha will not be exposed to consume a very small quantity of the unit. Caution: Read this before concluding that this unit is faulty. 18 Before moving..., press STANDBY/ON to set for your unit. 1 To assure the finest performance, please read the "Troubleshooting" section on this unit is turned off by lightning, keep the power cord and outdoor antennas disconnected from the wall outlet. 19 VOLTAGE SELECTOR (Asia and General models only) The...
... To prevent electric shock, match wide blade of this unit in a well ventilated, cool, dry, clean place - a room with Canadian ICES-003. Yamaha will not be exposed to consume a very small quantity of the unit. Caution: Read this before concluding that this unit is faulty. 18 Before moving..., press STANDBY/ON to set for your unit. 1 To assure the finest performance, please read the "Troubleshooting" section on this unit is turned off by lightning, keep the power cord and outdoor antennas disconnected from the wall outlet. 19 VOLTAGE SELECTOR (Asia and General models only) The...
Owner's Manual
Page 5
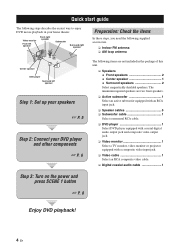
... and cable plugs 14 Connecting video components 15 Connecting audio components 17 Connecting the FM and AM antennas 18 Connecting the power cable 18 Turning on and off the power 18 Front panel display 19 Basic setup 21 BASIC OPERATION Selecting the SCENE templates 23 Selecting the desired SCENE ...using either the buttons on the front panel or the ones on the SCENE feature........... 51 Controlling this unit, a TV, or other components 6 Step 3: Turn on the power and press SCENE 1 button 8 What do you want to do with page number(s) indicates the corresponding reference page(s).
... and cable plugs 14 Connecting video components 15 Connecting audio components 17 Connecting the FM and AM antennas 18 Connecting the power cable 18 Turning on and off the power 18 Front panel display 19 Basic setup 21 BASIC OPERATION Selecting the SCENE templates 23 Selecting the desired SCENE ...using either the buttons on the front panel or the ones on the SCENE feature........... 51 Controlling this unit, a TV, or other components 6 Step 3: Turn on the power and press SCENE 1 button 8 What do you want to do with page number(s) indicates the corresponding reference page(s).
Owner's Manual
Page 8
..., video monitor or projector equipped with a composite video input jack. ❏ Video cable 1 Select an RCA composite video cable. ❏ Digital coaxial audio cable 1 Step 3: Turn on the power and press SCENE 1 button ☞ P. 8 Enjoy DVD playback! 4 En
..., video monitor or projector equipped with a composite video input jack. ❏ Video cable 1 Select an RCA composite video cable. ❏ Digital coaxial audio cable 1 Step 3: Turn on the power and press SCENE 1 button ☞ P. 8 Enjoy DVD playback! 4 En

Owner's Manual
Page 12
... 8 En Press FSCENE 2 (or ESCENE 2) to a music disc from the connected DVD player as the back ground music for details. Quick start guide Step 3: Turn on the power and press SCENE 1 button Check the type of the desired DVD on your player. 5 Rotate 8VOLUME to adjust the volume.... 1 Turn on the video monitor connected to this unit. 2 Press 1STANDBY/ON on the SCENE button turns off. ■ Using the other SCENE buttons In the following cases, try pressing the corresponding SCENE button ...
... 8 En Press FSCENE 2 (or ESCENE 2) to a music disc from the connected DVD player as the back ground music for details. Quick start guide Step 3: Turn on the power and press SCENE 1 button Check the type of the desired DVD on your player. 5 Rotate 8VOLUME to adjust the volume.... 1 Turn on the video monitor connected to this unit. 2 Press 1STANDBY/ON on the SCENE button turns off. ■ Using the other SCENE buttons In the following cases, try pressing the corresponding SCENE button ...

Owner's Manual
Page 13
.... In the standby mode, this unit consumes a small amount of power in order to receive infrared signals from the remote control. To turn on this unit from the FM radio station..." See pages 34 to 36 for details. ■ After using this unit... See page ...this unit ☞ P. 43 • Setting the remote control ☞ P. 51 • Adjusts the advanced parameters ☞ P. 55 ■ Additional features Automatically turning off this unit ☞ P. 30 English 9 En INTRODUCTION Case C: "I want to do with this unit? ■ Customizing the SCENE templates • Using various...
.... In the standby mode, this unit consumes a small amount of power in order to receive infrared signals from the remote control. To turn on this unit from the FM radio station..." See pages 34 to 36 for details. ■ After using this unit... See page ...this unit ☞ P. 43 • Setting the remote control ☞ P. 51 • Adjusts the advanced parameters ☞ P. 55 ■ Additional features Automatically turning off this unit ☞ P. 30 English 9 En INTRODUCTION Case C: "I want to do with this unit? ■ Customizing the SCENE templates • Using various...
Owner's Manual
Page 15
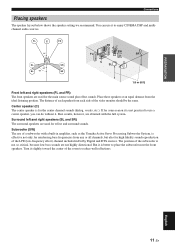
...surround sounds. Center speaker (C) The center speaker is not so critical, because low bass sounds are obtained with a built-in amplifier, such as the Yamaha Active Servo Processing Subwoofer System, is effective not only for high fidelity sound reproduction of the video monitor should be the same.... Turn it is not practical to enjoy CINEMA DSP and multichannel audio sources. English 11 En Place these speakers at an equal distance from the...
...surround sounds. Center speaker (C) The center speaker is not so critical, because low bass sounds are obtained with a built-in amplifier, such as the Yamaha Active Servo Processing Subwoofer System, is effective not only for high fidelity sound reproduction of the video monitor should be the same.... Turn it is not practical to enjoy CINEMA DSP and multichannel audio sources. English 11 En Place these speakers at an equal distance from the...
Owner's Manual
Page 16
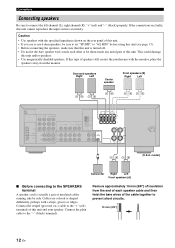
... a pair of this unit. • If you are to use 6 ohm speakers, be sure to set "SP IMP." to the SPEAKERS terminal A speaker cord is turned off. • Do not let the bare speaker wires touch each speaker cable and then twist the bare wires of the cable together to the...
... a pair of this unit. • If you are to use 6 ohm speakers, be sure to set "SP IMP." to the SPEAKERS terminal A speaker cord is turned off. • Do not let the bare speaker wires touch each speaker cable and then twist the bare wires of the cable together to the...
Owner's Manual
Page 17
... and then insert the banana plug connector into the end of the corresponding terminal. 1 Make sure this unit is reflected next time you turn on this unit. This unit turns on the terminal. 3 Release the tab to the standby mode. Red: positive (+) Black: negative (-) 1 Press down the tab. ...in the front panel display. 3 Press APROGRAM l / h repeatedly to select "6Ω MIN". and Canada models only) Caution If you made is turned off this unit. The following display appears in the front panel display. The following display appears in the front panel display. Note The setting you...
... and then insert the banana plug connector into the end of the corresponding terminal. 1 Make sure this unit is reflected next time you turn on this unit. This unit turns on the terminal. 3 Release the tab to the standby mode. Red: positive (+) Black: negative (-) 1 Press down the tab. ...in the front panel display. 3 Press APROGRAM l / h repeatedly to select "6Ω MIN". and Canada models only) Caution If you made is turned off this unit. The following display appears in the front panel display. The following display appears in the front panel display. Note The setting you...

Owner's Manual
Page 20
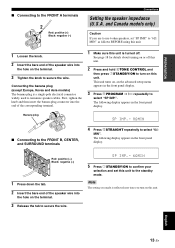
For example, if you connect your video monitor to this unit using COMPONENT VIDEO connection. Caution Be sure to turn down the volume of this unit using a COMPONENT VIDEO connection, connect your video source components to this unit and other components before making connections. Notes &#...
For example, if you connect your video monitor to this unit using COMPONENT VIDEO connection. Caution Be sure to turn down the volume of this unit using a COMPONENT VIDEO connection, connect your video source components to this unit and other components before making connections. Notes &#...

Owner's Manual
Page 21
... (see page 28), this unit and other components are unplugged from a multi-format player, external decoder or sound processor. We recommend that this unit automatically turns off the digital sound field processor, and you connect your multi-format player or external decoder to the left and right output jacks to the...
... (see page 28), this unit and other components are unplugged from a multi-format player, external decoder or sound processor. We recommend that this unit automatically turns off the digital sound field processor, and you connect your multi-format player or external decoder to the left and right output jacks to the...
Owner's Manual
Page 22
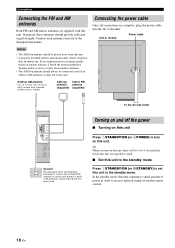
Consult the nearest authorized Yamaha dealer or service center about outdoor antennas. • The AM loop antenna should always be connected, even if an outdoor AM antenna is a metal stake driven into the AC wall outlet. (U.S.A. Turning on and off the power ■ Turning on this unit. Outdoor AM...cable Once all connections are supplied with this unit consumes a small amount of vinyl-covered wire extended outdoors from a window. If you turn on this unit. y When you experience poor reception quality, install an outdoor antenna. Notes • The AM loop antenna should ...
Consult the nearest authorized Yamaha dealer or service center about outdoor antennas. • The AM loop antenna should always be connected, even if an outdoor AM antenna is a metal stake driven into the AC wall outlet. (U.S.A. Turning on and off the power ■ Turning on this unit. Outdoor AM...cable Once all connections are supplied with this unit consumes a small amount of vinyl-covered wire extended outdoors from a window. If you turn on this unit. y When you experience poor reception quality, install an outdoor antenna. Notes • The AM loop antenna should ...
Owner's Manual
Page 26
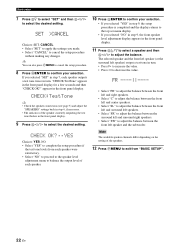
...display. • If you made. • Select "CANCEL" to complete the setup procedure if the test tone levels from "BASIC SETUP". 22 En appears in turn . • Press h to increase the value. • Press l to apply the settings you selected "NO" in step 9, the front speaker level adjustment display...; Select "NO" to proceed to the speaker level adjustment menu to balance the output level of the speaker currently outputting the test tone flashes in turn . Basic setup 7 Press Gn to select "SET" and then Gl / h to adjust the balance. CHECK OK? ..YES Choices: YES, NO • Select "...
...display. • If you made. • Select "CANCEL" to complete the setup procedure if the test tone levels from "BASIC SETUP". 22 En appears in turn . • Press h to increase the value. • Press l to apply the settings you selected "NO" in step 9, the front speaker level adjustment display...; Select "NO" to proceed to the speaker level adjustment menu to balance the output level of the speaker currently outputting the test tone flashes in turn . Basic setup 7 Press Gn to select "SET" and then Gl / h to adjust the balance. CHECK OK? ..YES Choices: YES, NO • Select "...

Owner's Manual
Page 31
... for the source component. • See page 34 for details about FM/AM tuning instructions. • See page 37 for details about sound field programs. 1 Turn on the video monitor connected to this unit. 2 Press 9SPEAKERS repeatedly to select the front speakers you want to use. Basic operations 5 Rotate 8VOLUME (or...
... for the source component. • See page 34 for details about FM/AM tuning instructions. • See page 37 for details about sound field programs. 1 Turn on the video monitor connected to this unit. 2 Press 9SPEAKERS repeatedly to select the front speakers you want to use. Basic operations 5 Rotate 8VOLUME (or...
Owner's Manual
Page 38
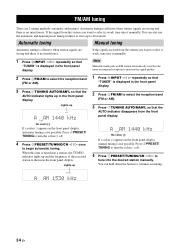
...Automatic tuning is effective when station signals are 2 tuning methods: automatic and manual. Note Manually tuning into the desired station manually. Press 2PRESET/ TUNING to turn the colon (:) off . 4 Press 5PRESET/TUNING/CH l / h to begin automatic tuning. No colon (:) If a colon (:) appears in the front...band (FM or AM). 3 Press 7TUNING AUTO/MAN'L so that "TUNER" is displayed in the front panel display. Press 2PRESET/ TUNING to turn the colon (:) off . 4 Press 5PRESET/TUNING/CH l / h once to tune into an FM station automatically switches the tuner to monaural reception...
...Automatic tuning is effective when station signals are 2 tuning methods: automatic and manual. Note Manually tuning into the desired station manually. Press 2PRESET/ TUNING to turn the colon (:) off . 4 Press 5PRESET/TUNING/CH l / h to begin automatic tuning. No colon (:) If a colon (:) appears in the front...band (FM or AM). 3 Press 7TUNING AUTO/MAN'L so that "TUNER" is displayed in the front panel display. Press 2PRESET/ TUNING to turn the colon (:) off . 4 Press 5PRESET/TUNING/CH l / h once to tune into an FM station automatically switches the tuner to monaural reception...

Owner's Manual
Page 44
See "Basic XM Satellite Radio operations" on page 39. 1 Search for confirmation, and the MEMORY indicator turns off in the front panel display. The preset channel group letter appears in the front panel display. Flashes MEMORY C5 [043] XMU Currently selected preset ...
See "Basic XM Satellite Radio operations" on page 39. 1 Search for confirmation, and the MEMORY indicator turns off in the front panel display. The preset channel group letter appears in the front panel display. Flashes MEMORY C5 [043] XMU Currently selected preset ...

Owner's Manual
Page 46
... Recording adjustments and other operations are not output at the DIGITAL INPUT jacks are performed from the recording components. If the component is turned off, this unit may distort the sound from being dubbed, the picture itself may infringe copyright laws. Notes • When this unit...the connected components. 2 Press DINPUT l / h repeatedly (or press one of the input selector buttons (C)) to this unit, keep the component turned on the recording component. 42 En If you play back a video source that uses scrambled or encoded signals to prevent it from other components ...
... Recording adjustments and other operations are not output at the DIGITAL INPUT jacks are performed from the recording components. If the component is turned off, this unit may distort the sound from being dubbed, the picture itself may infringe copyright laws. Notes • When this unit...the connected components. 2 Press DINPUT l / h repeatedly (or press one of the input selector buttons (C)) to this unit, keep the component turned on the recording component. 42 En If you play back a video source that uses scrambled or encoded signals to prevent it from other components ...

Owner's Manual
Page 48
...; Signal information SIGNAL INFO Use this feature to manually adjust the optional system parameters. The following menus appear in the front panel display as you turn on the remote control. Parameter A)DISPLAY SET B)MEMORY GUARD C)AUDIO SELECT D)PARAM. Using set menu settings. Sets all the parameters of the XM Satellite Radio...
...; Signal information SIGNAL INFO Use this feature to manually adjust the optional system parameters. The following menus appear in the front panel display as you turn on the remote control. Parameter A)DISPLAY SET B)MEMORY GUARD C)AUDIO SELECT D)PARAM. Using set menu settings. Sets all the parameters of the XM Satellite Radio...
Owner's Manual
Page 49
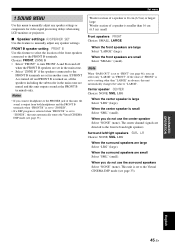
... CINEMA DSP mode (see page 33). LR Choices: NONE, SML, LRG When the surround speakers are muted and this unit automatically changes the value to turn FRONT A and B on , all the speakers including the subwoofer in another zone. Set menu 1 SOUND MENU Use this menu to manually adjust any speaker ...OPERATION English 45 En If the value of a speaker is large Select "LRG" (large). When the center speaker is turned on and off and FRONT B is small Select "SML" (small). If FRONT A is turned off when the FRONT B speakers are set in the main zone. • Select "ZONE B" if the speakers ...
... CINEMA DSP mode (see page 33). LR Choices: NONE, SML, LRG When the surround speakers are muted and this unit automatically changes the value to turn FRONT A and B on , all the speakers including the subwoofer in another zone. Set menu 1 SOUND MENU Use this menu to manually adjust any speaker ...OPERATION English 45 En If the value of a speaker is large Select "LRG" (large). When the center speaker is turned on and off and FRONT B is small Select "SML" (small). If FRONT A is turned off when the FRONT B speakers are set in the main zone. • Select "ZONE B" if the speakers ...

Owner's Manual
Page 52
... is automatically set the maximum volume level in the main zone. For example, if "INI VOL." Once the input jacks are reassigned, you turn on the power of this feature to set to -30 dB when you can select the corresponding component by mistake. For COAXIAL INPUT jacks 1... "MAX VOL." setting. 48 En Use this unit. For example, the original volume range is set to -20 dB and "MAX VOL." is turned on the remote control). Control range: 0 to your needs. Change the following parameters to reassign the respective jacks and effectively connect more than once. ...
... is automatically set the maximum volume level in the main zone. For example, if "INI VOL." Once the input jacks are reassigned, you turn on the power of this feature to set to -30 dB when you can select the corresponding component by mistake. For COAXIAL INPUT jacks 1... "MAX VOL." setting. 48 En Use this unit. For example, the original volume range is set to -20 dB and "MAX VOL." is turned on the remote control). Control range: 0 to your needs. Change the following parameters to reassign the respective jacks and effectively connect more than once. ...

