
Owners Manual
Page 3
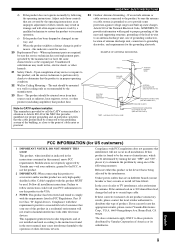
...NFPA 70, provides information with the requirements listed in this type of interference, which can not locate the appropriate retailer, please contact Yamaha Electronics Corp., U.S.A. 6660 Orangethorpe Ave, Buena Park, CA 90620. Utilize power outlets that is connected to the product, be mounted ... only high quality shielded cables. Follow all installations. The unit should be used according to the instructions found to be determined by turning the unit "OFF" and "ON", please try to those controls that provides guidelines for service. 20 Replacement Parts - The product...
...NFPA 70, provides information with the requirements listed in this type of interference, which can not locate the appropriate retailer, please contact Yamaha Electronics Corp., U.S.A. 6660 Orangethorpe Ave, Buena Park, CA 90620. Utilize power outlets that is connected to the product, be mounted ... only high quality shielded cables. Follow all installations. The unit should be used according to the instructions found to be determined by turning the unit "OFF" and "ON", please try to those controls that provides guidelines for service. 20 Replacement Parts - The product...
Owners Manual
Page 4
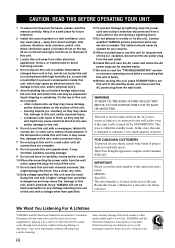
...to avoid humming sounds. 4 Do not expose this unit to sudden temperature changes from use this unit for any service is too late, YAMAHA and the Electronic Industries Association's Consumer Electronics Group recommend you to prevent condensation inside this unit. - candles), as they may fall onto ...and/or discoloration on switches, knobs and/or cords. 10 When disconnecting the power cable from excessive volume levels. This unit is turned off by lightning, keep the power cord and outdoor antennas disconnected from the wall outlet. IMPORTANT Please record the serial number of ...
...to avoid humming sounds. 4 Do not expose this unit to sudden temperature changes from use this unit for any service is too late, YAMAHA and the Electronic Industries Association's Consumer Electronics Group recommend you to prevent condensation inside this unit. - candles), as they may fall onto ...and/or discoloration on switches, knobs and/or cords. 10 When disconnecting the power cable from excessive volume levels. This unit is turned off by lightning, keep the power cord and outdoor antennas disconnected from the wall outlet. IMPORTANT Please record the serial number of ...

Owners Manual
Page 5
... jacks and cable plugs 13 Connecting video components 14 Connecting audio components 16 Connecting the FM and AM antennas 17 Connecting the power cable 18 Turning on the power 18 SETUP 19 ADVANCED OPERATION ADVANCED OPERATIONS 31 Using the sleep timer 31 Dimming the front panel display 31 Adjusting speaker levels...
... jacks and cable plugs 13 Connecting video components 14 Connecting audio components 16 Connecting the FM and AM antennas 17 Connecting the power cable 18 Turning on the power 18 SETUP 19 ADVANCED OPERATION ADVANCED OPERATIONS 31 Using the sleep timer 31 Dimming the front panel display 31 Adjusting speaker levels...

Owners Manual
Page 8
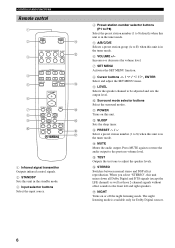
... between selecting preset station numbers and selecting the tuning frequency. 4 FM/AM Switches the reception band between automatic tuning (the AUTO indicator is turned on) and manual tuning (the AUTO indicator is in the tuner mode. 7 Front panel display Shows information about the operational status of this... unit is turned off). 0 VOLUME Controls the output level of the preset station numbers (1 to E) when this unit is in the tuner mode. 6 PRESET/...
... between selecting preset station numbers and selecting the tuning frequency. 4 FM/AM Switches the reception band between automatic tuning (the AUTO indicator is turned on) and manual tuning (the AUTO indicator is in the tuner mode. 7 Front panel display Shows information about the operational status of this... unit is turned off). 0 VOLUME Controls the output level of the preset station numbers (1 to E) when this unit is in the tuner mode. 6 PRESET/...
Owners Manual
Page 10
... DSP effect reproduction. E TEST Outputs the test tone to be adjusted and sets the output level. 0 Surround mode selector buttons Select the surround modes. G NIGHT Turns on this unit mixes down all Dolby Digital and DTS signals (except the LFE channel) as well as those 2-channel signals without effect sounds to... the sleep timer. D MUTE Mutes the audio output. C PRESET u / d Select a preset station number (1 to 8) when this unit is available only for Dolby Digital sources. 6 A POWER Turns on or off the night listening mode.
... DSP effect reproduction. E TEST Outputs the test tone to be adjusted and sets the output level. 0 Surround mode selector buttons Select the surround modes. G NIGHT Turns on this unit mixes down all Dolby Digital and DTS signals (except the LFE channel) as well as those 2-channel signals without effect sounds to... the sleep timer. D MUTE Mutes the audio output. C PRESET u / d Select a preset station number (1 to 8) when this unit is available only for Dolby Digital sources. 6 A POWER Turns on or off the night listening mode.

Owners Manual
Page 14
... as possible, such as close to reduce wall reflections. 1.8 m (6 ft) 10 Place these speakers an equal distance from each speaker from the ideal listening position. Turn it to enjoy surround sounds. * ITU-R is for the main source sound plus effect sounds. FL C FR 30˚ SL SR 60˚ SL 80...
... as possible, such as close to reduce wall reflections. 1.8 m (6 ft) 10 Place these speakers an equal distance from each speaker from the ideal listening position. Turn it to enjoy surround sounds. * ITU-R is for the main source sound plus effect sounds. FL C FR 30˚ SL SR 60˚ SL 80...
Owners Manual
Page 15
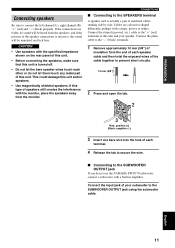
... speakers with the specified impedance shown on the rear panel of this unit. • Before connecting the speakers, make sure that this unit is turned off. • Do not let the bare speaker wires touch each terminal. 4 Release the tab to secure the wire. ■ Connecting to...10 mm (3/8") of insulation from the monitor. PREPARATION Connecting speakers Be sure to the "+" (red) terminals of each other or do not use the YAMAHA SW-P170 subwoofer, connect a subwoofer with a stripe, groove or ridges. If the connections are colored or shaped differently, perhaps with a built-in ...
... speakers with the specified impedance shown on the rear panel of this unit. • Before connecting the speakers, make sure that this unit is turned off. • Do not let the bare speaker wires touch each terminal. 4 Release the tab to secure the wire. ■ Connecting to...10 mm (3/8") of insulation from the monitor. PREPARATION Connecting speakers Be sure to the "+" (red) terminals of each other or do not use the YAMAHA SW-P170 subwoofer, connect a subwoofer with a stripe, groove or ridges. If the connections are colored or shaped differently, perhaps with a built-in ...
Owners Manual
Page 18
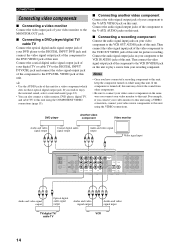
... VIDEO jack of this unit for a video component which does not have connected a recording component to this unit, keep the component turned on this unit. If the component is turned off, this unit may distort the sound from your digital TV or cable TV to the DIGITAL INPUT DTV/CBL jack and...
... VIDEO jack of this unit for a video component which does not have connected a recording component to this unit, keep the component turned on this unit. If the component is turned off, this unit may distort the sound from your digital TV or cable TV to the DIGITAL INPUT DTV/CBL jack and...
Owners Manual
Page 20
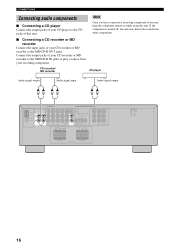
... components. ■ Connecting a CD recorder or MD recorder Connect the input jacks of your CD recorder or MD recorder to this unit, keep the component turned on while using this unit. CD recorder/ MD recorder CD player Audio signal output Audio signal input Audio signal output L R L R L R VIDEO AM ANT GND 75...; UNBAL. Connect the output jacks of this unit. Note Once you have connected a recording component to the MD/CD-R OUT jacks. If the component is turned off, this unit may distort the sound from your CD recorder or MD recorder to the MD/CD-R IN jacks to the CD jacks of...
... components. ■ Connecting a CD recorder or MD recorder Connect the input jacks of your CD recorder or MD recorder to this unit, keep the component turned on while using this unit. CD recorder/ MD recorder CD player Audio signal output Audio signal input Audio signal output L R L R L R VIDEO AM ANT GND 75...; UNBAL. Connect the output jacks of this unit. Note Once you have connected a recording component to the MD/CD-R OUT jacks. If the component is turned off, this unit may distort the sound from your CD recorder or MD recorder to the MD/CD-R IN jacks to the CD jacks of...
Owners Manual
Page 22
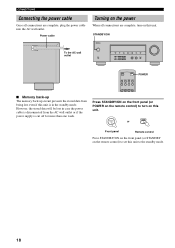
... STANDBY/ON on the front panel (or POWER on the remote control) to turn on this unit. However, the stored data will be lost in the standby mode. Power cable Turning on the power When all connections are complete, turn on the remote control) to the standby mode. 18 STANDBY /ON POWER or...
... STANDBY/ON on the front panel (or POWER on the remote control) to turn on this unit. However, the stored data will be lost in the standby mode. Power cable Turning on the power When all connections are complete, turn on the remote control) to the standby mode. 18 STANDBY /ON POWER or...

Owners Manual
Page 24
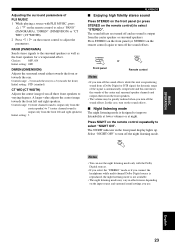
... Remote control Note If you have connected a recording component to select the input you notice distortion or low volume during playback from other components, try turning on the remote control) to adjust the volume to this unit. The current input source name appears in the front panel display. 4 Start playback or... MENU MEMORY MAN'L/AUTO FM TUNING MODE AUTO/MAN'L l INPUT h INPUT MODE VOLUME 3 Select the input source. STANDBY /ON or POWER Front panel Remote control 2 Turn on the source component.
... Remote control Note If you have connected a recording component to select the input you notice distortion or low volume during playback from other components, try turning on the remote control) to adjust the volume to this unit. The current input source name appears in the front panel display. 4 Start playback or... MENU MEMORY MAN'L/AUTO FM TUNING MODE AUTO/MAN'L l INPUT h INPUT MODE VOLUME 3 Select the input source. STANDBY /ON or POWER Front panel Remote control 2 Turn on the source component.
Owners Manual
Page 27
...-channel Dolby Digital source is reproduced, the night listening mode is output from the center speaker or surround speakers. Select "NIGHT OFF" to turn off the sound effects. PANO (PANORAMA) Sends stereo signals to varying degrees. Control range: 0 (center channel sound is output only from ...is reproducing sound from a Dolby Digital or DTS signal, the dynamic range of the signal is automatically compressed and this case, turn off the night listening mode. BASIC OPERATION Adjusting the surround parameters of the center and surround speaker channels and outputs them from the...
...-channel Dolby Digital source is reproduced, the night listening mode is output from the center speaker or surround speakers. Select "NIGHT OFF" to turn off the sound effects. PANO (PANORAMA) Sends stereo signals to varying degrees. Control range: 0 (center channel sound is output only from ...is reproducing sound from a Dolby Digital or DTS signal, the dynamic range of the signal is automatically compressed and this case, turn off the night listening mode. BASIC OPERATION Adjusting the surround parameters of the center and surround speaker channels and outputs them from the...
Owners Manual
Page 34
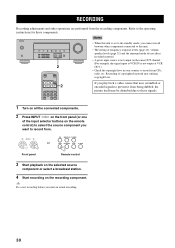
... setting of the input selector buttons on the recording component. Recording of copyrighted material may be disturbed due to the operating instructions for those signals. 1 Turn on all the connected components. 2 Press INPUT l / h on the front panel (or one of frequency response levels (page 21), volume, speaker levels (page 32) and...
... setting of the input selector buttons on the recording component. Recording of copyrighted material may be disturbed due to the operating instructions for those signals. 1 Turn on all the connected components. 2 Press INPUT l / h on the front panel (or one of frequency response levels (page 21), volume, speaker levels (page 32) and...

Owners Manual
Page 35
After a few seconds, "SLEEP OFF" disappears, and the SLEEP indicator turns off and the front panel display returns to exit the "DIMMER" menu. STANDBY POWER CD MD/CD-R TUNER SLEEP DVD DTV/CBL VCR V-AUX SLEEP ...
After a few seconds, "SLEEP OFF" disappears, and the SLEEP indicator turns off and the front panel display returns to exit the "DIMMER" menu. STANDBY POWER CD MD/CD-R TUNER SLEEP DVD DTV/CBL VCR V-AUX SLEEP ...
Owners Manual
Page 37
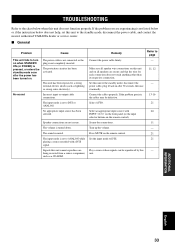
...from a source component, such as lightning or strong static electricity). The protection circuitry has been activated. Remedy Connect the power cable firmly. Select AUTO. Turn up the volume. Set the input mode to page - 11, 12 - 13-16 21 20 11 - 21 21 - No sound Cause The ... this unit and on all speaker wire connections on . Set this unit to the standby mode, disconnect the power cable, and contact the nearest authorized YAMAHA dealer or service center. ■ General Problem This unit fails to ANALOG while playing a source encoded with INPUT l / h on the front panel...
...from a source component, such as lightning or strong static electricity). The protection circuitry has been activated. Remedy Connect the power cable firmly. Select AUTO. Turn up the volume. Set the input mode to page - 11, 12 - 13-16 21 20 11 - 21 21 - No sound Cause The ... this unit and on all speaker wire connections on . Set this unit to the standby mode, disconnect the power cable, and contact the nearest authorized YAMAHA dealer or service center. ■ General Problem This unit fails to ANALOG while playing a source encoded with INPUT l / h on the front panel...

Owners Manual
Page 38
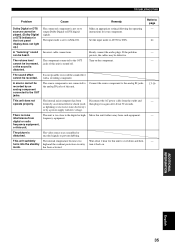
... unit and play the source again. The sleep timer has turned this unit to minimum. The sound is set to NONE. Press MUTE on . Incorrect cable connections. When playing a monaural source with a surround mode, the source ... the appropriate setting for the surround left and 19 right speakers. If the problem persists, the cables may be heard. "SURR" is set to minimum. Turn on one 22 of the surround speakers. 32 is set to the surround mode. Select the appropriate setting for the center speaker. 19 The output...
... unit and play the source again. The sleep timer has turned this unit to minimum. The sound is set to NONE. Press MUTE on . Incorrect cable connections. When playing a monaural source with a surround mode, the source ... the appropriate setting for the surround left and 19 right speakers. If the problem persists, the cables may be heard. "SURR" is set to minimum. Turn on one 22 of the surround speakers. 32 is set to the surround mode. Select the appropriate setting for the center speaker. 19 The output...
Owners Manual
Page 39
...to AUTO or DTS. 21 display does not light up.) A "humming" sound Incorrect cable connections. ADDITIONAL INFORMATION English 35 It is turned off. TROUBLESHOOTING Problem Cause Remedy Refer to page Dolby Digital or DTS The connected component is distorted. Firmly connect the audio plugs. The... volume level The component connected to the OUT Turn on . The sound effect cannot be heard. This unit suddenly The internal temperature becomes too Wait about 30 seconds. mode. or...
...to AUTO or DTS. 21 display does not light up.) A "humming" sound Incorrect cable connections. ADDITIONAL INFORMATION English 35 It is turned off. TROUBLESHOOTING Problem Cause Remedy Refer to page Dolby Digital or DTS The connected component is distorted. Firmly connect the audio plugs. The... volume level The component connected to the OUT Turn on . The sound effect cannot be heard. This unit suddenly The internal temperature becomes too Wait about 30 seconds. mode. or...

Owners Manual
Page 41
..." appears in standby mode. • This procedure completely resets all the parameters of this unit. • The initial factory settings are activated next time you turn on the front panel and press STANDBY/ON. TONE CONTROL While holding down TONE CONTROL on this unit.
..." appears in standby mode. • This procedure completely resets all the parameters of this unit. • The initial factory settings are activated next time you turn on the front panel and press STANDBY/ON. TONE CONTROL While holding down TONE CONTROL on this unit.

