
Owner's Manual
Page 5
... 66 SLEEP TIMER 67 Setting the Sleep Timer 67 Canceling the Sleep Timer 67 ZONE 2 (For U.S.A., Canada and Australia models 68 Remote Control in Zone 2 69 ADDITIONAL INFORMATION SOUND FIELD PROGRAM PARAMETER EDITING 70 What is a Sound Field 70 Sound Field Program Parameters 70... Changing Parameter Settings 71 Resetting a Parameter to a Preset Station 42 Exchanging Preset Stations 42 BASIC RECORDING 43 ADVANCED OPERATION REMOTE CONTROL FEATURES 44 Control Area 44 Setting the Manufacturer Code 45 Learn Feature 47 Changing the Source Name in to the Factory-set ...
... 66 SLEEP TIMER 67 Setting the Sleep Timer 67 Canceling the Sleep Timer 67 ZONE 2 (For U.S.A., Canada and Australia models 68 Remote Control in Zone 2 69 ADDITIONAL INFORMATION SOUND FIELD PROGRAM PARAMETER EDITING 70 What is a Sound Field 70 Sound Field Program Parameters 70... Changing Parameter Settings 71 Resetting a Parameter to a Preset Station 42 Exchanging Preset Stations 42 BASIC RECORDING 43 ADVANCED OPERATION REMOTE CONTROL FEATURES 44 Control Area 44 Setting the Manufacturer Code 45 Learn Feature 47 Changing the Source Name in to the Factory-set ...
Owner's Manual
Page 6
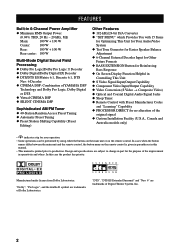
... N Dolby Digital/Dolby Digital EX Decoder N DTS/DTS ES Matrix 6.1, Discrete 6.1, DTS Neo: 6 Decoder N CINEMA DSP: Combination of YAMAHA DSP Technology and Dolby Pro Logic, Dolby Digital or DTS N Virtual CINEMA DSP N SILENT CINEMA DSP Sophisticated AM/FM Tuner N 40-Station...Component Video Input/Output Capability N Video Conversion (S Video → Composite Video) N Optical and Coaxial Digital Audio Signal Jacks N Sleep Timer N Remote Control with Preset Manufacturer Codes and "Learning" Capability N PROCESSOR DIRECT for your operation. • Some operations can be performed by using either ...
... N Dolby Digital/Dolby Digital EX Decoder N DTS/DTS ES Matrix 6.1, Discrete 6.1, DTS Neo: 6 Decoder N CINEMA DSP: Combination of YAMAHA DSP Technology and Dolby Pro Logic, Dolby Digital or DTS N Virtual CINEMA DSP N SILENT CINEMA DSP Sophisticated AM/FM Tuner N 40-Station...Component Video Input/Output Capability N Video Conversion (S Video → Composite Video) N Optical and Coaxial Digital Audio Signal Jacks N Sleep Timer N Remote Control with Preset Manufacturer Codes and "Learning" Capability N PROCESSOR DIRECT for your operation. • Some operations can be performed by using either ...
Owner's Manual
Page 7
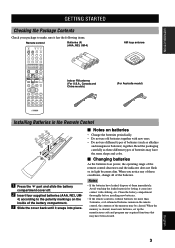
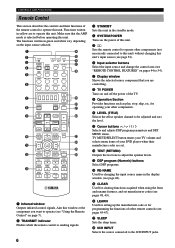
...manufacturer code and program any of these different types of the battery compartment. 3 Slide the cover back until it has the following items. Remote control TRANSMIT RE-NAME CLEAR LEARN SYSTEM POWER STANDBY SLEEP 6CH INPUT Batteries (4) (AAA, R03, UM-4) A PHONO TUNER CD V-AUX CBL...Notes • If the batteries have been cleared. When the memory is without batteries for more than 2 minutes, or if exhausted batteries remain in the Remote Control 2 1 3 1 Press the part and slide the battery compartment cover off. 2 Insert four supplied batteries (AAA, R03, UM- 4) according to...
...manufacturer code and program any of these different types of the battery compartment. 3 Slide the cover back until it has the following items. Remote control TRANSMIT RE-NAME CLEAR LEARN SYSTEM POWER STANDBY SLEEP 6CH INPUT Batteries (4) (AAA, R03, UM-4) A PHONO TUNER CD V-AUX CBL...Notes • If the batteries have been cleared. When the memory is without batteries for more than 2 minutes, or if exhausted batteries remain in the Remote Control 2 1 3 1 Press the part and slide the battery compartment cover off. 2 Insert four supplied batteries (AAA, R03, UM- 4) according to...
Owner's Manual
Page 8
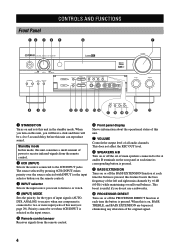
...the priority for the types of input signals (AUTO, DTS, ANALOG) to receive when one component is connected to receive infrared-signals from the remote control. 6 Front panel display Shows information about the operational status of this unit. 7 VOLUME Controls the output level of all audio channels. ...the left and right main channels by pressing 6CH (INPUT) takes priority over the source selected with INPUT (or the input selector buttons on the remote control). 3 INPUT selector Selects the input source you do not use a subwoofer. 0 PROCESSOR DIRECT Turns on this unit, you will hear a...
...the priority for the types of input signals (AUTO, DTS, ANALOG) to receive when one component is connected to receive infrared-signals from the remote control. 6 Front panel display Shows information about the operational status of this unit. 7 VOLUME Controls the output level of all audio channels. ...the left and right main channels by pressing 6CH (INPUT) takes priority over the source selected with INPUT (or the input selector buttons on the remote control). 3 INPUT selector Selects the input source you do not use a subwoofer. 0 PROCESSOR DIRECT Turns on this unit, you will hear a...
Owner's Manual
Page 10
... Outputs the test tone to the 6CH INPUT jacks. 6 e DSP program (Numeric) buttons Select DSP programs. r RE-NAME Used for operating your other remote controls (see "REMOTE CONTROL FEATURES" on pages 44 to 54). 7 Display window Shows the selected source component that the AMP mode is sending signals. 3 STANDBY Sets this...at the component you want to this unit) without changing this unit in green and white vary depending on and off the power of the remote control to be adjusted and sets the level. The functions written in the standby mode. 4 SYSTEM POWER Turns on the power of this ...
... Outputs the test tone to the 6CH INPUT jacks. 6 e DSP program (Numeric) buttons Select DSP programs. r RE-NAME Used for operating your other remote controls (see "REMOTE CONTROL FEATURES" on pages 44 to 54). 7 Display window Shows the selected source component that the AMP mode is sending signals. 3 STANDBY Sets this...at the component you want to this unit) without changing this unit in green and white vary depending on and off the power of the remote control to be adjusted and sets the level. The functions written in the standby mode. 4 SYSTEM POWER Turns on the power of this ...
Owner's Manual
Page 11
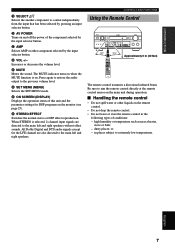
... ON SCREEN (DISPLAY) Displays the operation status of the component selected by the input selector button. Be sure to aim the remote control directly at the remote control sensor on . in the following types of conditions: - high humidity or temperature such as near a heater, stove or... VIDEO L AUDIO R OPTICAL SILENT VIDEO AUX VOLUME BASS TREBLE - + - + 30° 30° Approximately 6 m (20 feet) The remote control transmits a directional infrared beam. The MUTE indicator turns on when the MUTE function is selected, 2-channel input signals are also directed to the main...
... ON SCREEN (DISPLAY) Displays the operation status of the component selected by the input selector button. Be sure to aim the remote control directly at the remote control sensor on . in the following types of conditions: - high humidity or temperature such as near a heater, stove or... VIDEO L AUDIO R OPTICAL SILENT VIDEO AUX VOLUME BASS TREBLE - + - + 30° 30° Approximately 6 m (20 feet) The remote control transmits a directional infrared beam. The MUTE indicator turns on when the MUTE function is selected, 2-channel input signals are also directed to the main...
Owner's Manual
Page 13
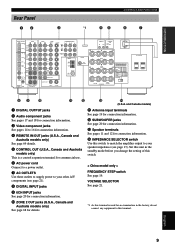
...terminal. B - e Speaker terminals See pages 11 and 12 for connection information. ADVANCED OPERATION ADDITIONAL INFORMATION APPENDIX English 9 MONITOR OUT VIDEO S VIDEO R+ REMOTE IN OUT CONTROL OUT +12V 15mA MAX. -A - +L OUTPUT SUB WOOFER + R+ + - VOLTAGE SELECTOR See page 21. 9 6CH INPUT jacks... the factory, do not connect any equipment to this switch to match the amplifier output to 16 for connection information. 4 REMOTE IN/OUT jacks (U.S.A., Canada and Australia models only) See page 69 details. 5 CONTROL OUT (U.S.A., Canada and Australia models ...
...terminal. B - e Speaker terminals See pages 11 and 12 for connection information. ADVANCED OPERATION ADDITIONAL INFORMATION APPENDIX English 9 MONITOR OUT VIDEO S VIDEO R+ REMOTE IN OUT CONTROL OUT +12V 15mA MAX. -A - +L OUTPUT SUB WOOFER + R+ + - VOLTAGE SELECTOR See page 21. 9 6CH INPUT jacks... the factory, do not connect any equipment to this switch to match the amplifier output to 16 for connection information. 4 REMOTE IN/OUT jacks (U.S.A., Canada and Australia models only) See page 69 details. 5 CONTROL OUT (U.S.A., Canada and Australia models ...
Owner's Manual
Page 16
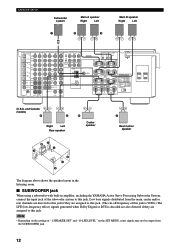
...;MIN. /SPEAKER CENTER SPEAKERS REAR CENTER AC OUTLETS (U.S.A. Low bass signals distributed from the SUBWOOFER jack. 12 ZONE 2 OUT MONITOR OUT VIDEO S VIDEO R+ REMOTE IN OUT CONTROL OUT +12V 15mA MAX. -A - +L OUTPUT + SUB WOOFER R+ + - MAIN - and Canada models) 4 5 Right Left Rear speaker... 6 Center speaker 7 Rear Center speaker 62 1 3 4 7 5 The diagram above shows the speaker layout in amplifier, including the YAMAHA Active Servo Processing Subwoofer System, connect the input jack of "1 SPEAKER SET" and "10 LFE LEVEL" on the settings of the subwoofer...
...;MIN. /SPEAKER CENTER SPEAKERS REAR CENTER AC OUTLETS (U.S.A. Low bass signals distributed from the SUBWOOFER jack. 12 ZONE 2 OUT MONITOR OUT VIDEO S VIDEO R+ REMOTE IN OUT CONTROL OUT +12V 15mA MAX. -A - +L OUTPUT + SUB WOOFER R+ + - MAIN - and Canada models) 4 5 Right Left Rear speaker... 6 Center speaker 7 Rear Center speaker 62 1 3 4 7 5 The diagram above shows the speaker layout in amplifier, including the YAMAHA Active Servo Processing Subwoofer System, connect the input jack of "1 SPEAKER SET" and "10 LFE LEVEL" on the settings of the subwoofer...
Owner's Manual
Page 24
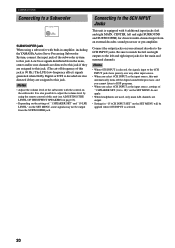
...input source. • When you select 6CH INPUT as the input source, settings of the subwoofer with built-in amplifier, including the YAMAHA Active Servo Processing Subwoofer System, connect the input jack of the subwoofer system to the 6CH INPUT jacks. Notes • Adjust the ...When headphones are used, only main L/R channels are assigned to this jack. CONNECTIONS Connecting to a Subwoofer OUTPUT SUB WOOFER SUBWOOFER jack When using the remote control of this unit (see ADJUSTING THE LEVEL OF THE EFFECT SPEAKERS on page 66). • Depending on the settings of "1 SPEAKER SET"...
...input source. • When you select 6CH INPUT as the input source, settings of the subwoofer with built-in amplifier, including the YAMAHA Active Servo Processing Subwoofer System, connect the input jack of the subwoofer system to the 6CH INPUT jacks. Notes • Adjust the ...When headphones are used, only main L/R channels are assigned to this jack. CONNECTIONS Connecting to a Subwoofer OUTPUT SUB WOOFER SUBWOOFER jack When using the remote control of this unit (see ADJUSTING THE LEVEL OF THE EFFECT SPEAKERS on page 66). • Depending on the settings of "1 SPEAKER SET"...
Owner's Manual
Page 26
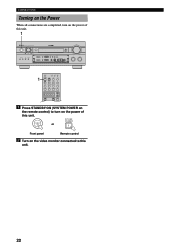
SYSTEM POWER STANDBY /ON or Front panel Remote control 2 Turn on the power of this unit. 1 NATURAL SOUND AV RECEIVER D I G I TA L STANDBY /ON 6CH INPUT MODE SPEAKERS A B BASS PROCESSOR EXTENSION DIRECT TUNER DSP A/B/C/D/E ... CBL/SAT MD/TAPE CD-R D-TV/LD VCR 1 VCR2/DVR DVD POWER TV REC SELECT POWER AV AMP 1 Press STANDBY/ON (SYSTEM POWER on the remote control) to turn on the video monitor connected to this unit. CONNECTIONS Turning on the Power When all connections are completed, turn on the power...
SYSTEM POWER STANDBY /ON or Front panel Remote control 2 Turn on the power of this unit. 1 NATURAL SOUND AV RECEIVER D I G I TA L STANDBY /ON 6CH INPUT MODE SPEAKERS A B BASS PROCESSOR EXTENSION DIRECT TUNER DSP A/B/C/D/E ... CBL/SAT MD/TAPE CD-R D-TV/LD VCR 1 VCR2/DVR DVD POWER TV REC SELECT POWER AV AMP 1 Press STANDBY/ON (SYSTEM POWER on the remote control) to turn on the video monitor connected to this unit. CONNECTIONS Turning on the Power When all connections are completed, turn on the power...
Owner's Manual
Page 27
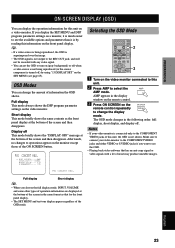
... video monitor connected to this unit, the OSD is not shown. The OSD mode changes in the display window on the remote control. 3 Press ON SCREEN on the ON SCREEN remote control repeatedly DISPLAY to see the available options and parameters than it is much easier to the COMPONENT VIDEO jacks of...
... video monitor connected to this unit, the OSD is not shown. The OSD mode changes in the display window on the remote control. 3 Press ON SCREEN on the ON SCREEN remote control repeatedly DISPLAY to see the available options and parameters than it is much easier to the COMPONENT VIDEO jacks of...

Owner's Manual
Page 29
... be sure to unplug the headphones from each speaker output level should be made , the output level heard at your listening position with the remote control. This is made at your listening position to check if the adjustments are connected to this adjustment is important for a surround sound system... Pro Logic , DTS, DTS ES, and DTS Neo: 6). After completing the adjustments, use VOL +/- AMP appears in the display window on the remote control. 1 Turn on the video monitor connected to this unit so you are using the test tone generator. Note • Since this unit cannot enter...
... be sure to unplug the headphones from each speaker output level should be made , the output level heard at your listening position with the remote control. This is made at your listening position to check if the adjustments are connected to this adjustment is important for a surround sound system... Pro Logic , DTS, DTS ES, and DTS Neo: 6). After completing the adjustments, use VOL +/- AMP appears in the display window on the remote control. 1 Turn on the video monitor connected to this unit so you are using the test tone generator. Note • Since this unit cannot enter...
Owner's Manual
Page 31
... jacks Press 6CH (INPUT) until "6CH INPUT" appears on the front panel display and on the video monitor. 6CH INPUT or 6CH Front panel Remote control Notes • If "6CH INPUT" is shown on the front panel display and on the front panel display. ADVANCED OPERATION ADDITIONAL INFORMATION APPENDIX ... speakers to select the input source. TV MUTE SELECT CH + PRESET TEST RETURN HALL 1 TV VOL - SYSTEM POWER STANDBY /ON or Front panel Remote control 2 Turn on the video monitor for the selected set(s) lights up on the video monitor, no other source can be used. To select another...
... jacks Press 6CH (INPUT) until "6CH INPUT" appears on the front panel display and on the video monitor. 6CH INPUT or 6CH Front panel Remote control Notes • If "6CH INPUT" is shown on the front panel display and on the front panel display. ADVANCED OPERATION ADDITIONAL INFORMATION APPENDIX ... speakers to select the input source. TV MUTE SELECT CH + PRESET TEST RETURN HALL 1 TV VOL - SYSTEM POWER STANDBY /ON or Front panel Remote control 2 Turn on the video monitor for the selected set(s) lights up on the video monitor, no other source can be used. To select another...

Owner's Manual
Page 32
... on the front panel. I BGV (background video) function The BGV function allows you have finished using this unit Press STANDBY/ON (STANDBY on the remote control) to 33 for the component. See pages 30 to set this case, turn on the component. • BASS EXTENSION may not be effective ...if "1B MAIN SP" on the remote control. BASS TREBLE BASS EXTENSION - + - + Notes • If the component connected to the VCR 1 OUT, VCR 2/DVR OUT, CD-R OUT and MD/TAPE ...
... on the front panel. I BGV (background video) function The BGV function allows you have finished using this unit Press STANDBY/ON (STANDBY on the remote control) to 33 for the component. See pages 30 to set this case, turn on the component. • BASS EXTENSION may not be effective ...if "1B MAIN SP" on the remote control. BASS TREBLE BASS EXTENSION - + - + Notes • If the component connected to the VCR 1 OUT, VCR 2/DVR OUT, CD-R OUT and MD/TAPE ...
Owner's Manual
Page 33
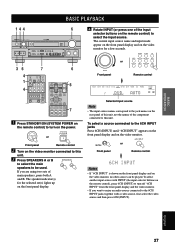
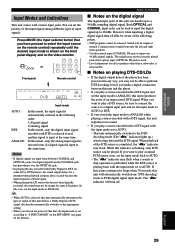
... PLAYBACK I Notes on the video monitor. A PHONO TUNER CD or MODE V-AUX CBL/SAT MD/TAPE CD-R D-TV/LD VCR 1 VCR2/DVR DVD Front panel Remote control V AUX VCR2/DVR VCR 1 CBL/SAT D TV/LD DVD MD/TAPE CD R TUNER CD PHONO SP DVD AUTO A VOLUME L R Input mode AUTO: DTS: ANALOG... in the following points. • DSP programs cannot be aware of this unit, the input mode is set to select the input source on the remote control) repeatedly until the desired input mode is input at the same time. I Notes on the digital signal The digital input jacks of this unit...
... PLAYBACK I Notes on the video monitor. A PHONO TUNER CD or MODE V-AUX CBL/SAT MD/TAPE CD-R D-TV/LD VCR 1 VCR2/DVR DVD Front panel Remote control V AUX VCR2/DVR VCR 1 CBL/SAT D TV/LD DVD MD/TAPE CD R TUNER CD PHONO SP DVD AUTO A VOLUME L R Input mode AUTO: DTS: ANALOG... in the following points. • DSP programs cannot be aware of this unit, the input mode is set to select the input source on the remote control) repeatedly until the desired input mode is input at the same time. I Notes on the digital signal The digital input jacks of this unit...

Owner's Manual
Page 34
...of this unit is reproduced as normal 2-channel stereo. In this unit. The acoustics of your listening preference, and not on the remote control) to this unit in your listening experience by the program. There are possible for all the sub-programs are 10 programs ... 5 MUSIC VIDEO 6 TV THEATER 7 MOVIE THEATER 1 8 MOVIE THEATER 2 9 /DTS SUR. 10 0 SELECT 11 +10 EX/ES 12 CHP/INDEX Front panel Remote control 3 After selecting the desired program, press the same button repeatedly to select the sub-program "70 mm SciFi", press MOVIE THEATER 1 repeatedly. For details...
...of this unit is reproduced as normal 2-channel stereo. In this unit. The acoustics of your listening preference, and not on the remote control) to this unit in your listening experience by the program. There are possible for all the sub-programs are 10 programs ... 5 MUSIC VIDEO 6 TV THEATER 7 MOVIE THEATER 1 8 MOVIE THEATER 2 9 /DTS SUR. 10 0 SELECT 11 +10 EX/ES 12 CHP/INDEX Front panel Remote control 3 After selecting the desired program, press the same button repeatedly to select the sub-program "70 mm SciFi", press MOVIE THEATER 1 repeatedly. For details...
Owner's Manual
Page 35
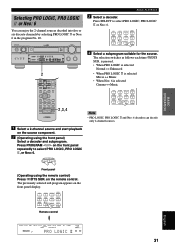
... PRO LOGIC, PRO LOGIC or Neo: 6 You can decode 1 Select a 2-channel source and start playback on the source component. 2 (Operating using the remote control) Press /DTS SUR. CHURCH 2 PRESET ON SCREEN STEREO DISPLAY JAZZ CLUB EFFECT ROCK CONCERT 3 4 ENTERTAINMENT 5 MUSIC VIDEO 6 TV THEATER 7 MOVIE ...5 MUSIC VIDEO 6 TV THEATER 7 MOVIE THEATER 1 8 MOVIE THEATER 2 9 /DTS SUR. 10 0 SELECT 11 +10 EX/ES 12 CHP/INDEX Remote control ADVANCED OPERATION ADDITIONAL INFORMATION APPENDIX English V AUX VCR2/DVR VCR 1 CBL/SAT D TV/LD DVD MD/TAPE CD R TUNER CD PHONO DOLBY DIGITAL ...
... PRO LOGIC, PRO LOGIC or Neo: 6 You can decode 1 Select a 2-channel source and start playback on the source component. 2 (Operating using the remote control) Press /DTS SUR. CHURCH 2 PRESET ON SCREEN STEREO DISPLAY JAZZ CLUB EFFECT ROCK CONCERT 3 4 ENTERTAINMENT 5 MUSIC VIDEO 6 TV THEATER 7 MOVIE ...5 MUSIC VIDEO 6 TV THEATER 7 MOVIE THEATER 1 8 MOVIE THEATER 2 9 /DTS SUR. 10 0 SELECT 11 +10 EX/ES 12 CHP/INDEX Remote control ADVANCED OPERATION ADDITIONAL INFORMATION APPENDIX English V AUX VCR2/DVR VCR 1 CBL/SAT D TV/LD DVD MD/TAPE CD R TUNER CD PHONO DOLBY DIGITAL ...
Owner's Manual
Page 37
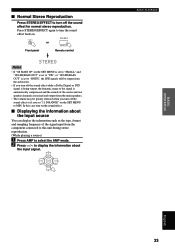
... TV MUTE SELECT TV VOL - CH + PRESET BASIC PLAYBACK BASIC OPERATION ADVANCED OPERATION ADDITIONAL INFORMATION APPENDIX English 33 STEREO EFFECT STEREO or EFFECT Front panel Remote control Notes • If "1B MAIN SP" on the SET MENU is set to "SMALL" and "1E LFE/BASS OUT" is set to "SW", or...
... TV MUTE SELECT TV VOL - CH + PRESET BASIC PLAYBACK BASIC OPERATION ADVANCED OPERATION ADDITIONAL INFORMATION APPENDIX English 33 STEREO EFFECT STEREO or EFFECT Front panel Remote control Notes • If "1B MAIN SP" on the SET MENU is set to "SMALL" and "1E LFE/BASS OUT" is set to "SW", or...
Owner's Manual
Page 42
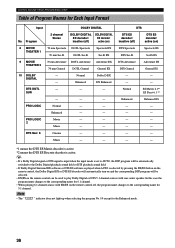
... No. Program 2 channel Stereo DOLBY DIGITAL EX decoder: inactive (off) DOLBY DIGITAL EX decoder: active (on the remote control off ) DTS ES decoder: active (on the remote control can be automatically switched to play Dolby Digital or DTS 5.1 channel sources with EX/ES on ) 8 MOVIE ... - - - - - - *1 means the DTS ES Matrix decoder is active. *2 means the DTS ES Discrete decoder is selected by pressing the EX/ES button on the remote control, the Dolby Digital EX or DTS ES decoder will automatically turn on and the corresponding DSP program will be used to the Dolby Digital...
... No. Program 2 channel Stereo DOLBY DIGITAL EX decoder: inactive (off) DOLBY DIGITAL EX decoder: active (on the remote control off ) DTS ES decoder: active (on the remote control can be automatically switched to play Dolby Digital or DTS 5.1 channel sources with EX/ES on ) 8 MOVIE ... - - - - - - *1 means the DTS ES Matrix decoder is active. *2 means the DTS ES Discrete decoder is selected by pressing the EX/ES button on the remote control, the Dolby Digital EX or DTS ES decoder will automatically turn on and the corresponding DSP program will be used to the Dolby Digital...
Owner's Manual
Page 43
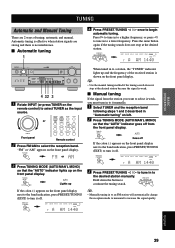
or POWER STANDBY SLEEP 6CH INPUT A PHONO TUNER CD V-AUX CBL/SAT MD/TAPE CD-R INPUT Front panel D-TV/LD VCR 1 VCR2/DVR DVD Remote control 2 Press FM/AM to PRESET/ TUNING continue the tuning search. I Manual tuning If the signal from the station you must tune in to it ... (EDIT) to turn it off from the front panel display. Hold down the button to select the reception band. If the colon (:) appears on the remote control) to select is no interference. Automatic tuning is effective when station signals are 2 ways of the received station is weak. PRESET/ TUNING VCR 1 CBL...
or POWER STANDBY SLEEP 6CH INPUT A PHONO TUNER CD V-AUX CBL/SAT MD/TAPE CD-R INPUT Front panel D-TV/LD VCR 1 VCR2/DVR DVD Remote control 2 Press FM/AM to PRESET/ TUNING continue the tuning search. I Manual tuning If the signal from the station you must tune in to it ... (EDIT) to turn it off from the front panel display. Hold down the button to select the reception band. If the colon (:) appears on the remote control) to select is no interference. Automatic tuning is effective when station signals are 2 ways of the received station is weak. PRESET/ TUNING VCR 1 CBL...


