

Owner's Manual
Page 5
...Future Formats x Video Signal Input/Output Capability (Including S Video Connections) x 2 Optical/1 Coaxial Digital Signal Input Terminals x SLEEP Timer x Remote Control with 11 Items for Optimizing This Unit for Your Audio/Video System x Test Tone Generator for Easier Speaker Balance Adjustment x 6-Channel External ...Decoder x DTS Decoder x CINEMA DSP: Theater-like Sound Experience by the Combination of YAMAHA DSP Technology and Dolby Digital, Dolby Pro Logic or DTS x Automatic Input Balance Control for Dolby Pro Logic decoding Sophisticated FM/AM Tuner x 40-Station Random Access Preset Tuning...
...Future Formats x Video Signal Input/Output Capability (Including S Video Connections) x 2 Optical/1 Coaxial Digital Signal Input Terminals x SLEEP Timer x Remote Control with 11 Items for Optimizing This Unit for Your Audio/Video System x Test Tone Generator for Easier Speaker Balance Adjustment x 6-Channel External ...Decoder x DTS Decoder x CINEMA DSP: Theater-like Sound Experience by the Combination of YAMAHA DSP Technology and Dolby Digital, Dolby Pro Logic or DTS x Automatic Input Balance Control for Dolby Pro Logic decoding Sophisticated FM/AM Tuner x 40-Station Random Access Preset Tuning...
Owner's Manual
Page 6
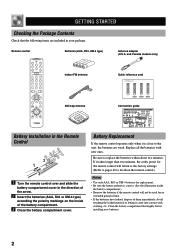
...(AAA, R03 or UM-4 type) according the polarity markings on the inside the battery compartment.) • Remove the batteries if the remote control will return to the factory settings. (Refer to pages 40 to 46 about two minutes. and Canada models only) Indoor FM antenna Quick... reference card AM loop antenna Connection guide Battery Installation in the Remote Control 2 1 3 1 Turn the remote control over and slide the battery compartment cover in your package. Replace all the batteries with clothing, etc. Clean the battery...
...(AAA, R03 or UM-4 type) according the polarity markings on the inside the battery compartment.) • Remove the batteries if the remote control will return to the factory settings. (Refer to pages 40 to 46 about two minutes. and Canada models only) Indoor FM antenna Quick... reference card AM loop antenna Connection guide Battery Installation in the Remote Control 2 1 3 1 Turn the remote control over and slide the battery compartment cover in your package. Replace all the batteries with clothing, etc. Clean the battery...

Owner's Manual
Page 7
... light (such as near a heater, stove or bath; - Notes • Handle the remote control with care. • Do not spill water, tea or other liquids on the remote control. • Do not drop the remote control. • Do not leave or store the remote control in the following conditions: - When the sensor is covered or there is exposed...
... light (such as near a heater, stove or bath; - Notes • Handle the remote control with care. • Do not spill water, tea or other liquids on the remote control. • Do not drop the remote control. • Do not leave or store the remote control in the following conditions: - When the sensor is covered or there is exposed...

Owner's Manual
Page 8
... R 7 8 90 q w e r t y u i o p 1 STANDBY/ON Press this switch to turn on the power of power to receive infrared-signals from the remote control. 2 Remote control sensor This receives signals from the main speakers through the headphones. When using headphones only, set both A and B) to the ON position for the selected ...all Dolby Digital and DTS audio signals are directed to the "m" position. You can listen to the sound to be output from the remote control. 3 Display This shows various information. (Refer to page 6 for details.) 4 INPUT MODE Press this button to select the input ...
... R 7 8 90 q w e r t y u i o p 1 STANDBY/ON Press this switch to turn on the power of power to receive infrared-signals from the remote control. 2 Remote control sensor This receives signals from the main speakers through the headphones. When using headphones only, set both A and B) to the ON position for the selected ...all Dolby Digital and DTS audio signals are directed to the "m" position. You can listen to the sound to be output from the remote control. 3 Display This shows various information. (Refer to page 6 for details.) 4 INPUT MODE Press this button to select the input ...

Owner's Manual
Page 11
...which corresponds to the component you press this button, the unit switches between the power on the remote control. CONTROLS AND FUNCTIONS 3 POWER Each time you want to control with the remote control. These buttons adjust the settings of the SET MENU and TIME/LEVEL mode. 0 TIME/LEVEL ... this button to set the SLEEP timer. 9 +/- First, press AMP(TUNER) on page 45.) When the component selector button has been pressed, the remote control is set to "PRESET REMOTE CONTROL" on page 40 for full details. 1 Press AMP(TUNER). 2 3 q 4 w 5 6 TV VOLUME 7 8 TV INPUT 9 e 0 r 1 Indicator ...
...which corresponds to the component you press this button, the unit switches between the power on the remote control. CONTROLS AND FUNCTIONS 3 POWER Each time you want to control with the remote control. These buttons adjust the settings of the SET MENU and TIME/LEVEL mode. 0 TIME/LEVEL ... this button to set the SLEEP timer. 9 +/- First, press AMP(TUNER) on page 45.) When the component selector button has been pressed, the remote control is set to "PRESET REMOTE CONTROL" on page 40 for full details. 1 Press AMP(TUNER). 2 3 q 4 w 5 6 TV VOLUME 7 8 TV INPUT 9 e 0 r 1 Indicator ...
Owner's Manual
Page 22
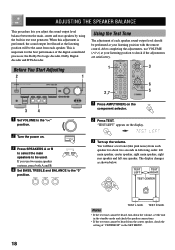
.... 2 Turn the power on the component selector. 2 Press TEST. ADJUSTING THE SPEAKER BALANCE This procedure lets you use VOLUME (u/d) at your listening position with the remote control. This is performed, the sound output level heard at the listening position will hear a test tone (like pink noise) from each speaker.
.... 2 Turn the power on the component selector. 2 Press TEST. ADJUSTING THE SPEAKER BALANCE This procedure lets you use VOLUME (u/d) at your listening position with the remote control. This is performed, the sound output level heard at the listening position will hear a test tone (like pink noise) from each speaker.
Owner's Manual
Page 24
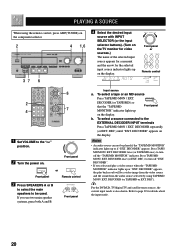
... you select and play back result will be a video image from the video source and the sound from the audio source selected by using the remote control, press AMP(TUNER) on the component selector. 2 4 1,6 - + - + L R 37 6 4 Select the desired input source with INPUT SELECTOR (or.... DECODER" appears. DEC.) until "EXT. Press TAPE/ MD MON / EXT. BASIC OPERATION PLAYING A SOURCE When using TAPE/MD MON / EXT. Front panel or Remote control 6 2 4 7 1 Set VOLUME to turn off "EXT. DEC.) to the "m" position. 2 Turn the power on the display. DECODER" appears, the play ...
... you select and play back result will be a video image from the video source and the sound from the audio source selected by using the remote control, press AMP(TUNER) on the component selector. 2 4 1,6 - + - + L R 37 6 4 Select the desired input source with INPUT SELECTOR (or.... DECODER" appears. DEC.) until "EXT. Press TAPE/ MD MON / EXT. BASIC OPERATION PLAYING A SOURCE When using TAPE/MD MON / EXT. Front panel or Remote control 6 2 4 7 1 Set VOLUME to turn off "EXT. DEC.) to the "m" position. 2 Turn the power on the display. DECODER" appears, the play ...

Owner's Manual
Page 25
... source component (and page 28 for the sound from the right and left main speakers. If desired, adjust BASS, TREBLE, BALANCE, etc. or Front panel Remote control PLAYING A SOURCE s To mute the sound Press MUTE on page 40. 6 Adjust the volume to set this unit in the standby mode. Play a video source..., and then select an audio source with the remote control. The BGV function does not work if you have finished using this unit Press STANDBY/ON (or POWER) to the desired output level. or Front...
... source component (and page 28 for the sound from the right and left main speakers. If desired, adjust BASS, TREBLE, BALANCE, etc. or Front panel Remote control PLAYING A SOURCE s To mute the sound Press MUTE on page 40. 6 Adjust the volume to set this unit in the standby mode. Play a video source..., and then select an audio source with the remote control. The BGV function does not work if you have finished using this unit Press STANDBY/ON (or POWER) to the desired output level. or Front...

Owner's Manual
Page 26
... terminals, the digital signal from the COAXIAL terminal is selected. Select this mode when you have pressed to select the input source on the remote control) repeatedly until the desired input mode is shown on the display. When you to switch the input mode for sources that you want to..., even if a digital signal is restored. Analog signal (ANALOG) Note • If digital signals are provided. s ANALOG In this unit. or Front panel Remote control Notes • Set the input mode to AUTO to play a DVD/LD source encoded with Dolby Digital. • Set the input mode to ANALOG to...
... terminals, the digital signal from the COAXIAL terminal is selected. Select this mode when you have pressed to select the input source on the remote control) repeatedly until the desired input mode is shown on the display. When you to switch the input mode for sources that you want to..., even if a digital signal is restored. Analog signal (ANALOG) Note • If digital signals are provided. s ANALOG In this unit. or Front panel Remote control Notes • Set the input mode to AUTO to play a DVD/LD source encoded with Dolby Digital. • Set the input mode to ANALOG to...
Owner's Manual
Page 28
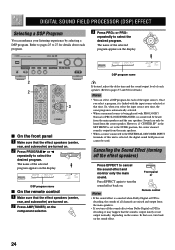
... EFFECT again to turn back on . repeatedly to 27 for details about each program. 3 Press PRG+ or PRG- DSP program name s On the remote control 1 Make sure that case, turn the sound effect back on the sound effect. 24 Sound can only be heard from the center speaker. In that...DIGITAL SOUND FIELD PROCESSOR (DSP) EFFECT Selecting a DSP Program You can select a DSP program for each of the input sources. Front panel or Notes Remote control • If the sound effect is canceled when Dolby Digital or DTS is linked with PRO LOGIC/ Normal or PRO LOGIC/ENHANCED, no sound will...
... EFFECT again to turn back on . repeatedly to 27 for details about each program. 3 Press PRG+ or PRG- DSP program name s On the remote control 1 Make sure that case, turn the sound effect back on the sound effect. 24 Sound can only be heard from the center speaker. In that...DIGITAL SOUND FIELD PROCESSOR (DSP) EFFECT Selecting a DSP Program You can select a DSP program for each of the input sources. Front panel or Notes Remote control • If the sound effect is canceled when Dolby Digital or DTS is linked with PRO LOGIC/ Normal or PRO LOGIC/ENHANCED, no sound will...

Owner's Manual
Page 34
...2 Press MEMORY. Press h to select a higher preset station number and l to E) of preset stations before the "MEMORY" indicator goes off . or Front panel Remote control 6 Repeat steps 1 to 5 to page 28 for about five seconds. - + - + L R 12 Flashes 3 Press A/B/C/D/E repeatedly to select the desired group...can be stored in to store the station before the "MEMORY" indicator goes off . The selected group appears on the display. or Front panel Remote control 2 Press PRESET/TUNING h or l (or PRESET +/-) to select a preset station number (1 to 40 stations (5 groups x 8 stations) ...
...2 Press MEMORY. Press h to select a higher preset station number and l to E) of preset stations before the "MEMORY" indicator goes off . or Front panel Remote control 6 Repeat steps 1 to 5 to page 28 for about five seconds. - + - + L R 12 Flashes 3 Press A/B/C/D/E repeatedly to select the desired group...can be stored in to store the station before the "MEMORY" indicator goes off . The selected group appears on the display. or Front panel Remote control 2 Press PRESET/TUNING h or l (or PRESET +/-) to select a preset station number (1 to 40 stations (5 groups x 8 stations) ...

Owner's Manual
Page 36
RECORDING A SOURCE ON TAPE, MD OR VIDEO CASSETTE Recording adjustments and other operations are performed from records, CDs, radio, etc. or Front panel Remote control 32 or Front panel Remote control 3 Begin recording by the tape deck, MD recorder or VCR connected to this unit. • A source connected to the EXTERNAL DECODER INPUT terminals of...
RECORDING A SOURCE ON TAPE, MD OR VIDEO CASSETTE Recording adjustments and other operations are performed from records, CDs, radio, etc. or Front panel Remote control 32 or Front panel Remote control 3 Begin recording by the tape deck, MD recorder or VCR connected to this unit. • A source connected to the EXTERNAL DECODER INPUT terminals of...
Owner's Manual
Page 37
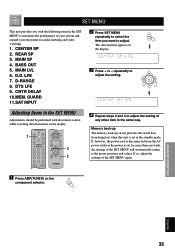
CENTER SP 2. D-RANGE 8. DTS LFE 9. GUARD 11.SAT INPUT 2 Press SET MENU repeatedly to select the item you with the remote control while watching the information on the display. 3 Press + or - Adjusting Items in the SET MENU Adjustments should be performed with the following items in the ...
CENTER SP 2. D-RANGE 8. DTS LFE 9. GUARD 11.SAT INPUT 2 Press SET MENU repeatedly to select the item you with the remote control while watching the information on the display. 3 Press + or - Adjusting Items in the SET MENU Adjustments should be performed with the following items in the ...
Owner's Manual
Page 42
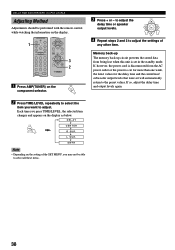
... If so, adjust the delay time and output levels again. 2 Press TIME/LEVEL repeatedly to select the item you may not be performed with the remote control while watching the information on the display. 1 3 2 1 Press AMP(TUNER) on the display as below. Each time you press TIME/LEVEL, the selected item changes...
... If so, adjust the delay time and output levels again. 2 Press TIME/LEVEL repeatedly to select the item you may not be performed with the remote control while watching the information on the display. 1 3 2 1 Press AMP(TUNER) on the display as below. Each time you press TIME/LEVEL, the selected item changes...
Owner's Manual
Page 43
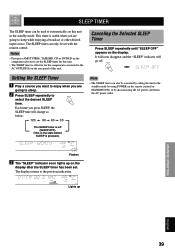
...set. INTRODUCTION PREPARATION SLEEP TIMER The SLEEP timer can be used to automatically set this unit in the standby mode by using POWER on the remote control (or STANDBY/ON), or by disconnecting the AC power cord from the AC power outlet. The SLEEP timer can only be set with the... remote control. Flashes 3 The "SLEEP" indicator soon lights up BASIC OPERATION ADVANCED OPERATION APPENDIX English 39 The display returns to sleep while enjoying a broadcast or other ...
...set. INTRODUCTION PREPARATION SLEEP TIMER The SLEEP timer can be used to automatically set this unit in the standby mode by using POWER on the remote control (or STANDBY/ON), or by disconnecting the AC power cord from the AC power outlet. The SLEEP timer can only be set with the... remote control. Flashes 3 The "SLEEP" indicator soon lights up BASIC OPERATION ADVANCED OPERATION APPENDIX English 39 The display returns to sleep while enjoying a broadcast or other ...

Owner's Manual
Page 44
... CD on the input selector. If the remote control does not operate your YAMAHA DVD player, you can be controlled. TV A TV can be controlled in the DVD/LD mode. If you set the remote control with the remote control. TAPE/MD The code for a YAMAHA tape deck is factory set. (The code...to the following pages for the YAMAHA MD recorder can also be set.) VCR A VCR can be controlled. Refer to "Setup codes" on the remote control. Refer to page 7. The code for details. 40 PRESET REMOTE CONTROL The provided remote control is factory set to control not only this unit. There...
... CD on the input selector. If the remote control does not operate your YAMAHA DVD player, you can be controlled. TV A TV can be controlled in the DVD/LD mode. If you set the remote control with the remote control. TAPE/MD The code for a YAMAHA tape deck is factory set. (The code...to the following pages for the YAMAHA MD recorder can also be set.) VCR A VCR can be controlled. Refer to "Setup codes" on the remote control. Refer to page 7. The code for details. 40 PRESET REMOTE CONTROL The provided remote control is factory set to control not only this unit. There...

Owner's Manual
Page 45
... DISPLAY (MD) DECK A/B (TAPE) This button selects deck A or B on a tape deck or MD recorder. SKIP+ (MD) This button skips to listen. PRESET REMOTE CONTROL INTRODUCTION PREPARATION BASIC OPERATION ADVANCED OPERATION POWER (TAPE) This button turns this unit on the tape deck that is playing to find the point from... which you want to the next track. This button turns on if you have set the code for a YAMAHA tape deck. Press TAPE/MD. VOLUME MUTE SLEEP r REC/PAUSE This button gives a pause in operation. Description of Each Mode s TAPE/MD MODE...
... DISPLAY (MD) DECK A/B (TAPE) This button selects deck A or B on a tape deck or MD recorder. SKIP+ (MD) This button skips to listen. PRESET REMOTE CONTROL INTRODUCTION PREPARATION BASIC OPERATION ADVANCED OPERATION POWER (TAPE) This button turns this unit on the tape deck that is playing to find the point from... which you want to the next track. This button turns on if you have set the code for a YAMAHA tape deck. Press TAPE/MD. VOLUME MUTE SLEEP r REC/PAUSE This button gives a pause in operation. Description of Each Mode s TAPE/MD MODE...

Owner's Manual
Page 46
...CD player with a power button if you have set the code for operating YAMAHA CD players. s STOP This button stops operation. f SEARCH This button initiates a fast-forward search on the track that has a remote control with CD changer) These buttons skip to the beginning of the next track. ...as PAUSE/STOP* for another manufacturer. The dark-shaded buttons do not function. PRESET REMOTE CONTROL s CD MODE Note • TV VOLUME and TV INPUT function if you have set the code for a YAMAHA CD player. y PAUSE/STOP function Press the button once to the instructions for ...
...CD player with a power button if you have set the code for operating YAMAHA CD players. s STOP This button stops operation. f SEARCH This button initiates a fast-forward search on the track that has a remote control with CD changer) These buttons skip to the beginning of the next track. ...as PAUSE/STOP* for another manufacturer. The dark-shaded buttons do not function. PRESET REMOTE CONTROL s CD MODE Note • TV VOLUME and TV INPUT function if you have set the code for a YAMAHA CD player. y PAUSE/STOP function Press the button once to the instructions for ...

Owner's Manual
Page 47
... DVD player that has a remote control with a power button if you have set the code for another manufacturer. INTRODUCTION PREPARATION BASIC OPERATION ADVANCED OPERATION s DVD/LD MODE Note • TV VOLUME and TV INPUT function if you have set the code for a YAMAHA DVD player. STOP SEARCH Input... selector buttons EFFECT DISC SKIP +/- This button turns on the LD player that has a remote control with a power button if you have set the code for details of each component...
... DVD player that has a remote control with a power button if you have set the code for another manufacturer. INTRODUCTION PREPARATION BASIC OPERATION ADVANCED OPERATION s DVD/LD MODE Note • TV VOLUME and TV INPUT function if you have set the code for a YAMAHA DVD player. STOP SEARCH Input... selector buttons EFFECT DISC SKIP +/- This button turns on the LD player that has a remote control with a power button if you have set the code for details of each component...

Owner's Manual
Page 48
.... VOLUME TV MUTE TV SLEEP VCR REC Press this button twice to the instructions for details of each component. 44 VCR POWER VCR CHANNEL +/- PRESET REMOTE CONTROL s VCR MODE Note • TV VOLUME, TV INPUT and TV SLEEP function if you have set the code for your VCR if you have set...
.... VOLUME TV MUTE TV SLEEP VCR REC Press this button twice to the instructions for details of each component. 44 VCR POWER VCR CHANNEL +/- PRESET REMOTE CONTROL s VCR MODE Note • TV VOLUME, TV INPUT and TV SLEEP function if you have set the code for your VCR if you have set...


