
Owner's Manual
Page 5
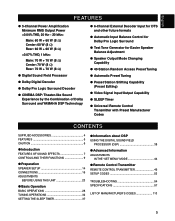
... q Dolby Digital Decoder q Dolby Pro Logic Surround Decoder q CINEMA DSP: Theater-like Sound Experience by the Combination of Dolby Surround and YAMAHA DSP Technology q 6-Channel External Decoder Input for DTS and other future formats q Automatic Input Balance Control for Dolby Pro Logic Surround q Test...Preparation SPEAKER SETUP 14 CONNECTIONS 16 ADJUSTMENTS BEFORE USING THIS UNIT 23 q Basic Operation BASIC OPERATIONS 28 TUNING OPERATIONS 32 SETTING THE SLEEP TIMER 37 q Information about DSP USING THE DIGITAL SOUND FIELD PROCESSOR (DSP 38 q Advanced Information ADJUSTMENTS IN THE...
... q Dolby Digital Decoder q Dolby Pro Logic Surround Decoder q CINEMA DSP: Theater-like Sound Experience by the Combination of Dolby Surround and YAMAHA DSP Technology q 6-Channel External Decoder Input for DTS and other future formats q Automatic Input Balance Control for Dolby Pro Logic Surround q Test...Preparation SPEAKER SETUP 14 CONNECTIONS 16 ADJUSTMENTS BEFORE USING THIS UNIT 23 q Basic Operation BASIC OPERATIONS 28 TUNING OPERATIONS 32 SETTING THE SLEEP TIMER 37 q Information about DSP USING THE DIGITAL SOUND FIELD PROCESSOR (DSP 38 q Advanced Information ADJUSTMENTS IN THE...
Owner's Manual
Page 6
...sure to the frequency spacing in fire or other than specified is designed to use this unit must be set for future reference. FOR CANADIAN CUSTOMERS To prevent electric shock, match wide blade of at the rear) ...chemical solvents; FREQUENCY STEP switch (China and General Models only) Because the interstation frequency spacing differs in different areas, set , contact your dealer. 4. IMPORTANT Please record the serial number of power. Install this unit in a safe ...future reference. 2. The openings on switches, controls or connection wires. YAMAHA will rise rapidly.
...sure to the frequency spacing in fire or other than specified is designed to use this unit must be set for future reference. FOR CANADIAN CUSTOMERS To prevent electric shock, match wide blade of at the rear) ...chemical solvents; FREQUENCY STEP switch (China and General Models only) Because the interstation frequency spacing differs in different areas, set , contact your dealer. 4. IMPORTANT Please record the serial number of power. Install this unit in a safe ...future reference. 2. The openings on switches, controls or connection wires. YAMAHA will rise rapidly.
Owner's Manual
Page 9
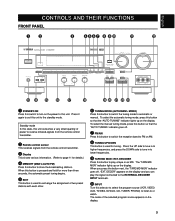
... a tape or an MD. The name of two preset stations with each other. 6 TUNING MODE (AUTO/MAN'L MONO) Press this unit. Press it again to set this button to play the signal connected to the EXTERNAL DECODER INPUT terminals. 0 INPUT Turn this button to store the broadcasting stations. When this button...
... a tape or an MD. The name of two preset stations with each other. 6 TUNING MODE (AUTO/MAN'L MONO) Press this unit. Press it again to set this button to play the signal connected to the EXTERNAL DECODER INPUT terminals. 0 INPUT Turn this button to store the broadcasting stations. When this button...
Owner's Manual
Page 10
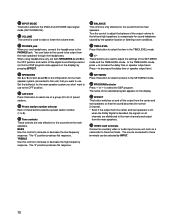
... button to select one of the output volume to the left and right speakers to these terminals can listen to the sound to adjust the settings of preset stations. e PHONES jack When you use . p +/- Turn the control to adjust the balance of a group (A to increase or decrease the... connected to compensate for sound imbalance caused by pressing EFFECT. TREBLE Use this button to 8). o TIME/LEVEL Press this control to E) of the SET MENU mode and the TIME/LEVEL mode. f VIDEO AUX terminals Connect an auxiliary video or audio input source unit such as a camcorder to these ...
... button to select one of the output volume to the left and right speakers to these terminals can listen to the sound to adjust the settings of preset stations. e PHONES jack When you use . p +/- Turn the control to adjust the balance of a group (A to increase or decrease the... connected to compensate for sound imbalance caused by pressing EFFECT. TREBLE Use this button to 8). o TIME/LEVEL Press this control to E) of the SET MENU mode and the TIME/LEVEL mode. f VIDEO AUX terminals Connect an auxiliary video or audio input source unit such as a camcorder to these ...
Owner's Manual
Page 12
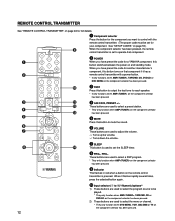
... has been pressed. 5 MUTE Press this button to mute the sound. 6 VOLUME These buttons are used to select the program source to be set for your component. When you have preset the code for another manufacturer's component, this button turns on that component. 2 POWER When you want ...46 for full details. 1 Component selector Press the button for the component you have preset the code for a YAMAHA component, this button switches between the power on the remote control transmitter is set to select a DSP program. * They only function when AMP on the component selector has been pressed. 9 ...
... has been pressed. 5 MUTE Press this button to mute the sound. 6 VOLUME These buttons are used to select the program source to be set for your component. When you have preset the code for another manufacturer's component, this button turns on that component. 2 POWER When you want ...46 for full details. 1 Component selector Press the button for the component you have preset the code for a YAMAHA component, this button switches between the power on the remote control transmitter is set to select a DSP program. * They only function when AMP on the component selector has been pressed. 9 ...

Owner's Manual
Page 13
... functions when AMP, TAPE/MD, CD, DVD/LD, VCR or TV on the component selector has been pressed. 2) This button is used to clear the settings. * It only functions when DVD MENU on the component selector has been pressed. 3) This button is used to select the channel. * It only functions when... previous disc. * They only function when CD, DVD/LD or DVD MENU on the component selector has been pressed. 2) These buttons are for adjusting various settings. * They only function when AMP, DVD MENU or CBL/ DBS on the component selector has been pressed. 13
... functions when AMP, TAPE/MD, CD, DVD/LD, VCR or TV on the component selector has been pressed. 2) This button is used to clear the settings. * It only functions when DVD MENU on the component selector has been pressed. 3) This button is used to select the channel. * It only functions when... previous disc. * They only function when CD, DVD/LD or DVD MENU on the component selector has been pressed. 2) These buttons are for adjusting various settings. * They only function when AMP, DVD MENU or CBL/ DBS on the component selector has been pressed. 13

Owner's Manual
Page 14
...maximum output of your sound field It is Dolby Digital-decoded. Best results, however, are used in power amplifier. Note: Be sure to set the CNTR (CENTER SPEAKER) mode to the "NONE" position. (See page 23 for reproducing the LFE (low frequency effect) sound with ... do without it is Dolby Digital-decoded, conversations will be equal to further expand your present stereo system. However, the sound effect of a YAMAHA Active Servo Processing Subwoofer System, which contains center-channel signals (dialog, vocals, etc.) using main speakers, rear speakers and a center speaker. ...
...maximum output of your sound field It is Dolby Digital-decoded. Best results, however, are used in power amplifier. Note: Be sure to set the CNTR (CENTER SPEAKER) mode to the "NONE" position. (See page 23 for reproducing the LFE (low frequency effect) sound with ... do without it is Dolby Digital-decoded, conversations will be equal to further expand your present stereo system. However, the sound effect of a YAMAHA Active Servo Processing Subwoofer System, which contains center-channel signals (dialog, vocals, etc.) using main speakers, rear speakers and a center speaker. ...

Owner's Manual
Page 15
Rear Center: speaker (R) Precisely between the main speakers. (To avoid interference with TV sets, use a magnetically shielded speaker.) Subwoofer: The position of your listening position, facing slightly inward. English SPEAKER PLACEMENT Refer to the following diagram when you place ...
Rear Center: speaker (R) Precisely between the main speakers. (To avoid interference with TV sets, use a magnetically shielded speaker.) Subwoofer: The position of your listening position, facing slightly inward. English SPEAKER PLACEMENT Refer to the following diagram when you place ...

Owner's Manual
Page 18
.... • Be sure to attach the covers when the OPTICAL terminals are not being used in the following order of priority with the input mode set to the AUTO position: 1 COAXIAL terminal 2 OPTICAL terminal 3 Analog terminal • All digital audio signal input terminals are equipped with the same named analog audio...
.... • Be sure to attach the covers when the OPTICAL terminals are not being used in the following order of priority with the input mode set to the AUTO position: 1 COAXIAL terminal 2 OPTICAL terminal 3 Analog terminal • All digital audio signal input terminals are equipped with the same named analog audio...

Owner's Manual
Page 21
... be 6 Ω or higher. If this unit fails to turn on , otherwise this unit may not be 8 Ω or higher. If so, set to this unit is pressed, the IMPEDANCE SELECTOR switch may be 8 Ω or higher. 21 Center: The impedance of each speaker must be 8 Ω... two pairs of main speakers, the impedance of each speaker must be 4 Ω or higher. The impedance of each speaker must be fully set the switch to either end. IMPEDANCE SELECTOR (U.S.A. model) Select the position whose requirements your speaker system meets. (Upper position) Main: If you ...
... be 6 Ω or higher. If this unit fails to turn on , otherwise this unit may not be 8 Ω or higher. If so, set to this unit is pressed, the IMPEDANCE SELECTOR switch may be 8 Ω or higher. 21 Center: The impedance of each speaker must be 8 Ω... two pairs of main speakers, the impedance of each speaker must be 4 Ω or higher. The impedance of each speaker must be fully set the switch to either end. IMPEDANCE SELECTOR (U.S.A. model) Select the position whose requirements your speaker system meets. (Upper position) Main: If you ...

Owner's Manual
Page 23
... each function to make the best use a center speaker that are selected for "BASS"). Select this position if your speaker system. (See "ADJUSTMENTS IN THE 'SET MENU' MODE" on the rear channels are output from the main speakers. Select this position when you do not have high ability for "BASS"). However... This unit provides you the following five functions to determine the method of your rear speakers do not have all been completed, select the proper setting for "BASS". CNTR (CENTER SPEAKER) 2.
... each function to make the best use a center speaker that are selected for "BASS"). Select this position if your speaker system. (See "ADJUSTMENTS IN THE 'SET MENU' MODE" on the rear channels are output from the main speakers. Select this position when you do not have high ability for "BASS"). However... This unit provides you the following five functions to determine the method of your rear speakers do not have all been completed, select the proper setting for "BASS". CNTR (CENTER SPEAKER) 2.
Owner's Manual
Page 24
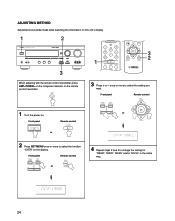
or Front panel Remote control or 2 Press SET MENU once or more to select the setting you want. Front panel Remote control 1 Turn the power on the display. Front panel Remote control or 4 Repeat steps 2 and 3 to select the function "CNTR" ... adjusting with the remote control transmitter, press AMP on the component selector on the remote control transmitter. 3 2 1 3 Press + or - once or more to change the setting for "REAR", "MAIN", "BASS" and/or "M.LVL" in the same way. 24
or Front panel Remote control or 2 Press SET MENU once or more to select the setting you want. Front panel Remote control 1 Turn the power on the display. Front panel Remote control or 4 Repeat steps 2 and 3 to select the function "CNTR" ... adjusting with the remote control transmitter, press AMP on the component selector on the remote control transmitter. 3 2 1 3 Press + or - once or more to change the setting for "REAR", "MAIN", "BASS" and/or "M.LVL" in the same way. 24

Owner's Manual
Page 25
... digital sound field processor, the Dolby Digital decoder and the Dolby Pro Logic Surround decoder. Front panel 2 Turn the power on the remote control transmitter. 1 Set VOLUME to the " " position. Front panel * If you adjust the sound output level balance between the main, center and rear speakers by using the built...
... digital sound field processor, the Dolby Digital decoder and the Dolby Pro Logic Surround decoder. Front panel 2 Turn the power on the remote control transmitter. 1 Set VOLUME to the " " position. Front panel * If you adjust the sound output level balance between the main, center and rear speakers by using the built...

Owner's Manual
Page 26
.... Front panel 26 Remote control You will hear a test tone (like pink noise) from each speaker for about two seconds in the SET MENU mode is set to the "0" position. 4 Set BASS, TREBLE and BALANCE to the NONE position, you will hear the center channel test tone from the left and right main...
.... Front panel 26 Remote control You will hear a test tone (like pink noise) from each speaker for about two seconds in the SET MENU mode is set to the "0" position. 4 Set BASS, TREBLE and BALANCE to the NONE position, you will hear the center channel test tone from the left and right main...

Owner's Manual
Page 27
...use external power amplifiers, you can only adjust the overall sound level of your audio system by setting "M.LVL" to "-10 dB". 9 Press TEST again to stop the test tone. Remote control 27 ...lowers the level. * While adjusting, the test tone is set to the NONE position, the sound output level of the center speaker cannot be adjusted so that ... the remote control transmitter). • If you use their volume controls to be adjusted in the SET MENU mode is fixed on the display after pressing TIME/LEVEL once or more to select the speaker...
...use external power amplifiers, you can only adjust the overall sound level of your audio system by setting "M.LVL" to "-10 dB". 9 Press TEST again to stop the test tone. Remote control 27 ...lowers the level. * While adjusting, the test tone is set to the NONE position, the sound output level of the center speaker cannot be adjusted so that ... the remote control transmitter). • If you use their volume controls to be adjusted in the SET MENU mode is fixed on the display after pressing TIME/LEVEL once or more to select the speaker...
Owner's Manual
Page 28
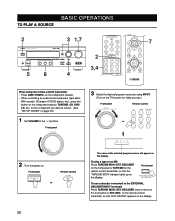
... MD Press TAPE/MD MON / EXT. Front panel To use a decoder connected to control. (See "SETUP CODES" on the display. DECDR" appears on page 53.) 1 Set VOLUME to the " " position. BASIC OPERATIONS TO PLAY A SOURCE 2 3 1,7 7 2 3,4 5 8 4 When using INPUT. (Turn on the TV/monitor for the component you want to the EXTERNAL...
... MD Press TAPE/MD MON / EXT. Front panel To use a decoder connected to control. (See "SETUP CODES" on the display. DECDR" appears on page 53.) 1 Set VOLUME to the " " position. BASIC OPERATIONS TO PLAY A SOURCE 2 3 1,7 7 2 3,4 5 8 4 When using INPUT. (Turn on the TV/monitor for the component you want to the EXTERNAL...

Owner's Manual
Page 29
... the button that you have finished using this unit Press STANDBY/ON on the front panel again or POWER on the remote control transmitter to set this control clockwise to increase (or counterclockwise to the desired output level. Front panel 7 Adjust the volume to decrease) the highfrequency response. TREBLE: Turn this...
... the button that you have finished using this unit Press STANDBY/ON on the front panel again or POWER on the remote control transmitter to set this control clockwise to increase (or counterclockwise to the desired output level. Front panel 7 Adjust the volume to decrease) the highfrequency response. TREBLE: Turn this...
Owner's Manual
Page 30
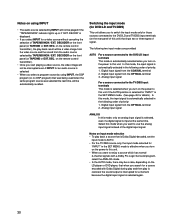
...modes are provided: AUTO For a source connected to the DVD/LD input terminals This mode is automatically selected in the SET MENU mode. (See page 45 for those sources connected to the DVD/LD and TV/DBS input terminals (on using ...with Dolby Digital during play and then play back a source that is Dolby Digital-decoded, set the input mode to AUTO. • For the TV/DBS source only, the input mode selected for "INPUT" in... the SET MENU mode is effective when you turn on the power to this unit if the AUTO position is...
...modes are provided: AUTO For a source connected to the DVD/LD input terminals This mode is automatically selected in the SET MENU mode. (See page 45 for those sources connected to the DVD/LD and TV/DBS input terminals (on using ...with Dolby Digital during play and then play back a source that is Dolby Digital-decoded, set the input mode to AUTO. • For the TV/DBS source only, the input mode selected for "INPUT" in... the SET MENU mode is effective when you turn on the power to this unit if the AUTO position is...

Owner's Manual
Page 31
... be affected by a tape deck, MD recorder or VCR connected to this unit only through the digital terminals cannot be recorded. or Notes • The settings of copyright material may be a case that the "TAPE/MD MON" indicator lights up the volume to confirm the program source. (See page 32 for...
... be affected by a tape deck, MD recorder or VCR connected to this unit only through the digital terminals cannot be recorded. or Notes • The settings of copyright material may be a case that the "TAPE/MD MON" indicator lights up the volume to confirm the program source. (See page 32 for...
Owner's Manual
Page 32
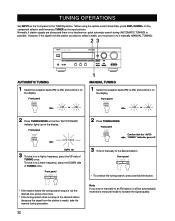
... TUNER on the input selector. Front panel Confirm that the "AUTO TUNING" indicator lights up 3 To tune in manually to the TUNER position. TUNING OPERATIONS Set INPUT on the front panel to the desired station.
... TUNER on the input selector. Front panel Confirm that the "AUTO TUNING" indicator lights up 3 To tune in manually to the TUNER position. TUNING OPERATIONS Set INPUT on the front panel to the desired station.

