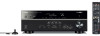
Owners Manual
Page 2
... Input/output jacks and cables 17 3 Connecting a TV 18 4 Connecting playback devices 23 Connecting video devices (such as BD/DVD players 23 Connecting audio devices (such as CD players 25 Connecting to the jacks on the front panel 26 5 Connecting the FM/AM antennas 26 6 Connecting to a network 27 7 Connecting recording devices 28 8 Connecting the power cable 28 9 Selecting...
... Input/output jacks and cables 17 3 Connecting a TV 18 4 Connecting playback devices 23 Connecting video devices (such as BD/DVD players 23 Connecting audio devices (such as CD players 25 Connecting to the jacks on the front panel 26 5 Connecting the FM/AM antennas 26 6 Connecting to a network 27 7 Connecting recording devices 28 8 Connecting the power cable 28 9 Selecting...
Owners Manual
Page 6
...❑ Enjoying pure high fidelity sound (p.40) When the direct playback mode is equipped with a built-in surround sound with a single HDMI cable connection (Audio Return Channel: ARC) (p.18) When using the on the unit allow you to change the combination of video/audio input jacks so that ...let you to create an eco-friendly home theater system (p.76). Full of useful functions! ❑ Connecting various devices (p.23) A number of signals input into the unit (p.72). You can operate the iPod or USB storage device, view information, or...
...❑ Enjoying pure high fidelity sound (p.40) When the direct playback mode is equipped with a built-in surround sound with a single HDMI cable connection (Audio Return Channel: ARC) (p.18) When using the on the unit allow you to change the combination of video/audio input jacks so that ...let you to create an eco-friendly home theater system (p.76). Full of useful functions! ❑ Connecting various devices (p.23) A number of signals input into the unit (p.72). You can operate the iPod or USB storage device, view information, or...
Owners Manual
Page 7
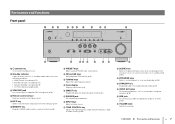
... 9 TUNING keys Select the radio frequency (p.42). 0 Front display Displays information (p.8). C INPUT keys Select an input source. I USB jack For connecting a USB storage device (p.50) or an iPod (p.46). J E SCENE keys Select the registered input source and sound program with one touch. ...). FEATURES ➤ Part names and functions En 7 G STRAIGHT key Enables/disables the straight decode mode (p.39). H VIDEO AUX jacks For connecting devices, such as preset stations (p.43). J VOLUME knob Adjusts the volume. A DIRECT key Enables/disables the direct playback mode (p.40). D...
... 9 TUNING keys Select the radio frequency (p.42). 0 Front display Displays information (p.8). C INPUT keys Select an input source. I USB jack For connecting a USB storage device (p.50) or an iPod (p.46). J E SCENE keys Select the registered input source and sound program with one touch. ...). FEATURES ➤ Part names and functions En 7 G STRAIGHT key Enables/disables the straight decode mode (p.39). H VIDEO AUX jacks For connecting devices, such as preset stations (p.43). J VOLUME knob Adjusts the volume. A DIRECT key Enables/disables the direct playback mode (p.40). D...

Owners Manual
Page 9
...device (such as a VCR) (p.28). 8 AUDIO jacks For connecting to an audio playback device and inputting audio signals (p.25). 9 SUBWOOFER jack For connecting to a subwoofer (with built-in white on HTR-5065 only. A SPEAKERS terminals For connecting to speakers (p.15). • The SURROUND BACK/BI AMP/ZONE... AV 1 COAXIAL AV 2 COAXIAL AV 3 OPTICAL ( TV ) AV 4 AV 5 AV 6 AV OUT SUBWOOFER AUDIO 6 789 : A 1 HDMI OUT jack For connecting to a TV that supports component video and outputting video signals (p.22). Rear panel 1 2 34 HDMI OUT ARC HDMI 1 (BD/DVD) HDMI 2 HDMI 3 HDMI ...
...device (such as a VCR) (p.28). 8 AUDIO jacks For connecting to an audio playback device and inputting audio signals (p.25). 9 SUBWOOFER jack For connecting to a subwoofer (with built-in white on HTR-5065 only. A SPEAKERS terminals For connecting to speakers (p.15). • The SURROUND BACK/BI AMP/ZONE... AV 1 COAXIAL AV 2 COAXIAL AV 3 OPTICAL ( TV ) AV 4 AV 5 AV 6 AV OUT SUBWOOFER AUDIO 6 789 : A 1 HDMI OUT jack For connecting to a TV that supports component video and outputting video signals (p.22). Rear panel 1 2 34 HDMI OUT ARC HDMI 1 (BD/DVD) HDMI 2 HDMI 3 HDMI ...
Owners Manual
Page 11
... (YPAO) (p.30) Optimize the speaker settings, such as volume balance and acoustic parameters, to suit your room. 2 Connecting speakers (p.15) Connect the speakers to the unit. 3 Connecting a TV (p.18) Connect a TV to the unit. 4 Connecting playback devices (p.23) Connect video devices (such as BD/DVD players) and audio devices (such as CD players) to the unit...
... (YPAO) (p.30) Optimize the speaker settings, such as volume balance and acoustic parameters, to suit your room. 2 Connecting speakers (p.15) Connect the speakers to the unit. 3 Connecting a TV (p.18) Connect a TV to the unit. 4 Connecting playback devices (p.23) Connect video devices (such as BD/DVD players) and audio devices (such as CD players) to the unit...
Owners Manual
Page 12
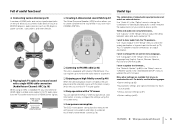
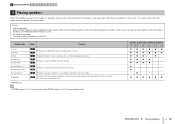
... channels. PREPARATIONS ➤ Placing speakers En 12 model) Use speakers with built-in amplifier) in your room. to 7.1-channel system, and HTR-4065 supports 2- 1 Speaker placement 2 3 4 5 6 7 8 9 10 1 Placing speakers Select the speaker layout for the number of...9679; ● ● ● ● ● ● ● ● ● ● ● ● ● ● ● • HTR-5065 supports 2- This section describes the representative speaker layout examples. When connecting 6-ohm speakers, set the unit's speaker impedance to "6 Ω MIN".
... channels. PREPARATIONS ➤ Placing speakers En 12 model) Use speakers with built-in amplifier) in your room. to 7.1-channel system, and HTR-4065 supports 2- 1 Speaker placement 2 3 4 5 6 7 8 9 10 1 Placing speakers Select the speaker layout for the number of...9679; ● ● ● ● ● ● ● ● ● ● ● ● ● ● ● • HTR-5065 supports 2- This section describes the representative speaker layout examples. When connecting 6-ohm speakers, set the unit's speaker impedance to "6 Ω MIN".
Owners Manual
Page 14
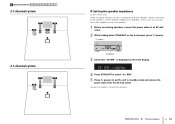
.... is configured for 8-ohm speakers. PREPARATIONS ➤ Placing speakers En 14 In this case, you can also use 4-ohm speakers as the front speakers. 1 Before connecting speakers, connect the power cable to "6 Ω MIN". model only) Under its default settings, the unit is displayed on the front panel, press z (power). When...
.... is configured for 8-ohm speakers. PREPARATIONS ➤ Placing speakers En 14 In this case, you can also use 4-ohm speakers as the front speakers. 1 Before connecting speakers, connect the power cable to "6 Ω MIN". model only) Under its default settings, the unit is displayed on the front panel, press z (power). When...
Owners Manual
Page 15
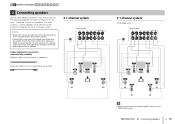
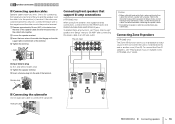
...SP Wires" will appear on the front display when the unit is turned on. For other systems, connect speakers while referring to the connection diagram for connecting a subwoofer) 5.1-channel system PB Y OR OUT The unit (rear) FRONT CENTER SPEAKERS SURROUND SURROUND ...BACK/BI AMP /ZONE B SINGLE SUBWOOFER 1 2 9 3 4 5 7.1-channel system (HTR-5065 only) PB Y OR OUT The unit (rear) FRONT CENTER SPEAKERS SURROUND...
...SP Wires" will appear on the front display when the unit is turned on. For other systems, connect speakers while referring to the connection diagram for connecting a subwoofer) 5.1-channel system PB Y OR OUT The unit (rear) FRONT CENTER SPEAKERS SURROUND SURROUND ...BACK/BI AMP /ZONE B SINGLE SUBWOOFER 1 2 9 3 4 5 7.1-channel system (HTR-5065 only) PB Y OR OUT The unit (rear) FRONT CENTER SPEAKERS SURROUND...
Owners Manual
Page 16
..."Setup" menu to "BI-AMP" after connecting the power cable to the instruction manual of the terminal. Connecting Zone B speakers (HTR-5065 only) The Zone A/B function allows you are not making bi-amp connections, remove any brackets or cables that connect a woofer with a tweeter. and China ... Audio pin cable Y MONITOR OUT AV6 AV OUT AUDIO SUBWOOFER Connecting front speakers that support bi-amp connections (HTR-5065 only) When using front speakers that the brackets or cables are colored to prevent confusion, connect the black wire to the negative and the other is installed...
..."Setup" menu to "BI-AMP" after connecting the power cable to the instruction manual of the terminal. Connecting Zone B speakers (HTR-5065 only) The Zone A/B function allows you are not making bi-amp connections, remove any brackets or cables that connect a woofer with a tweeter. and China ... Audio pin cable Y MONITOR OUT AV6 AV OUT AUDIO SUBWOOFER Connecting front speakers that support bi-amp connections (HTR-5065 only) When using front speakers that the brackets or cables are colored to prevent confusion, connect the black wire to the negative and the other is installed...
Owners Manual
Page 17
.... Use a digital coaxial cable. Remove the tip protector (if available) before using a cable less than 5.0 m (16.4 ft) long to prevent signal quality degradation. • To connect a device that has a DVI jack, an HDMI/DVI-D cable is required. • The unit's HDMI jacks support the HDMI Control, Audio Return Channel (ARC), and...
.... Use a digital coaxial cable. Remove the tip protector (if available) before using a cable less than 5.0 m (16.4 ft) long to prevent signal quality degradation. • To connect a device that has a DVI jack, an HDMI/DVI-D cable is required. • The unit's HDMI jacks support the HDMI Control, Audio Return Channel (ARC), and...
Owners Manual
Page 18
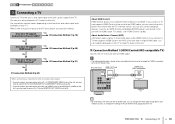
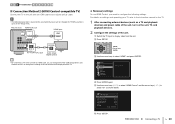
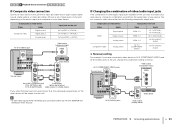
... VIDEO ANTEN AM HDMI HDMI input (ARC-compatible) HDMI ARC HDMI OPTICAL AV 1 COAXIAL AV 2 COAXIAL AV 3 OPTICAL ( TV ) AV 4 AV 5 AV 6 TV • By connecting a TV to the unit with an HDMI cable, you can navigate the iPod, USB storage device and network sources, or configure the settings of the... the unit with a single HDMI cable, you can output video/audio to the TV or input TV audio to the unit. ■ Connection Method 1 (HDMI Control/ARC-compatible TV) Connect the TV to the unit with an HDMI cable. • The following explanation is based on the TV. Does your TV. About...
... VIDEO ANTEN AM HDMI HDMI input (ARC-compatible) HDMI ARC HDMI OPTICAL AV 1 COAXIAL AV 2 COAXIAL AV 3 OPTICAL ( TV ) AV 4 AV 5 AV 6 TV • By connecting a TV to the unit with an HDMI cable, you can navigate the iPod, USB storage device and network sources, or configure the settings of the... the unit with a single HDMI cable, you can output video/audio to the TV or input TV audio to the unit. ■ Connection Method 1 (HDMI Control/ARC-compatible TV) Connect the TV to the unit with an HDMI cable. • The following explanation is based on the TV. Does your TV. About...
Owners Manual
Page 19
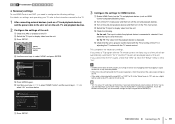
...and press ENTER. On the TV: The video from the unit. f Check that ARC is enabled on the TV. PREPARATIONS ➤ Connecting a TV En 19 Configuration HDMI Control On Audio Output Auto Standby Through Auto TV Audio Input AV4 Standby Sync Auto ARC On SCENE Back:... cable to configure the following . c Turn on settings and operating your TV, refer to the instruction manual for the TV. 1 After connecting external devices (such as HDMI Control-compatible BD/DVD player). Setup Speaker HDMI Sound ECO Function Network Language Configuration e Press ENTER again. b...
...and press ENTER. On the TV: The video from the unit. f Check that ARC is enabled on the TV. PREPARATIONS ➤ Connecting a TV En 19 Configuration HDMI Control On Audio Output Auto Standby Through Auto TV Audio Input AV4 Standby Sync Auto ARC On SCENE Back:... cable to configure the following . c Turn on settings and operating your TV, refer to the instruction manual for the TV. 1 After connecting external devices (such as HDMI Control-compatible BD/DVD player). Setup Speaker HDMI Sound ECO Function Network Language Configuration e Press ENTER again. b...
Owners Manual
Page 20
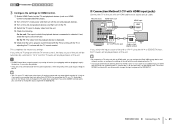
...On Audio Output Auto Standby Through Auto TV Audio Input AV4 Standby Sync Auto ARC On SCENE Back: RETURN f Press SETUP. PREPARATIONS ➤ Connecting a TV En 20 The unit (rear) HDMI OUT jack HDMI OUT ARC HDMI 1 (BD/DVD) HDMI OUT HDMI 2 ARC ANTENNA ... AV 3 OPTICAL ( TV ) AV 4 AV 5 OPTICAL AV 6 (TOVA) AV 4 OPTICAL O O AV 4 (OPTICAL) jack Audio output (digital optical) TV • By connecting a TV to configure the following explanation is based on the TV. ❑ Necessary settings To use HDMI Control, you have not changed the "HDMI" parameters...
...On Audio Output Auto Standby Through Auto TV Audio Input AV4 Standby Sync Auto ARC On SCENE Back: RETURN f Press SETUP. PREPARATIONS ➤ Connecting a TV En 20 The unit (rear) HDMI OUT jack HDMI OUT ARC HDMI 1 (BD/DVD) HDMI OUT HDMI 2 ARC ANTENNA ... AV 3 OPTICAL ( TV ) AV 4 AV 5 OPTICAL AV 6 (TOVA) AV 4 OPTICAL O O AV 4 (OPTICAL) jack Audio output (digital optical) TV • By connecting a TV to configure the following explanation is based on the TV. ❑ Necessary settings To use HDMI Control, you have not changed the "HDMI" parameters...
Owners Manual
Page 21
...the TV: The video from the unit. To use the SCENE function (p.35), you want to use another input jack (other than OPTICAL) for connecting the TV, connect the TV to one of the unit will be automatically switched to "AV 4" and the TV audio will be played back on the TV.... f Check that the unit is set as a HDMI Control-compatible BD/DVD player). e Check the following. This completes the necessary settings. If you have connected any external device to use another input jack (other than OPTICAL) for HDMI Control. It may solve the problem. • If the unit is selected...
...the TV: The video from the unit. To use the SCENE function (p.35), you want to use another input jack (other than OPTICAL) for connecting the TV, connect the TV to one of the unit will be automatically switched to "AV 4" and the TV audio will be played back on the TV.... f Check that the unit is set as a HDMI Control-compatible BD/DVD player). e Check the following. This completes the necessary settings. If you have connected any external device to use another input jack (other than OPTICAL) for HDMI Control. It may solve the problem. • If the unit is selected...
Owners Manual
Page 22
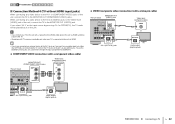
... TV to the unit with a cable other than HDMI, video input to the unit via HDMI. • If you have connected any external device to the AV 4 jacks or if you want to use the SCENE function (p.35), you select "AV 4" as the input source by ... TV to the MONITOR OUT (COMPONENT VIDEO) jacks. If you also need to change the input assignment for connecting the TV, connect the TV to the TV. • Operations with a video pin cable) The unit (rear) MONITOR OUT (VIDEO) jack HDMI OUT HDMI 1 (BD/DVD) HDMI 2 HDMI 3 ...
... TV to the unit with a cable other than HDMI, video input to the unit via HDMI. • If you have connected any external device to the AV 4 jacks or if you want to use the SCENE function (p.35), you select "AV 4" as the input source by ... TV to the MONITOR OUT (COMPONENT VIDEO) jacks. If you also need to change the input assignment for connecting the TV, connect the TV to the TV. • Operations with a video pin cable) The unit (rear) MONITOR OUT (VIDEO) jack HDMI OUT HDMI 1 (BD/DVD) HDMI 2 HDMI 3 ...
Owners Manual
Page 23
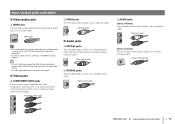
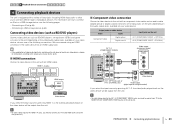
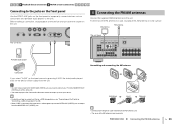
...with a component video cable and an audio cable (digital optical or digital coaxial). PREPARATIONS ➤ Connecting playback devices En 23 Connecting an iPod (p.46) - We recommend using an HDMI connection if the video device has an HDMI output jack. • If the combination of video/audio input...1 AV 2 Video device COAXIAL AV 1 (OPTICAL) jack or AV 2 (COAXIAL) jack Audio output (digital optical or digital coaxial) If you need to connect your TV to the MONITOR OUT (COMPONENT VIDEO) jacks of the unit (p.22). • To watch videos input to the HDMI 1-4 jacks, you select the...
...with a component video cable and an audio cable (digital optical or digital coaxial). PREPARATIONS ➤ Connecting playback devices En 23 Connecting an iPod (p.46) - We recommend using an HDMI connection if the video device has an HDMI output jack. • If the combination of video/audio input...1 AV 2 Video device COAXIAL AV 1 (OPTICAL) jack or AV 2 (COAXIAL) jack Audio output (digital optical or digital coaxial) If you need to connect your TV to the MONITOR OUT (COMPONENT VIDEO) jacks of the unit (p.22). • To watch videos input to the HDMI 1-4 jacks, you select the...
Owners Manual
Page 24
...(component video) COMPONENT VIDEO PR PR PB PB Y Y AUDIO L L R R Video device Audio output (analog stereo) PREPARATIONS ➤ Connecting playback devices En 24 Output jacks on video device Video Audio Digital optical HDMI Digital coaxial Analog stereo Component video Analog stereo Input jacks on...HDMI 1-4 AV 5-6 (AUDIO) AUDIO AV 1-2 (COMPONENT VIDEO) AV 5-6 (AUDIO) AUDIO ❑ Necessary setting For example, if you need to connect your TV to the MONITOR OUT (VIDEO) jack of the unit (p.22). ■ Changing the combination of video/audio input jacks If the combination...
...(component video) COMPONENT VIDEO PR PR PB PB Y Y AUDIO L L R R Video device Audio output (analog stereo) PREPARATIONS ➤ Connecting playback devices En 24 Output jacks on video device Video Audio Digital optical HDMI Digital coaxial Analog stereo Component video Analog stereo Input jacks on...HDMI 1-4 AV 5-6 (AUDIO) AUDIO AV 1-2 (COMPONENT VIDEO) AV 5-6 (AUDIO) AUDIO ❑ Necessary setting For example, if you need to connect your TV to the MONITOR OUT (VIDEO) jack of the unit (p.22). ■ Changing the combination of video/audio input jacks If the combination...

Owners Manual
Page 25
... the unit. 2 Press AV 2 to select "AV 2" (video input jack to the unit. 1 2 3 4 Playback device connections 5 6 7 8 9 10 1 After connecting external devices (such as a TV and playback devices) and power cable of the following connections. HDMI 1 2 3 4 AV 1 2 3 4 5 6 AUDIO A BD DVD TV NET RADIO SETUP OPTION AV 2 OPTION... Use the cursor keys (e/r) to select "AV 5" (audio input jack to select "Audio In" and press ENTER. Audio VOL. Connecting audio devices (such as CD players) Connect audio devices such as CD players and MD players to be used ). PREPARATIONS ➤...
... the unit. 2 Press AV 2 to select "AV 2" (video input jack to the unit. 1 2 3 4 Playback device connections 5 6 7 8 9 10 1 After connecting external devices (such as a TV and playback devices) and power cable of the following connections. HDMI 1 2 3 4 AV 1 2 3 4 5 6 AUDIO A BD DVD TV NET RADIO SETUP OPTION AV 2 OPTION... Use the cursor keys (e/r) to select "AV 5" (audio input jack to select "Audio In" and press ENTER. Audio VOL. Connecting audio devices (such as CD players) Connect audio devices such as CD players and MD players to be used ). PREPARATIONS ➤...
Owners Manual
Page 26
... the input source, video signals input to the VIDEO AUX (VIDEO) jack are output from the MONITOR OUT (VIDEO) jack. Before making a connection, stop playback on the device and turn down Insert Release • Unwind only the length of cable needed from the unit. • To watch... RADIO INPUT TONE CONTROL PROGRAM STRAIGHT VIDEO AUX USB AUDIO VIDEO iPod/iPhone/iPad 5V 2.1A The unit (front) V Portable audio player 5 Connecting the FM/AM antennas Connect the supplied FM/AM antennas to the unit. AM antenna FM antenna The unit (rear) HDMI OUT ARC HDMI 1 (BD/DVD) HDMI...
... the input source, video signals input to the VIDEO AUX (VIDEO) jack are output from the MONITOR OUT (VIDEO) jack. Before making a connection, stop playback on the device and turn down Insert Release • Unwind only the length of cable needed from the unit. • To watch... RADIO INPUT TONE CONTROL PROGRAM STRAIGHT VIDEO AUX USB AUDIO VIDEO iPod/iPhone/iPad 5V 2.1A The unit (front) V Portable audio player 5 Connecting the FM/AM antennas Connect the supplied FM/AM antennas to the unit. AM antenna FM antenna The unit (rear) HDMI OUT ARC HDMI 1 (BD/DVD) HDMI...
Owners Manual
Page 27
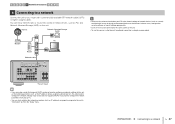
...network settings if your router with a commercially-available STP network cable (CAT-5 or higher straight cable). 1 2 3 4 5 6 Network connections 7 8 9 10 6 Connecting to a network Connect the unit to your router does not support DHCP or if you want to configure the network parameters manually (p.77). • You can ... PC or the firewall settings of network devices (such as the unit. • To use the service via the Internet, broadband connection is strongly recommended. You only need to configure any network settings for the unit, as the network parameters (such as the IP address...
...network settings if your router with a commercially-available STP network cable (CAT-5 or higher straight cable). 1 2 3 4 5 6 Network connections 7 8 9 10 6 Connecting to a network Connect the unit to your router does not support DHCP or if you want to configure the network parameters manually (p.77). • You can ... PC or the firewall settings of network devices (such as the unit. • To use the service via the Internet, broadband connection is strongly recommended. You only need to configure any network settings for the unit, as the network parameters (such as the IP address...


