
Owner's Manual
Page 2
... openings in a fire or electric shock. Power-supply cords should be equipped with them , paying particular attention to rain or water, I CAUTION If you to keep from the wall outlet and disconnect the antenna or cable system. Do not defeat the safety purpose of important operating and maintenance (servicing) instructions in the operating instructions should be placed in a built-in a risk of power source...
... openings in a fire or electric shock. Power-supply cords should be equipped with them , paying particular attention to rain or water, I CAUTION If you to keep from the wall outlet and disconnect the antenna or cable system. Do not defeat the safety purpose of important operating and maintenance (servicing) instructions in the operating instructions should be placed in a built-in a risk of power source...
Owner's Manual
Page 3
... grounding electrodes, and requirements for service. 20 Replacement Parts - Utilize power outlets that the cable ground shall be mounted to CATV system installer: This reminder is in the USA. 3. this product in proper operating condition. 22 Wall or Ceiling Mounting - Note to a wall or ceiling only as indicated in the instructions contained in wire to an antenna discharge unit, size of grounding...
... grounding electrodes, and requirements for service. 20 Replacement Parts - Utilize power outlets that the cable ground shall be mounted to CATV system installer: This reminder is in the USA. 3. this product in proper operating condition. 22 Wall or Ceiling Mounting - Note to a wall or ceiling only as indicated in the instructions contained in wire to an antenna discharge unit, size of grounding...
Owner's Manual
Page 4
.... 5 Avoid installing this product is connected to wide slot and fully insert. In a cabinet, allow about 10 cm (4 in.) of power. in a location where foreign objects may overheat, possibly causing damage. 9 Do not use this unit for any service is turned off , then disconnect the AC power plug from excessive volume levels. Since hearing damage from loud sounds is called the standby mode.
.... 5 Avoid installing this product is connected to wide slot and fully insert. In a cabinet, allow about 10 cm (4 in.) of power. in a location where foreign objects may overheat, possibly causing damage. 9 Do not use this unit for any service is turned off , then disconnect the AC power plug from excessive volume levels. Since hearing damage from loud sounds is called the standby mode.
Owner's Manual
Page 5
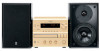
... BUTTONS AND CONTROLS Front panel 3 Display 3 Remote control 4 GETTING STARTED Remote control 5 Connecting the speakers and antennas 6 Connecting other components 7 Setting the clock 8 Adjusting the brightness of the display 8 LISTENING TO A SOURCE 9 TUNING 10 Presetting stations 11 CD OPERATIONS Playing a disc 12 Selecting the time display and CD TEXT .......... 13 Random-sequence play 13 Repeat play 14 Program play 14 USING THE BUILT-IN TIMER Before using the timer 16 Timer play • CD TEXT display • Copy time control • CD-RW compatible The CD receiver CRX...
... BUTTONS AND CONTROLS Front panel 3 Display 3 Remote control 4 GETTING STARTED Remote control 5 Connecting the speakers and antennas 6 Connecting other components 7 Setting the clock 8 Adjusting the brightness of the display 8 LISTENING TO A SOURCE 9 TUNING 10 Presetting stations 11 CD OPERATIONS Playing a disc 12 Selecting the time display and CD TEXT .......... 13 Random-sequence play 13 Repeat play 14 Program play 14 USING THE BUILT-IN TIMER Before using the timer 16 Timer play • CD TEXT display • Copy time control • CD-RW compatible The CD receiver CRX...

Owner's Manual
Page 6
... play 8-cm (3-inch) compact discs. • Compact discs are not affected by using a clean, dry cloth. Wipe by reliable manufacturers. • Some discs cannot be kept clean. wipe straight outward from the center. (Playback only) • Be sure to load any other type of disc into the unit. TIME D E TAPE DIRECTION PRESET TUNER PRESET MD CD TAPE AUX MD REC/PAUSE TAPE REC/PAUSE MODE DUBBING START SLEEP DISPLAY VOLUME • AM loop antenna...
... play 8-cm (3-inch) compact discs. • Compact discs are not affected by using a clean, dry cloth. Wipe by reliable manufacturers. • Some discs cannot be kept clean. wipe straight outward from the center. (Playback only) • Be sure to load any other type of disc into the unit. TIME D E TAPE DIRECTION PRESET TUNER PRESET MD CD TAPE AUX MD REC/PAUSE TAPE REC/PAUSE MODE DUBBING START SLEEP DISPLAY VOLUME • AM loop antenna...
Owner's Manual
Page 7
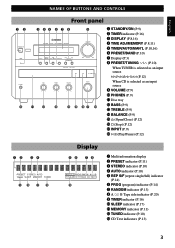
... OF BUTTONS AND CONTROLS 12 STANDBY/ON TIMER PHONES 0 Front panel 3 45 6 7 8 NATURAL SOUND CD RECEIVER CRX-E300 9 VOLUME DISPLAY TIMER ADJ TIMER MEMORY AUTO/MAN'L PRESET/BAND HOUR MIN PRESET/TUNING MIN MAX BASS - + TREBLE - + BALANCE L R INPUT q w e r t yu i 1 STANDBY/ON (P.9) 2 TIMER indicator (P.16) 3 DISPLAY (P.8,16) 4 TIME ADJ/MEMORY (P.8,11) 5 TIMER/AUTO/MAN'L (P.10,16) 6 PRESET/BAND (P.10) 7 Display (P.3) 8 PRESET/TUNING / (P.10) When TUNER is selected as an input source P.12) When CD is selected as an input source 9 VOLUME (P.9) 0 PHONES (P.9) q Disc tray...
... OF BUTTONS AND CONTROLS 12 STANDBY/ON TIMER PHONES 0 Front panel 3 45 6 7 8 NATURAL SOUND CD RECEIVER CRX-E300 9 VOLUME DISPLAY TIMER ADJ TIMER MEMORY AUTO/MAN'L PRESET/BAND HOUR MIN PRESET/TUNING MIN MAX BASS - + TREBLE - + BALANCE L R INPUT q w e r t yu i 1 STANDBY/ON (P.9) 2 TIMER indicator (P.16) 3 DISPLAY (P.8,16) 4 TIME ADJ/MEMORY (P.8,11) 5 TIMER/AUTO/MAN'L (P.10,16) 6 PRESET/BAND (P.10) 7 Display (P.3) 8 PRESET/TUNING / (P.10) When TUNER is selected as an input source P.12) When CD is selected as an input source 9 VOLUME (P.9) 0 PHONES (P.9) q Disc tray...

Owner's Manual
Page 8
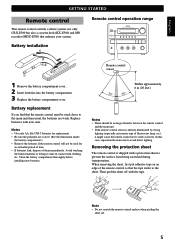
...for each component. TIME D E TAPE DIRECTION PRESET TUNER PRESET MD CD TAPE AUX MD REC/PAUSE TAPE REC/PAUSE MODE DUBBING START SLEEP DISPLAY VOLUME 4 5 7 9 0 5 7 8,q 9 q w 1 POWER (P.9) 2 Preset numbers (1-8)* (P.11) 3 A/B/C/D/E* (P.11) 4 PRESET / * (P.11) 5 TUNER (P.11) 6 MD (MDX-E300) (P.18) 7 TAPE (KX-E300) (P.18) 8 CD (P.12) 9 AUX (The equipment connected to the AUX terminal) 0 SLEEP (P.17) q DISPLAY (P.16) w VOLUME + - (P.9) * When TUNER is used when operating MDX-E300. 3 REP (Repeat) (P.14) 4 PROG (Program) (P.14) 5 RANDOM (Random) (P.13) 6 TEXT/TIME (P.13) 7 ^ (Play/Pause...
...for each component. TIME D E TAPE DIRECTION PRESET TUNER PRESET MD CD TAPE AUX MD REC/PAUSE TAPE REC/PAUSE MODE DUBBING START SLEEP DISPLAY VOLUME 4 5 7 9 0 5 7 8,q 9 q w 1 POWER (P.9) 2 Preset numbers (1-8)* (P.11) 3 A/B/C/D/E* (P.11) 4 PRESET / * (P.11) 5 TUNER (P.11) 6 MD (MDX-E300) (P.18) 7 TAPE (KX-E300) (P.18) 8 CD (P.12) 9 AUX (The equipment connected to the AUX terminal) 0 SLEEP (P.17) q DISPLAY (P.16) w VOLUME + - (P.9) * When TUNER is used when operating MDX-E300. 3 REP (Repeat) (P.14) 4 PROG (Program) (P.14) 5 RANDOM (Random) (P.13) 6 TEXT/TIME (P.13) 7 ^ (Play/Pause...
Owner's Manual
Page 9
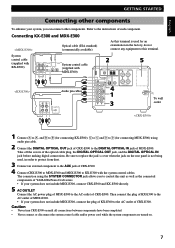
... an extended period of time. • If batteries leak, dispose of them immediately. In this case, reposition the main unit to the sheet. Battery installation 1 3 2 Remote control operation range STANDBY/ON TIMER NATURAL SOUND CD RECEIVER CRX-E300 VOLUME DISPLAY TIMER ADJ TIMER MEMORY AUTO/MAN'L PRESET/BAND HOUR MIN PRESET/TUNING MIN MAX PHONES BASS TREBLE BALANCE - + - + L R INPUT Remote control sensor 1 Remove the battery compartment cover. 2 Insert batteries into the battery compartment. 3 Replace the battery compartment cover. Within approximately...
... an extended period of time. • If batteries leak, dispose of them immediately. In this case, reposition the main unit to the sheet. Battery installation 1 3 2 Remote control operation range STANDBY/ON TIMER NATURAL SOUND CD RECEIVER CRX-E300 VOLUME DISPLAY TIMER ADJ TIMER MEMORY AUTO/MAN'L PRESET/BAND HOUR MIN PRESET/TUNING MIN MAX PHONES BASS TREBLE BALANCE - + - + L R INPUT Remote control sensor 1 Remove the battery compartment cover. 2 Insert batteries into the battery compartment. 3 Replace the battery compartment cover. Within approximately...

Owner's Manual
Page 10
.... 3 Tighten the knob to a wall outlet. GND - GETTING STARTED Connecting the speakers and antennas Never plug the AC power cord to the wall outlet until all connections are completed. AM ANT SYSTEM CONNECTOR DIGITAL OPTICAL OUT SUBWOOFER OUT C IN MD OUT D A IN TAPE OUT B AUX IN R L SPEAKERS R L 6Ω MIN. /SPEAKER CLASS 2 WIRING 1 4 To wall outlet 1 Connect the Speakers. 1 Unscrew the knob. 2 Remove approx. 10 mm (4") of insulation from the main unit...
.... 3 Tighten the knob to a wall outlet. GND - GETTING STARTED Connecting the speakers and antennas Never plug the AC power cord to the wall outlet until all connections are completed. AM ANT SYSTEM CONNECTOR DIGITAL OPTICAL OUT SUBWOOFER OUT C IN MD OUT D A IN TAPE OUT B AUX IN R L SPEAKERS R L 6Ω MIN. /SPEAKER CLASS 2 WIRING 1 4 To wall outlet 1 Connect the Speakers. 1 Unscrew the knob. 2 Remove approx. 10 mm (4") of insulation from the main unit...
Owner's Manual
Page 11
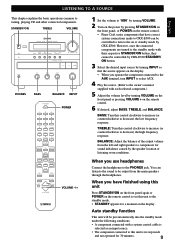
... component to the AC outlet of the optical cable plug, the DIGITAL OPTICAL OUT jack, and the DIGITAL OPTICAL IN jack before making digital connections. The connection using audio pin cable. 2 Connect the DIGITAL OPTICAL OUT jack of CRX-E300 to control this terminal. Be sure to replace the jack's cover when the jack on . 7 System control cable (supplied with KX-E300) ANALOG SYSTEM IN D L C OUT CONNECTOR R DIGITAL OPTICAL 1 2 IN System control cable (supplied with the system control cables. Take off the covers of CRX-E300. Then connect the plug of KX-E300...
... component to the AC outlet of the optical cable plug, the DIGITAL OPTICAL OUT jack, and the DIGITAL OPTICAL IN jack before making digital connections. The connection using audio pin cable. 2 Connect the DIGITAL OPTICAL OUT jack of CRX-E300 to control this terminal. Be sure to replace the jack's cover when the jack on . 7 System control cable (supplied with KX-E300) ANALOG SYSTEM IN D L C OUT CONNECTOR R DIGITAL OPTICAL 1 2 IN System control cable (supplied with the system control cables. Take off the covers of CRX-E300. Then connect the plug of KX-E300...

Owner's Manual
Page 12
... power cord is automatically adjusted to that "Dimmer ±0" appears on a 12-hour system for about 8 seconds, then the normal display returns. The clock is displayed. Some buttons and controls may not work while the current time is based on the display. DISPLAY STANDBY/ON TIMER NATURAL SOUND CD RECEIVER CRX-E300 VOLUME DISPLAY TIMER ADJ TIMER MEMORY AUTO/MAN'L PRESET/BAND HOUR MIN PRESET/TUNING MIN MAX PHONES BASS - + TREBLE - + BALANCE L R INPUT INPUT Press and hold DISPLAY for U.S. GETTING STARTED Setting the clock You must reset...
... power cord is automatically adjusted to that "Dimmer ±0" appears on a 12-hour system for about 8 seconds, then the normal display returns. The clock is displayed. Some buttons and controls may not work while the current time is based on the display. DISPLAY STANDBY/ON TIMER NATURAL SOUND CD RECEIVER CRX-E300 VOLUME DISPLAY TIMER ADJ TIMER MEMORY AUTO/MAN'L PRESET/BAND HOUR MIN PRESET/TUNING MIN MAX PHONES BASS - + TREBLE - + BALANCE L R INPUT INPUT Press and hold DISPLAY for U.S. GETTING STARTED Setting the clock You must reset...
Owner's Manual
Page 13
...E POWER TAPE DIRECTION PRESET TUNER PRESET MD CD TAPE AUX MD REC/PAUSE TAPE REC/PAUSE MODE DUBBING START SLEEP DISPLAY VOLUME VOLUME -/+ 1 Set the volume to "MIN" by turning VOLUME. 2 Turn on the display. • When you use headphones Connect the headphones to be put automatically into the standby mode under the following conditions: • A component connected with each selected component.) 5 Adjust the volume level by CRX-E300. You can be controlled to turn INPUT to select AUX. 4 Play the source. (Refer to the owner's manual supplied with a system control cable...
...E POWER TAPE DIRECTION PRESET TUNER PRESET MD CD TAPE AUX MD REC/PAUSE TAPE REC/PAUSE MODE DUBBING START SLEEP DISPLAY VOLUME VOLUME -/+ 1 Set the volume to "MIN" by turning VOLUME. 2 Turn on the display. • When you use headphones Connect the headphones to be put automatically into the standby mode under the following conditions: • A component connected with each selected component.) 5 Adjust the volume level by CRX-E300. You can be controlled to turn INPUT to select AUX. 4 Play the source. (Refer to the owner's manual supplied with a system control cable...
Owner's Manual
Page 14
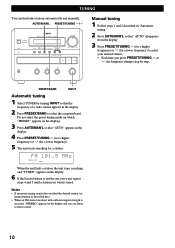
... time you want , repeat steps 4 and 5 until a station you press PRESET/TUNING or , the frequency changes step by turning INPUT so that "AUTO" disappears from the display. 3 Press PRESET/TUNING (for a higher frequency) or (for a station. Notes • If automatic tuning search does not find radio stations automatically and manually. AUTO/MAN'L PRESET/TUNING / STANDBY/ON TIMER NATURAL SOUND CD RECEIVER CRX-E300 VOLUME DISPLAY TIMER ADJ TIMER MEMORY AUTO/MAN'L PRESET/BAND HOUR MIN PRESET/TUNING MIN MAX PHONES BASS - + TREBLE - + BALANCE L R INPUT Manual tuning...
... time you want , repeat steps 4 and 5 until a station you press PRESET/TUNING or , the frequency changes step by turning INPUT so that "AUTO" disappears from the display. 3 Press PRESET/TUNING (for a higher frequency) or (for a station. Notes • If automatic tuning search does not find radio stations automatically and manually. AUTO/MAN'L PRESET/TUNING / STANDBY/ON TIMER NATURAL SOUND CD RECEIVER CRX-E300 VOLUME DISPLAY TIMER ADJ TIMER MEMORY AUTO/MAN'L PRESET/BAND HOUR MIN PRESET/TUNING MIN MAX PHONES BASS - + TREBLE - + BALANCE L R INPUT Manual tuning...
Owner's Manual
Page 15
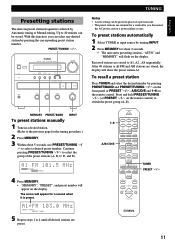
... TIMER NATURAL SOUND CD RECEIVER CRX-E300 VOLUME DISPLAY TIMER ADJ TIMER MEMORY AUTO/MAN'L PRESET/BAND HOUR MIN PRESET/TUNING MIN MAX PHONES BASS - + TREBLE - + BALANCE L R INPUT MEMORY PRESET/BAND INPUT To preset stations manually 1 Tune in place of the preset stations (A, B, C, D, and E). Received stations are stored, the display will appear for a second when it is preset. Press and hold PRESET/TUNING / (or PRESET / on the remote control. TIME D E TAPE DIRECTION PRESET TUNER PRESET MD CD TAPE AUX MD REC/PAUSE TAPE REC/PAUSE MODE DUBBING START...
... TIMER NATURAL SOUND CD RECEIVER CRX-E300 VOLUME DISPLAY TIMER ADJ TIMER MEMORY AUTO/MAN'L PRESET/BAND HOUR MIN PRESET/TUNING MIN MAX PHONES BASS - + TREBLE - + BALANCE L R INPUT MEMORY PRESET/BAND INPUT To preset stations manually 1 Tune in place of the preset stations (A, B, C, D, and E). Received stations are stored, the display will appear for a second when it is preset. Press and hold PRESET/TUNING / (or PRESET / on the remote control. TIME D E TAPE DIRECTION PRESET TUNER PRESET MD CD TAPE AUX MD REC/PAUSE TAPE REC/PAUSE MODE DUBBING START...
Owner's Manual
Page 16
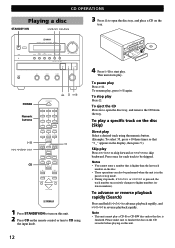
... disc tray, and remove the CD from the tray. Press once for each track to be performed when the unit is pressed, the track number successively changes to higher numbers (or lower numbers). This unit starts play Press &. To stop mode, if ⁄/› or $/! Please make sure to start play , press ^ again. TIME D E TAPE DIRECTION PRESET TUNER PRESET MD CD TAPE AUX MD REC/PAUSE TAPE REC/PAUSE MODE DUBBING START SLEEP DISPLAY VOLUME &^ & 1 Press STANDBY/ON to turn to CD using...
... disc tray, and remove the CD from the tray. Press once for each track to be performed when the unit is pressed, the track number successively changes to higher numbers (or lower numbers). This unit starts play Press &. To stop mode, if ⁄/› or $/! Please make sure to start play , press ^ again. TIME D E TAPE DIRECTION PRESET TUNER PRESET MD CD TAPE AUX MD REC/PAUSE TAPE REC/PAUSE MODE DUBBING START SLEEP DISPLAY VOLUME &^ & 1 Press STANDBY/ON to turn to CD using...
Owner's Manual
Page 20
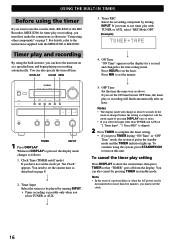
...set the clock yet "Set Clock" appears. OFF Time Set the time the same way as follows: 1. For details, refer to the instructions supplied with TUNER or AUX, select "REC Mode OFF". (Example) Timer play or recording will change in standby mode. Whenever DISPLAY is possible only when you must first make the connections as described on page 8. 2. STANDBY/ON TIMER NATURAL SOUND CD RECEIVER CRX-E300 VOLUME DISPLAY TIMER ADJ TIMER MEMORY AUTO/MAN'L PRESET/BAND HOUR MIN PRESET/TUNING MIN MAX PHONES BASS - + TREBLE - + BALANCE L R INPUT TIMER INPUT...
...set the clock yet "Set Clock" appears. OFF Time Set the time the same way as follows: 1. For details, refer to the instructions supplied with TUNER or AUX, select "REC Mode OFF". (Example) Timer play or recording will change in standby mode. Whenever DISPLAY is possible only when you must first make the connections as described on page 8. 2. STANDBY/ON TIMER NATURAL SOUND CD RECEIVER CRX-E300 VOLUME DISPLAY TIMER ADJ TIMER MEMORY AUTO/MAN'L PRESET/BAND HOUR MIN PRESET/TUNING MIN MAX PHONES BASS - + TREBLE - + BALANCE L R INPUT TIMER INPUT...

Owner's Manual
Page 22
TIME D E TAPE DIRECTION PRESET TUNER PRESET MD CD TAPE AUX MD REC/PAUSE TAPE REC/PAUSE MODE DUBBING START SLEEP DISPLAY 6 7,2 8,3 6 7 MDX-E300 1 POWER 2 Numeric buttons 3 REP (Repeat) 4 RANDOM 5 TEXT/TIME 6 PROG (Program) 7 ^ (Play/Pause) 8 ⁄ › (Skip/Search forward) 9 $ ! (Skip/Search backward) 0 & (Stop) q MD input w MD REC/PAUSE KX-E300 1 POWER 2 ^ (Play) 3 ⁄ › (Fast-foward) 4 $ ! (Rewind) 5 & (Stop) 6 TAPE input 7 TAPE REC/PAUSE VOLUME 18 SYSTEM CONTROL Controlling other components with the remote control 1,1 2 3 4 5 9,4 0,5 q w POWER 1 2 3 1...
TIME D E TAPE DIRECTION PRESET TUNER PRESET MD CD TAPE AUX MD REC/PAUSE TAPE REC/PAUSE MODE DUBBING START SLEEP DISPLAY 6 7,2 8,3 6 7 MDX-E300 1 POWER 2 Numeric buttons 3 REP (Repeat) 4 RANDOM 5 TEXT/TIME 6 PROG (Program) 7 ^ (Play/Pause) 8 ⁄ › (Skip/Search forward) 9 $ ! (Skip/Search backward) 0 & (Stop) q MD input w MD REC/PAUSE KX-E300 1 POWER 2 ^ (Play) 3 ⁄ › (Fast-foward) 4 $ ! (Rewind) 5 & (Stop) 6 TAPE input 7 TAPE REC/PAUSE VOLUME 18 SYSTEM CONTROL Controlling other components with the remote control 1,1 2 3 4 5 9,4 0,5 q w POWER 1 2 3 1...
Owner's Manual
Page 23
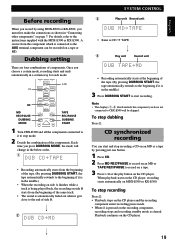
... B. 2 SYSTEM CONTROL 3 Play unit Record unit • Same as shown in "Connecting other components" on page 7. CD synchronized recording You can be skipped. When playback starts on the CD player, recording starts automatically on the CD player. 19 Playback continues on MDX-E300 or KX-E300. D E ^ & TAPE DIRECTION PRESET TUNER PRESET CD MD REC/PAUSE DUBBING MODE MD CD TAPE AUX MD REC/PAUSE TAPE REC/PAUSE MODE DUBBING START SLEEP DISPLAY TAPE REC/PAUSE DUBBING START 1 Turn CRX-E300 and all the components connected...
... B. 2 SYSTEM CONTROL 3 Play unit Record unit • Same as shown in "Connecting other components" on page 7. CD synchronized recording You can be skipped. When playback starts on the CD player, recording starts automatically on the CD player. 19 Playback continues on MDX-E300 or KX-E300. D E ^ & TAPE DIRECTION PRESET TUNER PRESET CD MD REC/PAUSE DUBBING MODE MD CD TAPE AUX MD REC/PAUSE TAPE REC/PAUSE MODE DUBBING START SLEEP DISPLAY TAPE REC/PAUSE DUBBING START 1 Turn CRX-E300 and all the components connected...
Owner's Manual
Page 24
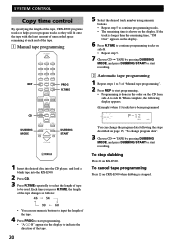
SYSTEM CONTROL Copy time control By specifying the length of the tape, CRX-E300 programs tracks or helps you press R.TIME, the length of the tape changes as follows: 46 54 90 60 • You can change program data". 3 Choose CD = TAPE by pressing DUBBING MODE, and press DUBBING START to start recording. TIME D E PROG R.TIME CD DUBBING MODE TAPE DIRECTION PRESET TUNER PRESET MD CD TAPE AUX MD REC/PAUSE TAPE REC/PAUSE MODE DUBBING START SLEEP DISPLAY DUBBING START VOLUME 1 Insert the desired disc into the CD player, and...
SYSTEM CONTROL Copy time control By specifying the length of the tape, CRX-E300 programs tracks or helps you press R.TIME, the length of the tape changes as follows: 46 54 90 60 • You can change program data". 3 Choose CD = TAPE by pressing DUBBING MODE, and press DUBBING START to start recording. TIME D E PROG R.TIME CD DUBBING MODE TAPE DIRECTION PRESET TUNER PRESET MD CD TAPE AUX MD REC/PAUSE TAPE REC/PAUSE MODE DUBBING START SLEEP DISPLAY DUBBING START VOLUME 1 Insert the desired disc into the CD player, and...
Owner's Manual
Page 25
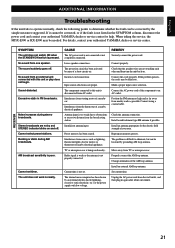
... antenna. Make a proper input source selection. REMEDY Securely connect the power cord. If it cannot be defective. Connect using a coaxial cable. Cannot set . Current time is difficult to eliminate, but can be lessened by grounding AM loop antenna. TV or microprocessor is not connected or not completely connected. Unplug the AC power cord from AC outlet. The problem is not set timer. English ADDITIONAL INFORMATION Troubleshooting If the unit fails to operate...
... antenna. Make a proper input source selection. REMEDY Securely connect the power cord. If it cannot be defective. Connect using a coaxial cable. Cannot set . Current time is difficult to eliminate, but can be lessened by grounding AM loop antenna. TV or microprocessor is not connected or not completely connected. Unplug the AC power cord from AC outlet. The problem is not set timer. English ADDITIONAL INFORMATION Troubleshooting If the unit fails to operate...


