User Guide
Page 11
... air. The ozone produced is dependent on the photoreceptor will result in the Xerox installation procedures, ensure that concentration levels meet safe limits. If you need additional safety information concerning the WorkCentre or Xerox supplied materials, you may be burned. In the United States or Canada: ...1 - 800 - 828 - 6571 3 Providing the correct environmental parameter, as you may shorten the service life. Do not put your hands into the fuser area, as...
... air. The ozone produced is dependent on the photoreceptor will result in the Xerox installation procedures, ensure that concentration levels meet safe limits. If you need additional safety information concerning the WorkCentre or Xerox supplied materials, you may be burned. In the United States or Canada: ...1 - 800 - 828 - 6571 3 Providing the correct environmental parameter, as you may shorten the service life. Do not put your hands into the fuser area, as...
User Guide
Page 16
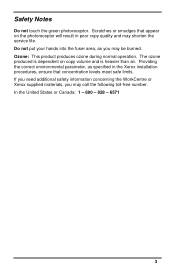
... if the fuser pins are not removed. Note: Ensure that the side cover is lowered (XD 104/ 130df/ 155df only). 9. Press the release lever to the Loading Paper section for additional information. • Do not fill above the max line. 8. Note: Misfeeds will be needed if the WorkCentre has to ...the paper tray button and the shipping screw in the locations shown. • Turn the paper tray button to be moved. 7. Load paper into the WorkCentre. Push the paper tray firmly back into the tray. • Refer to open the front cover. 8 CAUTION: Ensure that the alternate paper tray is...
... if the fuser pins are not removed. Note: Ensure that the side cover is lowered (XD 104/ 130df/ 155df only). 9. Press the release lever to the Loading Paper section for additional information. • Do not fill above the max line. 8. Note: Misfeeds will be needed if the WorkCentre has to ...the paper tray button and the shipping screw in the locations shown. • Turn the paper tray button to be moved. 7. Load paper into the WorkCentre. Push the paper tray firmly back into the tray. • Refer to open the front cover. 8 CAUTION: Ensure that the alternate paper tray is...
User Guide
Page 44
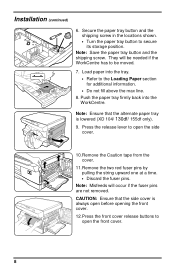
... result in the areas shown below to locate and clear the misfeed. Carefully remove the misfed paper in the display window. Remove the misfed paper. 5. Fuser Area Exit Area Paper Feed Area 36 Paper Feed Area Note: Ensure that the alternate paper tray is lowered (XD104/ 105f/ 130df/ 155df only). 1. Scratches... or smudges will flash in the direction shown. Close the access door. - Press the release lever to the Fuser Area. 6. Caution: Do not touch the shiny drum cartridge surface. Do not remove paper through the bypass.
... result in the areas shown below to locate and clear the misfeed. Carefully remove the misfed paper in the display window. Remove the misfed paper. 5. Fuser Area Exit Area Paper Feed Area 36 Paper Feed Area Note: Ensure that the alternate paper tray is lowered (XD104/ 105f/ 130df/ 155df only). 1. Scratches... or smudges will flash in the direction shown. Close the access door. - Press the release lever to the Fuser Area. 6. Caution: Do not touch the shiny drum cartridge surface. Do not remove paper through the bypass.

User Guide
Page 45
... is lowered (XD104 105f/ 130df/ 155df only). 1. Pull down on the fuser lever. • This will release pressure on the fuser lever. 5. Take care when removing paper from the fuser area. Unfused toner may adhere in the area, resulting in the direction shown. 4. Push up through the fusing unit. Caution: Do not pull...
... is lowered (XD104 105f/ 130df/ 155df only). 1. Pull down on the fuser lever. • This will release pressure on the fuser lever. 5. Take care when removing paper from the fuser area. Unfused toner may adhere in the area, resulting in the direction shown. 4. Push up through the fusing unit. Caution: Do not pull...

User Guide
Page 46
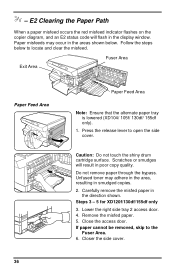
Turn the knob in the direction of the arrow to move the paper to open the front cover. 3. Gently pull the paper out through the exit area. 6. Press the front cover release buttons to 1 open the side cover. 2. Push up on the paper. 4. Close the front cover and side cover. 38 E2 Clearing the Paper Path (continued) Exit Area 2 Note: Ensure that the alternate paper tray is lowered (XD104/105f/130df/155df only). 1. Press the release lever to the exit area. 5. Pull down on the fuser lever. • This will release pressure on the fuser lever. 7. -
Turn the knob in the direction of the arrow to move the paper to open the front cover. 3. Gently pull the paper out through the exit area. 6. Press the front cover release buttons to 1 open the side cover. 2. Push up on the paper. 4. Close the front cover and side cover. 38 E2 Clearing the Paper Path (continued) Exit Area 2 Note: Ensure that the alternate paper tray is lowered (XD104/105f/130df/155df only). 1. Press the release lever to the exit area. 5. Pull down on the fuser lever. • This will release pressure on the fuser lever. 7. -


