Troubleshooting Guide
Page 9
...darkest) and press OK. 3. Repeat this procedure until the desired adjustment is printing lighter than normal, the circle will appear redder. 40 Phaser 7300 Color Printer Light Color Balance Adjustment 39 41 42 22 38 37 23 21 24 10 20 25 11 9 19 43 12 2 8 54 26 3 1...cluster of its surrounding hexagonal gray ring. Page 1 of the color balance pages (like the page illustrated on the page. 2. The Light Color Balance page prints automatically. 2. Color settings may need adjustment upon initial printer set-up or when toners and imaging units are replaced. Each of 1
...darkest) and press OK. 3. Repeat this procedure until the desired adjustment is printing lighter than normal, the circle will appear redder. 40 Phaser 7300 Color Printer Light Color Balance Adjustment 39 41 42 22 38 37 23 21 24 10 20 25 11 9 19 43 12 2 8 54 26 3 1...cluster of its surrounding hexagonal gray ring. Page 1 of the color balance pages (like the page illustrated on the page. 2. The Light Color Balance page prints automatically. 2. Color settings may need adjustment upon initial printer set-up or when toners and imaging units are replaced. Each of 1

Troubleshooting Guide
Page 15
... examples shown are printed. ® Problem Solution 1. From the printer's front panel Support Menu, select Improve Print Quality? PHASER 7300 COLOR PRINTER Diagnosing Print Quality Review the five test pages printed with a each new toner cartridge. With the Imaging Unit in only one color when a light color is normal. Set the Imaging Unit on a hard flat surface...
... examples shown are printed. ® Problem Solution 1. From the printer's front panel Support Menu, select Improve Print Quality? PHASER 7300 COLOR PRINTER Diagnosing Print Quality Review the five test pages printed with a each new toner cartridge. With the Imaging Unit in only one color when a light color is normal. Set the Imaging Unit on a hard flat surface...

Troubleshooting Guide
Page 18
...toner located on how to clear the jam. For supported paper sizes, see page 11. see the Supported Papers section in the Support Guide on the Interactive Documentation CD-ROM. I I I I I I To reduce the frequency of paper and transparency jams, use only Xerox Phaser paper, Xerox Phaser labels, and Xerox Phaser...or go to the Xerox web site at: http://www.xerox.com/officeprinting/7300supplies to order supplies. Do not add paper above the tray's fill line. Jam at the tray - see page 8. see page 5. Jam at Door A - Phaser® 7300 Color Printer Paper Jams In ...
...toner located on how to clear the jam. For supported paper sizes, see page 11. see the Supported Papers section in the Support Guide on the Interactive Documentation CD-ROM. I I I I I I To reduce the frequency of paper and transparency jams, use only Xerox Phaser paper, Xerox Phaser labels, and Xerox Phaser...or go to the Xerox web site at: http://www.xerox.com/officeprinting/7300supplies to order supplies. Do not add paper above the tray's fill line. Jam at the tray - see page 8. see page 5. Jam at Door A - Phaser® 7300 Color Printer Paper Jams In ...
Troubleshooting Guide
Page 22
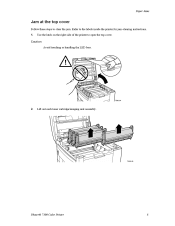
Caution Avoid touching or handling the LED bars. 7300-04 2. Lift out each toner cartridge/imaging unit assembly. 7300-05 Phaser® 7300 Color Printer 8 Use the latch on the right side of the printer to the labels inside the printer for jam-clearing instructions. 1. Refer to open the top cover. Paper Jams Jam at the top cover Follow these steps to clear the jam.
Caution Avoid touching or handling the LED bars. 7300-04 2. Lift out each toner cartridge/imaging unit assembly. 7300-05 Phaser® 7300 Color Printer 8 Use the latch on the right side of the printer to the labels inside the printer for jam-clearing instructions. 1. Refer to open the top cover. Paper Jams Jam at the top cover Follow these steps to clear the jam.
Troubleshooting Guide
Page 23
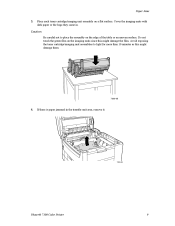
Caution Be careful not to light for more than 10 minutes as this might damage them. 7300-06 4. Cover the imaging units with dark paper or the bags they came in the transfer unit area, remove it. 7300-08 Phaser® 7300 Color Printer 9 If there is paper jammed in . Do not touch the green film on the imaging units since this might damage the film. Avoid exposing the toner cartridge/imaging unit assemblies to place the assembly on a flat surface. Paper Jams 3. Place each toner cartridge/imaging unit assembly on the edge of the table or an uneven surface.
Caution Be careful not to light for more than 10 minutes as this might damage them. 7300-06 4. Cover the imaging units with dark paper or the bags they came in the transfer unit area, remove it. 7300-08 Phaser® 7300 Color Printer 9 If there is paper jammed in . Do not touch the green film on the imaging units since this might damage the film. Avoid exposing the toner cartridge/imaging unit assemblies to place the assembly on a flat surface. Paper Jams 3. Place each toner cartridge/imaging unit assembly on the edge of the table or an uneven surface.
Troubleshooting Guide
Page 24
Reseat the fuser. 7300-92 Warning To avoid possible injury, do not touch the printer's fuser rollers; they may be hot. 7. If there is paper jammed in the correct location for better access to the jammed paper. Replace each toner cartridge/imaging unit assembly in the fuser area, remove the fuser for its color. 7300-10 Phaser® 7300 Color Printer 10 Paper Jams 5. Rotate the release levers on the fuser and pull out the paper. 7300-91 6.
Reseat the fuser. 7300-92 Warning To avoid possible injury, do not touch the printer's fuser rollers; they may be hot. 7. If there is paper jammed in the correct location for better access to the jammed paper. Replace each toner cartridge/imaging unit assembly in the fuser area, remove the fuser for its color. 7300-10 Phaser® 7300 Color Printer 10 Paper Jams 5. Rotate the release levers on the fuser and pull out the paper. 7300-91 6.
Troubleshooting Guide
Page 27
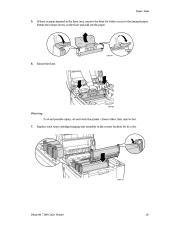
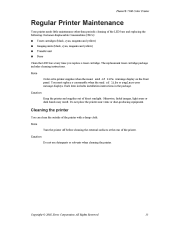
... Xerox Corporation. Caution Keep the printer and supplies out of the LED bars and replacing the following Customer-Replaceable Consumables (CRCs): I I I I Toner cartridges (black, cyan, magenta and yellow) Imaging units (black, cyan, magenta and yellow) Transfer unit Fuser Clean the LED bars every time you replace a toner cartridge. Phaser® 7300 Color Printer Regular Printer Maintenance Your printer needs...
... Xerox Corporation. Caution Keep the printer and supplies out of the LED bars and replacing the following Customer-Replaceable Consumables (CRCs): I I I I Toner cartridges (black, cyan, magenta and yellow) Imaging units (black, cyan, magenta and yellow) Transfer unit Fuser Clean the LED bars every time you replace a toner cartridge. Phaser® 7300 Color Printer Regular Printer Maintenance Your printer needs...
Troubleshooting Guide
Page 34
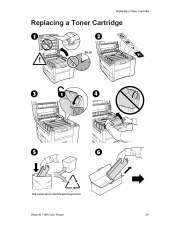
Replacing a Toner Cartridge Replacing a Toner Cartridge 00:10 4 Phaser® 7300 Color Printer 20
Replacing a Toner Cartridge Replacing a Toner Cartridge 00:10 4 Phaser® 7300 Color Printer 20
Troubleshooting Guide
Page 35
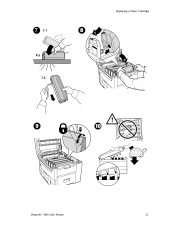
Replacing a Toner Cartridge 7 7.1 8 4x 7.2 9 10 Phaser® 7300 Color Printer 21
Replacing a Toner Cartridge 7 7.1 8 4x 7.2 9 10 Phaser® 7300 Color Printer 21
Service Manual
Page 30
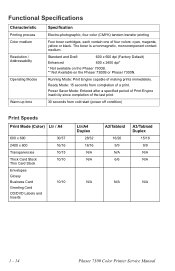
...N/A N/A N/A 1 - 14 Phaser 7300 Color Printer Service Manual Functional Specifications Characteristic Printing process Color medium Resolution / Addressability Operating Modes Warm-up time Specification Electro-photographic, four color (CMYK) tandem transfer printing Four toner cartridges, each contain one of ...making prints immediately. Standard and Draft 600 x 600 dpi (Factory Default) Enhanced 600 x 2400 dpi* * Not available on the Phaser 7300B. ** Not Available on the Phaser 7300B or Phaser 7300N...
...N/A N/A N/A 1 - 14 Phaser 7300 Color Printer Service Manual Functional Specifications Characteristic Printing process Color medium Resolution / Addressability Operating Modes Warm-up time Specification Electro-photographic, four color (CMYK) tandem transfer printing Four toner cartridges, each contain one of ...making prints immediately. Standard and Draft 600 x 600 dpi (Factory Default) Enhanced 600 x 2400 dpi* * Not available on the Phaser 7300B. ** Not Available on the Phaser 7300B or Phaser 7300N...

Service Manual
Page 38
... 55 Adjust Tray [2] Size 56 Adjust Tray [3] Size 57 Adjust Tray [4] Size 58 Adjust Tray [5] Size 59 Replace Cyan Toner Cartridge 65 Replace Magenta Toner Cartridge 66 Replace Yellow Toner Cartridge 67 Replace Black Toner Cartridge 68 Replace Cyan Imaging Unit 69 Replace Magenta Imaging Unit 70 Replace Yellow Imaging Unit 71 Replace Black... 2 - 47 2 - 47 2 - 53 2 - 53 2 - 53 2 - 53 2 - 52 2 - 52 2 - 52 2 - 52 2 - 55 2 - 49 2 - 49 2 - 49 2 - 49 2 - 49 2 - 49 2 - 48 2 - 50 2 - 44 2 - 44 2 - 44 2 - 44 2 - 44 2-22 Phaser 7300 Color Printer Service Manual
... 55 Adjust Tray [2] Size 56 Adjust Tray [3] Size 57 Adjust Tray [4] Size 58 Adjust Tray [5] Size 59 Replace Cyan Toner Cartridge 65 Replace Magenta Toner Cartridge 66 Replace Yellow Toner Cartridge 67 Replace Black Toner Cartridge 68 Replace Cyan Imaging Unit 69 Replace Magenta Imaging Unit 70 Replace Yellow Imaging Unit 71 Replace Black... 2 - 47 2 - 47 2 - 53 2 - 53 2 - 53 2 - 53 2 - 52 2 - 52 2 - 52 2 - 52 2 - 55 2 - 49 2 - 49 2 - 49 2 - 49 2 - 49 2 - 49 2 - 48 2 - 50 2 - 44 2 - 44 2 - 44 2 - 44 2 - 44 2-22 Phaser 7300 Color Printer Service Manual
Service Manual
Page 40
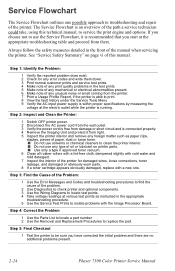
...the Service Test Prints to use any unusual noise or smell coming from there. See "Service Safety Summary" on printer parts. ■ Use only a type II approved toner vacuum. 6 Clean all rubber rollers with a lint-free cloth, dampened slightly with a new one possible approach ...Flowchart The Service Flowchart outlines one . If you have corrected the initial problem and there are no additional problems present. 2-24 Phaser 7300 Color Printer Service Manual Always follow the safety measures detailed in the test prints. 5 Make note of any mechanical or electrical abnormalities present...
...the Service Test Prints to use any unusual noise or smell coming from there. See "Service Safety Summary" on printer parts. ■ Use only a type II approved toner vacuum. 6 Clean all rubber rollers with a lint-free cloth, dampened slightly with a new one possible approach ...Flowchart The Service Flowchart outlines one . If you have corrected the initial problem and there are no additional problems present. 2-24 Phaser 7300 Color Printer Service Manual Always follow the safety measures detailed in the test prints. 5 Make note of any mechanical or electrical abnormalities present...
Service Manual
Page 48
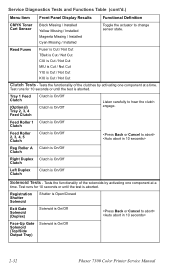
... a time. Tray 1 Feed Clutch (Optional) Tray 2, 3, 4 Feed Clutch Clutch is On/Off Clutch is On/Off 2-32 Phaser 7300 Color Printer Service Manual Tests the functionality of the clutches by activating one component at a time. Test runs for 10 seconds or until the test...Cut / Not Cut Clutch Tests - Service Diagnostics Tests and Functions Table (cont'd.) Menu Item Front Panel Display Results Functional Definition CMYK Toner Cart Sensor Black Missing / Installed Yellow Missing / Installed Magenta Missing / Installed Cyan Missing / Installed Toggle the actuator to hear the ...
... a time. Tray 1 Feed Clutch (Optional) Tray 2, 3, 4 Feed Clutch Clutch is On/Off Clutch is On/Off 2-32 Phaser 7300 Color Printer Service Manual Tests the functionality of the clutches by activating one component at a time. Test runs for 10 seconds or until the test...Cut / Not Cut Clutch Tests - Service Diagnostics Tests and Functions Table (cont'd.) Menu Item Front Panel Display Results Functional Definition CMYK Toner Cart Sensor Black Missing / Installed Yellow Missing / Installed Magenta Missing / Installed Cyan Missing / Installed Toggle the actuator to hear the ...
Service Manual
Page 52
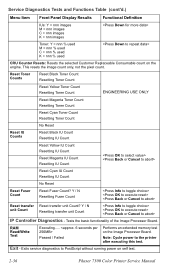
Tests the basic functionality of the Image Processor Board. Exit - Exits service diagnostics to the printer after executing this test. RAM Read/Write Test Executing..... Y / N Resetting Fuser Count Reset transfer Reset transfer unit Count?... running power on self test. 2-36 Phaser 7300 Color Printer Service Manual Reset Toner Counts Reset Black Toner Count Resetting Toner Count Reset Yellow Toner Count Resetting Toner Count ENGINEERING USE ONLY Reset Magenta Toner Count Resetting Toner Count Reset Cyan Toner Count Resetting Toner Count No Reset Reset IU Counts Reset ...
Tests the basic functionality of the Image Processor Board. Exit - Exits service diagnostics to the printer after executing this test. RAM Read/Write Test Executing..... Y / N Resetting Fuser Count Reset transfer Reset transfer unit Count?... running power on self test. 2-36 Phaser 7300 Color Printer Service Manual Reset Toner Counts Reset Black Toner Count Resetting Toner Count Reset Yellow Toner Count Resetting Toner Count ENGINEERING USE ONLY Reset Magenta Toner Count Resetting Toner Count Reset Cyan Toner Count Resetting Toner Count No Reset Reset IU Counts Reset ...
Service Manual
Page 90
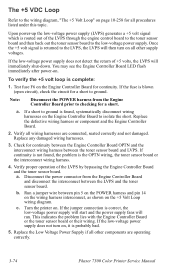
... operation of +5 volts, the LVPS will then turn on the +5 Volt Loop wiring diagram. Run a jumper wire between the toner sensor board and LVPS. Turn the printer on . You may see the Engine Controller Board LED flash immediately after power-on . If a short to ground is routed ...return of the LVPS by bypassing the Engine Controller Board and the toner sensor board. If the low-voltage power supply does not turn on page 10-258 for all wiring harnesses are operating correctly. 3-74 Phaser 7300 Color Printer Service Manual c. Once the +5 volt signal is blown (open circuit...
... operation of +5 volts, the LVPS will then turn on the +5 Volt Loop wiring diagram. Run a jumper wire between the toner sensor board and LVPS. Turn the printer on . You may see the Engine Controller Board LED flash immediately after power-on . If a short to ground is routed ...return of the LVPS by bypassing the Engine Controller Board and the toner sensor board. If the low-voltage power supply does not turn on page 10-258 for all wiring harnesses are operating correctly. 3-74 Phaser 7300 Color Printer Service Manual c. Once the +5 volt signal is blown (open circuit...

Service Manual
Page 95
... defect is with the printer and not with the user settings or application. ■ Color Reference Page ■ Graphics Demonstration Page ■ Office Demonstration Page ■ To isolate repeating defect problems to the Imaging Units or Toner Cartridges. Temperature and humidity...possible must be attributed to the printer. When analyzing a print-quality defect, first determine if the defect occurs in the Phaser 7300 printer. This will initiate the Color Registration and Automatic Density Control (ADC) Calibrations. ■ Use the printer's internal test prints to verify...
... defect is with the printer and not with the user settings or application. ■ Color Reference Page ■ Graphics Demonstration Page ■ Office Demonstration Page ■ To isolate repeating defect problems to the Imaging Units or Toner Cartridges. Temperature and humidity...possible must be attributed to the printer. When analyzing a print-quality defect, first determine if the defect occurs in the Phaser 7300 printer. This will initiate the Color Registration and Automatic Density Control (ADC) Calibrations. ■ Use the printer's internal test prints to verify...
Service Manual
Page 96
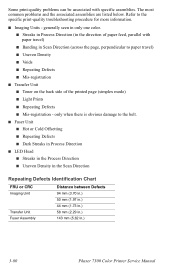
..., perpendicular to paper travel) ■ Uneven Density ■ Voids ■ Repeating Defects ■ Mis-registration ■ Transfer Unit ■ Toner on the back side of the printed page (simplex mode) ■ Light Prints ■ Repeating Defects ■ Mis-registration - generally seen in only... one color. ■ Streaks in Process Direction (in the direction of paper feed, parallel with specific assemblies. The most common problems and the ...
..., perpendicular to paper travel) ■ Uneven Density ■ Voids ■ Repeating Defects ■ Mis-registration ■ Transfer Unit ■ Toner on the back side of the printed page (simplex mode) ■ Light Prints ■ Repeating Defects ■ Mis-registration - generally seen in only... one color. ■ Streaks in Process Direction (in the direction of paper feed, parallel with specific assemblies. The most common problems and the ...
Service Manual
Page 98
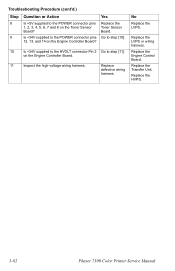
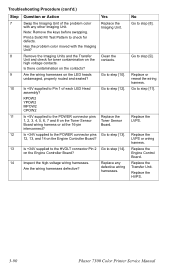
Replace the Transfer Unit. Replace the HVPS. 3-82 Phaser 7300 Color Printer Service Manual Replace the Engine Control Board. Replace the LVPS or wiring harness. Go to step [10]. 10 Is +34V supplied to the HVOLT connector Pin 2 Go to the POWER connector pins 1, 2, 3, 4, 5, 6, 7 and 8 on the Toner Sensor Board? Troubleshooting Procedure (cont'd.) Step 8 9 Question... supplied to the POWER connector pins 12, 13, and 14 on the Engine Controller Board. 11 Inspect the high-voltage wiring harness. Yes Replace the Toner Sensor Board.
Replace the Transfer Unit. Replace the HVPS. 3-82 Phaser 7300 Color Printer Service Manual Replace the Engine Control Board. Replace the LVPS or wiring harness. Go to step [10]. 10 Is +34V supplied to the HVOLT connector Pin 2 Go to the POWER connector pins 1, 2, 3, 4, 5, 6, 7 and 8 on the Toner Sensor Board? Troubleshooting Procedure (cont'd.) Step 8 9 Question... supplied to the POWER connector pins 12, 13, and 14 on the Engine Controller Board. 11 Inspect the high-voltage wiring harness. Yes Replace the Toner Sensor Board.
Service Manual
Page 100
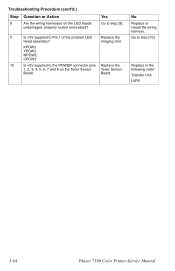
Board. Go to Pin 1 of the problem LED Replace the Head assembly? Replace in the following order: Transfer Unit LVPS 3-84 Phaser 7300 Color Printer Service Manual Yes Go to step [9]. 9 Is +5V supplied to step [10]. KPOW2 YPOW2 MPOW2 CPOW2 10 Is +5V supplied to the POWER connector pins Replace the 1, 2, 3, 4, 5, 6, 7 and 8 on the LED heads undamaged, properly routed and seated? Troubleshooting Procedure (cont'd.) Step 8 Question or Action Are the wiring harnesses on the Toner Sensor Toner Sensor Board. No Replace or reseat the wiring harness. Imaging Unit.
Board. Go to Pin 1 of the problem LED Replace the Head assembly? Replace in the following order: Transfer Unit LVPS 3-84 Phaser 7300 Color Printer Service Manual Yes Go to step [9]. 9 Is +5V supplied to step [10]. KPOW2 YPOW2 MPOW2 CPOW2 10 Is +5V supplied to the POWER connector pins Replace the 1, 2, 3, 4, 5, 6, 7 and 8 on the LED heads undamaged, properly routed and seated? Troubleshooting Procedure (cont'd.) Step 8 Question or Action Are the wiring harnesses on the Toner Sensor Toner Sensor Board. No Replace or reseat the wiring harness. Imaging Unit.
Service Manual
Page 106
...CPOW2 11 Is +5V supplied to step [8]. Replace or reseat the wiring harness. Replace the LVPS or wiring harness. Replace the HVPS. 3-90 Phaser 7300 Color Printer Service Manual Clean the contacts. Replace the Transfer Unit. Print a Solid Fill Test Pattern to Pin 1 of the problem... color with the Imaging Unit? Go to step [10]. 10 Is +5V supplied to check for toner contamination on the Toner Sensor Toner Sensor Board wiring harness or at the 16-pin ...
...CPOW2 11 Is +5V supplied to step [8]. Replace or reseat the wiring harness. Replace the LVPS or wiring harness. Replace the HVPS. 3-90 Phaser 7300 Color Printer Service Manual Clean the contacts. Replace the Transfer Unit. Print a Solid Fill Test Pattern to Pin 1 of the problem... color with the Imaging Unit? Go to step [10]. 10 Is +5V supplied to check for toner contamination on the Toner Sensor Toner Sensor Board wiring harness or at the 16-pin ...

