Troubleshooting Guide
Page 2
..., licensed exclusively through X/Open Company Limited. Antique Olive® is a registered trademark in TrueType® format is a trademark of Xerox Corporation. Sun® and Sun Microsystems® are registered U.S. The ENERGY STAR name and logo are registered trademarks of the companies ...trademark of copyrightable materials and information now allowed by John Halleck, which are four- Hoefler Text was designed by the Phaser 7300 Color Printer are displayed on this product meets the ENERGY STAR guidelines for SHA-1 written by statutory or judicial law or hereinafter ...
..., licensed exclusively through X/Open Company Limited. Antique Olive® is a registered trademark in TrueType® format is a trademark of Xerox Corporation. Sun® and Sun Microsystems® are registered U.S. The ENERGY STAR name and logo are registered trademarks of the companies ...trademark of copyrightable materials and information now allowed by John Halleck, which are four- Hoefler Text was designed by the Phaser 7300 Color Printer are displayed on this product meets the ENERGY STAR guidelines for SHA-1 written by statutory or judicial law or hereinafter ...
Troubleshooting Guide
Page 4
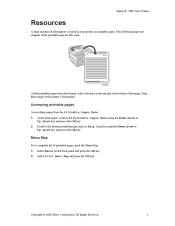
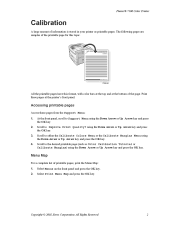
...Scroll to the Printable Pages Menu using the Down Arrow or Up Arrow key and press the OK key. Phaser® 7300 Color Printer Resources A large amount of printable pages, print the Menu Map: 1. 2. The following pages are samples of...of the printable page for this topic. 7300-58 All the printable pages have this format, with color bars at the top and at the printer's front panel. Select Print Menu Map and press the OK key. Menu Map For a complete list...At the front panel, scroll to the desired printable page (such as printable pages. Copyright © 2002 Xerox Corporation.
...Scroll to the Printable Pages Menu using the Down Arrow or Up Arrow key and press the OK key. Phaser® 7300 Color Printer Resources A large amount of printable pages, print the Menu Map: 1. 2. The following pages are samples of...of the printable page for this topic. 7300-58 All the printable pages have this format, with color bars at the top and at the printer's front panel. Select Print Menu Map and press the OK key. Menu Map For a complete list...At the front panel, scroll to the desired printable page (such as printable pages. Copyright © 2002 Xerox Corporation.
Troubleshooting Guide
Page 5
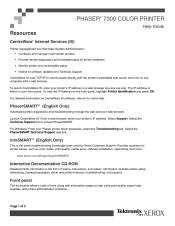
... knowledge base used by Xerox Customer Support. Launch CentreWare IS: From a web browser, enter your Phaser printer driver properties, select the Troubleshooting tab. www.xerox.com/officeprinting/infoSMART Interactive Documentation CD-ROM Detailed printer information in a web ...a web browser. PHASER 7300 COLOR PRINTER Help Guide ® Resources CentreWare® Internet Services (IS) Printer management tool that helps System Administrators: • Configure and manage multi-vendor printers. • Provide remote diagnostics and troubleshooting for printer issues, such as...
... knowledge base used by Xerox Customer Support. Launch CentreWare IS: From a web browser, enter your Phaser printer driver properties, select the Troubleshooting tab. www.xerox.com/officeprinting/infoSMART Interactive Documentation CD-ROM Detailed printer information in a web ...a web browser. PHASER 7300 COLOR PRINTER Help Guide ® Resources CentreWare® Internet Services (IS) Printer management tool that helps System Administrators: • Configure and manage multi-vendor printers. • Provide remote diagnostics and troubleshooting for printer issues, such as...
Troubleshooting Guide
Page 8
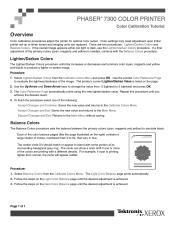
... press the OK key. Copyright © 2002 Xerox Corporation. Accessing printable pages Access these pages at the bottom of the page. Scroll to Improve Print Quality? Menu Map For a complete list of information is stored in your printer as Color Calibration Tutorial or Calibrate Margins) using the Down ...Arrow or Up Arrow key and press the OK key. Select Print Menu Map and press the OK key. Phaser® 7300 Color Printer Calibration A large amount of printable pages, print the Menu Map: 1. 2. using the Down Arrow or Up Arrow key and press the...
... press the OK key. Copyright © 2002 Xerox Corporation. Accessing printable pages Access these pages at the bottom of the page. Scroll to Improve Print Quality? Menu Map For a complete list of information is stored in your printer as Color Calibration Tutorial or Calibrate Margins) using the Down ...Arrow or Up Arrow key and press the OK key. Select Print Menu Map and press the OK key. Phaser® 7300 Color Printer Calibration A large amount of printable pages, print the Menu Map: 1. 2. using the Down Arrow or Up Arrow key and press the...
Troubleshooting Guide
Page 9
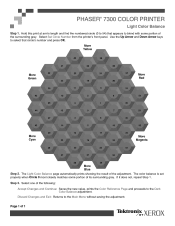
... match or appear to evaluate the lightness/darkness of 1 Follow the steps on the Dark Color Balance page until the desired adjustment is printing lighter than normal, the circle will appear redder. 40 Phaser 7300 Color Printer Light Color Balance Adjustment 39 41 42 22 38 37 23 21 24 10 20 25 11 9 19...
... match or appear to evaluate the lightness/darkness of 1 Follow the steps on the Dark Color Balance page until the desired adjustment is printing lighter than normal, the circle will appear redder. 40 Phaser 7300 Color Printer Light Color Balance Adjustment 39 41 42 22 38 37 23 21 24 10 20 25 11 9 19...
Troubleshooting Guide
Page 10
... and find the numbered circle (0 to blend with some portion of the following: Accept Changes and Continue: Saves the new value, prints the Color Reference Page and proceeds to the Main Menu without saving the adjustment. Use the Up Arrow and Down Arrow keys to select that appears to... 29 16 33 More Magenta 51 30 32 47 31 50 48 49 More Blue Step 2. The color balance is set properly when Circle 0 most closely matches some portion of 1 Step 3. PHASER 7300 COLOR PRINTER Light Color Balance Step 1. Select one of its surrounding gray. If it does not, repeat Step 1. The ...
... and find the numbered circle (0 to blend with some portion of the following: Accept Changes and Continue: Saves the new value, prints the Color Reference Page and proceeds to the Main Menu without saving the adjustment. Use the Up Arrow and Down Arrow keys to select that appears to... 29 16 33 More Magenta 51 30 32 47 31 50 48 49 More Blue Step 2. The color balance is set properly when Circle 0 most closely matches some portion of 1 Step 3. PHASER 7300 COLOR PRINTER Light Color Balance Step 1. Select one of its surrounding gray. If it does not, repeat Step 1. The ...
Troubleshooting Guide
Page 11
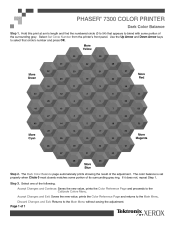
... Exit: Returns to the Main Menu. Hold this print at arm's length and find the numbered circle (0 to the Calibrate Colors Menu. The Dark Color Balance page automatically prints showing the result of 1 Step 3. Accept Changes and Exit: Saves the new value, prints the... surrounding gray. The color balance is set properly when Circle 0 most closely matches some portion of the following: Accept Changes and Continue: Saves the new value, prints the Color Reference Page and proceeds to 54) that circle's number and press OK. PHASER 7300 COLOR PRINTER Dark Color Balance Step 1. Select...
... Exit: Returns to the Main Menu. Hold this print at arm's length and find the numbered circle (0 to the Calibrate Colors Menu. The Dark Color Balance page automatically prints showing the result of 1 Step 3. Accept Changes and Exit: Saves the new value, prints the... surrounding gray. The color balance is set properly when Circle 0 most closely matches some portion of the following: Accept Changes and Continue: Saves the new value, prints the Color Reference Page and proceeds to 54) that circle's number and press OK. PHASER 7300 COLOR PRINTER Dark Color Balance Step 1. Select...

Troubleshooting Guide
Page 12
... OK to print this page to verify the adjustment. ® You can be moved (-40 to move right. B+ Phaser 7700 Color Printer Phaser 7700 Color Printer Calibrate Margins Phaser 7700 Color Printer Calibrate Margins Phaser 7700 Color Printer Calibrate Margins Calibrate Margins A- Phaser 7300 Cal Phaser 7300 B - + Cal A - PHASER 7300 COLOR PRINTER Calibrate for Margins (Long-Edge Feed) The Calibrate Margins Menu allows you to adjust the...
... OK to print this page to verify the adjustment. ® You can be moved (-40 to move right. B+ Phaser 7700 Color Printer Phaser 7700 Color Printer Calibrate Margins Phaser 7700 Color Printer Calibrate Margins Phaser 7700 Color Printer Calibrate Margins Calibrate Margins A- Phaser 7300 Cal Phaser 7300 B - + Cal A - PHASER 7300 COLOR PRINTER Calibrate for Margins (Long-Edge Feed) The Calibrate Margins Menu allows you to adjust the...

Troubleshooting Guide
Page 13
...2 solid lines until they align with the Side 1 rectangle. Reprint to the Calibrate Margins Menu and press OK. B - PHASER 7300 COLOR PRINTER Calibrate for Margins (Short-Edge Feed) The Calibrate Margins Menu allows you , hold the print up . Step 2. Adjust Side... the edges of the rectangle's dashed lines is shown as illustrated below. 4. A+ Phaser 7700 Color Printer Phaser 7700 Color Printer Calibrate Margins Calibrate Margins Phaser 7700 Color Printer Calibrate Margins Phaser 7700 Color Printer Calibrate Margins ® B- To move the dashed rectangle to the position you want...
...2 solid lines until they align with the Side 1 rectangle. Reprint to the Calibrate Margins Menu and press OK. B - PHASER 7300 COLOR PRINTER Calibrate for Margins (Short-Edge Feed) The Calibrate Margins Menu allows you , hold the print up . Step 2. Adjust Side... the edges of the rectangle's dashed lines is shown as illustrated below. 4. A+ Phaser 7700 Color Printer Phaser 7700 Color Printer Calibrate Margins Calibrate Margins Phaser 7700 Color Printer Calibrate Margins Phaser 7700 Color Printer Calibrate Margins ® B- To move the dashed rectangle to the position you want...

Troubleshooting Guide
Page 14
Phaser® 7300 Color Printer Diagnosing Print Quality A large amount of printable pages, print the Menu Map: 1. 2. Print these pages from the Printable Pages Menu: 1. 2. Select Print Menu Map and press the OK key. Copyright © 2002 Xerox Corporation. At the...Arrow key and press the OK key. Menu Map For a complete list of information is stored in your printer as Diagnosing Print Quality) using the Down Arrow or Up Arrow key and press the OK key. All... topic. 7300-58 All the printable pages have this format, with color bars at the top and at the printer's front panel.
Phaser® 7300 Color Printer Diagnosing Print Quality A large amount of printable pages, print the Menu Map: 1. 2. Print these pages from the Printable Pages Menu: 1. 2. Select Print Menu Map and press the OK key. Copyright © 2002 Xerox Corporation. At the...Arrow key and press the OK key. Menu Map For a complete list of information is stored in your printer as Diagnosing Print Quality) using the Down Arrow or Up Arrow key and press the OK key. All... topic. 7300-58 All the printable pages have this format, with color bars at the top and at the printer's front panel.

Troubleshooting Guide
Page 15
... the shiny green surface underneath. Adjust the light or darkness levels. then select Calibrate Colors Menu, then select Print Tutorial Page. Caution: Do not leave the top cover open for the problem color, keeping the toner cartridge installed. PHASER 7300 COLOR PRINTER Diagnosing Print Quality Review the five test pages printed with a each new toner...
... the shiny green surface underneath. Adjust the light or darkness levels. then select Calibrate Colors Menu, then select Print Tutorial Page. Caution: Do not leave the top cover open for the problem color, keeping the toner cartridge installed. PHASER 7300 COLOR PRINTER Diagnosing Print Quality Review the five test pages printed with a each new toner...

Troubleshooting Guide
Page 18
... Tray. Use clean, undamaged paper. Do not add paper above the tray's fill line. Phaser® 7300 Color Printer Paper Jams In addition to information on the Interactive Documentation CD-ROM or go to the Xerox web site at : www.xerox.com/officeprinting/7300support/ Preventing jams I To reduce the frequency of paper and transparency jams...
... Tray. Use clean, undamaged paper. Do not add paper above the tray's fill line. Phaser® 7300 Color Printer Paper Jams In addition to information on the Interactive Documentation CD-ROM or go to the Xerox web site at : www.xerox.com/officeprinting/7300support/ Preventing jams I To reduce the frequency of paper and transparency jams...

Troubleshooting Guide
Page 19
... occur most often under these steps to the labels inside the printer for the paper. The paper is loaded above the tray's fill line. The tray is not supported by the paper tray. Phaser® 7300 Color Printer 5 Refer to clear the jam. The paper does not meet... specifications. Jam at Door A Follow these conditions: I I I I I I I An incorrect paper type was selected in the printer driver. Open the door labeled A on the right...
... occur most often under these steps to the labels inside the printer for the paper. The paper is loaded above the tray's fill line. The tray is not supported by the paper tray. Phaser® 7300 Color Printer 5 Refer to clear the jam. The paper does not meet... specifications. Jam at Door A Follow these conditions: I I I I I I I An incorrect paper type was selected in the printer driver. Open the door labeled A on the right...
Troubleshooting Guide
Page 20
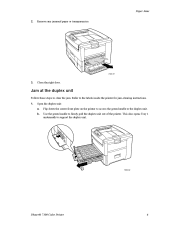
Close the right door. Jam at the duplex unit Follow these steps to the labels inside the printer for jam-clearing instructions. 1. Open the duplex unit: a. b. Refer to clear the jam. Flip down the center front plate on the printer to access the green handle to firmly pull the duplex unit out of the printer. Use the green handle to the duplex unit. This also opens Tray 1 underneath to support the duplex unit. 7300-02 Phaser® 7300 Color Printer 6 Paper Jams 2. Remove any jammed paper or transparencies. 7300-57 3.
Close the right door. Jam at the duplex unit Follow these steps to the labels inside the printer for jam-clearing instructions. 1. Open the duplex unit: a. b. Refer to clear the jam. Flip down the center front plate on the printer to access the green handle to firmly pull the duplex unit out of the printer. Use the green handle to the duplex unit. This also opens Tray 1 underneath to support the duplex unit. 7300-02 Phaser® 7300 Color Printer 6 Paper Jams 2. Remove any jammed paper or transparencies. 7300-57 3.
Troubleshooting Guide
Page 21
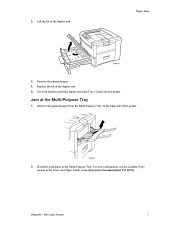
Use both hands to push the duplex unit (and Tray 1) back into the printer. Phaser® 7300 Color Printer 7 Lift the lid of the duplex unit. Jam at the Multi-Purpose Tray 1. For more information, see the Loading Trays section in the Multi-Purpose Tray. Replace the lid of the duplex unit. 7300-56 3. 4. 5. If needed, load paper in the Trays and Paper Guide on the right side of the printer. 7300-03 2. Remove the jammed paper. Remove the jammed paper from the Multi-Purpose Tray on the Interactive Documentation CD-ROM. Paper Jams 2.
Use both hands to push the duplex unit (and Tray 1) back into the printer. Phaser® 7300 Color Printer 7 Lift the lid of the duplex unit. Jam at the Multi-Purpose Tray 1. For more information, see the Loading Trays section in the Multi-Purpose Tray. Replace the lid of the duplex unit. 7300-56 3. 4. 5. If needed, load paper in the Trays and Paper Guide on the right side of the printer. 7300-03 2. Remove the jammed paper. Remove the jammed paper from the Multi-Purpose Tray on the Interactive Documentation CD-ROM. Paper Jams 2.
Troubleshooting Guide
Page 22
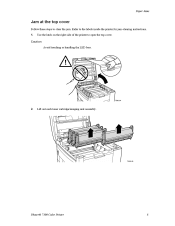
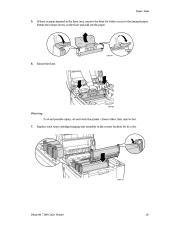
Lift out each toner cartridge/imaging unit assembly. 7300-05 Phaser® 7300 Color Printer 8 Use the latch on the right side of the printer to clear the jam. Caution Avoid touching or handling the LED bars. 7300-04 2. Paper Jams Jam at the top cover Follow these steps to open the top cover. Refer to the labels inside the printer for jam-clearing instructions. 1.
Lift out each toner cartridge/imaging unit assembly. 7300-05 Phaser® 7300 Color Printer 8 Use the latch on the right side of the printer to clear the jam. Caution Avoid touching or handling the LED bars. 7300-04 2. Paper Jams Jam at the top cover Follow these steps to open the top cover. Refer to the labels inside the printer for jam-clearing instructions. 1.
Troubleshooting Guide
Page 23
Place each toner cartridge/imaging unit assembly on the edge of the table or an uneven surface. If there is paper jammed in . Do not touch the green film on the imaging units since this might damage the film. Caution Be careful not to light for more than 10 minutes as this might damage them. 7300-06 4. Avoid exposing the toner cartridge/imaging unit assemblies to place the assembly on a flat surface. Cover the imaging units with dark paper or the bags they came in the transfer unit area, remove it. 7300-08 Phaser® 7300 Color Printer 9 Paper Jams 3.
Place each toner cartridge/imaging unit assembly on the edge of the table or an uneven surface. If there is paper jammed in . Do not touch the green film on the imaging units since this might damage the film. Caution Be careful not to light for more than 10 minutes as this might damage them. 7300-06 4. Avoid exposing the toner cartridge/imaging unit assemblies to place the assembly on a flat surface. Cover the imaging units with dark paper or the bags they came in the transfer unit area, remove it. 7300-08 Phaser® 7300 Color Printer 9 Paper Jams 3.
Troubleshooting Guide
Page 24
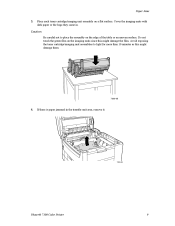
they may be hot. 7. Reseat the fuser. 7300-92 Warning To avoid possible injury, do not touch the printer's fuser rollers; If there is paper jammed in the correct location for better access to the jammed paper. Paper Jams 5. Replace each toner cartridge/imaging unit assembly in the fuser area, remove the fuser for its color. 7300-10 Phaser® 7300 Color Printer 10 Rotate the release levers on the fuser and pull out the paper. 7300-91 6.
they may be hot. 7. Reseat the fuser. 7300-92 Warning To avoid possible injury, do not touch the printer's fuser rollers; If there is paper jammed in the correct location for better access to the jammed paper. Paper Jams 5. Replace each toner cartridge/imaging unit assembly in the fuser area, remove the fuser for its color. 7300-10 Phaser® 7300 Color Printer 10 Rotate the release levers on the fuser and pull out the paper. 7300-91 6.
Troubleshooting Guide
Page 25
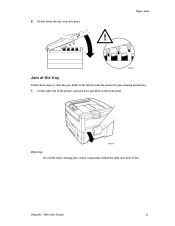
Slowly lower the top cover into place. 7300-11 Jam at the tray Follow these steps to the labels inside the printer for jam-clearing instructions. 1. On the right side of the printer, open the door specified on the front panel. 7300-01 Warning Be careful when clearing jams. Some components behind the right door may be hot. Refer to clear the jam. Paper Jams 8. Phaser® 7300 Color Printer 11
Slowly lower the top cover into place. 7300-11 Jam at the tray Follow these steps to the labels inside the printer for jam-clearing instructions. 1. On the right side of the printer, open the door specified on the front panel. 7300-01 Warning Be careful when clearing jams. Some components behind the right door may be hot. Refer to clear the jam. Paper Jams 8. Phaser® 7300 Color Printer 11
Troubleshooting Guide
Page 26
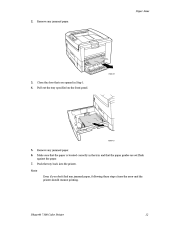
Paper Jams 2. Remove any jammed paper, following these steps clears the error and the printer should resume printing. Phaser® 7300 Color Printer 12 Note Even if you opened in the tray and that you don't find any jammed paper. Push the tray back into the printer. Remove any jammed paper. 7300-57 3. 4. Make sure that the paper is located correctly in Step 1. Pull out the tray specified on the front panel. 7300-13 5. 6. 7. Close the door that the paper guides are set flush against the paper.
Paper Jams 2. Remove any jammed paper, following these steps clears the error and the printer should resume printing. Phaser® 7300 Color Printer 12 Note Even if you opened in the tray and that you don't find any jammed paper. Push the tray back into the printer. Remove any jammed paper. 7300-57 3. 4. Make sure that the paper is located correctly in Step 1. Pull out the tray specified on the front panel. 7300-13 5. 6. 7. Close the door that the paper guides are set flush against the paper.


