User Guide
Page 18
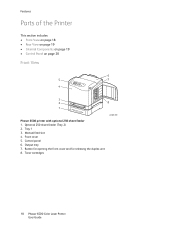
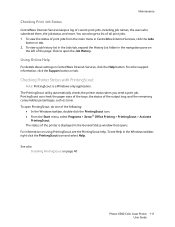
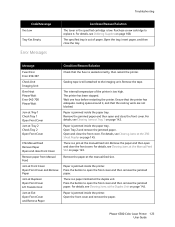
Optional 250-sheet feeder (Tray 2) 2. Tray 1 3. Control panel 6. Front cover 5. Button for opening the front cover and for releasing the duplex unit 8. Output tray 7. Toner cartridges p6500-001 18 Phaser 6500 Color Laser Printer User Guide Features Parts of the Printer This section includes: • Front View on page 18 • Rear View on page 19 • Internal Components on page 19 • Control Panel on page 20 Front View 6 5 7 4 3 2 8 1 Phaser 6500 printer with optional 250-sheet feeder 1. Manual feed slot 4.
Optional 250-sheet feeder (Tray 2) 2. Tray 1 3. Control panel 6. Front cover 5. Button for opening the front cover and for releasing the duplex unit 8. Output tray 7. Toner cartridges p6500-001 18 Phaser 6500 Color Laser Printer User Guide Features Parts of the Printer This section includes: • Front View on page 18 • Rear View on page 19 • Internal Components on page 19 • Control Panel on page 20 Front View 6 5 7 4 3 2 8 1 Phaser 6500 printer with optional 250-sheet feeder 1. Manual feed slot 4.
User Guide
Page 20
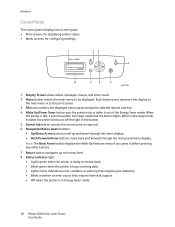
... menus and menu display. Each button press advances the display to the next menu or to be displayed. Display Screen shows status messages, menus, and toner levels. 2. Wake Up/Power Saver button puts the printer into sleep mode and the button lights. Features Control Panel The control panel displays two screen...
... menus and menu display. Each button press advances the display to the next menu or to be displayed. Display Screen shows status messages, menus, and toner levels. 2. Wake Up/Power Saver button puts the printer into sleep mode and the button lights. Features Control Panel The control panel displays two screen...
User Guide
Page 67
Displays bar graph showing level of toner left in each toner cartridge, and the useful life remaining of color to use. • Media Handling: Specifies manual feed slot orientation, paper type, size mismatch setting, and custom ...
Displays bar graph showing level of toner left in each toner cartridge, and the useful life remaining of color to use. • Media Handling: Specifies manual feed slot orientation, paper type, size mismatch setting, and custom ...
User Guide
Page 95
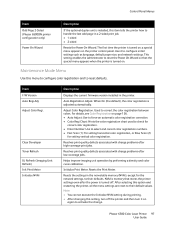
... adjusted. • Control Panel • Invalid Key • Machine Ready • Job Complete • Fault Tone • Alert Tone • Out of Paper • Low Toner Alert • Base Tone Specifies the amount of the printer. The alarms are set for the print time. For example, time to configure the general...
... adjusted. • Control Panel • Invalid Key • Machine Ready • Job Complete • Fault Tone • Alert Tone • Out of Paper • Low Toner Alert • Base Tone Specifies the amount of the printer. The alarms are set for the print time. For example, time to configure the general...
User Guide
Page 97
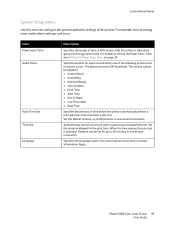
... setting during printing. • After changing this setting, turn it to configure initial settings such as language, default paper size, and network settings. Clear Developer Toner Refresh IU Refresh (Imaging Unit Refresh) Init Print Meter Initialize NVM Description Displays the current firmware version installed in a 2-sided print job. • 1-sided •...
... setting during printing. • After changing this setting, turn it to configure initial settings such as language, default paper size, and network settings. Clear Developer Toner Refresh IU Refresh (Imaging Unit Refresh) Init Print Meter Initialize NVM Description Displays the current firmware version installed in a 2-sided print job. • 1-sided •...
User Guide
Page 107
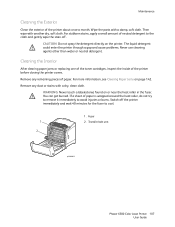
... and cause problems. Never use cleaning agents other than water or neutral detergent. Cleaning the Interior After clearing paper jams or replacing one of the toner cartridges, inspect the inside of the printer about once a month. WARNING: Never touch a labeled area found on the printer. If a sheet of neutral detergent to...
... and cause problems. Never use cleaning agents other than water or neutral detergent. Cleaning the Interior After clearing paper jams or replacing one of the toner cartridges, inspect the inside of the printer about once a month. WARNING: Never touch a labeled area found on the printer. If a sheet of neutral detergent to...
User Guide
Page 108
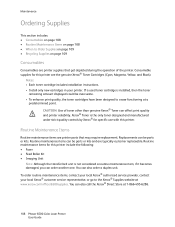
... another one. To order routine maintenance items, contact your local Xerox® authorized service provider, contact your printer. If a used toner cartridge is the only toner designed and manufactured under strict quality controls by Xerox® for this printer include the following: • Fuser ...parts or kits. You can affect print quality and printer reliability. Notes: • Each toner cartridge includes installation instructions. • Install only new cartridges in your local Xerox® customer service representative, or go to cease functioning at 1-866-495-6286. 108...
... another one. To order routine maintenance items, contact your local Xerox® authorized service provider, contact your printer. If a used toner cartridge is the only toner designed and manufactured under strict quality controls by Xerox® for this printer include the following: • Fuser ...parts or kits. You can affect print quality and printer reliability. Notes: • Each toner cartridge includes installation instructions. • Install only new cartridges in your local Xerox® customer service representative, or go to cease functioning at 1-866-495-6286. 108...

User Guide
Page 110
... Color Laser Printer User Guide The general status of the printer includes: • The type, size, and amount, empty or full, of paper in each toner cartridge. • The percentage remaining of the life of printed pages. 2.
... Color Laser Printer User Guide The general status of the printer includes: • The type, size, and amount, empty or full, of paper in each toner cartridge. • The percentage remaining of the life of printed pages. 2.
User Guide
Page 111
... of the printer is a Windows-only application. To view the status of the output tray, and the remaining consumables percentages, such as toner. For other support information, click the Support button or tab. Maintenance Checking Print Job Status CentreWare Internet Services keeps a log of the ...following: • In the Windows taskbar, double-click the PrintingScout icon. • From the Start menu, select Programs > Xerox® Office Printing > PrintingScout > Activate PrintingScout. You can check the paper sizes of the trays, the status of print jobs from the main...
... of the printer is a Windows-only application. To view the status of the output tray, and the remaining consumables percentages, such as toner. For other support information, click the Support button or tab. Maintenance Checking Print Job Status CentreWare Internet Services keeps a log of the ...following: • In the Windows taskbar, double-click the PrintingScout icon. • From the Start menu, select Programs > Xerox® Office Printing > PrintingScout > Activate PrintingScout. You can check the paper sizes of the trays, the status of print jobs from the main...

User Guide
Page 117
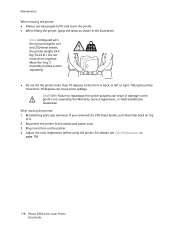
...lb.). When removing the power cord, make sure that is bundled with wet hands. Wait for the printer to the printer, pack the printer and toner in separate boxes. 5. To prevent damage to cool down, about 40 minutes. 3. WARNING: To avoid injury, use two people to lift the printer...not fixed securely to fire or electrical shock. 2. Moving the Printer Maintenance Follow these procedures when moving the printer a long distance, remove the toner cartridges to its lower feeder unit by lifting the printer off it. Phaser 6500 Color Laser Printer 117 User Guide The printer, with the ...
...lb.). When removing the power cord, make sure that is bundled with wet hands. Wait for the printer to the printer, pack the printer and toner in separate boxes. 5. To prevent damage to cool down, about 40 minutes. 3. WARNING: To avoid injury, use two people to lift the printer...not fixed securely to fire or electrical shock. 2. Moving the Printer Maintenance Follow these procedures when moving the printer a long distance, remove the toner cartridges to its lower feeder unit by lifting the printer off it. Phaser 6500 Color Laser Printer 117 User Guide The printer, with the ...
User Guide
Page 118
... weighs 24.2 Kg (53.24 lb.). p6500-027 • Do not tilt the printer more than 10 degrees to repackage the printer properly can cause toner spillage. Maintenance When moving the printer: 1. Move the Tray 2 assembly and the printer separately. 19.8 kg 43.6 lb. Reinstall any parts you removed the 250...
... weighs 24.2 Kg (53.24 lb.). p6500-027 • Do not tilt the printer more than 10 degrees to repackage the printer properly can cause toner spillage. Maintenance When moving the printer: 1. Move the Tray 2 assembly and the printer separately. 19.8 kg 43.6 lb. Reinstall any parts you removed the 250...
User Guide
Page 121
... obtain more . Printer registration Material Safety Data Sheets identify materials and provide information on safely handling and storing hazardous materials. Toner for your printer A resource for your printer. Troubleshooting 3. Press the Down Arrow button to go to meet your printer ... to the desired page and then press OK. Information about your individual needs. and Canada) www.xerox.com/environment_europe (European Union) www.xerox.com/gwa www.xerox.com/office/6500supplies Phaser 6500 Color Laser Printer 121 User Guide Includes online Technical Support, Recommended Media ...
... obtain more . Printer registration Material Safety Data Sheets identify materials and provide information on safely handling and storing hazardous materials. Toner for your printer A resource for your printer. Troubleshooting 3. Press the Down Arrow button to go to meet your printer ... to the desired page and then press OK. Information about your individual needs. and Canada) www.xerox.com/environment_europe (European Union) www.xerox.com/gwa www.xerox.com/office/6500supplies Phaser 6500 Color Laser Printer 121 User Guide Includes online Technical Support, Recommended Media ...
User Guide
Page 122
... Unit instruction sheet that came in the documentation packet with your printer. Replace the old toner cartridge with a new one of the following: the Yellow Toner (Y), Cyan Toner (C), Magenta Toner (M), Black Toner (K), a tray, or fuser. Troubleshooting Control Panel Messages This section includes: • Supply...351 Insert Fuser 010-317 Replace Imaging Unit Insert Imaging Unit Insert Xxx Cartridge Replace Xxx Cartridge Invalid Xxx Non-Xerox® Toner Low Density Xxx Cartridge Condition/Reason/Solution Time to provide instructions. The fuser is not installed or it ....
... Unit instruction sheet that came in the documentation packet with your printer. Replace the old toner cartridge with a new one of the following: the Yellow Toner (Y), Cyan Toner (C), Magenta Toner (M), Black Toner (K), a tray, or fuser. Troubleshooting Control Panel Messages This section includes: • Supply...351 Insert Fuser 010-317 Replace Imaging Unit Insert Imaging Unit Insert Xxx Cartridge Replace Xxx Cartridge Invalid Xxx Non-Xerox® Toner Low Density Xxx Cartridge Condition/Reason/Solution Time to provide instructions. The fuser is not installed or it ....
User Guide
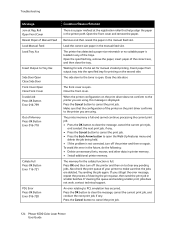
Page 123
... and then open and close the front cover. There is low. Troubleshooting Code/Message Xxx Low Tray Xxx Empty Error Messages Condition/Reason/Solution The toner in the specified cartridge is a paper misfeed at the duplex unit. Ensure that the printer has adequate cooling space around it . For details, see Ordering...
... and then open and close the front cover. There is low. Troubleshooting Code/Message Xxx Low Tray Xxx Empty Error Messages Condition/Reason/Solution The toner in the specified cartridge is a paper misfeed at the duplex unit. Ensure that the printer has adequate cooling space around it . For details, see Ordering...
User Guide
Page 124
... the job being held. • If the problem is full and cannot continue processing the current print job. • Press the OK button to the toner is displayed. Also check the print queue of the printer on to the printer you still get the error message, repeat the process of the...
... the job being held. • If the problem is full and cannot continue processing the current print job. • Press the OK button to the toner is displayed. Also check the print queue of the printer on to the printer you still get the error message, repeat the process of the...

User Guide
Page 128
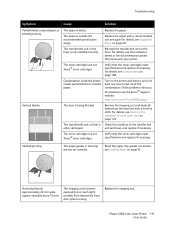
...not improve after carrying out the appropriate action, contact Xerox® Customer Support or your control panel/print driver settings are not Xerox® toner cartridges. Composite black is old or damaged. The toner cartridges are correct. The high-voltage supply is outside... the recommended specification range. For details, see the Xerox® Support website at a predetermined point. ...
...not improve after carrying out the appropriate action, contact Xerox® Customer Support or your control panel/print driver settings are not Xerox® toner cartridges. Composite black is old or damaged. The toner cartridges are correct. The high-voltage supply is outside... the recommended specification range. For details, see the Xerox® Support website at a predetermined point. ...
User Guide
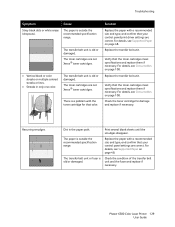
Page 129
... is old or damaged. Replace the paper with a recommended size and type, and confirm that your control panel settings are not Xerox® toner cartridges. Troubleshooting Symptom Stray black dots or white areas (dropouts). The transfer belt unit is outside the recommended specification range. Solution Replace... fuser is a problem with a recommended size and type, and confirm that your control panel/print driver settings are not Xerox® toner cartridges. • Vertical black or color streaks or multiple colored streaks or lines. • Streaks in the paper path.
... is old or damaged. Replace the paper with a recommended size and type, and confirm that your control panel settings are not Xerox® toner cartridges. Troubleshooting Symptom Stray black dots or white areas (dropouts). The transfer belt unit is outside the recommended specification range. Solution Replace... fuser is a problem with a recommended size and type, and confirm that your control panel/print driver settings are not Xerox® toner cartridges. • Vertical black or color streaks or multiple colored streaks or lines. • Streaks in the paper path.
User Guide
Page 130
.... For details, see Paper Storage Guidelines on page 108. Hair-like marks appear in a dry environment. Colored dots are not Xerox® toner cartridges. Printed pages are not Xerox® toner cartridges. The toner cartridges are printed at once. Also, see Color Registration on page 108. The transfer belt unit is incorrect. Adjust the color...
.... For details, see Paper Storage Guidelines on page 108. Hair-like marks appear in a dry environment. Colored dots are not Xerox® toner cartridges. Printed pages are not Xerox® toner cartridges. The toner cartridges are printed at once. Also, see Color Registration on page 108. The transfer belt unit is incorrect. Adjust the color...
User Guide
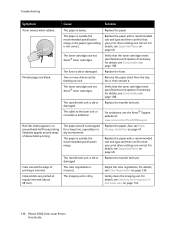
Page 131
... it on for assistance see the instruction sheets in the trays are not Xerox® toner cartridges. Reset the paper tray guides. For details, see Supported Paper on page 51. The toner cartridges are not Xerox® toner cartridges. For details, see Loading Paper on page 48. If the problems...for at least one hour to too much light; Verify that the toner cartridges meet specifications and replace if necessary. The paper is not installed correctly. For details, see the Xerox® Support website: www.xerox.com/office/6500support Remove the imaging unit and clean all debris from...
... it on for assistance see the instruction sheets in the trays are not Xerox® toner cartridges. Reset the paper tray guides. For details, see Supported Paper on page 51. The toner cartridges are not Xerox® toner cartridges. For details, see Loading Paper on page 48. If the problems...for at least one hour to too much light; Verify that the toner cartridges meet specifications and replace if necessary. The paper is not installed correctly. For details, see the Xerox® Support website: www.xerox.com/office/6500support Remove the imaging unit and clean all debris from...
User Guide
Page 133
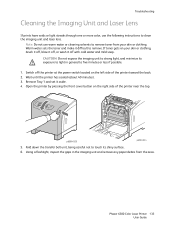
... minimize its shiny surface. 6. Wait until the printer has cooled (about 40 minutes). 3. Remove Tray 1 and set it difficult to remove. Warm water sets the toner and make it aside. 4. Switch off with cold water and mild soap. Note: Do not use the following instructions to clean the imaging unit and... Imaging Unit and Laser Lens If prints have voids or light streaks through one or more color, use warm water or cleaning solvents to remove toner from the area. Open the printer by pressing the front cover button on the right side of the printer toward the back. 2. p6500-023 ...
... minimize its shiny surface. 6. Wait until the printer has cooled (about 40 minutes). 3. Remove Tray 1 and set it difficult to remove. Warm water sets the toner and make it aside. 4. Switch off with cold water and mild soap. Note: Do not use the following instructions to clean the imaging unit and... Imaging Unit and Laser Lens If prints have voids or light streaks through one or more color, use warm water or cleaning solvents to remove toner from the area. Open the printer by pressing the front cover button on the right side of the printer toward the back. 2. p6500-023 ...
