
DocuTech 61xx - Operator HandyBook
Page 3
... Heavy Paper Levers 44 Adjust the Binder Tape Registration 46 Enable a Paper Tray for Stitcher 26 3. Paper Trays & Loading Media 13 Paper Tray & Finisher Capacities 13 Adding Paper to Tray 1 or 2 ...16 Adding Paper to Trays 3, 4, or 5 18 Loading Transparencies ...19 Re-Loading Tabs ...19 ...Enable or Disable the Stitcher ...48 Modify the Bindexer Capacity Number 49 Modify the Lighter / Darker Setting 49 Stop a Job From Printing at the Printer 50 6. Recommended Shift Preventative Maintenance Plan .... 27 4. Problem Solving 51 COMMON FAULT CODES & CASE 52 PROBLEM LISTING AND SOLUTIONS...
... Heavy Paper Levers 44 Adjust the Binder Tape Registration 46 Enable a Paper Tray for Stitcher 26 3. Paper Trays & Loading Media 13 Paper Tray & Finisher Capacities 13 Adding Paper to Tray 1 or 2 ...16 Adding Paper to Trays 3, 4, or 5 18 Loading Transparencies ...19 Re-Loading Tabs ...19 ...Enable or Disable the Stitcher ...48 Modify the Bindexer Capacity Number 49 Modify the Lighter / Darker Setting 49 Stop a Job From Printing at the Printer 50 6. Recommended Shift Preventative Maintenance Plan .... 27 4. Problem Solving 51 COMMON FAULT CODES & CASE 52 PROBLEM LISTING AND SOLUTIONS...
DocuTech 61xx - Operator HandyBook
Page 4
..., 14, and 15 97 Clear Paper Jams in Areas 17 and 18 100 Clear the Entire Paper Path From the Paper Trays to the Finisher 102 Clear the Fault in the Printer Fault Clearance Window 102 Clear the Paper Jam in Area 4 103 Clear the Paper Jam in Areas 11, 14, 17... Stress 128 If the Job is Jammed in Job Manager 148 DT6180 HandyBook Delete a Job in the Fuser, Release the Camming Motor Brake 127 If Printing to the Edges of Paper ...139 7. Allow Main, Aux, Auto, or Unspecified to be Used as Stock Names 143 3. Perform...
..., 14, and 15 97 Clear Paper Jams in Areas 17 and 18 100 Clear the Entire Paper Path From the Paper Trays to the Finisher 102 Clear the Fault in the Printer Fault Clearance Window 102 Clear the Paper Jam in Area 4 103 Clear the Paper Jam in Areas 11, 14, 17... Stress 128 If the Job is Jammed in Job Manager 148 DT6180 HandyBook Delete a Job in the Fuser, Release the Camming Motor Brake 127 If Printing to the Edges of Paper ...139 7. Allow Main, Aux, Auto, or Unspecified to be Used as Stock Names 143 3. Perform...

DocuTech 61xx - Operator HandyBook
Page 11
... photoreceptor. • Areas 5 to H - Paper travels through this area if paper is fed from trays 1, 4 or 5 and also to pass paper from area 10 (through the top tray slot. • Areas 13 to 16 - The system prints an image on the stacker in area 18, if desired, and placed on one side.... • Areas 11 and 12 - DT6180 HandyBook 11 If the prints are stitched in area 17, or bound in area 19. The prints are to be fed to the top tray, the system delivers the prints through F and H) to 4 - The stock leaves a paper tray and is the interposer area. If the job requires 2-sided...
... photoreceptor. • Areas 5 to H - Paper travels through this area if paper is fed from trays 1, 4 or 5 and also to pass paper from area 10 (through the top tray slot. • Areas 13 to 16 - The system prints an image on the stacker in area 18, if desired, and placed on one side.... • Areas 11 and 12 - DT6180 HandyBook 11 If the prints are stitched in area 17, or bound in area 19. The prints are to be fed to the top tray, the system delivers the prints through F and H) to 4 - The stock leaves a paper tray and is the interposer area. If the job requires 2-sided...
DocuTech 61xx - Operator HandyBook
Page 19
... backing: Run these types of transparencies from Paper Trays 1 and 2 with the paper side down, and from the menu. Close the paper tray. The Tray Properties window will be displayed. 5. Printing is loaded. 2. Add additional tab stock. 4. Information about the paper tray you are three tabs remaining on top of the... the paper side up for DocuTech 2000 series 61XX screen, select [Printer Manager]. Select the check box next to the right if you are adding tab stock to [Set Sequence Position]. Open the paper tray where the tab stock is not allowed on top of the stack ...
... backing: Run these types of transparencies from Paper Trays 1 and 2 with the paper side down, and from the menu. Close the paper tray. The Tray Properties window will be displayed. 5. Printing is loaded. 2. Add additional tab stock. 4. Information about the paper tray you are three tabs remaining on top of the... the paper side up for DocuTech 2000 series 61XX screen, select [Printer Manager]. Select the check box next to the right if you are adding tab stock to [Set Sequence Position]. Open the paper tray where the tab stock is not allowed on top of the stack ...

DocuTech 61xx - Operator HandyBook
Page 20
Adding Inserts Paper Trays & Loading Media For DocuSP 4.x and above: Creating inserts differs from slip sheets in that programmed ...button, and then click on [Close]. 8. When two or more special pages are not allowed between pages printed on the [Special Pages] tab. 4. See the Related Items below for a job with covers if the inserts affect the cover... printing. Click on [Add Inserts] button. If the insert is to be programmed for additional information. 2. DT6180 HandyBook...
Adding Inserts Paper Trays & Loading Media For DocuSP 4.x and above: Creating inserts differs from slip sheets in that programmed ...button, and then click on [Close]. 8. When two or more special pages are not allowed between pages printed on the [Special Pages] tab. 4. See the Related Items below for a job with covers if the inserts affect the cover... printing. Click on [Add Inserts] button. If the insert is to be programmed for additional information. 2. DT6180 HandyBook...

DocuTech 61xx - Operator HandyBook
Page 21
... g/m2) Slightly curled paper Intermixed weights Transparencies Label stock Adhesive drafting film Paper with a white stripe. Freshly printed offset prints, use short grain. For stock larger than 8 x 10 inches cannot be long grain. Paper Trays & Loading Media Satisfaction Guides Satisfaction Guide for any stock not defined in perfectly flat condition Less reliable feeds...
... g/m2) Slightly curled paper Intermixed weights Transparencies Label stock Adhesive drafting film Paper with a white stripe. Freshly printed offset prints, use short grain. For stock larger than 8 x 10 inches cannot be long grain. Paper Trays & Loading Media Satisfaction Guides Satisfaction Guide for any stock not defined in perfectly flat condition Less reliable feeds...

DocuTech 61xx - Operator HandyBook
Page 22
... for any stock not defined in good condition Drilled stock, fanned thoroughly Slightly curled paper Intermixed weights Xerox vellum Full cut tabs Label stock Adhesive drafting film Paper with a white stripe, use tray 1 or 2. Do not use excessively curled paper Substance 110 (200 g/m2) must be long... grain except 17 x 11 inch (432 x 279 mm) substance 110 (200 g/m2) which must be short grain. Paper Trays & Loading Media Satisfaction Guide for Paper Tray 3 Stock Size Weight Capacity Type or condition Reliable feeds may be expected 2600 sheets, substance 20 (75 g/m2) Xerographic bond ...
... for any stock not defined in good condition Drilled stock, fanned thoroughly Slightly curled paper Intermixed weights Xerox vellum Full cut tabs Label stock Adhesive drafting film Paper with a white stripe, use tray 1 or 2. Do not use excessively curled paper Substance 110 (200 g/m2) must be long... grain except 17 x 11 inch (432 x 279 mm) substance 110 (200 g/m2) which must be short grain. Paper Trays & Loading Media Satisfaction Guide for Paper Tray 3 Stock Size Weight Capacity Type or condition Reliable feeds may be expected 2600 sheets, substance 20 (75 g/m2) Xerographic bond ...

DocuTech 61xx - Operator HandyBook
Page 24
...m2) paper • Substance 16 (60 g/m2) paper • Substance 20 (75 g/m2) paper • Card stock • Xerox substance 65 (176 g/m2) • Substance 110 (200 g/m2) long grain (index) • Xerox 4024, substance 20 (75 g/m2) • 3 hole drilled • 4 hole drilled • 7 hole drilled • Never... in this guide. Load paper with seam side up into trays 1 and 2 with holes to minimize paper dust. Optimum satisfaction can be run 2-sided prints. Fan the paper and check the paper for any tray. load the paper into trays 1 and 2; Do not use Acceptable, but may be...
...m2) paper • Substance 16 (60 g/m2) paper • Substance 20 (75 g/m2) paper • Card stock • Xerox substance 65 (176 g/m2) • Substance 110 (200 g/m2) long grain (index) • Xerox 4024, substance 20 (75 g/m2) • 3 hole drilled • 4 hole drilled • 7 hole drilled • Never... in this guide. Load paper with seam side up into trays 1 and 2 with holes to minimize paper dust. Optimum satisfaction can be run 2-sided prints. Fan the paper and check the paper for any tray. load the paper into trays 1 and 2; Do not use Acceptable, but may be...

DocuTech 61xx - Operator HandyBook
Page 25
.... Image quality problems may occur near the reinforcement with holes to the left . Printing is not allowed on top of approximately 50 sheets of paper in trays 1 and 2. face down . Load the paper into all trays with side 2 printing. Do not run as inserts to 400°F (204°C) • Can...to a bound job. With the white stripe to the right, place the transparencies on inserts. Do not select 2-sided prints. side 1 with the stripe to the right in the tray. Do not run out of 50 or fewer at the above temperature • Can withstand the above conditions for 25...
.... Image quality problems may occur near the reinforcement with holes to the left . Printing is not allowed on top of approximately 50 sheets of paper in trays 1 and 2. face down . Load the paper into all trays with side 2 printing. Do not run as inserts to 400°F (204°C) • Can...to a bound job. With the white stripe to the right, place the transparencies on inserts. Do not select 2-sided prints. side 1 with the stripe to the right in the tray. Do not run out of 50 or fewer at the above temperature • Can withstand the above conditions for 25...

DocuTech 61xx - Operator HandyBook
Page 26
... To test, run a proof copy. Type or condition: Xerographic bond paper in trays 1 and 2. Paper Trays & Loading Media Stock type • Textured paper • Window stock • Xerox Carbonless Instructions for stock fed to avoid finisher bin jams. Load the window stock ... sheets maximum per stitch, 7 mm (0.28 inch) thick sets. side 1 up into trays 1 and 2; Do not use Load the paper into a tray (tray 1 or 2 is recommended. To test, run a proof print. Xerox Carbonless Paper is recommended) with a ragged character appearance or deletions. Less reliable stapling may ...
... To test, run a proof copy. Type or condition: Xerographic bond paper in trays 1 and 2. Paper Trays & Loading Media Stock type • Textured paper • Window stock • Xerox Carbonless Instructions for stock fed to avoid finisher bin jams. Load the window stock ... sheets maximum per stitch, 7 mm (0.28 inch) thick sets. side 1 up into trays 1 and 2; Do not use Load the paper into a tray (tray 1 or 2 is recommended. To test, run a proof print. Xerox Carbonless Paper is recommended) with a ragged character appearance or deletions. Less reliable stapling may ...

DocuTech 61xx - Operator HandyBook
Page 43
..., turn the stack of paper. 7. Open the right door of the paper path, as shown below. 3. Locate the decurler lever in the paper tray. 6. If the print curl is still a curl problem, perform steps 1 to the left. 5. Adjusting the Decurler Lever 1. If the decurler adjustment does not eliminate the ...paper curl problem, or for Paper Curl - If there is -3 or more , move the green decurler lever to 4 again. DT6180 HandyBook 43 If the print curl is +2 or more , move the green decurler lever to load a new ream of paper over in area 7 of the processor. 2. Close the processor...
..., turn the stack of paper. 7. Open the right door of the paper path, as shown below. 3. Locate the decurler lever in the paper tray. 6. If the print curl is still a curl problem, perform steps 1 to the left. 5. Adjusting the Decurler Lever 1. If the decurler adjustment does not eliminate the ...paper curl problem, or for Paper Curl - If there is -3 or more , move the green decurler lever to 4 again. DT6180 HandyBook 43 If the print curl is +2 or more , move the green decurler lever to load a new ream of paper over in area 7 of the processor. 2. Close the processor...
DocuTech 61xx - Operator HandyBook
Page 47
...1. Under Internal Finishers, right-click on the tray and select [Enable Cleanup] from the menu. 4. From the DocuSP Print Services window, select [Printer Manager]. The Printer Manager window will mark the tray for clean up . 3. In Printer Manager, select [Options]. The Printer Manager window will be displayed. 2. Select [Finishing... enabled for clean up have a green check mark in the Printer window. Select [Enable Clean Up] from the menu. Machine Maintenance Enable a Paper Tray for Clean up If you wish to the Print Manager window. Close the Finisher Doors. 8. Select [OK] to...
...1. Under Internal Finishers, right-click on the tray and select [Enable Cleanup] from the menu. 4. From the DocuSP Print Services window, select [Printer Manager]. The Printer Manager window will mark the tray for clean up . 3. In Printer Manager, select [Options]. The Printer Manager window will be displayed. 2. Select [Finishing... enabled for clean up have a green check mark in the Printer window. Select [Enable Clean Up] from the menu. Machine Maintenance Enable a Paper Tray for Clean up If you wish to the Print Manager window. Close the Finisher Doors. 8. Select [OK] to...
DocuTech 61xx - Operator HandyBook
Page 59
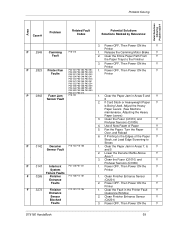
...Edge Screening to Stress 1. Power OFF, Then Power ON the Y DT6180 HandyBook 59 Clear the Entire Paper Path From Y the Paper Trays to the Edges of Paper Y P 3142 Decurler P10-104 P10-105 Sensor Fault P 3147 Interlock P01-220 P01-221 System Failure Faults...? If Printing to the Finisher 3. Lower the Decurler Baffle Above Y Area 7 3. Power OFF, Then Power ON the Y Printer 1. Clear the Paper Jam in the Printer Fault Y Clearance Window 2. Power OFF, Then Power ON the Y Printer 1. Power OFF, Then Power ON the Y Printer P 2823 Printer Run P03...
...Edge Screening to Stress 1. Power OFF, Then Power ON the Y DT6180 HandyBook 59 Clear the Entire Paper Path From Y the Paper Trays to the Edges of Paper Y P 3142 Decurler P10-104 P10-105 Sensor Fault P 3147 Interlock P01-220 P01-221 System Failure Faults...? If Printing to the Finisher 3. Lower the Decurler Baffle Above Y Area 7 3. Power OFF, Then Power ON the Y Printer 1. Clear the Paper Jam in the Printer Fault Y Clearance Window 2. Power OFF, Then Power ON the Y Printer 1. Power OFF, Then Power ON the Y Printer P 2823 Printer Run P03...
DocuTech 61xx - Operator HandyBook
Page 62
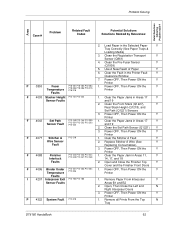
... /Solutions Ranked by Relevance: 2. Power OFF, Then Power ON the Y Printer F 4077 Stitcher A P12-218 1. Power OFF, Then Power ON the Y Printer P 3853 Fuser P10-201 P10-202 P10-203 1. Clear the Paper Jams in the Selected Paper Y Tray Correctly (See Paper Trays & Loading Media) 3. Clean the Set Path Sensor (Q1221) Y 3. ... P12-248 14, 17, and 18 Faults 2. Remove Paper From Interposer Y Sensor Faults Areas B1 and B2 2. Power OFF, Then Power ON the Y Printer P 4322 System Fault P12-518 1. Remove all Prints From the Top N Tray DT6180 HandyBook 62
... /Solutions Ranked by Relevance: 2. Power OFF, Then Power ON the Y Printer F 4077 Stitcher A P12-218 1. Power OFF, Then Power ON the Y Printer P 3853 Fuser P10-201 P10-202 P10-203 1. Clear the Paper Jams in the Selected Paper Y Tray Correctly (See Paper Trays & Loading Media) 3. Clean the Set Path Sensor (Q1221) Y 3. ... P12-248 14, 17, and 18 Faults 2. Remove Paper From Interposer Y Sensor Faults Areas B1 and B2 2. Power OFF, Then Power ON the Y Printer P 4322 System Fault P12-518 1. Remove all Prints From the Top N Tray DT6180 HandyBook 62
DocuTech 61xx - Operator HandyBook
Page 66
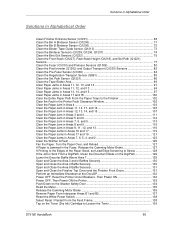
..., 14, and 15 97 Clear Paper Jams in Areas 17 and 18 100 Clear the Entire Paper Path From the Paper Trays to the Finisher 102 Clear the Fault in the Printer Fault Clearance Window 102 Clear the Paper Jam in Area 4 103 Clear the Paper Jam in Areas 11, 14, 17... ...125 Fan the Paper, Turn the Paper Over, and Reload 127 If Paper is Jammed in the Fuser, Release the Camming Motor Brake 127 If Printing to the Edges of the Paper Stock, set Lead Edge Screening to Stress 128 If the Job is Sent From a DigiPath, Clean the Document Glass...
..., 14, and 15 97 Clear Paper Jams in Areas 17 and 18 100 Clear the Entire Paper Path From the Paper Trays to the Finisher 102 Clear the Fault in the Printer Fault Clearance Window 102 Clear the Paper Jam in Area 4 103 Clear the Paper Jam in Areas 11, 14, 17... ...125 Fan the Paper, Turn the Paper Over, and Reload 127 If Paper is Jammed in the Fuser, Release the Camming Motor Brake 127 If Printing to the Edges of the Paper Stock, set Lead Edge Screening to Stress 128 If the Job is Sent From a DigiPath, Clean the Document Glass...
DocuTech 61xx - Operator HandyBook
Page 102
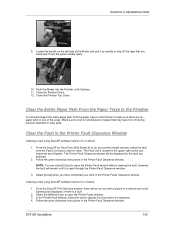
... Clearance window. Locate the handle on the left side of paper that may have completed your printer model) window, select the fault from the paper trays to the Finisher to close the Printer Fault window without clearing the fault. Clearing a fault using DocuSP software version 3.x or above: 1. ... to snip off during previous attempts to clear. From the DocuSP Print Services window, there will remain until it is located in the Printer Fault Clearance window. Clear the Entire Paper Path From the Paper Trays to the Finisher You should inspect the entire paper path from the...
... Clearance window. Locate the handle on the left side of paper that may have completed your printer model) window, select the fault from the paper trays to the Finisher to close the Printer Fault window without clearing the fault. Clearing a fault using DocuSP software version 3.x or above: 1. ... to snip off during previous attempts to clear. From the DocuSP Print Services window, there will remain until it is located in the Printer Fault Clearance window. Clear the Entire Paper Path From the Paper Trays to the Finisher You should inspect the entire paper path from the...

DocuTech 61xx - Operator HandyBook
Page 116
...Paper Jam in the top left Finisher Door using the handle on the top, front of the printer may be HOT! Carefully inspect the rollers for any debris or torn pieces of the cover. 2.... accessible and easier to its original position. CAUTION: The following area of the machine above Paper Tray 3. 5. Carefully reach your hand. Return the green pinch lever to its original position and use...and lift it is being removed from this area during two-sided printing. Raise the Transport to remove. 8. c. Push the paper tray back into the area, squeeze the edges of the arrow on ...
...Paper Jam in the top left Finisher Door using the handle on the top, front of the printer may be HOT! Carefully inspect the rollers for any debris or torn pieces of the cover. 2.... accessible and easier to its original position. CAUTION: The following area of the machine above Paper Tray 3. 5. Carefully reach your hand. Return the green pinch lever to its original position and use...and lift it is being removed from this area during two-sided printing. Raise the Transport to remove. 8. c. Push the paper tray back into the area, squeeze the edges of the arrow on ...

DocuTech 61xx - Operator HandyBook
Page 131
... will reset the tilt bed. Some baffles can be opened while clearing a paper jam and not closed properly; The baffle is located just above Paper Tray 1 and has a grey sticker with green print on the handle. 3. Close the Processor Door. Solutions in place. 4. Open the right Processor Door. 2.
... will reset the tilt bed. Some baffles can be opened while clearing a paper jam and not closed properly; The baffle is located just above Paper Tray 1 and has a grey sticker with green print on the handle. 3. Close the Processor Door. Solutions in place. 4. Open the right Processor Door. 2.

DocuTech 61xx - Operator HandyBook
Page 138
...select Reset from the fault frame on DocuSP software version 2.x: 1. Make sure the top of the paper tray. The Fault List is depressed, or pushed down. 5. Open the Processor Doors. 2. The Printer Fault Clearance window is above and to the right of the switch is located in the paper path. Select... selected. 4. From the DocuSP for the fault you selected. 2. Make sure all paper has been removed from the menu. From the DocuSP Print Services window, click [Status] from the paper path and there are no torn pieces of paper remaining in the upper-left corner of paper...
...select Reset from the fault frame on DocuSP software version 2.x: 1. Make sure the top of the paper tray. The Fault List is depressed, or pushed down. 5. Open the Processor Doors. 2. The Printer Fault Clearance window is above and to the right of the switch is located in the paper path. Select... selected. 4. From the DocuSP for the fault you selected. 2. Make sure all paper has been removed from the menu. From the DocuSP Print Services window, click [Status] from the paper path and there are no torn pieces of paper remaining in the upper-left corner of paper...

FreeFlow® Print Server IBM® IPDS User Guide
Page 32
...and applied. When the Map IPDS Trays to the host as inserter bins, which are reported as for the job are mapped to non-fusing physical trays, Xerox FreeFlow® Print Server IPDS reports them to Stock and the Select Stock for Printer Trays dialogs show all of the media ...used for other paper trays. When virtual trays are appropriate. The Tray Type setting of non-fusing paper trays. Ensure that the host will...
...and applied. When the Map IPDS Trays to the host as inserter bins, which are reported as for the job are mapped to non-fusing physical trays, Xerox FreeFlow® Print Server IPDS reports them to Stock and the Select Stock for Printer Trays dialogs show all of the media ...used for other paper trays. When virtual trays are appropriate. The Tray Type setting of non-fusing paper trays. Ensure that the host will...


