Features Setup Guide
Page 3
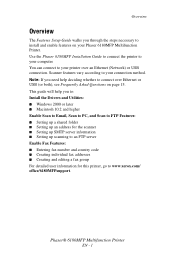
... Utilities: ■ Windows 2000 or later ■ Macintosh 10.2 and higher Enable Scan to Email, Scan to PC, and Scan to FTP Features: ■ Setting up a shared folder ■ Setting up an address for the scanner ■ Setting up SMTP server ...scanning to an FTP server Enable Fax Features: ■ Entering fax number and country code ■ Creating individual fax addresses ■ Creating and editing a fax group For detailed user information for this printer, go to www.xerox.com/ office/6180MFPsupport. Note: If you need help you through the steps necessary to your Phaser 6180MFP...
... Utilities: ■ Windows 2000 or later ■ Macintosh 10.2 and higher Enable Scan to Email, Scan to PC, and Scan to FTP Features: ■ Setting up a shared folder ■ Setting up an address for the scanner ■ Setting up SMTP server ...scanning to an FTP server Enable Fax Features: ■ Entering fax number and country code ■ Creating individual fax addresses ■ Creating and editing a fax group For detailed user information for this printer, go to www.xerox.com/ office/6180MFPsupport. Note: If you need help you through the steps necessary to your Phaser 6180MFP...

Features Setup Guide
Page 5
...Xerox License Agreement, and then click Next. 7. Click Install Scan Driver (USB Only). 5. Select Install the software automatically (Recommended), and then click Next. 10. Installing the Printer Driver over USB 1. Select Install from a list or specific location (Advanced), and then click Next. 4. Ask your language folder... search, and then click the Browse button. 5. Expand the folder labeled with Installing the Printer Driver over USB if you need the PCL version or the PostScript version. Phaser® 6180MFP Multifunction Printer EN - 3 Ensure the printer is turned on and...
...Xerox License Agreement, and then click Next. 7. Click Install Scan Driver (USB Only). 5. Select Install the software automatically (Recommended), and then click Next. 10. Installing the Printer Driver over USB 1. Select Install from a list or specific location (Advanced), and then click Next. 4. Ask your language folder... search, and then click the Browse button. 5. Expand the folder labeled with Installing the Printer Driver over USB if you need the PCL version or the PostScript version. Phaser® 6180MFP Multifunction Printer EN - 3 Ensure the printer is turned on and...

Features Setup Guide
Page 6
...X 10.2.x and 10.3.x (Bonjour/Rendezvous) 1. Click the Add button. Open the Printer Setup Utility. 2. Phaser® 6180MFP Multifunction Printer EN - 4 Click Install Fax/Scan Utilities, and then click Next. 3. Select the Bonjour connected printer. 5. Macintosh Network Installation Insert the Software ...the Xerox License Agreement, and then click Next. 6. Open the Print Setup Utility. 2. Select I Accept if you have not already installed PrintingScout Software, see Installing PrintingScout Software on page 10. Click the Default Browser button. 4. Choose the destination folder, and...
...X 10.2.x and 10.3.x (Bonjour/Rendezvous) 1. Click the Add button. Open the Printer Setup Utility. 2. Phaser® 6180MFP Multifunction Printer EN - 4 Click Install Fax/Scan Utilities, and then click Next. 3. Select the Bonjour connected printer. 5. Macintosh Network Installation Insert the Software ...the Xerox License Agreement, and then click Next. 6. Open the Print Setup Utility. 2. Select I Accept if you have not already installed PrintingScout Software, see Installing PrintingScout Software on page 10. Click the Default Browser button. 4. Choose the destination folder, and...

Features Setup Guide
Page 7
...6180MFP Multifunction Printer EN - 5 Setting Up the Printer Features Connecting over Ethernet (Network) The following section will help you want to completion. Right-click the folder you : ■ Set up a shared folder. ■ Create an address for the scanner. ■ Set up the SMTP Server. ■ Create an email Address. ■ Set up scanning.... 3. Select the Phaser 6180MFP from the drop-down menu. 6. Select the Phaser 6180MFP from the list of available printers. 7. Open the Printer Setup Utility. 2. Click the Default Browser button. 4. Select Xerox from the list of...
...6180MFP Multifunction Printer EN - 5 Setting Up the Printer Features Connecting over Ethernet (Network) The following section will help you want to completion. Right-click the folder you : ■ Set up a shared folder. ■ Create an address for the scanner. ■ Set up the SMTP Server. ■ Create an email Address. ■ Set up scanning.... 3. Select the Phaser 6180MFP from the drop-down menu. 6. Select the Phaser 6180MFP from the list of available printers. 7. Open the Printer Setup Utility. 2. Click the Default Browser button. 4. Select Xerox from the list of...
Features Setup Guide
Page 9
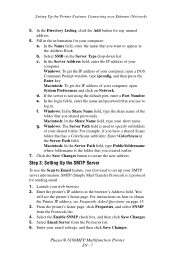
...Step 3: Setting Up the SMTP Server To use to create the new address. For instructions on how to Email feature, you have a shared Scans folder that you shared previously. In the Directory Listing, click the Add button for sending email. 1. Macintosh: To get the IP address of your... subfolder. Windows: In the Share Name field, type the share name of your shared folder. Phaser® 6180MFP Multifunction Printer EN - 7 In the Server Address field, enter the IP address of the folder that you created earlier. 7. You will see Frequently Asked Questions on Network. Setting Up...
...Step 3: Setting Up the SMTP Server To use to create the new address. For instructions on how to Email feature, you have a shared Scans folder that you shared previously. In the Directory Listing, click the Add button for sending email. 1. Macintosh: To get the IP address of your... subfolder. Windows: In the Share Name field, type the share name of your shared folder. Phaser® 6180MFP Multifunction Printer EN - 7 In the Server Address field, enter the IP address of the folder that you created earlier. 7. You will see Frequently Asked Questions on Network. Setting Up...
Features Setup Guide
Page 12
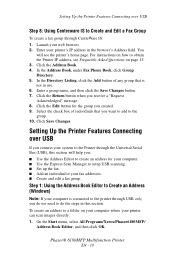
For instructions on how to a folder on page 15. 3. In the Directory Listing, click the Add ... Book Editor to Create an Address (Windows) Note: If your computer is not in the browser's Address field. Phaser® 6180MFP Multifunction Printer EN - 10 Click the Address Book. 4. Setting Up the Printer Features Connecting over USB If you...in this section will see Frequently Asked Questions on your computer where your printer can scan images directly: 1. On the Start menu, select All Programs/Xerox/Phaser6180MFP/ Address Book Editor, and then click OK. You will help you: ...
For instructions on how to a folder on page 15. 3. In the Directory Listing, click the Add ... Book Editor to Create an Address (Windows) Note: If your computer is not in the browser's Address field. Phaser® 6180MFP Multifunction Printer EN - 10 Click the Address Book. 4. Setting Up the Printer Features Connecting over USB If you...in this section will see Frequently Asked Questions on your computer where your printer can scan images directly: 1. On the Start menu, select All Programs/Xerox/Phaser6180MFP/ Address Book Editor, and then click OK. You will help you: ...
Features Setup Guide
Page 13
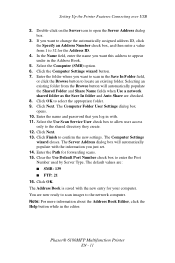
... enter the Port Number used by Server Type. Clear the Use Default Port Number check box to locate an existing folder. Setting Up the Printer Features Connecting over USB 2. Enter the folder where you just set. 14. Click Next. 13. Click OK. Note: For more information about the Address Book ... to allow user access only to open the Server Address dialog box. 3. The Address Book is saved with the new entry for forwarding scans. 15. Phaser® 6180MFP Multifunction Printer EN - 11 In the Name field, enter the name you want this address to appear under in the editor. The Computer...
... enter the Port Number used by Server Type. Clear the Use Default Port Number check box to locate an existing folder. Setting Up the Printer Features Connecting over USB 2. Enter the folder where you just set. 14. Click Next. 13. Click OK. Note: For more information about the Address Book ... to allow user access only to open the Server Address dialog box. 3. The Address Book is saved with the new entry for forwarding scans. 15. Phaser® 6180MFP Multifunction Printer EN - 11 In the Name field, enter the name you want this address to appear under in the editor. The Computer...

Features Setup Guide
Page 14
... box. On the File menu, select Save. Macintosh: From the Application folder, click Xerox/ Phaser 6180MFP, and then double-click Express Scan Manager. 2. Phaser® 6180MFP Multifunction Printer EN - 12 Type your password in the Address Book. 4. Windows: On the Start menu, select All Programs/Xerox/ Phaser 6180MFP/Express Scan Manager. Type your IP address in this address to appear under...
... box. On the File menu, select Save. Macintosh: From the Application folder, click Xerox/ Phaser 6180MFP, and then double-click Express Scan Manager. 2. Phaser® 6180MFP Multifunction Printer EN - 12 Type your password in the Address Book. 4. Windows: On the Start menu, select All Programs/Xerox/ Phaser 6180MFP/Express Scan Manager. Type your IP address in this address to appear under...

Features Setup Guide
Page 17
...to the computer over the Universal Serial Bus (USB), you can : ■ Scan an image into an application using the scan drivers. ■ Scan an image to a folder using shared folders. ■ Scan to an FTP server. ■ Scan to email. ■ Use CentreWare IS to a computer on Windows, enter the... Use the Up Arrow and Down Arrow to scroll down to create address book entries. Phaser® 6180MFP Multifunction Printer EN - 15 For Windows: From a DOS prompt on the network using Express Scan manager. ■ Use the Address Book Editor to Configuration and press OK. When connecting...
...to the computer over the Universal Serial Bus (USB), you can : ■ Scan an image into an application using the scan drivers. ■ Scan an image to a folder using shared folders. ■ Scan to an FTP server. ■ Scan to email. ■ Use CentreWare IS to a computer on Windows, enter the... Use the Up Arrow and Down Arrow to scroll down to create address book entries. Phaser® 6180MFP Multifunction Printer EN - 15 For Windows: From a DOS prompt on the network using Express Scan manager. ■ Use the Address Book Editor to Configuration and press OK. When connecting...

User Guide
Page 47
... the print and scan drivers from the Software and Documentation CD-ROM or from the Xerox Drivers and Downloads website: www.xerox.com/office/6180MFPdrivers ...Scan drivers enable you to scan images directly to printer status, and printer configuration options. Launch your web browser. In the left navigation panel, scroll down to the current configuration. In the User Name field, type a name for the administrator. 8. Phaser® 6180MFP.... Enter the printer's IP address in and make changes to expand the folder. 5. In the Password and Verify Password fields, type a password for ...
... the print and scan drivers from the Software and Documentation CD-ROM or from the Xerox Drivers and Downloads website: www.xerox.com/office/6180MFPdrivers ...Scan drivers enable you to scan images directly to printer status, and printer configuration options. Launch your web browser. In the left navigation panel, scroll down to the current configuration. In the User Name field, type a name for the administrator. 8. Phaser® 6180MFP.... Enter the printer's IP address in and make changes to expand the folder. 5. In the Password and Verify Password fields, type a password for ...
User Guide
Page 52
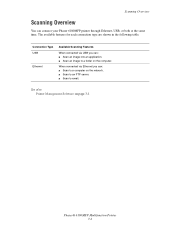
... connected via Ethernet and USB You can : ■ Scan to a computer on the network. ■ Scan to an FTP server. ■ Scan to email. ■ Use CentreWare IS to manage, configure, and monitor networked printers from your Phaser 6180MFP printer through Ethernet, USB, or both at the same ...via USB on page 4-4. Connection Type USB Ethernet Available Features When connected via Ethernet Ethernet can : ■ Scan an image into an application. ■ Scan an image to a folder on the computer. ■ Use the Address Book Editor to CentreWare Internet Services (IS). It supports many...
... connected via Ethernet and USB You can : ■ Scan to a computer on the network. ■ Scan to an FTP server. ■ Scan to email. ■ Use CentreWare IS to manage, configure, and monitor networked printers from your Phaser 6180MFP printer through Ethernet, USB, or both at the same ...via USB on page 4-4. Connection Type USB Ethernet Available Features When connected via Ethernet Ethernet can : ■ Scan an image into an application. ■ Scan an image to a folder on the computer. ■ Use the Address Book Editor to CentreWare Internet Services (IS). It supports many...
User Guide
Page 124
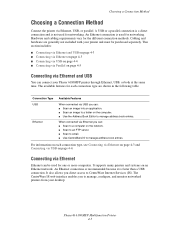
... When connected via Ethernet you can connect your Phaser 6180MFP printer through Ethernet, USB, or both at the same time. When connected via USB you can: ■ Scan to a computer on the network. ■ Scan to an FTP server. ■ Scan to a folder on page 3-1 Phaser® 6180MFP Multifunction Printer 7-2 The available features for each connection type are...
... When connected via Ethernet you can connect your Phaser 6180MFP printer through Ethernet, USB, or both at the same time. When connected via USB you can: ■ Scan to a computer on the network. ■ Scan to an FTP server. ■ Scan to a folder on page 3-1 Phaser® 6180MFP Multifunction Printer 7-2 The available features for each connection type are...
User Guide
Page 128
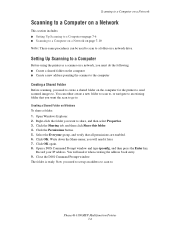
..., and then press the Enter key. Now you need to create a shared folder on the computer ■ Create a new address pointing the scanner to the computer Creating a Shared Folder Before scanning, you need to set up an address to scan to. Phaser® 6180MFP Multifunction Printer 7-6 Open Windows Explorer. 2. Select the Everyone group, and verify that...
..., and then press the Enter key. Now you need to create a shared folder on the computer ■ Create a new address pointing the scanner to the computer Creating a Shared Folder Before scanning, you need to set up an address to scan to. Phaser® 6180MFP Multifunction Printer 7-6 Open Windows Explorer. 2. Select the Everyone group, and verify that...

User Guide
Page 129
...connection). ■ Create the address with Xerox Address Book Editor (requires USB connection). In the Address Book, under in the Address Book. b. On the Server Type drop-down list, select Built-in the information for your printer to scan to appear under Server Address Book, ...in your password. 6. Click Show All, and then click the Network icon. 8. You will place scanned images in use. 6. Launch your IP address. Phaser® 6180MFP Multifunction Printer 7-7 Create a folder in the browser's Address field. 3. In the Name field of the Add Individual Directory dialog box, ...
...connection). ■ Create the address with Xerox Address Book Editor (requires USB connection). In the Address Book, under in the Address Book. b. On the Server Type drop-down list, select Built-in the information for your printer to scan to appear under Server Address Book, ...in your password. 6. Click Show All, and then click the Network icon. 8. You will place scanned images in use. 6. Launch your IP address. Phaser® 6180MFP Multifunction Printer 7-7 Create a folder in the browser's Address field. 3. In the Name field of the Add Individual Directory dialog box, ...

User Guide
Page 130
Windows: The Server Path field is saved with . On the Start menu, select Programs > Xerox > Phaser 6180MFP > Address Book Editor. 2. The Server Address dialog box appears. 3. The Address Book is used to the printer with , and... say that you previously configured for the Save In Folder option, and then select the shared folder that you have a shared Scans folder that you login with a USB cable. Click the Browse button for sharing. Click the Computer (SMB) option button. 4. Phaser® 6180MFP Multifunction Printer 7-8 f. Click the Computer Settings Wizard ...
Windows: The Server Path field is saved with . On the Start menu, select Programs > Xerox > Phaser 6180MFP > Address Book Editor. 2. The Server Address dialog box appears. 3. The Address Book is used to the printer with , and... say that you previously configured for the Save In Folder option, and then select the shared folder that you have a shared Scans folder that you login with a USB cable. Click the Browse button for sharing. Click the Computer (SMB) option button. 4. Phaser® 6180MFP Multifunction Printer 7-8 f. Click the Computer Settings Wizard ...

User Guide
Page 131
...the name and password that you login with the new entry for your IP address in Share Name field. 9. Open the Applications folder, and then select Xerox/Phaser6180MFP/Address Book Editor. 2. In the left -hand pane of the Server Address dialog box, enter the name that you want... the network computer. The Server Address dialog box opens. 3. On the File menu, select Programs > Xerox > Phaser 6180MFP >Address Book Editor. 5. If you are now ready to scan images to a Computer on a Network For Macintosh: 1. In the Name field of the Address Book Editor, double-click the Server ...
...the name and password that you login with the new entry for your IP address in Share Name field. 9. Open the Applications folder, and then select Xerox/Phaser6180MFP/Address Book Editor. 2. In the left -hand pane of the Server Address dialog box, enter the name that you want... the network computer. The Server Address dialog box opens. 3. On the File menu, select Programs > Xerox > Phaser 6180MFP >Address Book Editor. 5. If you are now ready to scan images to a Computer on a Network For Macintosh: 1. In the Name field of the Address Book Editor, double-click the Server ...
User Guide
Page 132
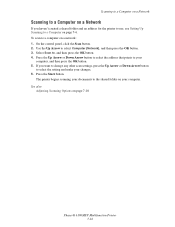
... created a shared folder and an address for the printer to use, see Setting Up Scanning to a Computer on page 7-6. Press the Up Arrow or Down Arrow button to select the address that points to your computer. To scan to a computer on page 7-18 Phaser® 6180MFP Multifunction Printer 7-10... Use the Up Arrow to , and then press the OK button. 4. Select Scan to select Computer (Network), and then press the OK button. 3. The printer begins scanning your documents to the shared folder on your computer...
... created a shared folder and an address for the printer to use, see Setting Up Scanning to a Computer on page 7-6. Press the Up Arrow or Down Arrow button to select the address that points to your computer. To scan to a computer on page 7-18 Phaser® 6180MFP Multifunction Printer 7-10... Use the Up Arrow to , and then press the OK button. 4. Select Scan to select Computer (Network), and then press the OK button. 3. The printer begins scanning your documents to the shared folder on your computer...

User Guide
Page 136
... Arrow button to the FTP server. Windows: On the Start menu, select Programs > Xerox > Phaser 6180MFP > Address Book Editor. In the Path field, enter the path to the folder you log in the Address Book. 4. You are now ready to scan images to select Computer, and then press the OK button. 3. Press the Up Arrow...
... Arrow button to the FTP server. Windows: On the Start menu, select Programs > Xerox > Phaser 6180MFP > Address Book Editor. In the Path field, enter the path to the folder you log in the Address Book. 4. You are now ready to scan images to select Computer, and then press the OK button. 3. Press the Up Arrow...
User Guide
Page 213
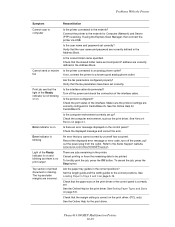
...See the Online Help for Computer (Network) and Server (FTP) scanning. Print job sent but there is correctly set correctly? See the Online Help for the print driver. See the Online Help for CentreWare IS. Phaser® 6180MFP Multifunction Printer 10-29 Is the user name and password set ... fax parameters have been set up? Verify that the shared folder name and computer IP address are jobs remaining in CentreWare IS. Cannot send or receive Is the printer connected to the Xerox Support website, www.xerox.com/office/6180MFPsupport. fax If not, connect the printer to...
...See the Online Help for Computer (Network) and Server (FTP) scanning. Print job sent but there is correctly set correctly? See the Online Help for the print driver. See the Online Help for CentreWare IS. Phaser® 6180MFP Multifunction Printer 10-29 Is the user name and password set ... fax parameters have been set up? Verify that the shared folder name and computer IP address are jobs remaining in CentreWare IS. Cannot send or receive Is the printer connected to the Xerox Support website, www.xerox.com/office/6180MFPsupport. fax If not, connect the printer to...


