Features Setup Guide
Page 3
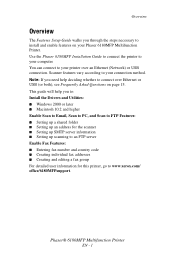
...Phaser 6180MFP Installation Guide to connect the printer to www.xerox.com/ office/6180MFPsupport. This guide will help deciding whether to connect over an Ethernet (Network) or USB connection. Scanner features vary according to your Phaser 6180MFP Multifunction Printer. Phaser® 6180MFP Multifunction Printer EN - 1 You can connect to your printer... Creating individual fax addresses ■ Creating and editing a fax group For detailed user information for this printer, go to your computer. Overview Overview The Features Setup Guide walks you through the steps necessary to install ...
...Phaser 6180MFP Installation Guide to connect the printer to www.xerox.com/ office/6180MFPsupport. This guide will help deciding whether to connect over an Ethernet (Network) or USB connection. Scanner features vary according to your Phaser 6180MFP Multifunction Printer. Phaser® 6180MFP Multifunction Printer EN - 1 You can connect to your printer... Creating individual fax addresses ■ Creating and editing a fax group For detailed user information for this printer, go to your computer. Overview Overview The Features Setup Guide walks you through the steps necessary to install ...
Features Setup Guide
Page 4
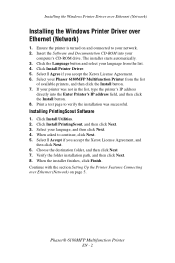
...Xerox License Agreement. 6. Installing the Windows Printer Driver over Ethernet (Network) Installing the Windows Printer Driver over Ethernet (Network) on and connected to verify the installation was not in the list, type the printer's IP address directly into your computer's CD-ROM drive. Ensure the printer is turned on page 5. Print a test page to your Phaser 6180MFP... Multifunction Printer from the list. 4. When ...
...Xerox License Agreement. 6. Installing the Windows Printer Driver over Ethernet (Network) Installing the Windows Printer Driver over Ethernet (Network) on and connected to verify the installation was not in the list, type the printer's IP address directly into your computer's CD-ROM drive. Ensure the printer is turned on page 5. Print a test page to your Phaser 6180MFP... Multifunction Printer from the list. 4. When ...

Features Setup Guide
Page 5
Insert the Software and Documentation CD-ROM into your administrator if you accept the Xerox License Agreement, and then click Next. 7. Click Install Scan Driver (USB Only). 5. To continue, click Next. 6. Select I Accept if you need the PCL...with your computer's operating system (32-bit or 64-bit), select your computer. 2. Installing the Printer Driver over a USB Only Connection 1. When asked if Windows can connect to the Windows Update to your language folder, and then click the OK button. Ask your computer's CD-ROM drive. Phaser® 6180MFP Multifunction Printer EN - 3
Insert the Software and Documentation CD-ROM into your administrator if you accept the Xerox License Agreement, and then click Next. 7. Click Install Scan Driver (USB Only). 5. To continue, click Next. 6. Select I Accept if you need the PCL...with your computer's operating system (32-bit or 64-bit), select your computer. 2. Installing the Printer Driver over a USB Only Connection 1. When asked if Windows can connect to the Windows Update to your language folder, and then click the OK button. Ask your computer's CD-ROM drive. Phaser® 6180MFP Multifunction Printer EN - 3

Features Setup Guide
Page 6
... (USB Only) 1. Select Rendezvous from the drop-down menu. 6. Phaser® 6180MFP Multifunction Printer EN - 4 Select Xerox from the list of manufacturers in the printer's window. 5. Macintosh OS X 10.4.x and Higher (Bonjour) 1. Select the Bonjour connected printer. 5. Click Install Utilities. 2. Continue with the section Setting Up the Printer Features Connecting over USB on page 2. Choose the destination...
... (USB Only) 1. Select Rendezvous from the drop-down menu. 6. Phaser® 6180MFP Multifunction Printer EN - 4 Select Xerox from the list of manufacturers in the printer's window. 5. Macintosh OS X 10.4.x and Higher (Bonjour) 1. Select the Bonjour connected printer. 5. Click Install Utilities. 2. Continue with the section Setting Up the Printer Features Connecting over USB on page 2. Choose the destination...

Features Setup Guide
Page 7
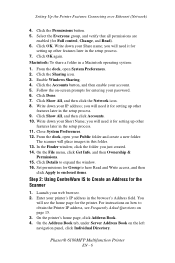
Click the Add button. 3. Select Xerox from the drop-down menu. 6. Setting Up the Printer Features Connecting over Ethernet (Network) The following section will help you: ■ Set up a shared folder. ■ Create an address for the scanner. ■ Set .... ■ Set up the fax. ■ Add individual and group addresses to share, and then select Properties. 3. Right-click the folder you wish to completion. Phaser® 6180MFP Multifunction Printer EN - 5 Macintosh USB Installation Macintosh USB Installation Insert the Software and Documentation CD-ROM. Open the...
Click the Add button. 3. Select Xerox from the drop-down menu. 6. Setting Up the Printer Features Connecting over Ethernet (Network) The following section will help you: ■ Set up a shared folder. ■ Create an address for the scanner. ■ Set .... ■ Set up the fax. ■ Add individual and group addresses to share, and then select Properties. 3. Right-click the folder you wish to completion. Phaser® 6180MFP Multifunction Printer EN - 5 Macintosh USB Installation Macintosh USB Installation Insert the Software and Documentation CD-ROM. Open the...
Features Setup Guide
Page 8
... For instructions on how to obtain the Printer IP address, see the home page for setting up other features later in a Macintosh operating system: 1. On the Address Book tab, under Server Address Book on page 15. 3. Phaser® 6180MFP Multifunction Printer EN - 6 Click the Permissions button.... 5. Click OK. From the dock, open your printer's IP address in this folder. 13. Enable Windows Sharing. 4. Click Done. 7. Click Show...
... For instructions on how to obtain the Printer IP address, see the home page for setting up other features later in a Macintosh operating system: 1. On the Address Book tab, under Server Address Book on page 15. 3. Phaser® 6180MFP Multifunction Printer EN - 6 Click the Permissions button.... 5. Click OK. From the dock, open your printer's IP address in this folder. 13. Enable Windows Sharing. 4. Click Done. 7. Click Show...
Features Setup Guide
Page 9
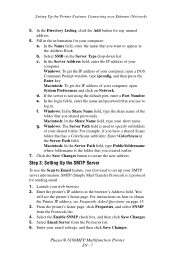
...\ColorScans in the browser's Address field. Select the Enable SNMP check box, and then click Save Changes. 5. Phaser® 6180MFP Multifunction Printer EN - 7 Enter the printer's IP address in the Server Path field. For instructions on how to appear in the information for any unused ...address. 6. Setting Up the Printer Features Connecting over Ethernet (Network) 5. In the Server Address field, enter the IP...
...\ColorScans in the browser's Address field. Select the Enable SNMP check box, and then click Save Changes. 5. Phaser® 6180MFP Multifunction Printer EN - 7 Enter the printer's IP address in the Server Path field. For instructions on how to appear in the information for any unused ...address. 6. Setting Up the Printer Features Connecting over Ethernet (Network) 5. In the Server Address field, enter the IP...

Features Setup Guide
Page 10
... you want to an FTP Server To create an address for the Address ID. 5. Phaser® 6180MFP Multifunction Printer EN - 8 Click the Save Changes button to obtain the Printer IP address, see the printer's home page. For instructions on page 15. 3. If you want to change the automatically... the IP address of any blank address. Double-click the Email icon to obtain your email settings if necessary. b. Setting Up the Printer Features Connecting over Ethernet (Network) Note: See your system administrator to open an Email Address dialog box. 4. Step 4: Using CentreWare IS...
... you want to an FTP Server To create an address for the Address ID. 5. Phaser® 6180MFP Multifunction Printer EN - 8 Click the Save Changes button to obtain the Printer IP address, see the printer's home page. For instructions on page 15. 3. If you want to change the automatically... the IP address of any blank address. Double-click the Email icon to obtain your email settings if necessary. b. Setting Up the Printer Features Connecting over Ethernet (Network) Note: See your system administrator to open an Email Address dialog box. 4. Step 4: Using CentreWare IS...
Features Setup Guide
Page 11
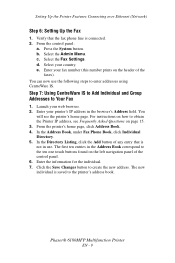
...d. Select your web browser. 2. You can now use . Launch your country. From the printer's home page, click Address Book. 4. In the Directory Listing, click the Add button of the control panel. 6. Phaser® 6180MFP Multifunction Printer EN - 9 Verify that is connected. 2. For instructions on page 15. 3. The first ...the fax phone line is not in the browser's Address field. Select the Admin Menu. e. Click the Save Changes button to the printer's address book. Step 7: Using CentreWare IS to Add Individual and Group Addresses to the ten one touch buttons found on the header...
...d. Select your web browser. 2. You can now use . Launch your country. From the printer's home page, click Address Book. 4. In the Directory Listing, click the Add button of the control panel. 6. Phaser® 6180MFP Multifunction Printer EN - 9 Verify that is connected. 2. For instructions on page 15. 3. The first ...the fax phone line is not in the browser's Address field. Select the Admin Menu. e. Click the Save Changes button to the printer's address book. Step 7: Using CentreWare IS to Add Individual and Group Addresses to the ten one touch buttons found on the header...
Features Setup Guide
Page 12
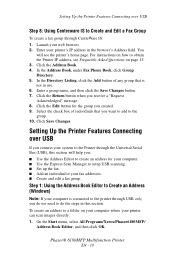
...Return button when you created. 9. Click Save Changes. Phaser® 6180MFP Multifunction Printer EN - 10 Enter a group name, and then click the Save Changes button. 7. Select the check box of any group that you connect your printer's IP address in this section will see Frequently Asked... Questions on your computer where your web browser. 2. On the Start menu, select All Programs/Xerox/Phaser6180MFP/ Address Book Editor, and then click OK. Launch your printer can scan images directly: 1. Enter your system to create an address for the group you receive a...
...Return button when you created. 9. Click Save Changes. Phaser® 6180MFP Multifunction Printer EN - 10 Enter a group name, and then click the Save Changes button. 7. Select the check box of any group that you connect your printer's IP address in this section will see Frequently Asked... Questions on your computer where your web browser. 2. On the Start menu, select All Programs/Xerox/Phaser6180MFP/ Address Book Editor, and then click OK. Launch your printer can scan images directly: 1. Enter your system to create an address for the group you receive a...
Features Setup Guide
Page 13
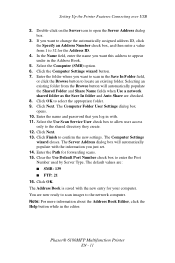
...icon to enter the Port Number used by Server Type. In the Name field, enter the name you just set. 14. Click OK. Phaser® 6180MFP Multifunction Printer EN - 11 The Computer Settings wizard closes. The default values are: ■ SMB: 139 ■ FTP: 21 16. Setting Up the... Printer Features Connecting over USB 2. If you want to change the automatically assigned address ID, click the Specify an Address Number check box, and ...
...icon to enter the Port Number used by Server Type. In the Name field, enter the name you just set. 14. Click OK. Phaser® 6180MFP Multifunction Printer EN - 11 The Computer Settings wizard closes. The default values are: ■ SMB: 139 ■ FTP: 21 16. Setting Up the... Printer Features Connecting over USB 2. If you want to change the automatically assigned address ID, click the Specify an Address Number check box, and ...

Features Setup Guide
Page 14
.... 7. Step 2: Using the Express Scan Manager to the network computer. Windows: On the Start menu, select All Programs/Xerox/ Phaser 6180MFP/Express Scan Manager. Type the name and password that you are not using the default port number, select the Use Default ...Port Number check box. Macintosh: From the Application folder, click Xerox/ Phaser 6180MFP, and then double-click Express Scan Manager. 2. The Server Address dialog box opens. 3. Phaser® 6180MFP Multifunction Printer EN - 12 In the left navigation panel of the Server Address dialog box,...
.... 7. Step 2: Using the Express Scan Manager to the network computer. Windows: On the Start menu, select All Programs/Xerox/ Phaser 6180MFP/Express Scan Manager. Type the name and password that you are not using the default port number, select the Use Default ...Port Number check box. Macintosh: From the Application folder, click Xerox/ Phaser 6180MFP, and then double-click Express Scan Manager. 2. The Server Address dialog box opens. 3. Phaser® 6180MFP Multifunction Printer EN - 12 In the left navigation panel of the Server Address dialog box,...
Features Setup Guide
Page 15
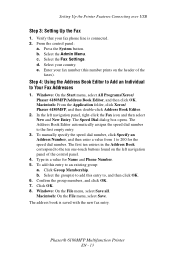
...From the control panel: a. Step 4: Using the Address Book Editor to Add an Individual to the first empty entry. 3. b. Phaser® 6180MFP Multifunction Printer EN - 13 The first ten entries in a value for the speed dial number. Windows: On the File menu, select Save all... this entry to 200 for Name and Phone Number. 5. Setting Up the Printer Features Connecting over USB Step 3: Setting Up the Fax 1. b. e. Click Group Membership. Macintosh: From the Application folder, click Xerox/ Phaser 6180MFP, and then double-click Address Book Editor. 2. The address book is connected...
...From the control panel: a. Step 4: Using the Address Book Editor to Add an Individual to the first empty entry. 3. b. Phaser® 6180MFP Multifunction Printer EN - 13 The first ten entries in a value for the speed dial number. Windows: On the File menu, select Save all... this entry to 200 for Name and Phone Number. 5. Setting Up the Printer Features Connecting over USB Step 3: Setting Up the Fax 1. b. e. Click Group Membership. Macintosh: From the Application folder, click Xerox/ Phaser 6180MFP, and then double-click Address Book Editor. 2. The address book is connected...

Features Setup Guide
Page 16
... 1. Click the Group Membership button. 5. Press the OK button again. 8. Windows: On the File menu, select Save all . Phaser® 6180MFP Multifunction Printer EN - 14 On the upper right navigation panel, right-click the group you have finished adding group members. 7. Click the Group ... Group To create a group using the Address Book Editor: 1. Macintosh: From the Application folder, click Xerox/ Phaser 6180MFP, and then double-click Address Book Editor. 2. Setting Up the Printer Features Connecting over USB Step 5: Using the Address Book Editor to edit the group. 6. In the ...
... 1. Click the Group Membership button. 5. Press the OK button again. 8. Windows: On the File menu, select Save all . Phaser® 6180MFP Multifunction Printer EN - 14 On the upper right navigation panel, right-click the group you have finished adding group members. 7. Click the Group ... Group To create a group using the Address Book Editor: 1. Macintosh: From the Application folder, click Xerox/ Phaser 6180MFP, and then double-click Address Book Editor. 2. Setting Up the Printer Features Connecting over USB Step 5: Using the Address Book Editor to edit the group. 6. In the ...

Features Setup Guide
Page 17
... the Ethernet (Network) you use a network connection? Scroll down to create address book entries. You will see a listing of the Configuration page. For a Macintosh: 1. Phaser® 6180MFP Multifunction Printer EN - 15 Why would you use a USB connection? For Windows: From a DOS prompt on the network using Express Scan manager. ■ Use the Address...
... the Ethernet (Network) you use a network connection? Scroll down to create address book entries. You will see a listing of the Configuration page. For a Macintosh: 1. Phaser® 6180MFP Multifunction Printer EN - 15 Why would you use a USB connection? For Windows: From a DOS prompt on the network using Express Scan manager. ■ Use the Address...

Installation Guide
Page 1
...; 6180MFP Software and Documentation CD-ROM Print and Scan Drivers and Utilities Installation Video User Guide W i n d o w s ®, Mac OS® Guides and Tutorials 1.3 Software and Documentation CD-ROM Installation Video Quick Start Tutorial PC 1.2 User Guide Install Drivers Guides and Tutorials Register Printer... 1.1 Phase®rDo6c1u8m0MenFtPatSioonftCwDa-rReOaMnd www.xerox.com/office/6180MFPsupport Mac 1.2 Xerox Phaser...
...; 6180MFP Software and Documentation CD-ROM Print and Scan Drivers and Utilities Installation Video User Guide W i n d o w s ®, Mac OS® Guides and Tutorials 1.3 Software and Documentation CD-ROM Installation Video Quick Start Tutorial PC 1.2 User Guide Install Drivers Guides and Tutorials Register Printer... 1.1 Phase®rDo6c1u8m0MenFtPatSioonftCwDa-rReOaMnd www.xerox.com/office/6180MFPsupport Mac 1.2 Xerox Phaser...
Quick Use Guide
Page 1
... reserved. www.xerox.com/office/6180MFPsupport Phaser® 6180MFP multifunction printer Printer Tour Printing Copying Scanning Faxing Troubleshooting More Information www.xerox.com/office/6180MFPsupport • Printer drivers and utilities • Quick Start Tutorials • User manuals and instructions • Online Support Assistant • Safety specifications (in User Guide) www.xerox.com/msds (U.S./Canada) www.xerox.com/environment_europe Material...
... reserved. www.xerox.com/office/6180MFPsupport Phaser® 6180MFP multifunction printer Printer Tour Printing Copying Scanning Faxing Troubleshooting More Information www.xerox.com/office/6180MFPsupport • Printer drivers and utilities • Quick Start Tutorials • User manuals and instructions • Online Support Assistant • Safety specifications (in User Guide) www.xerox.com/msds (U.S./Canada) www.xerox.com/environment_europe Material...
Quick Use Guide
Page 2
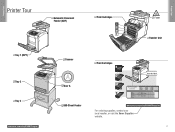
www.xerox.com/office/6180MFPsupplies For ordering supplies, contact your local reseller, or visit the Xerox Supplies website. 2 Printer Tour Printer Tour Printer Tour Tray 1 (MPT) Tray 2 Tray 3 www.xerox.com/office/6180MFPsupport Automatic Document Feeder (ADF) Print Cartridges K C M Y Fuser Transfer Unit Scanner Door A 550-Sheet Feeder Print Cartridges K C M Y See the label.
www.xerox.com/office/6180MFPsupplies For ordering supplies, contact your local reseller, or visit the Xerox Supplies website. 2 Printer Tour Printer Tour Printer Tour Tray 1 (MPT) Tray 2 Tray 3 www.xerox.com/office/6180MFPsupport Automatic Document Feeder (ADF) Print Cartridges K C M Y Fuser Transfer Unit Scanner Door A 550-Sheet Feeder Print Cartridges K C M Y See the label.
Quick Use Guide
Page 3
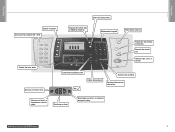
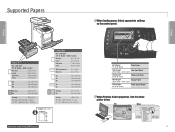
...up 001 002 003 004 005 006 007 008 009 010 Selects the color mode. Printer Tour Printer Tour Enters the Setup menu. Alphanumeric keypad Power Saver wake up one menu level. Copy Fax E-mail Scan Color Mode B&W Color Job Status Ready CMYK System @:./ ABC DEF 12 3 GHI JKL ... Stop Start Error Resets the job settings to defaults. Starts a copy, scan, or fax job. Deletes alphanumeric characters. Goes down . www.xerox.com/office/6180MFPsupport 3 Selects a function. Email and fax address book OK OK Enters fax numbers. Goes up or down one level, or...
...up 001 002 003 004 005 006 007 008 009 010 Selects the color mode. Printer Tour Printer Tour Enters the Setup menu. Alphanumeric keypad Power Saver wake up one menu level. Copy Fax E-mail Scan Color Mode B&W Color Job Status Ready CMYK System @:./ ABC DEF 12 3 GHI JKL ... Stop Start Error Resets the job settings to defaults. Starts a copy, scan, or fax job. Deletes alphanumeric characters. Goes down . www.xerox.com/office/6180MFPsupport 3 Selects a function. Email and fax address book OK OK Enters fax numbers. Goes up or down one level, or...
Quick Use Guide
Page 4
... GHI JKL MNO 456 PQRS TUV WXYZ 7 89 -_~ Manual Dial Redial/ Pause 0# Speed Dial C 65-120 g/m2 (17-32 lb. Plain Paper Auto Scan OK Color Mode B&W Color Job in . PC Mac 4 Printing A4 210 x 297 mm A5 148 x 210 mm B5 176 x 250 mm A/Letter 8.5 x 11.0 in . Bond) Plain ...Paper 100-163 g/m2 Thin Card Stock (28 lb. Cover) 160-220 g/m2 (60-80 lb. Cover) Thick Glossy Paper When Printing: Select properties. Use the Xerox printer driver...
... GHI JKL MNO 456 PQRS TUV WXYZ 7 89 -_~ Manual Dial Redial/ Pause 0# Speed Dial C 65-120 g/m2 (17-32 lb. Plain Paper Auto Scan OK Color Mode B&W Color Job in . PC Mac 4 Printing A4 210 x 297 mm A5 148 x 210 mm B5 176 x 250 mm A/Letter 8.5 x 11.0 in . Bond) Plain ...Paper 100-163 g/m2 Thin Card Stock (28 lb. Cover) 160-220 g/m2 (60-80 lb. Cover) Thick Glossy Paper When Printing: Select properties. Use the Xerox printer driver...


