
Quick Reference Guide
Page 28
... 94 500-Sheet Feeder Assembly Not Recognized Troubleshooting Procedure 164 Table 95 Exit Sensor Troubleshooting Procedure 167 Table 96 Pre-Registration Sensor Troubleshooting Procedure 168 Table 97 HCS Motor Assembly Message Troubleshooting Procedure 170 Table 98 Hard Disk Formatting Troubleshooting Procedure 172 Table 99 Erratic Printer Operation Troubleshooting Procedure 173 Table 100 Image-Quality Defect Definitions 177 Table 101 Light (Undertoned) Prints Troubleshooting Procedure 178 Table 102 Blank Prints Troubleshooting Procedure 181...
... 94 500-Sheet Feeder Assembly Not Recognized Troubleshooting Procedure 164 Table 95 Exit Sensor Troubleshooting Procedure 167 Table 96 Pre-Registration Sensor Troubleshooting Procedure 168 Table 97 HCS Motor Assembly Message Troubleshooting Procedure 170 Table 98 Hard Disk Formatting Troubleshooting Procedure 172 Table 99 Erratic Printer Operation Troubleshooting Procedure 173 Table 100 Image-Quality Defect Definitions 177 Table 101 Light (Undertoned) Prints Troubleshooting Procedure 178 Table 102 Blank Prints Troubleshooting Procedure 181...

Quick Reference Guide
Page 31
...-generated image onto the surface of a sheet of the electrically charged xerographic drum inside the Print Cartridge, electrically charged toner is removed. I The Phaser 5400 Laser Printer comes standard with ENERGY STAR requirements. The printer requires 110 VAC, 50/60 Hz (or optionally 220-240 VAC 50/60 Hz) using 1.1 kw for warm-up and approximately 890 watts for Letter-size and smaller paper) 2 Phaser 5400 Laser Printer Service Guide Power saver mode reduces power...
...-generated image onto the surface of a sheet of the electrically charged xerographic drum inside the Print Cartridge, electrically charged toner is removed. I The Phaser 5400 Laser Printer comes standard with ENERGY STAR requirements. The printer requires 110 VAC, 50/60 Hz (or optionally 220-240 VAC 50/60 Hz) using 1.1 kw for warm-up and approximately 890 watts for Letter-size and smaller paper) 2 Phaser 5400 Laser Printer Service Guide Power saver mode reduces power...

Quick Reference Guide
Page 36
... print jobs: Ready.. I The printer is a problem (in this case, a paper jam has occurred while feeding from Tray 3): Tray 3 JamOpen Tray 3 Phaser 5400 Laser Printer Service Guide 7 I There is waiting for more information on toner: Toner Low I A tray is empty (in this case, Tray 2 is empty and no longer is processing data: Processing.. I Displays information about the status of menus to print): Tray 2 Empty I The printer is being used to configure and control the printer. Access the menus by pressing the Menu...
... print jobs: Ready.. I The printer is a problem (in this case, a paper jam has occurred while feeding from Tray 3): Tray 3 JamOpen Tray 3 Phaser 5400 Laser Printer Service Guide 7 I There is waiting for more information on toner: Toner Low I A tray is empty (in this case, Tray 2 is empty and no longer is processing data: Processing.. I Displays information about the status of menus to print): Tray 2 Empty I The printer is being used to configure and control the printer. Access the menus by pressing the Menu...

Quick Reference Guide
Page 46
... 1 Memory Upgrades Memory Upgrades 16-Mbyte DIMM 32-Mbyte DIMM 64-Mbyte DIMM 8-Mbyte Flash DIMM Part Number 097S02356 097S02357 097S02358 097S02360 Phaser 5400 Laser Printer Service Guide 17 Refer to the instructions packed with 32 Mbytes of RAM and is expandable as a standard. I Improves collation printing. however, this is not a standard option and is not likely to be in J6 slot; Printer Specifications RAM and Printer Capabilities The Phaser 5400 Laser Printer...
... 1 Memory Upgrades Memory Upgrades 16-Mbyte DIMM 32-Mbyte DIMM 64-Mbyte DIMM 8-Mbyte Flash DIMM Part Number 097S02356 097S02357 097S02358 097S02360 Phaser 5400 Laser Printer Service Guide 17 Refer to the instructions packed with 32 Mbytes of RAM and is expandable as a standard. I Improves collation printing. however, this is not a standard option and is not likely to be in J6 slot; Printer Specifications RAM and Printer Capabilities The Phaser 5400 Laser Printer...

Quick Reference Guide
Page 55
... (printer cartridge, media, etc.) or Options, refer to Be Replaced Periodically Fuser Unit 200,000 prints (Letter LEF) Bias Transfer Roll 200,000 prints (Letter LEF) Options The basic Phaser 5400 Laser Printer configuration consists of this kit, the customer must be installed. Installed as the second or third paper high capacity feeders. Installed as indicated by the Control Panel. Table 15 Components to Xerox Supplies and Accessories on page 428 of the base engine and a Paper Feeder (Standard feeder) with a A4/Letter 500-sheet universal...
... (printer cartridge, media, etc.) or Options, refer to Be Replaced Periodically Fuser Unit 200,000 prints (Letter LEF) Bias Transfer Roll 200,000 prints (Letter LEF) Options The basic Phaser 5400 Laser Printer configuration consists of this kit, the customer must be installed. Installed as the second or third paper high capacity feeders. Installed as indicated by the Control Panel. Table 15 Components to Xerox Supplies and Accessories on page 428 of the base engine and a Paper Feeder (Standard feeder) with a A4/Letter 500-sheet universal...

Quick Reference Guide
Page 57
.../IP address and is not visible on page 107. View fault history in this section with trays or consumables, open covers, jams, system failures or other operating problems. Error codes are usually specific: the word string or code has a special meaning, which makes it encounters certain system failures or anomalies otherwise undetected by the user. Continue to press the [3] key to a network, view the printer's web page using Print Menu, Display...
.../IP address and is not visible on page 107. View fault history in this section with trays or consumables, open covers, jams, system failures or other operating problems. Error codes are usually specific: the word string or code has a special meaning, which makes it encounters certain system failures or anomalies otherwise undetected by the user. Continue to press the [3] key to a network, view the printer's web page using Print Menu, Display...

Quick Reference Guide
Page 59
.... 3. Use the Wiring Diagrams to clean the printer interior. Figure 16 Service Flowchart S5400-03 30 Phaser 5400 Laser Printer Service Guide Make note of paper, paper dust, or toner. 2 5. Disconnect the AC power cord from strong light. 4. Do not use any type of any error codes and write them down. 3. Use the Removal and Replacement Procedures (RRPs) to replace a part. 5 Final Checkout Test the printer to check printer and option components. Take voltage readings at various test points. Identify the Problem 1. Use...
.... 3. Use the Wiring Diagrams to clean the printer interior. Figure 16 Service Flowchart S5400-03 30 Phaser 5400 Laser Printer Service Guide Make note of paper, paper dust, or toner. 2 5. Disconnect the AC power cord from strong light. 4. Do not use any type of any error codes and write them down. 3. Use the Removal and Replacement Procedures (RRPs) to replace a part. 5 Final Checkout Test the printer to check printer and option components. Take voltage readings at various test points. Identify the Problem 1. Use...

Quick Reference Guide
Page 64
...Phaser 5400 Laser Printer Service Guide 35 Paper level sensor on when 2000Sheet Feeder Tray is out of paper. Go to RAP 3, page 46 Load Tray 1 C5: Tray 1 Empty Tray 1 is opened . Error Codes with Repair Analysis Procedure Table 18 Error Code / Repair Analysis Procedure Displayed Fault Diagnostic Message / Error Message History Fault Description / Log Comment Action Insert Tray 1 C3: Tray 1 Error Tray 1 is not detected in printer. (All paper size switches not actuated.) Install Tray 3 500-Sheet Feeder Go to RAP 2, page 44. Open and close 2000-Sheet Feeder paper tray...
...Phaser 5400 Laser Printer Service Guide 35 Paper level sensor on when 2000Sheet Feeder Tray is out of paper. Go to RAP 3, page 46 Load Tray 1 C5: Tray 1 Empty Tray 1 is opened . Error Codes with Repair Analysis Procedure Table 18 Error Code / Repair Analysis Procedure Displayed Fault Diagnostic Message / Error Message History Fault Description / Log Comment Action Insert Tray 1 C3: Tray 1 Error Tray 1 is not detected in printer. (All paper size switches not actuated.) Install Tray 3 500-Sheet Feeder Go to RAP 2, page 44. Open and close 2000-Sheet Feeder paper tray...

Quick Reference Guide
Page 68
... sensor. 2. Tray 2 Failure Power Off/On E9-3 E-9: HCF Fail 2000-Sheet Feeder removed while power is not deactuated within the time after the actutation of HCS Sensor. 3. Phaser 5400 Laser Printer Service Guide 39 Stacker Jam Open Rear Cover Open Stacker Door Clear Paper Path E8-1 E8-1 HCS Jam 1. Install the Print Cartridge, or replace with the correct Print Cartridge. Go to RAP 27, page 92. HCS Sensor is on . Duplex Unit Fail or Removed E9-1 E9: Duplex Fail Duplex module removed while power is not installed. Comment: Jam...
... sensor. 2. Tray 2 Failure Power Off/On E9-3 E-9: HCF Fail 2000-Sheet Feeder removed while power is not deactuated within the time after the actutation of HCS Sensor. 3. Phaser 5400 Laser Printer Service Guide 39 Stacker Jam Open Rear Cover Open Stacker Door Clear Paper Path E8-1 E8-1 HCS Jam 1. Install the Print Cartridge, or replace with the correct Print Cartridge. Go to RAP 27, page 92. HCS Sensor is on . Duplex Unit Fail or Removed E9-1 E9: Duplex Fail Duplex module removed while power is not installed. Comment: Jam...

Quick Reference Guide
Page 71
... 3. 3 END GUIDE ADJUSTMENT Problem Go to start the test. 4. Does adjusting the End Guide clear the Insert Tray 1 message? 4 PAPER SIZE TEST Replace Go to contact the paper stack. From the Main Menu, select Component Test / Tray 1 Controller Size / press [4]. Replace Tray 1 [PL 2.1, page 386 / PL 2.2, page 388]. 42 Phaser 5400 Laser Printer Service Guide Table 19 Error Code C3: Insert Tray Troubleshooting Procedure Step Actions and Questions Yes No 1 REMOVE & REINSTALL TRAY 1 Completely remove and reinstall Tray. RAP 1 Error Code C3: Insert Tray 1 The Tray 1 Assembly...
... 3. 3 END GUIDE ADJUSTMENT Problem Go to start the test. 4. Does adjusting the End Guide clear the Insert Tray 1 message? 4 PAPER SIZE TEST Replace Go to contact the paper stack. From the Main Menu, select Component Test / Tray 1 Controller Size / press [4]. Replace Tray 1 [PL 2.1, page 386 / PL 2.2, page 388]. 42 Phaser 5400 Laser Printer Service Guide Table 19 Error Code C3: Insert Tray Troubleshooting Procedure Step Actions and Questions Yes No 1 REMOVE & REINSTALL TRAY 1 Completely remove and reinstall Tray. RAP 1 Error Code C3: Insert Tray 1 The Tray 1 Assembly...

Quick Reference Guide
Page 77
... select Tray 1 as Input Tray. 3. Remove Tray 1 from the tray. 3. Is the bottom plate raised fully and evenly? PL 2.2, page 388]. 48 Phaser 5400 Laser Printer Service Guide Step 7. 2. Does the Load Tray 1 message appear when you feed paper from Tray 1? Go to the MBF or a Paper Tray appears on the LCD. Is there paper in Tray 1? Step 6. 2. RAP 4 Load MBF / Load Tray 1 / Load Tray 2 / Load Tray 3 Logic Control on the Print Engine Controller Board detected a problem where a false message to add paper to Step 2. 2 TRAY 1 PAPER...
... select Tray 1 as Input Tray. 3. Remove Tray 1 from the tray. 3. Is the bottom plate raised fully and evenly? PL 2.2, page 388]. 48 Phaser 5400 Laser Printer Service Guide Step 7. 2. Does the Load Tray 1 message appear when you feed paper from Tray 1? Go to the MBF or a Paper Tray appears on the LCD. Is there paper in Tray 1? Step 6. 2. RAP 4 Load MBF / Load Tray 1 / Load Tray 2 / Load Tray 3 Logic Control on the Print Engine Controller Board detected a problem where a false message to add paper to Step 2. 2 TRAY 1 PAPER...
Quick Reference Guide
Page 89
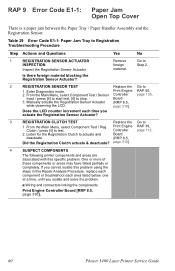
... the Registration Sensor Actuator? 3 REGISTRATION CLUTCH TEST Replace the Go to Registration Troubleshooting Procedure Step Actions and Questions Yes No 1 REGISTRATION SENSOR ACTUATOR INSPECTION Inspect the Registration Sensor Actuator. Enter Diagnostics mode. 2. RAP 50, page 135. From the Main Menu, select Component Test / Reg Clutch / press [4] to 1. Table 29 Error Code E1-1: Paper Jam Tray to 1. RAP 9 Error Code E1-1: Paper Jam Open Top Cover There is a paper jam between the Paper Tray / Paper Handler Assembly...
... the Registration Sensor Actuator? 3 REGISTRATION CLUTCH TEST Replace the Go to Registration Troubleshooting Procedure Step Actions and Questions Yes No 1 REGISTRATION SENSOR ACTUATOR INSPECTION Inspect the Registration Sensor Actuator. Enter Diagnostics mode. 2. RAP 50, page 135. From the Main Menu, select Component Test / Reg Clutch / press [4] to 1. Table 29 Error Code E1-1: Paper Jam Tray to 1. RAP 9 Error Code E1-1: Paper Jam Open Top Cover There is a paper jam between the Paper Tray / Paper Handler Assembly...

Quick Reference Guide
Page 91
... 1. I Wiring and connectors linking the components 62 Phaser 5400 Laser Printer Service Guide Remove Tray 1 and remove all paper. Insert the Tray Assembly into the printer and observe the bottom plate. Remove Tray 1. 5. From the Main Menu, select Component Test / Main Motor / press [4] to test. Do the Feed Rollers rotate one at a time, until you cannot isolate this problem using the steps in this specific problem. Inspect the retard holder and retard arm...
... 1. I Wiring and connectors linking the components 62 Phaser 5400 Laser Printer Service Guide Remove Tray 1 and remove all paper. Insert the Tray Assembly into the printer and observe the bottom plate. Remove Tray 1. 5. From the Main Menu, select Component Test / Main Motor / press [4] to test. Do the Feed Rollers rotate one at a time, until you cannot isolate this problem using the steps in this specific problem. Inspect the retard holder and retard arm...

Quick Reference Guide
Page 123
..., page 142. 94 Phaser 5400 Laser Printer Service Guide Enter Diagnostics mode. the size of the paper tray. the MBF Tray. 2. Does the paper size displayed on the left side of the paper actually loaded? 7 SENSOR INPUT TEST Go to 1. Replace the paper tray [PL 2.1, page 386 / PL 2.2, page 388]. 6 TRAY SIZE TEST Replace the Go to 1. While still in the MBF? One at a time, press and release each time you press and release one of the problem tray size actuators. Step 3. Replace with paper...
..., page 142. 94 Phaser 5400 Laser Printer Service Guide Enter Diagnostics mode. the size of the paper tray. the MBF Tray. 2. Does the paper size displayed on the left side of the paper actually loaded? 7 SENSOR INPUT TEST Go to 1. Replace the paper tray [PL 2.1, page 386 / PL 2.2, page 388]. 6 TRAY SIZE TEST Replace the Go to 1. While still in the MBF? One at a time, press and release each time you press and release one of the problem tray size actuators. Step 3. Replace with paper...
Quick Reference Guide
Page 124
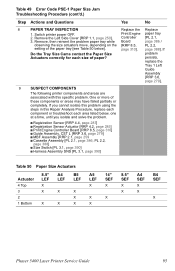
... at a time, until you cannot isolate this problem using the steps in this specific problem. page 310]. problem persists, replace the Tray 1 Left Guide Assembly [RRP 3.6, page 279]. 9 SUSPECT COMPONENTS The following printer components and areas are associated with this Repair Analysis Procedure, replace each component or troubleshoot each size of these components or areas may have failed partially or completely. Table 49 Error Code PSE-1 Paper Size Jam Troubleshooting Procedure (cont...
... at a time, until you cannot isolate this problem using the steps in this specific problem. page 310]. problem persists, replace the Tray 1 Left Guide Assembly [RRP 3.6, page 279]. 9 SUSPECT COMPONENTS The following printer components and areas are associated with this Repair Analysis Procedure, replace each component or troubleshoot each size of these components or areas may have failed partially or completely. Table 49 Error Code PSE-1 Paper Size Jam Troubleshooting Procedure (cont...
Quick Reference Guide
Page 148
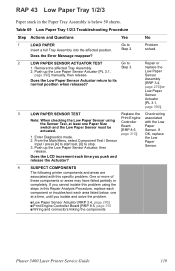
... 1 LOAD PAPER Go to its normal position when released? Does the Error Message reappear? Does the Low Paper Sensor Actuator return to Insert a full Tray Assembly into the affected position. I Low Paper Sensor Actuator [RRP 3.4, page 276] I Print Engine Controller Board [RRP 8.5, page 310 I Wiring and connectors linking the components Phaser 5400 Laser Printer Service Guide 119 If OK, replace 1. If you cannot isolate this specific problem. Print Engine Controller Board [RRP 8.5, page 310]. Enter Diagnostics mode...
... 1 LOAD PAPER Go to its normal position when released? Does the Error Message reappear? Does the Low Paper Sensor Actuator return to Insert a full Tray Assembly into the affected position. I Low Paper Sensor Actuator [RRP 3.4, page 276] I Print Engine Controller Board [RRP 8.5, page 310 I Wiring and connectors linking the components Phaser 5400 Laser Printer Service Guide 119 If OK, replace 1. If you cannot isolate this specific problem. Print Engine Controller Board [RRP 8.5, page 310]. Enter Diagnostics mode...

Quick Reference Guide
Page 180
.... Step 5. 2. Replace the Print Engine Controller Board [RRP 8.5, page 310]. 4 "YES" FROM STEP 3 ABOVE Problem Go to 1. Reconnect P/J14. 3. Does the voltage measure +5.0 VDC when the cartridge is in place and 0.0 VDC when the cartridge is raised? 5 TONER SENSOR HARNESS CONTINUITY Replace the Repair or CHECK Toner replace the 1. Phaser 5400 Laser Printer Service Guide 151 Switch printer power ON. 7. Does the voltage measure +5.0 VDC? Switch printer power ON. 4. RAP 58 Toner Sensor Assembly Table 88 Toner Sensor As...
.... Step 5. 2. Replace the Print Engine Controller Board [RRP 8.5, page 310]. 4 "YES" FROM STEP 3 ABOVE Problem Go to 1. Reconnect P/J14. 3. Does the voltage measure +5.0 VDC when the cartridge is in place and 0.0 VDC when the cartridge is raised? 5 TONER SENSOR HARNESS CONTINUITY Replace the Repair or CHECK Toner replace the 1. Phaser 5400 Laser Printer Service Guide 151 Switch printer power ON. 7. Does the voltage measure +5.0 VDC? Switch printer power ON. 4. RAP 58 Toner Sensor Assembly Table 88 Toner Sensor As...

Quick Reference Guide
Page 189
... 91 Low Paper Tray 2 (or Tray 3) / 500-Sheet Feeder Troubleshooting Procedure (cont'd.) Step Actions and Questions Yes No 6 "NO" FROM STEP 5 ABOVE Replace the Repair or 1. Measure the voltage between P/J132-7 (Tray 2) or Step 8. P/J137. Remove the 500-Sheet Feeder Left Tray Guide. I Low Paper Sensor Actuator [RRP 11.18, page 347] I Tray Left Guide Assembly [RRP 11.13, page 340] I Feeder Board [RRP 11-7, page 334] I Print Engine Controller Board [RRP 8.5, page 310] 160 Phaser 5400 Laser Printer Service Guide between page...
... 91 Low Paper Tray 2 (or Tray 3) / 500-Sheet Feeder Troubleshooting Procedure (cont'd.) Step Actions and Questions Yes No 6 "NO" FROM STEP 5 ABOVE Replace the Repair or 1. Measure the voltage between P/J132-7 (Tray 2) or Step 8. P/J137. Remove the 500-Sheet Feeder Left Tray Guide. I Low Paper Sensor Actuator [RRP 11.18, page 347] I Tray Left Guide Assembly [RRP 11.13, page 340] I Feeder Board [RRP 11-7, page 334] I Print Engine Controller Board [RRP 8.5, page 310] 160 Phaser 5400 Laser Printer Service Guide between page...

Quick Reference Guide
Page 203
...Replace the Low Voltage Power Supply ("RRP 8.6 Low-Voltage Power Supply [LVPS] Assembly"). 3. Replace the Print Engine Controller Board ("RRP 8.5 Print Engine Controller Board"). 2. Monitor printer operation. Reconnect P/J168 to your printer configuration, check the Step 8. Monitor printer operation. solved. computer to stop. 5. Monitor printer operation. Are the NVRAM settings set to the factory default values? Reload print driver software in the host computer. Problem solved. 174 Phaser 5400 Laser Printer Service Guide From the Main Menu, select Test Print / Print...
...Replace the Low Voltage Power Supply ("RRP 8.6 Low-Voltage Power Supply [LVPS] Assembly"). 3. Replace the Print Engine Controller Board ("RRP 8.5 Print Engine Controller Board"). 2. Monitor printer operation. Reconnect P/J168 to your printer configuration, check the Step 8. Monitor printer operation. solved. computer to stop. 5. Monitor printer operation. Are the NVRAM settings set to the factory default values? Reload print driver software in the host computer. Problem solved. 174 Phaser 5400 Laser Printer Service Guide From the Main Menu, select Test Print / Print...

Quick Reference Guide
Page 269
...Customer-Replaceable Unit (CRU). When the Control Display shows *IOT?*, release buttons [2] and [6], then press and hold buttons [2] and [6] on page 428. 240 Phaser 5400 Laser Printer Service Guide Xerox Phaser™ 5400 On Line Form Feed ! The interval for when those instructions are included in the FRU Parts Lists on printer power. Replace." For Maintenance Kit part numbers, see Xerox Supplies and Accessories in the kit. Wordless reset instructions are unavailable. You have 10 seconds to install a Maintenance Kit by displaying "Maintenance Kit - Make...
...Customer-Replaceable Unit (CRU). When the Control Display shows *IOT?*, release buttons [2] and [6], then press and hold buttons [2] and [6] on page 428. 240 Phaser 5400 Laser Printer Service Guide Xerox Phaser™ 5400 On Line Form Feed ! The interval for when those instructions are included in the FRU Parts Lists on printer power. Replace." For Maintenance Kit part numbers, see Xerox Supplies and Accessories in the kit. Wordless reset instructions are unavailable. You have 10 seconds to install a Maintenance Kit by displaying "Maintenance Kit - Make...


