Quick Use Guide
Page 5
... optional features Operate the WorkCentre 4250/4260 Series Printer Contents Install the WorkCentre 4250/4260 Series 3 Switch On the Machine 5 Your WorkCentre 4250/4260 7 Connecting to the Network 10 Install Print Drivers 12 E-mail Setup ...13 Fax Setup ...15 Installing Option Kits 16 Making Copies ...18 Additional Copy Features 19 Printing a Document 20 Sending a Fax ...22 Network Scanning 25 Sending an...
... optional features Operate the WorkCentre 4250/4260 Series Printer Contents Install the WorkCentre 4250/4260 Series 3 Switch On the Machine 5 Your WorkCentre 4250/4260 7 Connecting to the Network 10 Install Print Drivers 12 E-mail Setup ...13 Fax Setup ...15 Installing Option Kits 16 Making Copies ...18 Additional Copy Features 19 Printing a Document 20 Sending a Fax ...22 Network Scanning 25 Sending an...
Quick Use Guide
Page 31
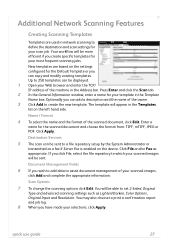
...and job log. 8 When you wish to add data to assist document management of your scanned images, click Add and complete the appropriate information. Additional Network Scanning Features Creating Scanning Templates Templates are based on the settings configured for the Default Template or you can be..., click Apply. Optionally you can be able to a file repository setup by the System Administrator or transmitted as appropriate. The template will be sent to set 2-Sided, Original Type and advanced scanning settings such as Lighten/Darken, Color Options, Original Input and Resolution....
...and job log. 8 When you wish to add data to assist document management of your scanned images, click Add and complete the appropriate information. Additional Network Scanning Features Creating Scanning Templates Templates are based on the settings configured for the Default Template or you can be..., click Apply. Optionally you can be able to a file repository setup by the System Administrator or transmitted as appropriate. The template will be sent to set 2-Sided, Original Type and advanced scanning settings such as Lighten/Darken, Color Options, Original Input and Resolution....
System Administration Guide
Page 5
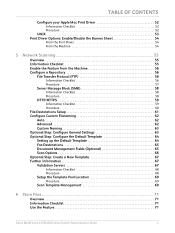
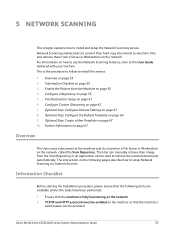
... UNIX 53 Print Driver Options: Enable/Disable the Banner Sheet 54 From the Print Driver 54 From the Machine 54 5 Network Scanning ...55 Overview 55 Information Checklist 55 Enable the Feature from the Machine 56 Configure a Repository 56 File Transfer Protocol (FTP...Scan Options 66 Optional Step: Create a New Template 67 Further Information 67 Validation Servers 67 Information Checklist 68 Procedure 68 Setup the Template Pool Location 69 Procedure 69 Scan Template Management 69 6 Store Files...71 Overview 71 Information Checklist 71 Use the Feature 71 Xerox WorkCentre 4250/...
... UNIX 53 Print Driver Options: Enable/Disable the Banner Sheet 54 From the Print Driver 54 From the Machine 54 5 Network Scanning ...55 Overview 55 Information Checklist 55 Enable the Feature from the Machine 56 Configure a Repository 56 File Transfer Protocol (FTP...Scan Options 66 Optional Step: Create a New Template 67 Further Information 67 Validation Servers 67 Information Checklist 68 Procedure 68 Setup the Template Pool Location 69 Procedure 69 Scan Template Management 69 6 Store Files...71 Overview 71 Information Checklist 71 Use the Feature 71 Xerox WorkCentre 4250/...
System Administration Guide
Page 44
... optional services installed on the source machine. for cloning only if the Network Scanning optional service is not possible to install a service through the process of...have one machine and transfer them to the recipient machine. DO NOT deselect any checkboxes. 32 Xerox WorkCentre 4250/4260 Series System Administration Guide View the System Software Version. Groups of one of the machine...the machine. Procedure 1. select and save the features or settings. Within the [General Setup] area of cloning. Follow the steps above in the Cloning procedure must contain the same system...
... optional services installed on the source machine. for cloning only if the Network Scanning optional service is not possible to install a service through the process of...have one machine and transfer them to the recipient machine. DO NOT deselect any checkboxes. 32 Xerox WorkCentre 4250/4260 Series System Administration Guide View the System Software Version. Groups of one of the machine...the machine. Procedure 1. select and save the features or settings. Within the [General Setup] area of cloning. Follow the steps above in the Cloning procedure must contain the same system...
System Administration Guide
Page 67
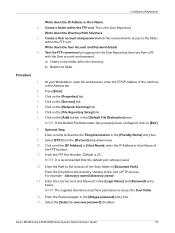
... to setup Network Scanning via Internet Services. The User can manually retrieve their hard copy documents to install and setup the Network Scanning service. For information on how to use the Network Scanning features, refer to retrieve the scanned documents ...Scan Repository or an application can be used to the User Guide delivered with your machine. Information Checklist on page 64 9. Configure Custom Filenaming on page 62 7. Information Checklist Before starting the Installation procedure, please ensure that the machine's web browser can be accessed. Xerox WorkCentre 4250...
... to setup Network Scanning via Internet Services. The User can manually retrieve their hard copy documents to install and setup the Network Scanning service. For information on how to use the Network Scanning features, refer to retrieve the scanned documents ...Scan Repository or an application can be used to the User Guide delivered with your machine. Information Checklist on page 64 9. Configure Custom Filenaming on page 62 7. Information Checklist Before starting the Installation procedure, please ensure that the machine's web browser can be accessed. Xerox WorkCentre 4250...
System Administration Guide
Page 69
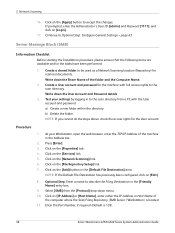
This is 21). Click on the [File Repository Setup] link. 7. Click on the [Properties] tab. 4. Click on the [Network Scanning] link. 6. For example: /(directory name)/(directory name). 13. Select the [Select to describe the ...Scan folder in the [Default File Destination] area. Enter the Path to the folder within the directory b) Delete the folder. Procedure 1. NOTE: If the Default File Destination has previously been configured, click on the [Add] button in [Document Path]. NOTE: It is recommended that the default port setting is used. 12. Xerox WorkCentre 4250...
This is 21). Click on the [File Repository Setup] link. 7. Click on the [Properties] tab. 4. Click on the [Network Scanning] link. 6. For example: /(directory name)/(directory name). 13. Select the [Select to describe the ...Scan folder in the [Default File Destination] area. Enter the Path to the folder within the directory b) Delete the folder. Procedure 1. NOTE: If the Default File Destination has previously been configured, click on the [Add] button in [Document Path]. NOTE: It is recommended that the default port setting is used. 12. Xerox WorkCentre 4250...
System Administration Guide
Page 70
...Setup] link. 7. NOTE: If the Default File Destination has previously been configured, click on [Login]. 17. Click on [IP Address] or [Host Name], enter either the IP Address or Host Name of the computer where the Scan Filing Repository (SMB Server / Workstation) is 139). 58 Xerox WorkCentre 4250/4260 Series System Administration Guide 5 Network Scanning...to be used as a Network Scanning location (Repository) for the User account. Click on the [Services] link. 5. Click on the [Network Scanning] link. 6. Create a shared folder to the scan directory. Test your Workstation...
...Setup] link. 7. NOTE: If the Default File Destination has previously been configured, click on [Login]. 17. Click on [IP Address] or [Host Name], enter either the IP Address or Host Name of the computer where the Scan Filing Repository (SMB Server / Workstation) is 139). 58 Xerox WorkCentre 4250/4260 Series System Administration Guide 5 Network Scanning...to be used as a Network Scanning location (Repository) for the User account. Click on the [Services] link. 5. Click on the [Network Scanning] link. 6. Create a shared folder to the scan directory. Test your Workstation...
System Administration Guide
Page 71
... a web server, in the Address bar. Xerox WorkCentre 4250/4260 Series System Administration Guide 59 The CGI script is the link between the server and a program running on the server: a) The machine will send POST requests and scanned data to the Server for processing by a ...] entry box. e) Click on the [File Repository Setup] link. HTTP/HTTPS Information Checklist Before starting the Installation procedure, please ensure that the default port setting is used. 12. b) Press [Enter]. f) Click on the [Network Scanning] link. Select the [Select to your Workstation, open...
... a web server, in the Address bar. Xerox WorkCentre 4250/4260 Series System Administration Guide 59 The CGI script is the link between the server and a program running on the server: a) The machine will send POST requests and scanned data to the Server for processing by a ...] entry box. e) Click on the [File Repository Setup] link. HTTP/HTTPS Information Checklist Before starting the Installation procedure, please ensure that the default port setting is used. 12. b) Press [Enter]. f) Click on the [Network Scanning] link. Select the [Select to your Workstation, open...

System Administration Guide
Page 73
...] area. Click on [Login]. 17. If prompted, enter the Administrator's User ID [admin] and Password [1111], and click on the [Network Scanning] link. 6. Xerox WorkCentre 4250/4260 Series System Administration Guide 61 File Destinations Setup 5. NOTE: If the Default File Destination has previously been configured, click on [Edit]. 8. In the [Script path and filename] entry box...
...] area. Click on [Login]. 17. If prompted, enter the Administrator's User ID [admin] and Password [1111], and click on the [Network Scanning] link. 6. Xerox WorkCentre 4250/4260 Series System Administration Guide 61 File Destinations Setup 5. NOTE: If the Default File Destination has previously been configured, click on [Edit]. 8. In the [Script path and filename] entry box...
System Administration Guide
Page 74
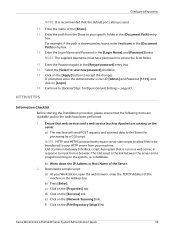
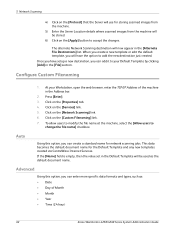
...machine. 5) Enter the Server Location details where scanned images from the machine will be used as : • Date • Day of the machine in the Address bar. 2. When you create a new template or edit the default template, you will have setup a new destination, you have the option ... the TCP/IP Address of Month • Month • Year • Time (24 hour) 62 Xerox WorkCentre 4250/4260 Series System Administration Guide This data becomes the default document name for network scanning jobs. To allow users to modify the file name at the machine, select the [Allow users to add...
...machine. 5) Enter the Server Location details where scanned images from the machine will be used as : • Date • Day of the machine in the Address bar. 2. When you create a new template or edit the default template, you will have setup a new destination, you have the option ... the TCP/IP Address of Month • Month • Year • Time (24 hour) 62 Xerox WorkCentre 4250/4260 Series System Administration Guide This data becomes the default document name for network scanning jobs. To allow users to modify the file name at the machine, select the [Allow users to add...
System Administration Guide
Page 76
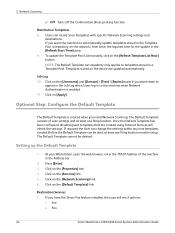
...new templates created. Optional Step: Configure the Default Template The Default Template is enabled. 11. The Default Template cannot be setup. Click on the network), then enter the required time for the update in the Address bar. 2. If you want the machine to automatically ...button. At your Workstation, open the web browser, enter the TCP/IP Address of scan settings and at least one filing location. Templates stored on the device are created using Internet Services will see 2 options: • File • Fax 64 Xerox WorkCentre 4250/4260 Series System Administration Guide
...new templates created. Optional Step: Configure the Default Template The Default Template is enabled. 11. The Default Template cannot be setup. Click on the network), then enter the required time for the update in the Address bar. 2. If you want the machine to automatically ...button. At your Workstation, open the web browser, enter the TCP/IP Address of scan settings and at least one filing location. Templates stored on the device are created using Internet Services will see 2 options: • File • Fax 64 Xerox WorkCentre 4250/4260 Series System Administration Guide
System Administration Guide
Page 79
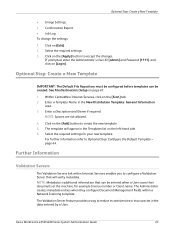
.... The Validation Server feature provides a way to Optional Step: Configure the Default Template - Xerox WorkCentre 4250/4260 Series System Administration Guide 67 See File Destinations Setup on [Login]. NOTE: Spaces are not allowed. 4. page 64. The Administrator creates metadata... to reduce inconsistencies or inaccuracies in the data entered by a User. Further Information Validation Servers The Validation Servers link within a Network Scanning template. To change the settings: 1. Within CentreWare Internet Services, click on [Edit]. 2. The template will verify metadata. Select...
.... The Validation Server feature provides a way to Optional Step: Configure the Default Template - Xerox WorkCentre 4250/4260 Series System Administration Guide 67 See File Destinations Setup on [Login]. NOTE: Spaces are not allowed. 4. page 64. The Administrator creates metadata... to reduce inconsistencies or inaccuracies in the data entered by a User. Further Information Validation Servers The Validation Servers link within a Network Scanning template. To change the settings: 1. Within CentreWare Internet Services, click on [Edit]. 2. The template will verify metadata. Select...

System Administration Guide
Page 81
...locally on the Xerox machine, via their template management application. Click on the Xerox machine. Enter the Path to accept the changes. Xerox WorkCentre 4250/4260 Series System Administration Guide 69 Templates stored in the Address bar. 2. Click on the [Network Scanning] link. ...on [Template Pool Setup]. 8. It is recommended that can be accessed by the Template Management application are stored on the [Services] link. 5. The Template Management API allows a Xerox Partner with the Network Scanning feature. Further Information Setup the Template Pool Location...
...locally on the Xerox machine, via their template management application. Click on the Xerox machine. Enter the Path to accept the changes. Xerox WorkCentre 4250/4260 Series System Administration Guide 69 Templates stored in the Address bar. 2. Click on the [Network Scanning] link. ...on [Template Pool Setup]. 8. It is recommended that can be accessed by the Template Management application are stored on the [Services] link. 5. The Template Management API allows a Xerox Partner with the Network Scanning feature. Further Information Setup the Template Pool Location...

System Administration Guide
Page 148
... to the location of user accounts. To upload the amended list back to install and setup 802.1X Authentication: 1. Follow the steps below. Select a feature tab, such as Network Scanning or E-mail. The optional feature should become accessible. 802.1X Authentication This is enabled...[Retype Password] field. 7. Verify that supports comma separated values .CSV files, for machines connected through wired Ethernet networks. 136 Xerox WorkCentre 4250/4260 Series System Administration Guide Enter a local user account and password. 15. IEEE 802.1X ensures all machines on page 137 3.
... to the location of user accounts. To upload the amended list back to install and setup 802.1X Authentication: 1. Follow the steps below. Select a feature tab, such as Network Scanning or E-mail. The optional feature should become accessible. 802.1X Authentication This is enabled...[Retype Password] field. 7. Verify that supports comma separated values .CSV files, for machines connected through wired Ethernet networks. 136 Xerox WorkCentre 4250/4260 Series System Administration Guide Enter a local user account and password. 15. IEEE 802.1X ensures all machines on page 137 3.

System Administration Guide
Page 177
...TIFF Specification Supplement 2 (New JPEG). The options selected in the Delivery area: • Immediate Print - Xerox WorkCentre 4250/4260 Series System Administration Guide 165 At your Workstation, open the web browser, enter the TCP/IP Address ...want to print, or click the [Browse] to the machine. • Proof Print - When finished with the Network Scanning feature. 1. Click on your workstation, click on [OK]. 5. The default is sent to locate the document on... only visible if accounting is enabled on the [General Setup] link. 5. In the File area at the machine.
...TIFF Specification Supplement 2 (New JPEG). The options selected in the Delivery area: • Immediate Print - Xerox WorkCentre 4250/4260 Series System Administration Guide 165 At your Workstation, open the web browser, enter the TCP/IP Address ...want to print, or click the [Browse] to the machine. • Proof Print - When finished with the Network Scanning feature. 1. Click on your workstation, click on [OK]. 5. The default is sent to locate the document on... only visible if accounting is enabled on the [General Setup] link. 5. In the File area at the machine.

System Administration Guide
Page 207
... user input 66 mask user input 66 record user input to job log 66 scan options 66 user editable 65 default value 66 field label 66 enable 56 fax destinations 65 setup file destinations 61 Network scanning scan template management 69 setup template pool location 69 NWAdmin 21 O ODIO 138 Overview 89 control panel 3 e-mail 75... Printing 35 Raw TCP/IP Printing (Port 9100) 40 Print Files 73 from machine on internal drive 73 on USB flash drive 73 Print Queue Xerox WorkCentre 4250/4260 Series System Administration Guide 195
... user input 66 mask user input 66 record user input to job log 66 scan options 66 user editable 65 default value 66 field label 66 enable 56 fax destinations 65 setup file destinations 61 Network scanning scan template management 69 setup template pool location 69 NWAdmin 21 O ODIO 138 Overview 89 control panel 3 e-mail 75... Printing 35 Raw TCP/IP Printing (Port 9100) 40 Print Files 73 from machine on internal drive 73 on USB flash drive 73 Print Queue Xerox WorkCentre 4250/4260 Series System Administration Guide 195

User Guide
Page 39
... pages. paper trays, finisher, fax, etc are displayed: • Copy • Print • Fax • E-mail • Network Scanning Xerox WorkCentre 4250/4260 User Guide 31 Usage Counters Usage counters display images as well as preset by the System Administrator: • Customer Support details •...• System Software Version For information on how to set up this screen, refer to Customer Support and Supplies Numbers in the Setups chapter on the machine. The number of features such as preset by the System Administrator) Machine Details Select the Machine Details button...
... pages. paper trays, finisher, fax, etc are displayed: • Copy • Print • Fax • E-mail • Network Scanning Xerox WorkCentre 4250/4260 User Guide 31 Usage Counters Usage counters display images as well as preset by the System Administrator: • Customer Support details •...• System Software Version For information on how to set up this screen, refer to Customer Support and Supplies Numbers in the Setups chapter on the machine. The number of features such as preset by the System Administrator) Machine Details Select the Machine Details button...

User Guide
Page 174
...Copy Defaults E-mail Network Scanning Network Accounting On Demand Image Overwrite Embedded Fax Server Fax USB Port Reduce/Enlarge Preset Basic Copy Preset Fax Country Setting Line Configuration Incoming Fax Defaults Transmission Defaults Mailbox Setup Documents Received in Mailbox... Fax Report Error Correction Mode Software Upgrade Network Setting Physical Media Authentication Mode Network Accounting Setup Foreign Interface Device Setup Job Operation Right Immediate Overwrite On Demand Overwrite (when enabled) 166 Xerox WorkCentre 4250/4260 ...
...Copy Defaults E-mail Network Scanning Network Accounting On Demand Image Overwrite Embedded Fax Server Fax USB Port Reduce/Enlarge Preset Basic Copy Preset Fax Country Setting Line Configuration Incoming Fax Defaults Transmission Defaults Mailbox Setup Documents Received in Mailbox... Fax Report Error Correction Mode Software Upgrade Network Setting Physical Media Authentication Mode Network Accounting Setup Foreign Interface Device Setup Job Operation Right Immediate Overwrite On Demand Overwrite (when enabled) 166 Xerox WorkCentre 4250/4260 ...
User Guide
Page 187
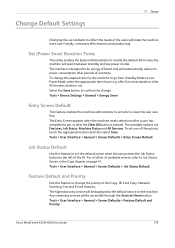
... the left of the Copy, ID Card Copy, Network Scanning, Fax and E-mail features. Any remaining services will spend between standby and low power modes. Tools > User Interface > General > Screen Defaults > Feature Default and Priority Xerox WorkCentre 4250/4260 User Guide 179 To change the priority of... the machine administrator to reflect the needs of the options, touch the appropriate button and then select Save. Change Default Settings 11 Setups Changing the user defaults to set which screen the user sees first. Tools > User Interface > General > Screen Defaults > Job...
... the left of the Copy, ID Card Copy, Network Scanning, Fax and E-mail features. Any remaining services will spend between standby and low power modes. Tools > User Interface > General > Screen Defaults > Feature Default and Priority Xerox WorkCentre 4250/4260 User Guide 179 To change the priority of... the machine administrator to reflect the needs of the options, touch the appropriate button and then select Save. Change Default Settings 11 Setups Changing the user defaults to set which screen the user sees first. Tools > User Interface > General > Screen Defaults > Job...
User Guide
Page 192
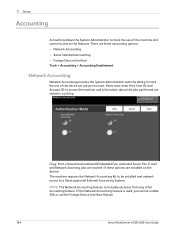
...job per account. 11 Setups Accounting Accounting allows the System Administrator to track the use of the machine and control access to the features. Copy, Print, inbound and outbound Embedded Fax, outbound Server Fax, E-mail and Network Scanning jobs are tracked (if... are installed on the device). NOTE: The Network Accounting feature is used, you cannot enable XSA or use the Foreign Device Interface feature. 184 Xerox WorkCentre 4250/4260 User Guide There are three accounting options: • Network Accounting • Xerox Standard Accounting • Foreign Device Interface Tools...
...job per account. 11 Setups Accounting Accounting allows the System Administrator to track the use of the machine and control access to the features. Copy, Print, inbound and outbound Embedded Fax, outbound Server Fax, E-mail and Network Scanning jobs are tracked (if... are installed on the device). NOTE: The Network Accounting feature is used, you cannot enable XSA or use the Foreign Device Interface feature. 184 Xerox WorkCentre 4250/4260 User Guide There are three accounting options: • Network Accounting • Xerox Standard Accounting • Foreign Device Interface Tools...


