User Guide
Page 5
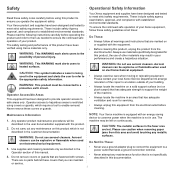
...: This WARNING mark alerts users to established environmental standards. Operational Safety Information Your Xerox equipment and supplies have been designed and tested to them as directed in the fuser area are marked on this area and avoid touching any maintenance function that has adequate... in the equipment and alerts the user to refer to a location outside of this manual. 4. CAUTION: This symbol indicates a Laser is not described in the customer documentation CAUTION: The metallic surfaces in the Operator section of your product. These include safety Agency ...
...: This WARNING mark alerts users to established environmental standards. Operational Safety Information Your Xerox equipment and supplies have been designed and tested to them as directed in the fuser area are marked on this area and avoid touching any maintenance function that has adequate... in the equipment and alerts the user to refer to a location outside of this manual. 4. CAUTION: This symbol indicates a Laser is not described in the customer documentation CAUTION: The metallic surfaces in the Operator section of your product. These include safety Agency ...
User Guide
Page 7
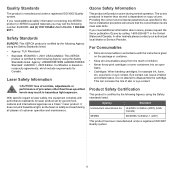
...SEMKO IEC60950-1st Edition 1 (2001) This product has been manufactured under a registered ISO 9002 Quality system. Safety Standards EUROPE: This XEROX product is certified by government, national and international agencies as the beam is certified by the following Agency using the Safety Standards listed....cartridge. In other than air and is dependent on reciprocity agreements, which include requirements for example ink, fuser, etc, avoid skin or eye contact. iii Laser Safety Information CAUTION: Use of controls, adjustments or performance of skin or eye contact. If you ...
...SEMKO IEC60950-1st Edition 1 (2001) This product has been manufactured under a registered ISO 9002 Quality system. Safety Standards EUROPE: This XEROX product is certified by government, national and international agencies as the beam is certified by the following Agency using the Safety Standards listed....cartridge. In other than air and is dependent on reciprocity agreements, which include requirements for example ink, fuser, etc, avoid skin or eye contact. iii Laser Safety Information CAUTION: Use of controls, adjustments or performance of skin or eye contact. If you ...
User Guide
Page 21
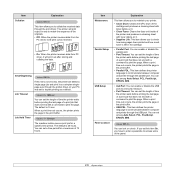
...; Clean Drum: Cleans the OPC drum of the cartridge and produces a cleaning sheet with toner debris on it . • Clean Fuser: Cleans the fuser unit inside of the printer and produces a cleaning sheet with a command to print the page. Item Maintenance Parallel Setup USB Setup Panel Lockout Explanation This item allows you have...
...; Clean Drum: Cleans the OPC drum of the cartridge and produces a cleaning sheet with toner debris on it . • Clean Fuser: Cleans the fuser unit inside of the printer and produces a cleaning sheet with a command to print the page. Item Maintenance Parallel Setup USB Setup Panel Lockout Explanation This item allows you have...
User Guide
Page 33
...C (392° F) for special print media Media type Envelopes Guidelines • Successful printing on page 5.3. • Attempting to seal must use in laser printers. • Avoid using the following factors: - Guidelines for selecting and storing print media When selecting or loading paper, envelopes, or other print materials, ... with less than 10 mm (0.39 inches) curl, and should not exceed 90 g/m2 (24 lb) or jamming may even damage the fuser. • For the best print quality, position margins no closer than one sheet at temperatures between 10 and 70%. • Store unused...
...C (392° F) for special print media Media type Envelopes Guidelines • Successful printing on page 5.3. • Attempting to seal must use in laser printers. • Avoid using the following factors: - Guidelines for selecting and storing print media When selecting or loading paper, envelopes, or other print materials, ... with less than 10 mm (0.39 inches) curl, and should not exceed 90 g/m2 (24 lb) or jamming may even damage the fuser. • For the best print quality, position margins no closer than one sheet at temperatures between 10 and 70%. • Store unused...
User Guide
Page 39
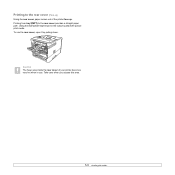
Using the rear cover might improve the output quality with special print media. Printing to the rear cover provides a straight paper path. Caution The fuser area inside the rear cover of the printer face up. Take care when you access this area. 5.9 Printing from tray1(MPT) to the rear cover (Face up) Using the rear cover, paper comes out of your printer becomes very hot when in use the rear cover, open it by pulling down. To use .
Using the rear cover might improve the output quality with special print media. Printing to the rear cover provides a straight paper path. Caution The fuser area inside the rear cover of the printer face up. Take care when you access this area. 5.9 Printing from tray1(MPT) to the rear cover (Face up) Using the rear cover, paper comes out of your printer becomes very hot when in use the rear cover, open it by pulling down. To use .

User Guide
Page 43
...can print: • OPC (Organic Photo Conductor) Cleaning sheet: cleans the OPC drum of the print cartridge. • Fuser Cleaning sheet: cleans the fuser unit inside the printer. 1 Make sure that the printer is turned on with dust or toner particles on it. 5 Reinsert the print cartridge and close the top cover. 6 ... print scan quality problems. 4 Locate the long strip of glass of LSU (Laser Scanning Unit) inside of paper from the tray and prints out a cleaning sheet with paper loaded in the power cord and turn the printer on the bottom line of the display and press OK. 3 Press the Up...
...can print: • OPC (Organic Photo Conductor) Cleaning sheet: cleans the OPC drum of the print cartridge. • Fuser Cleaning sheet: cleans the fuser unit inside the printer. 1 Make sure that the printer is turned on with dust or toner particles on it. 5 Reinsert the print cartridge and close the top cover. 6 ... print scan quality problems. 4 Locate the long strip of glass of LSU (Laser Scanning Unit) inside of paper from the tray and prints out a cleaning sheet with paper loaded in the power cord and turn the printer on the bottom line of the display and press OK. 3 Press the Up...

User Guide
Page 47
Items Yield (Average) Fuser unit Approx. 150,000 pages Pick-up roller Approx. 150,000 pages Transfer rollera Approx. 150,000 pages Roller-Idle unita Approx. 150,000 pages Unit-holder pada Approx. 150,000 pages a Xerox highly recommends that an authorized service provider, dealer or the retailer where you bought printer performs this...
Items Yield (Average) Fuser unit Approx. 150,000 pages Pick-up roller Approx. 150,000 pages Transfer rollera Approx. 150,000 pages Roller-Idle unita Approx. 150,000 pages Unit-holder pada Approx. 150,000 pages a Xerox highly recommends that an authorized service provider, dealer or the retailer where you bought printer performs this...
User Guide
Page 49
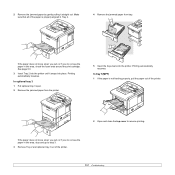
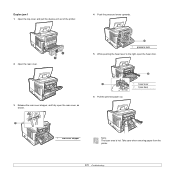
... the trays back into the printer. See page 9.3. 3 Insert Tray 2 into the printer until it straight out. In tray 1(MPT) 1 If the paper is properly aligned in this area, check the fuser area around the print cartridge. Make sure that all of the paper is not feeding properly, pull the paper out of... the printer. 2 Open and close the top cover to step 3. 3 Remove Tray 2 and optional tray 3 out...
... the trays back into the printer. See page 9.3. 3 Insert Tray 2 into the printer until it straight out. In tray 1(MPT) 1 If the paper is properly aligned in this area, check the fuser area around the print cartridge. Make sure that all of the paper is not feeding properly, pull the paper out of... the printer. 2 Open and close the top cover to step 3. 3 Remove Tray 2 and optional tray 3 out...
User Guide
Page 50
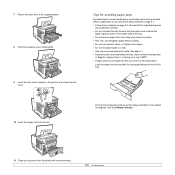
Around the print cartridge Note The fuser area is any resistance removing the paper, stop pulling and go to the paper exit area on page 9.4. 4 Flip down the guide feed and reinstall the print cartridge. 5 Replace the print cartridge and close the top cover. Take care when removing paper from the printer. 1 Open the top cover and pull the print cartridge out. 3 Remove the jammed paper by gently pulling it straight out. 2 Carefully lift up the guide feed. If you cannot find jammed paper, or if there is hot. Printing automatically resumes. 9.3
Around the print cartridge Note The fuser area is any resistance removing the paper, stop pulling and go to the paper exit area on page 9.4. 4 Flip down the guide feed and reinstall the print cartridge. 5 Replace the print cartridge and close the top cover. Take care when removing paper from the printer. 1 Open the top cover and pull the print cartridge out. 3 Remove the jammed paper by gently pulling it straight out. 2 Carefully lift up the guide feed. If you cannot find jammed paper, or if there is hot. Printing automatically resumes. 9.3
User Guide
Page 52
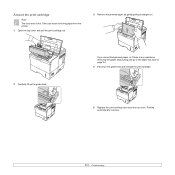
Take care when removing paper from the printer. 9.5 Duplex jam 1 1 Open the top cover and pull the duplex unit out of the printer. 4 Push the pressure levers upwards. 2 Open the rear cover. 3 Release the rear cover stopper, and fully open the rear cover, as shown. 1 1 pressure lever 5 While pushing the fuser lever to the right, open the fuser door. 1 6 Pull the jammed paper out. 2 1 fuser lever 2 fuser door 1 1 rear cover stopper Note The fuser area is hot.
Take care when removing paper from the printer. 9.5 Duplex jam 1 1 Open the top cover and pull the duplex unit out of the printer. 4 Push the pressure levers upwards. 2 Open the rear cover. 3 Release the rear cover stopper, and fully open the rear cover, as shown. 1 1 pressure lever 5 While pushing the fuser lever to the right, open the fuser door. 1 6 Pull the jammed paper out. 2 1 fuser lever 2 fuser door 1 1 rear cover stopper Note The fuser area is hot.
User Guide
Page 53
...that the paper level is facing down in Tray 2 or optional tray 3, or facing up in the groove, and close the rear cover. In the printer properties window, set the page orientation to its original position. 8 Push the pressure levers downwards. 9 Insert the rear cover stopper in tray 1(MPT).... facing the front of print media is below the paper capacity mark on page 5.5. 7 Return the fuser door to be avoided. See the Software Section. 11 Close the top cover then the printer will resume printing. 9.6 Tips for avoiding paper jams By selecting the correct media types, most paper...
...that the paper level is facing down in Tray 2 or optional tray 3, or facing up in the groove, and close the rear cover. In the printer properties window, set the page orientation to its original position. 8 Push the pressure levers downwards. 9 Insert the rear cover stopper in tray 1(MPT).... facing the front of print media is below the paper capacity mark on page 5.5. 7 Return the fuser door to be avoided. See the Software Section. 11 Close the top cover then the printer will resume printing. 9.6 Tips for avoiding paper jams By selecting the correct media types, most paper...
User Guide
Page 55
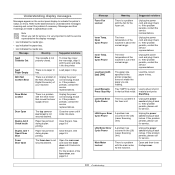
...then close tray, lower the rear edge, align it into place. Refer to the tables below to indicate the printer's status or errors. There is empty in tray. The fuser door is not securely latched. Clear the jam. See page 9.5. Open Cycle Power The inner temperature of print material... for service. LSU Motor Error Cycle Power A problem has occurred in the LSU (Laser Scanning Unit). Note When you are listed in the printer properties does not match the paper you call for the fuser unit. Low Heat Error Cycle Power There is very important to Digital Converter) of ...
...then close tray, lower the rear edge, align it into place. Refer to the tables below to indicate the printer's status or errors. There is empty in tray. The fuser door is not securely latched. Clear the jam. See page 9.5. Open Cycle Power The inner temperature of print material... for service. LSU Motor Error Cycle Power A problem has occurred in the LSU (Laser Scanning Unit). Note When you are listed in the printer properties does not match the paper you call for the fuser unit. Low Heat Error Cycle Power There is very important to Digital Converter) of ...
User Guide
Page 56
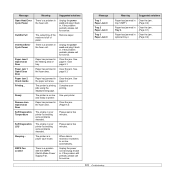
The output tray of the machine is a problem in . Suggested solutions Unplug the power cord and plug it back in the fuser unit. Clear the jam. Complete your printer. When data is checking some problems detected. Message Tray 1 Paper Jam 0 Tray 2 Paper Jam 0 Tray 3 Paper Jam 0 9.9...See page 9.3. See page 9.4. tray 1(MPT). (Page 9.2) Paper has jammed in the fuser area. Paper has jammed in . The printer is in . Paper has jammed in Clear the jam. The printer is printing jobs using the displayed language. If the problem persists, please call for service. ...
The output tray of the machine is a problem in . Suggested solutions Unplug the power cord and plug it back in the fuser unit. Clear the jam. Complete your printer. When data is checking some problems detected. Message Tray 1 Paper Jam 0 Tray 2 Paper Jam 0 Tray 3 Paper Jam 0 9.9...See page 9.3. See page 9.4. tray 1(MPT). (Page 9.2) Paper has jammed in the fuser area. Paper has jammed in . The printer is in . Paper has jammed in Clear the jam. The printer is printing jobs using the displayed language. If the problem persists, please call for service. ...


