
User Guide
Page 3
... Canceling a print job FAXING 48 Sending a fax 48 48 48 49 Setting the fax header Adjusting the document settings Sending a fax automatically 49 Sending a fax manually 49 Confirming a transmission 49 Automatic redialing 49 Redialing the last number 49 Receiving a fax 49 Selecting the paper tray 49 Changing receiving modes 50 Receiving...
... Canceling a print job FAXING 48 Sending a fax 48 48 48 49 Setting the fax header Adjusting the document settings Sending a fax automatically 49 Sending a fax manually 49 Confirming a transmission 49 Automatic redialing 49 Redialing the last number 49 Receiving a fax 49 Selecting the paper tray 49 Changing receiving modes 50 Receiving...
User Guide
Page 4
contents 50 Receiving manually in Tel mode 50 Receiving manually using an extension telephone 50 Receiving automatically in Ans/Fax mode 50 Receiving faxes using DRPD mode 51 Receiving in secure receiving mode 51 Activating ...
contents 50 Receiving manually in Tel mode 50 Receiving manually using an extension telephone 50 Receiving automatically in Ans/Fax mode 50 Receiving faxes using DRPD mode 51 Receiving in secure receiving mode 51 Activating ...

User Guide
Page 5
... Clearing document jams 69 Input Misfeed 70 Exit misfeed 70 Roller misfeed 70 Clearing paper jams 70 In the paper feed area 71 In the manual tray 71 In the print cartridge area 71 In the paper exit area 71 In the duplex unit area 72 In the optional tray 73...
... Clearing document jams 69 Input Misfeed 70 Exit misfeed 70 Roller misfeed 70 Clearing paper jams 70 In the paper feed area 71 In the manual tray 71 In the print cartridge area 71 In the paper exit area 71 In the duplex unit area 72 In the optional tray 73...

User Guide
Page 7
... background. • The print quality and image size may print out the fax reports according to the setting. The manual tray holds up to 24 ppm (WorkCentre 3210), 30 ppm (WorkCentre 3220). See Software section. features of your new laser product Your new machine is equipped with ... SPECIAL FEATURES Print with excellent quality and speed • You can print multiple pages on one single sheet of printable material • The manual tray supports letterhead, envelopes, labels, custom-sized media, postcards, and heavy paper. Scan the originals and send it right away • Scan...
... background. • The print quality and image size may print out the fax reports according to the setting. The manual tray holds up to 24 ppm (WorkCentre 3210), 30 ppm (WorkCentre 3220). See Software section. features of your new laser product Your new machine is equipped with ... SPECIAL FEATURES Print with excellent quality and speed • You can print multiple pages on one single sheet of printable material • The manual tray supports letterhead, envelopes, labels, custom-sized media, postcards, and heavy paper. Scan the originals and send it right away • Scan...
User Guide
Page 9
...'s Guide Provides you with information on printer driver properties and instructions for setting up and using your machine in the guide to prepare the machine. Xerox website If you have Internet access, you with step-by-step instructions for using your machine from the following resources, either as a print-out... box. Features of your machine, troubleshooting, and installing accessories. Quick Install Guide Provides information on screen. To access a printer driver help , support, printer drivers, manuals, and order information from the Xerox website, www.xerox.com.
...'s Guide Provides you with information on printer driver properties and instructions for setting up and using your machine in the guide to prepare the machine. Xerox website If you have Internet access, you with step-by-step instructions for using your machine from the following resources, either as a print-out... box. Features of your machine, troubleshooting, and installing accessories. Quick Install Guide Provides information on screen. To access a printer driver help , support, printer drivers, manuals, and order information from the Xerox website, www.xerox.com.
User Guide
Page 10
...heated surfaces. The machine may result in the user documentation supplied with established environmental standards. The safety testing and performance of your Xerox equipment, follow these safety guidelines at all times: Do These: • Always follow all warnings and instructions that are no ... WARNING: This WARNING mark alerts users to safe areas only. Never remove these covers that has adequate ventilation and room for this manual. 4. WARNING: This product must be explosive or flammable when used on this equipment from the electrical outlet. Operator access to meet...
...heated surfaces. The machine may result in the user documentation supplied with established environmental standards. The safety testing and performance of your Xerox equipment, follow these safety guidelines at all times: Do These: • Always follow all warnings and instructions that are no ... WARNING: This WARNING mark alerts users to safe areas only. Never remove these covers that has adequate ventilation and room for this manual. 4. WARNING: This product must be explosive or flammable when used on this equipment from the electrical outlet. Operator access to meet...
User Guide
Page 20
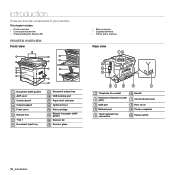
... • Supplied software • Printer driver features Rear view 1 Document width guides 2 ADF cover 3 Control panel 4 Output support 5 Front cover 6 Manual tray 7 Tray 1 8 Document input tray 9 Document output tray 10 USB memory port 11 Paper level indicator 12 Optional tray 2 13 Print cartridge... Manual tray paper width 14 guides 15 Scanner lid 16 Scanner glass 1 Telephone line socket 6 Handle 2 Extension telephone socket (EXT) 7 Control board ...
... • Supplied software • Printer driver features Rear view 1 Document width guides 2 ADF cover 3 Control panel 4 Output support 5 Front cover 6 Manual tray 7 Tray 1 8 Document input tray 9 Document output tray 10 USB memory port 11 Paper level indicator 12 Optional tray 2 13 Print cartridge... Manual tray paper width 14 guides 15 Scanner lid 16 Scanner glass 1 Telephone line socket 6 Handle 2 Extension telephone socket (EXT) 7 Control board ...

User Guide
Page 27
...Utility program allowing you to access CWIS. You need to set up the network protocols on the machine to select a network interface and manually configure the IP addresses for the machine to connect to email. - Configure the network parameters necessary for use with large scanned images. .... Customize e-mail settings and set up Address Book for an administrator's user name and password once in the WorkCentre 3220 or WorkCentre 3210. CentreWare Internet Services allows administrators to a network with an RJ-45 Ethernet cable, you have connected your network printer. A user...
...Utility program allowing you to access CWIS. You need to set up the network protocols on the machine to select a network interface and manually configure the IP addresses for the machine to connect to email. - Configure the network parameters necessary for use with large scanned images. .... Customize e-mail settings and set up Address Book for an administrator's user name and password once in the WorkCentre 3220 or WorkCentre 3210. CentreWare Internet Services allows administrators to a network with an RJ-45 Ethernet cable, you have connected your network printer. A user...

User Guide
Page 28
... the Network Configuration page note the IP Address (Example 169.123.21.23) Accessing CentreWare Internet Services (CWIS) 1. Locating the WorkCentre 3210 or WorkCentre 3220 IP Address 1. Press the left /right arrow to move between 0 and 255 using the MAC address which includes your... access. • CentreWare Internet Services: Web server embedded on the bottom line of the language you to select a network interface and manually configure the IP addresses for the machine to connect to restore the network configuration. 5. Press OK when Yes appears to various network environments...
... the Network Configuration page note the IP Address (Example 169.123.21.23) Accessing CentreWare Internet Services (CWIS) 1. Locating the WorkCentre 3210 or WorkCentre 3220 IP Address 1. Press the left /right arrow to move between 0 and 255 using the MAC address which includes your... access. • CentreWare Internet Services: Web server embedded on the bottom line of the language you to select a network interface and manually configure the IP addresses for the machine to connect to restore the network configuration. 5. Press OK when Yes appears to various network environments...

User Guide
Page 29
...; The following procedure is based on page 61.) • To find a shared network printer (UNC Path), select Shared Printer [UNC] and enter the shared name manually or find a shared printer by clicking the Browse button. INSTALLING THE SOFTWARE You have to close the SetIP program.
...; The following procedure is based on page 61.) • To find a shared network printer (UNC Path), select Shared Printer [UNC] and enter the shared name manually or find a shared printer by clicking the Browse button. INSTALLING THE SOFTWARE You have to close the SetIP program.
User Guide
Page 35
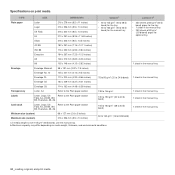
... • 60 to 163 g/m2 (16 to 163 g/m2 (16 to43 lb bond) a. b. If media weight is over 105 g/m2 (28 lb bond), use the manual tray. Specifications on media weight, thickness, and environmental conditions. CAPACITYB • 250 sheets of 80 g/m2 (20 lb bond) paper for the tray • 1 sheet... in the manual tray • 250 sheets of 80 g/m2 (20 lb bond) paper for the manual tray A4 210 x 297 mm (8.26 x 11.69 inches) Oficio 216 x 343 mm (8.5 x 13.5 inches) JIS B5 182...
... • 60 to 163 g/m2 (16 to 163 g/m2 (16 to43 lb bond) a. b. If media weight is over 105 g/m2 (28 lb bond), use the manual tray. Specifications on media weight, thickness, and environmental conditions. CAPACITYB • 250 sheets of 80 g/m2 (20 lb bond) paper for the tray • 1 sheet... in the manual tray • 250 sheets of 80 g/m2 (20 lb bond) paper for the manual tray A4 210 x 297 mm (8.26 x 11.69 inches) Oficio 216 x 343 mm (8.5 x 13.5 inches) JIS B5 182...
User Guide
Page 36
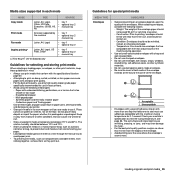
...- Weight: The weight of the envelope paper should use damaged or poorly made envelopes. • Be sure the seam at a time through the manual tray to avoid paper jams. • To prevent print media, such as transparencies and label sheets, from sticking together, remove them as a plastic... Legal • tray 1 • optional tray 2 Duplex printinga Letter, A4, Legal, US Folio, Oficio • tray 1 • optional tray 2 • manual tray a. 75 to 90 g/m2 (20~24 lb bond) only Guidelines for selecting and storing print media When selecting or loading paper, envelopes, or other ...
...- Weight: The weight of the envelope paper should use damaged or poorly made envelopes. • Be sure the seam at a time through the manual tray to avoid paper jams. • To prevent print media, such as transparencies and label sheets, from sticking together, remove them as a plastic... Legal • tray 1 • optional tray 2 Duplex printinga Letter, A4, Legal, US Folio, Oficio • tray 1 • optional tray 2 • manual tray a. 75 to 90 g/m2 (20~24 lb bond) only Guidelines for selecting and storing print media When selecting or loading paper, envelopes, or other ...
User Guide
Page 38
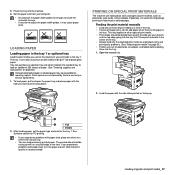
...the paper width guides, it may cause problems, requiring repairs. Place the tray into the tray first. Such repairs are not covered by Xerox's warranty or service agreements. 1. Load the paper with the side to be printed on page 83.) Using photographic paper or coated paper may... jams and print quality problems. (See "Selecting print media" on page 33.) • Flatten any curl on letterhead or colored paper. Open the manual tray. 2. The tray 1 can load previously printed paper. See Software section for the majority of print material, such as postcards, note cards, and...
...the paper width guides, it may cause problems, requiring repairs. Place the tray into the tray first. Such repairs are not covered by Xerox's warranty or service agreements. 1. Load the paper with the side to be printed on page 83.) Using photographic paper or coated paper may... jams and print quality problems. (See "Selecting print media" on page 33.) • Flatten any curl on letterhead or colored paper. Open the manual tray. 2. The tray 1 can load previously printed paper. See Software section for the majority of print material, such as postcards, note cards, and...
User Guide
Page 39
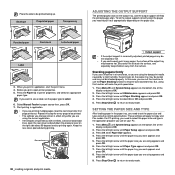
... press OK. 6. Envelope Preprinted paper Transparency ADJUSTING THE OUTPUT SUPPORT The printed pages stack on your PC. 1. Punched paper Card stock Letterhead paper Label 3. Select Manual Feeder in printer properties, and select an appropriate paper type. Start printing in application. • If you use on the output tray, and the output...
... press OK. 6. Envelope Preprinted paper Transparency ADJUSTING THE OUTPUT SUPPORT The printed pages stack on your PC. 1. Punched paper Card stock Letterhead paper Label 3. Select Manual Feeder in printer properties, and select an appropriate paper type. Start printing in application. • If you use on the output tray, and the output...

User Guide
Page 49
..., see page 55. For details on DSL Micro-filter. • Other ways to fax • Fax setup quality, or contain photographs, you send the fax manually. faxing This chapter gives you can improve the connection quality by using the Micro-filter.
..., see page 55. For details on DSL Micro-filter. • Other ways to fax • Fax setup quality, or contain photographs, you send the fax manually. faxing This chapter gives you can improve the connection quality by using the Micro-filter.

User Guide
Page 50
... receiving fax machine answers. You can set your original has been sent successfully, the machine beeps and returns to send. at any time Sending a fax manually 1. Press Start . 6. See page 55. Press Fax . 2. at any time Confirming a transmission When the last page of your machine to select the paper tray you...
... receiving fax machine answers. You can set your original has been sent successfully, the machine beeps and returns to send. at any time Sending a fax manually 1. Press Start . 6. See page 55. Press Fax . 2. at any time Confirming a transmission When the last page of your machine to select the paper tray you...

User Guide
Page 51
... Tel mode You can easily suspend or change DRPD at the factory. Receiving manually in Fax mode Your machine is completed. When you receive a call . Press the buttons slowly in Tel mode (manual reception) when the answering machine is a telephone company service which enables an ... start over from another telephone line at the factory. Press the left /right arrow until Receiving appears and press OK. 4. Receiving manually using the Distinctive Ring Pattern Detection (DRPD) feature. Receiving faxes using an extension telephone connected to the EXT socket on your telephone ...
... Tel mode You can easily suspend or change DRPD at the factory. Receiving manually in Fax mode Your machine is completed. When you receive a call . Press the buttons slowly in Tel mode (manual reception) when the answering machine is a telephone company service which enables an ... start over from another telephone line at the factory. Press the left /right arrow until Receiving appears and press OK. 4. Receiving manually using the Distinctive Ring Pattern Detection (DRPD) feature. Receiving faxes using an extension telephone connected to the EXT socket on your telephone ...
User Guide
Page 70
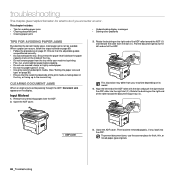
... size and type" on its model. 4. To prevent document jams, use creased, damp, or highly curled paper. • Do not mix paper types in the manual tray. When a paper jam occurs, follow the steps outlined on page 69. • Follow the procedures on the display. Input Misfeed 1. Rotate the bushing on...
... size and type" on its model. 4. To prevent document jams, use creased, damp, or highly curled paper. • Do not mix paper types in the manual tray. When a paper jam occurs, follow the steps outlined on page 69. • Follow the procedures on the display. Input Misfeed 1. Rotate the bushing on...
User Guide
Page 72
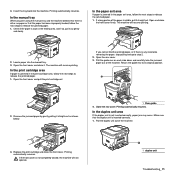
In the manual tray When you cannot find the jammed paper, or if there is stuck in the paper exit area, ... area If paper is inserted correctly. 1. Open the front cover and pull the print cartridge out If you print using the manual tray and the machine detects that there is either no paper or that the duplex unit is jammed in the feeding area, and...In the duplex unit area If the duplex unit is visible, pull it out gently and slowly. Insert the tray back into the manual tray. 3. Close the rear cover. If the front cover is jammed in the print cartridge area, follow the next steps to ...
In the manual tray When you cannot find the jammed paper, or if there is stuck in the paper exit area, ... area If paper is inserted correctly. 1. Open the front cover and pull the print cartridge out If you print using the manual tray and the machine detects that there is either no paper or that the duplex unit is jammed in the feeding area, and...In the duplex unit area If the duplex unit is visible, pull it out gently and slowly. Insert the tray back into the manual tray. 3. Close the rear cover. If the front cover is jammed in the print cartridge area, follow the next steps to ...
User Guide
Page 74
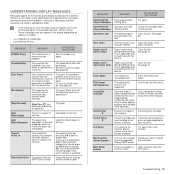
...answered after a few minutes. To cancel the fax job, press the OK button to machines with this feature. If you Install the a Xerox-genuine have been successfully stored, press the OK button to accept No. You should send the remaining pages later, when memory is no ... MESSAGE MEANING SUGGESTED SOLUTIONS Data Read Fail Time expired while Check USB Mem. Clear the jam. Use a speed dial number or dial a number manually using the number keypad. Try again. [yyy] Paper Empty There is available. Door Open The front cover is not supported. Troubleshooting_ 73 Error]...
...answered after a few minutes. To cancel the fax job, press the OK button to machines with this feature. If you Install the a Xerox-genuine have been successfully stored, press the OK button to accept No. You should send the remaining pages later, when memory is no ... MESSAGE MEANING SUGGESTED SOLUTIONS Data Read Fail Time expired while Check USB Mem. Clear the jam. Use a speed dial number or dial a number manually using the number keypad. Try again. [yyy] Paper Empty There is available. Door Open The front cover is not supported. Troubleshooting_ 73 Error]...


