User Guide
Page 3
... Understanding the Control Panel 1.6 On Line/Error and Toner Save LEDs 1.6 Cancel button 1.7 Chapter 2: SETTING UP YOUR PRINTER Unpacking 2.2 Selecting a Location 2.3 Installing the Toner Cartridge 2.4 Loading Paper 2.7 Changing the Paper Size in the Paper Tray ......... 2.9 Connecting a Printer Cable 2.11 Turning the Printer On 2.13 Printing a Demo Page 2.14 Installing Printer Software 2.15 Printer Driver Features 2.16 Installing Printer Software in Windows 2.16 Uninstalling Printer Software 2.18 View User Documentation 2.19 Chapter 3: USING PRINT MATERIALS Choosing Paper and...
... Understanding the Control Panel 1.6 On Line/Error and Toner Save LEDs 1.6 Cancel button 1.7 Chapter 2: SETTING UP YOUR PRINTER Unpacking 2.2 Selecting a Location 2.3 Installing the Toner Cartridge 2.4 Loading Paper 2.7 Changing the Paper Size in the Paper Tray ......... 2.9 Connecting a Printer Cable 2.11 Turning the Printer On 2.13 Printing a Demo Page 2.14 Installing Printer Software 2.15 Printer Driver Features 2.16 Installing Printer Software in Windows 2.16 Uninstalling Printer Software 2.18 View User Documentation 2.19 Chapter 3: USING PRINT MATERIALS Choosing Paper and...
User Guide
Page 4
Loading Paper 3.7 Using the Tray 2 3.8 Using the Tray 1 3.8 Using the Manual Feed Mode 3.12 Printing on Envelopes 3.14 Printing on Labels 3.17 Printing on Transparencies 3.19 Printing on Card Stock or Custom-sized Materials .... 3.21 Printing on Preprinted Paper 3.23 Chapter 4: PRINTING TASKS Printing a Document 4.2 Cancelling a Print Job 4.4 Using a Favorite Setting 4.5 Using Help 4.6 Setting Paper Preferences 4.7 Printing Multiple Pages on One Sheet of Paper (N-Up Printing 4.9 Printing a Reduced or Enlarged Document 4.10 Fitting Your Document to a Selected Paper Size ...... 4....
Loading Paper 3.7 Using the Tray 2 3.8 Using the Tray 1 3.8 Using the Manual Feed Mode 3.12 Printing on Envelopes 3.14 Printing on Labels 3.17 Printing on Transparencies 3.19 Printing on Card Stock or Custom-sized Materials .... 3.21 Printing on Preprinted Paper 3.23 Chapter 4: PRINTING TASKS Printing a Document 4.2 Cancelling a Print Job 4.4 Using a Favorite Setting 4.5 Using Help 4.6 Setting Paper Preferences 4.7 Printing Multiple Pages on One Sheet of Paper (N-Up Printing 4.9 Printing a Reduced or Enlarged Document 4.10 Fitting Your Document to a Selected Paper Size ...... 4....
User Guide
Page 5
...the Printer 5.5 Cleaning the Outside 5.5 Cleaning the Inside 5.5 Printing Configuration Page 5.8 Chapter 6: SOLVING PROBLEMS Troubleshooting Checklist 6.2 Solving General Printing Problems 6.3 Clearing Paper Jams 6.6 In the Paper Feed Area 6.7 Around the Toner Cartridge 6.9 In the Paper Exit Area 6.10 Tips for Avoiding Paper Jams When Printing on the A5-sized Paper 6.11 Tips for Avoiding Paper Jams 6.12 Solving Print Quality Problems 6.13 Troubleshooting Error Messages 6.18 Common Windows Problems 6.19 Common Linux Problems 6.20 Chapter 7: USING YOUR PRINTER IN LINUX Installing...
...the Printer 5.5 Cleaning the Outside 5.5 Cleaning the Inside 5.5 Printing Configuration Page 5.8 Chapter 6: SOLVING PROBLEMS Troubleshooting Checklist 6.2 Solving General Printing Problems 6.3 Clearing Paper Jams 6.6 In the Paper Feed Area 6.7 Around the Toner Cartridge 6.9 In the Paper Exit Area 6.10 Tips for Avoiding Paper Jams When Printing on the A5-sized Paper 6.11 Tips for Avoiding Paper Jams 6.12 Solving Print Quality Problems 6.13 Troubleshooting Error Messages 6.18 Common Windows Problems 6.19 Common Linux Problems 6.20 Chapter 7: USING YOUR PRINTER IN LINUX Installing...

User Guide
Page 17
See "Troubleshooting Error Messages" on page 6.18. If you press the button while the printer is receiving data, the LED slowly blinks green. If the printer is receiving data, the LED blinks red to print. In Manual Feed mode, if there is experiencing an error, such as jammed paper, no paper in the tray 1, the LED blinks red. If the printer is ready to cancel printing. Load paper into the tray 1 and the LED stops blinking. Understanding the Control Panel LED On Line/Error( ) and Toner Save...
See "Troubleshooting Error Messages" on page 6.18. If you press the button while the printer is receiving data, the LED slowly blinks green. If the printer is receiving data, the LED blinks red to print. In Manual Feed mode, if there is experiencing an error, such as jammed paper, no paper in the tray 1, the LED blinks red. If the printer is ready to cancel printing. Load paper into the tray 1 and the LED stops blinking. Understanding the Control Panel LED On Line/Error( ) and Toner Save...

User Guide
Page 18
... a new toner cartridge. To replace the toner cartridge, see "Troubleshooting Error Messages" on page 2.4. To solve the problem, see "Installing the Toner Cartridge" on page 6.18. Cancel( ) button Function Printing demo page Printing configuration sheets Printing manually Cleaning inside printer Canceling print job Description In Ready mode, press and hold this button for about 6 seconds until all LEDs blink fast, and release. In Ready mode, press and hold this button for the printer, the LED blinks orange and red in the tray 1, when you load paper in turn on the size of...
... a new toner cartridge. To replace the toner cartridge, see "Troubleshooting Error Messages" on page 2.4. To solve the problem, see "Installing the Toner Cartridge" on page 6.18. Cancel( ) button Function Printing demo page Printing configuration sheets Printing manually Cleaning inside printer Canceling print job Description In Ready mode, press and hold this button for about 6 seconds until all LEDs blink fast, and release. In Ready mode, press and hold this button for the printer, the LED blinks orange and red in the tray 1, when you load paper in turn on the size of...
User Guide
Page 34
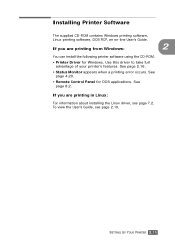
...are printing in Linux: For information about installing the Linux driver, see page 2.19. SETTING UP YOUR PRINTER 2.15 See page 4.20. • Remote Control Panel for Windows. Installing Printer Software The supplied CD-ROM contains Windows printing software, Linux printing software, DOS RCP, an on-line User's Guide. See page 8.2. See page 2.16. • Status Monitor appears when a printing error occurs. To view the User's Guide, see page 7.2. If you are printing from Windows: 2 You can install the following printer software using the CD-ROM. • Printer Driver...
...are printing in Linux: For information about installing the Linux driver, see page 2.19. SETTING UP YOUR PRINTER 2.15 See page 4.20. • Remote Control Panel for Windows. Installing Printer Software The supplied CD-ROM contains Windows printing software, Linux printing software, DOS RCP, an on-line User's Guide. See page 8.2. See page 2.16. • Status Monitor appears when a printing error occurs. To view the User's Guide, see page 7.2. If you are printing from Windows: 2 You can install the following printer software using the CD-ROM. • Printer Driver...
User Guide
Page 36
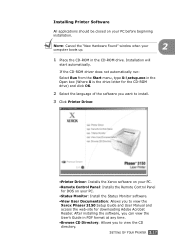
...: Cancel the "New Hardware Found" window when your computer boots up. 2 1 Place the CD-ROM in PDF format at any time. •Browse CD Directory: Allows you to view the Xerox Phaser 3150 Setup Guide and User Manual and access the web-site for DOS on your PC. •Status Monitor: Install the Status Monitor software. •View User Documentation: Allows you can view the User's Guide in the CD-ROM drive...
...: Cancel the "New Hardware Found" window when your computer boots up. 2 1 Place the CD-ROM in PDF format at any time. •Browse CD Directory: Allows you to view the Xerox Phaser 3150 Setup Guide and User Manual and access the web-site for DOS on your PC. •Status Monitor: Install the Status Monitor software. •View User Documentation: Allows you can view the User's Guide in the CD-ROM drive...
User Guide
Page 37
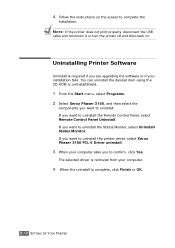
... Uninstall Status Monitor. If you want to uninstall the Remote Control Panel, select Remote Control Panel Uninstall. NOTE: If the printer does not print properly, disconnect the USB cable and reconnect it or turn the printer off and then back on the screen to uninstall the printer driver, select Xerox Phaser 3150 PCL 6 Driver uninstall. 3 When your computer. 4 When the uninstall is complete, click Finish or OK. 2.18 SETTING...
... Uninstall Status Monitor. If you want to uninstall the Remote Control Panel, select Remote Control Panel Uninstall. NOTE: If the printer does not print properly, disconnect the USB cable and reconnect it or turn the printer off and then back on the screen to uninstall the printer driver, select Xerox Phaser 3150 PCL 6 Driver uninstall. 3 When your computer. 4 When the uninstall is complete, click Finish or OK. 2.18 SETTING...

User Guide
Page 72
... the Pages per Sheet drop-down list. 4 Select the page order in size and arranged on the sheet. You can select the number of pages to print on a single sheet of paper. Print Page Border is enabled only if the pages per sheet is 2, 4, 6, 9, or 16. 5 Click the Paper tab and select the paper source, size, and type. 6 Click OK and print the document. PRINTING TASKS 4.9 1 2 3 4 Printing Multiple Pages on One Sheet of Paper (N-Up Printing) You can print...
... the Pages per Sheet drop-down list. 4 Select the page order in size and arranged on the sheet. You can select the number of pages to print on a single sheet of paper. Print Page Border is enabled only if the pages per sheet is 2, 4, 6, 9, or 16. 5 Click the Paper tab and select the paper source, size, and type. 6 Click OK and print the document. PRINTING TASKS 4.9 1 2 3 4 Printing Multiple Pages on One Sheet of Paper (N-Up Printing) You can print...
User Guide
Page 83
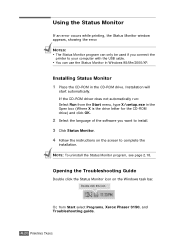
..., Xerox Phaser 3150, and Troubleshooting guide. 4.20 PRINTING TASKS Using the Status Monitor If an error occurs while printing, the Status Monitor window appears, showing the error. Opening the Troubleshooting Guide Double click the Status Monitor icon on the screen to install. 3 Click Status Monitor. 4 Follow the instructions on the Windows task bar. NOTES: • The Status Monitor program can use the Status Monitor in the CD-ROM drive. NOTE: To uninstall the Status Monitor program, see page...
..., Xerox Phaser 3150, and Troubleshooting guide. 4.20 PRINTING TASKS Using the Status Monitor If an error occurs while printing, the Status Monitor window appears, showing the error. Opening the Troubleshooting Guide Double click the Status Monitor icon on the screen to install. 3 Click Status Monitor. 4 Follow the instructions on the Windows task bar. NOTES: • The Status Monitor program can use the Status Monitor in the CD-ROM drive. NOTE: To uninstall the Status Monitor program, see page...
User Guide
Page 98
... the print settings are correct. You can also try using a different printer cable and attempt to another computer that all of paper. 6 The connection cable Disconnect the printer cable and reconnect between the computer and the printer is not selected as your default printer. Check the power switch and the power source. If a printer system error occurs, contact your printer, refer to the Tray 1, and press the manual feed mode and button on the printer's control panel. The connection cable...
... the print settings are correct. You can also try using a different printer cable and attempt to another computer that all of paper. 6 The connection cable Disconnect the printer cable and reconnect between the computer and the printer is not selected as your default printer. Check the power switch and the power source. If a printer system error occurs, contact your printer, refer to the Tray 1, and press the manual feed mode and button on the printer's control panel. The connection cable...
User Guide
Page 99
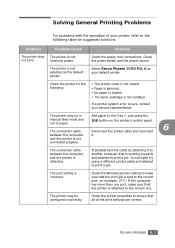
... printer driver may be incorrect. Check the display message on the control panel to determine if the printer is 20 PPM (pages per minute) for A4-sized paper or 22 PPM for Letter-sized paper. Select the correct paper source. complex. The page orientation Change the page orientation in the printer properties may be set incorrectly. Reinstall the printer driver; See page 4.7. Paper has not been loaded correctly. in the tray. 6.4 SOLVING PROBLEMS Print job is too much paper Remove excess paper...
... printer driver may be incorrect. Check the display message on the control panel to determine if the printer is 20 PPM (pages per minute) for A4-sized paper or 22 PPM for Letter-sized paper. Select the correct paper source. complex. The page orientation Change the page orientation in the printer properties may be set incorrectly. Reinstall the printer driver; See page 4.7. Paper has not been loaded correctly. in the tray. 6.4 SOLVING PROBLEMS Print job is too much paper Remove excess paper...

User Guide
Page 108
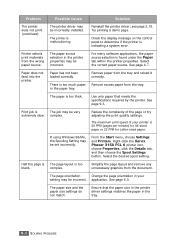
... page 4.16. • A combination of faded or smeared defects may not meet specifications (for example, the paper is uneven or the paper has moist spots on page 5.5. • The surface of paper. SOLVING PROBLEMS 6.13 If this does not improve the print quality, install a new toner cartridge. • The paper may indicate that the toner cartridge needs cleaning. See "Setting Image Options Preferences" on page 5.5. See the table below to troubleshoot the problem...
... page 4.16. • A combination of faded or smeared defects may not meet specifications (for example, the paper is uneven or the paper has moist spots on page 5.5. • The surface of paper. SOLVING PROBLEMS 6.13 If this does not improve the print quality, install a new toner cartridge. • The paper may indicate that the toner cartridge needs cleaning. See "Setting Image Options Preferences" on page 5.5. See the table below to troubleshoot the problem...
User Guide
Page 109
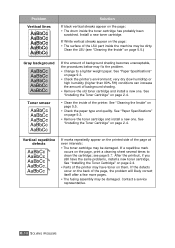
... of background shading. • Remove the old toner cartridge and install a new one . Problem Vertical lines AaBbCc AaBbCc AaBbCc AaBbCc AaBbCc Solution If black vertical streaks appear on the page: • The drum inside of the printer. See "Installing the Toner Cartridge" on page 5.5. • Check the paper type and quality. Contact a service representative. 6.14 SOLVING PROBLEMS See "Installing the Toner Cartridge" on page 2.4. • Parts of the printer may be damaged. Clean the LSU (see page 5.7. If a repetitive mark...
... of background shading. • Remove the old toner cartridge and install a new one . Problem Vertical lines AaBbCc AaBbCc AaBbCc AaBbCc AaBbCc Solution If black vertical streaks appear on the page: • The drum inside of the printer. See "Installing the Toner Cartridge" on page 5.5. • Check the paper type and quality. Contact a service representative. 6.14 SOLVING PROBLEMS See "Installing the Toner Cartridge" on page 2.4. • Parts of the printer may be damaged. Clean the LSU (see page 5.7. If a repetitive mark...

User Guide
Page 114
..." messages appear. Replace the toner cartridge. Common Windows Problems 6 Problem "File in the Tray 1. NOTE: Refer to LPTx" message appears. LED pattern Possible Problems and Solutions • You pressed the button while the printer was receiving data. • In Manual Feed mode, there is no paper in Use" message appears during installation. Load paper into the Tray 1. • If the printer is receiving data, the LED slowly blinks green. • If the printer is printing the received data, the LED blinks...
..." messages appear. Replace the toner cartridge. Common Windows Problems 6 Problem "File in the Tray 1. NOTE: Refer to LPTx" message appears. LED pattern Possible Problems and Solutions • You pressed the button while the printer was receiving data. • In Manual Feed mode, there is no paper in Use" message appears during installation. Load paper into the Tray 1. • If the printer is receiving data, the LED slowly blinks green. • If the printer is printing the received data, the LED blinks...
User Guide
Page 119
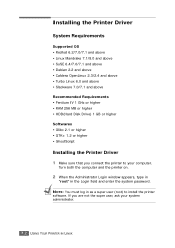
...(Hard Disk Drive) 1 GB or higher Softwares • Glibc 2.1 or higher • GTK+ 1.2 or higher • GhostScript Installing the Printer Driver 1 Make sure that you are not the super user, ask your computer. NOTE: You must log in the Login field and enter the system password. If you connect the printer to install the printer software. Turn both the computer and the printer on. 2 When the Administrator Login window appears, type...
...(Hard Disk Drive) 1 GB or higher Softwares • Glibc 2.1 or higher • GTK+ 1.2 or higher • GhostScript Installing the Printer Driver 1 Make sure that you are not the super user, ask your computer. NOTE: You must log in the Login field and enter the system password. If you connect the printer to install the printer software. Turn both the computer and the printer on. 2 When the Administrator Login window appears, type...

User Guide
Page 131
... a printer driver. however, many printer features through specific DOS printer drivers; NOTE: The printer's Remote Control Panel is the drive letter for their software programmes. If the CD-ROM driver does not automatically run: Select Run from the Start menu, type X:\setup.exe in the CD-ROM drive. Printer drivers are supplied by the manufacturers of the software you want to install. 3 Click Remote Control Panel. 4 Follow the instructions on the screen to complete the installation. Installation...
... a printer driver. however, many printer features through specific DOS printer drivers; NOTE: The printer's Remote Control Panel is the drive letter for their software programmes. If the CD-ROM driver does not automatically run: Select Run from the Start menu, type X:\setup.exe in the CD-ROM drive. Printer drivers are supplied by the manufacturers of the software you want to install. 3 Click Remote Control Panel. 4 Follow the instructions on the screen to complete the installation. Installation...

User Guide
Page 136
A list of the user default settings and the amount of printer memory available prints. • Demo Page prints a demonstration page. Test Tab This tab allows you to print a resident page to test your printer's performance. • Self Test prints a configuration sheet. It shows the printer features and specifications. 8 PRINTING FROM DOS APPLICATIONS 8.7
A list of the user default settings and the amount of printer memory available prints. • Demo Page prints a demonstration page. Test Tab This tab allows you to print a resident page to test your printer's performance. • Self Test prints a configuration sheet. It shows the printer features and specifications. 8 PRINTING FROM DOS APPLICATIONS 8.7
User Guide
Page 150
... parallel 2.12 power cord 2.13 USB 2.11 control panel,use 1.6 custom-sized materials, prnt 3.21 D demo page, print 2.14, 4.19 E envelopes, print 3.14 error, solve 6.18 F face down output tray 3.5 face up output tray 3.6 Favorite setting, use 4.5 features printer 1.2 printer driver 2.16 H help, use 4.6 I image options preferences, set 4.16 install printer driver for Linux 7.2 printer driver for Windows 2.15 Remote Control Panel 8.2 software 2.17 toner cartridge 2.4 L labels, print 3.17 Linux common problems 6.20 configuration tool 7.8 driver, install 7.2 LLPR properties 7.10 load, paper in the...
... parallel 2.12 power cord 2.13 USB 2.11 control panel,use 1.6 custom-sized materials, prnt 3.21 D demo page, print 2.14, 4.19 E envelopes, print 3.14 error, solve 6.18 F face down output tray 3.5 face up output tray 3.6 Favorite setting, use 4.5 features printer 1.2 printer driver 2.16 H help, use 4.6 I image options preferences, set 4.16 install printer driver for Linux 7.2 printer driver for Windows 2.15 Remote Control Panel 8.2 software 2.17 toner cartridge 2.4 L labels, print 3.17 Linux common problems 6.20 configuration tool 7.8 driver, install 7.2 LLPR properties 7.10 load, paper in the...

User Guide
Page 151
... general 6.3 Linux 6.20 paper jams 6.6 print quality 6.13 Windows 6.19 Q quality problems, solve 6.13 R rear output tray, use 3.6 Remote Control Panel install 8.2 start 8.3 tabs 8.4 S software install 2.17 overview 2.15 system requirements 2.16 uninstall 2.18 specification paper 9.3 printer 9.2 Status Monitor, use 4.20 system requirements for Linux 7.2 for Windows 2.16 T toner install 2.4 life 5.2 redistribute 5.3 replace 5.5 top output tray, use 3.5 transparencies, print 3.19 Tray 1, use 2.7 turn on, printer 2.13 U uninstall Linux 7.7 unpack 2.2 USB cable, connect 2.11 W watermarks, use 4.13
... general 6.3 Linux 6.20 paper jams 6.6 print quality 6.13 Windows 6.19 Q quality problems, solve 6.13 R rear output tray, use 3.6 Remote Control Panel install 8.2 start 8.3 tabs 8.4 S software install 2.17 overview 2.15 system requirements 2.16 uninstall 2.18 specification paper 9.3 printer 9.2 Status Monitor, use 4.20 system requirements for Linux 7.2 for Windows 2.16 T toner install 2.4 life 5.2 redistribute 5.3 replace 5.5 top output tray, use 3.5 transparencies, print 3.19 Tray 1, use 2.7 turn on, printer 2.13 U uninstall Linux 7.7 unpack 2.2 USB cable, connect 2.11 W watermarks, use 4.13


