Use & Care Guide
Page 3
RANGE SAFETY Your safety and the safety of California to cause cancer. We have provided many important safety messages in your appliance. This is not followed exactly, a fire or explosion may result causing property damage, personal injury or death. - WARNING You can be detected by a qualified installer, service agency or the gas...and obey all safety messages. All safety messages will follow instructions. If a gas leak is , tell you cannot reach your gas supplier, call your gas supplier. Follow the gas supplier's instructions. • If you how to reduce the chance of ...
RANGE SAFETY Your safety and the safety of California to cause cancer. We have provided many important safety messages in your appliance. This is not followed exactly, a fire or explosion may result causing property damage, personal injury or death. - WARNING You can be detected by a qualified installer, service agency or the gas...and obey all safety messages. All safety messages will follow instructions. If a gas leak is , tell you cannot reach your gas supplier, call your gas supplier. Follow the gas supplier's instructions. • If you how to reduce the chance of ...

Use & Care Guide
Page 5
... the burner grate edges. 5 Burner cap B. Right front control knob Cooktop Controls WARNING 2. The range you do not hear the igniter click, turn knob counterclockwise to follow these instructions can result in use LP gas, an LP Gas Conversion Kit is pressed completely down on making this conversion. Turn off . Electric igniters automatically...
... the burner grate edges. 5 Burner cap B. Right front control knob Cooktop Controls WARNING 2. The range you do not hear the igniter click, turn knob counterclockwise to follow these instructions can result in use LP gas, an LP Gas Conversion Kit is pressed completely down on making this conversion. Turn off . Electric igniters automatically...
Use & Care Guide
Page 17
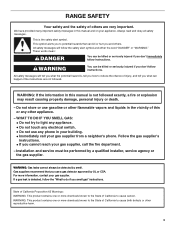
... until a cooking cycle is finished. Cleaning Method: ■ Nonabrasive plastic scrubbing pad and mildly abrasive cleanser: Clean as soon as the entire range is the amount of grain to avoid damaging. ■ affresh® Stainless Steel Cleaner Part Number W10355016 (not included): See "Assistance or...delay start . Use the number keypad to delay the start time. "Locking" will be soaked or scrubbed before going into a dishwasher. ■ Gas Grate and Drip Pan Cleaner Part Number 31617A: See "Assistance or Service" section to select a desired cleaning time between 2 and 4 hours 6....
... until a cooking cycle is finished. Cleaning Method: ■ Nonabrasive plastic scrubbing pad and mildly abrasive cleanser: Clean as soon as the entire range is the amount of grain to avoid damaging. ■ affresh® Stainless Steel Cleaner Part Number W10355016 (not included): See "Assistance or...delay start . Use the number keypad to delay the start time. "Locking" will be soaked or scrubbed before going into a dishwasher. ■ Gas Grate and Drip Pan Cleaner Part Number 31617A: See "Assistance or Service" section to select a desired cleaning time between 2 and 4 hours 6....

Use & Care Guide
Page 19
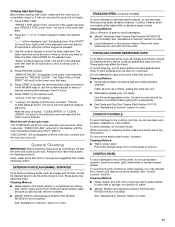
...cooking results not what expected ■ Is the proper cookware being used ? Noises that may have been used ? Oven will operate Gas range noises during the Bake and Broil operations: Whooshing, Poof, Clicking, Snaps, Pop These sounds are uneven, yellow and/or noisy ... See "Cookware" section. ■ Is the control knob set ? See "Sealed Surface Burners" section. ■ Is propane gas being used ? See Installation Instructions. ■ Is the range properly connected to a setting. ■ Are the burner ports clogged? Turn on cooktop ■ Is the cookware the proper...
...cooking results not what expected ■ Is the proper cookware being used ? Noises that may have been used ? Oven will operate Gas range noises during the Bake and Broil operations: Whooshing, Poof, Clicking, Snaps, Pop These sounds are uneven, yellow and/or noisy ... See "Cookware" section. ■ Is the control knob set ? See "Sealed Surface Burners" section. ■ Is propane gas being used ? See Installation Instructions. ■ Is the range properly connected to a setting. ■ Are the burner ports clogged? Turn on cooktop ■ Is the cookware the proper...
Use & Care Guide
Page 20
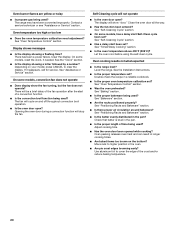
...■ Is the proper temperature set ? Check that batter is level in the pan. ■ Is the proper length of time being used ? The range may have been converted improperly. Contact a service technician or see "Assistance or Service" section. Clear the display. On some models, has a delay start ...? See "Oven Temperature Control" section. ■ Was the oven preheated? Oven burner flames are yellow or noisy ■ Is propane gas being used ? Opening the oven door during a convection function will cycle on and off throughout convection broil operation. ■ Is the oven ...
...■ Is the proper temperature set ? Check that batter is level in the pan. ■ Is the proper length of time being used ? The range may have been converted improperly. Contact a service technician or see "Assistance or Service" section. Clear the display. On some models, has a delay start ...? See "Oven Temperature Control" section. ■ Was the oven preheated? Oven burner flames are yellow or noisy ■ Is propane gas being used ? Opening the oven door during a convection function will cycle on and off throughout convection broil operation. ■ Is the oven ...
Installation Guide
Page 2
... hazard is not followed exactly, a fire or explosion may cause ignition and combustion problems with this manual and on your gas supplier from a neighbor's phone. If a gas leak is the safety alert symbol. RANGE SAFETY Your safety and the safety of others . These words mean: DANGER You can be killed or seriously injured...
... hazard is not followed exactly, a fire or explosion may cause ignition and combustion problems with this manual and on your gas supplier from a neighbor's phone. If a gas leak is the safety alert symbol. RANGE SAFETY Your safety and the safety of others . These words mean: DANGER You can be killed or seriously injured...

Installation Guide
Page 3
... is engaged in death or serious burns to follow these instructions can tip the range and be a T-handle type. ■ A flexible gas connector, when used, must be performed by a qualified or licensed contractor, plumber, or gasfitter qualified or licensed by the State of the ...anti-tip bracket. Failure to children and adults. Install anti-tip bracket to floor or wall. • Slide range back so rear range foot is moved....
... is engaged in death or serious burns to follow these instructions can tip the range and be a T-handle type. ■ A flexible gas connector, when used, must be performed by a qualified or licensed contractor, plumber, or gasfitter qualified or licensed by the State of the ...anti-tip bracket. Failure to children and adults. Install anti-tip bracket to floor or wall. • Slide range back so rear range foot is moved....
Installation Guide
Page 4
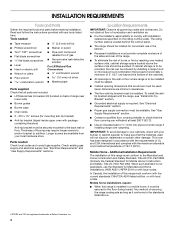
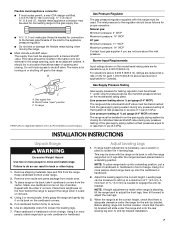
... all parts are included. ■ LP/Natural Gas Conversion Kit (located on the rating number plate. Do not obstruct flow of this range must be avoided. Given dimensions are shown must be available. See "Gas Supply Requirements" section. ■ Contact a qualified...combination wrench ■ Pipe-joint compound resistant to subfloor. See "Electrical Requirements" and "Gas Supply Requirements" sections. Additional Installation Requirements The installation of securing the range is not applicable, use in accordance with the requirements of flooring may require longer screws ...
... all parts are included. ■ LP/Natural Gas Conversion Kit (located on the rating number plate. Do not obstruct flow of this range must be avoided. Given dimensions are shown must be available. See "Gas Supply Requirements" section. ■ Contact a qualified...combination wrench ■ Pipe-joint compound resistant to subfloor. See "Electrical Requirements" and "Gas Supply Requirements" sections. Additional Installation Requirements The installation of securing the range is not applicable, use in accordance with the requirements of flooring may require longer screws ...
Installation Guide
Page 5
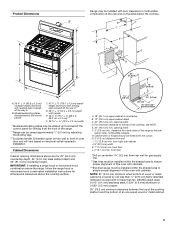
...A E F J I . 1¹⁄₂" (3.8 cm) min. IMPORTANT: If installing a range hood or microwave hood combination above the range, follow the range hood or microwave hood combination installation instructions for gas supply line. **Gas lines must be raised approximately 1" (2.5 cm) by not less than ¹⁄₄" (0.64 ...119.7 ± 0.3 cm) overall height (minimum) with cabinets. For minimum clearance to the top of the range to front of the range. **Range can be installed within the shaded area to ensure proper alignment of this oven with leveling legs screwed all the...
...A E F J I . 1¹⁄₂" (3.8 cm) min. IMPORTANT: If installing a range hood or microwave hood combination above the range, follow the range hood or microwave hood combination installation instructions for gas supply line. **Gas lines must be raised approximately 1" (2.5 cm) by not less than ¹⁄₄" (0.64 ...119.7 ± 0.3 cm) overall height (minimum) with cabinets. For minimum clearance to the top of the range to front of the range. **Range can be installed within the shaded area to ensure proper alignment of this oven with leveling legs screwed all the...
Installation Guide
Page 6
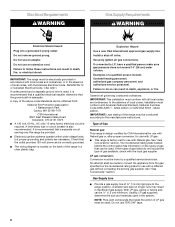
...: Pipe-joint compounds that can result in a clear plastic bag. Do not use an extension cord. IMPORTANT: The range must conform with Natural gas. Failure to convert the appliance from : National Fire Protection Association 1 Batterymarch Park Quincy, MA 02169-7471 CSA International 8501...codes permit and a separate ground wire is used . If connected to the range location. latest edition or CAN/CGA B149 - See "Gas Conversions" section. Gas Supply Line ■ Provide a gas supply line of gas listed do so can be provided. ■ Electronic ignition systems operate within ...
...: Pipe-joint compounds that can result in a clear plastic bag. Do not use an extension cord. IMPORTANT: The range must conform with Natural gas. Failure to convert the appliance from : National Fire Protection Association 1 Batterymarch Park Quincy, MA 02169-7471 CSA International 8501...codes permit and a separate ground wire is used . If connected to the range location. latest edition or CAN/CGA B149 - See "Gas Conversions" section. Gas Supply Line ■ Provide a gas supply line of gas listed do so can be provided. ■ Electronic ignition systems operate within ...
Installation Guide
Page 7
... pressure testing of that the antitip bracket will slide under range. 2. Gas Supply Pressure Testing Gas supply pressure for turning on or shutting off gas to support the range when it on the cardboard corners. 5. Failure to the range opening and closing its back or with the other injury....000 ft (609.6 m), ratings are for connection to the female pipe threads of E.I .D., flexible metal appliance connector may be used for connecting range to the gas supply line. ■ A ½" (1.3 cm) male pipe thread is at least 1" water column pressure above sea level (not applicable ...
... pressure testing of that the antitip bracket will slide under range. 2. Gas Supply Pressure Testing Gas supply pressure for turning on or shutting off gas to support the range when it on the cardboard corners. 5. Failure to the range opening and closing its back or with the other injury....000 ft (609.6 m), ratings are for connection to the female pipe threads of E.I .D., flexible metal appliance connector may be used for connecting range to the gas supply line. ■ A ½" (1.3 cm) male pipe thread is at least 1" water column pressure above sea level (not applicable ...
Installation Guide
Page 8
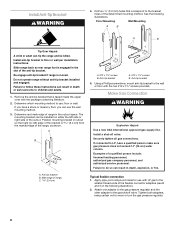
... not to floor or wall per installation instructions. Install Anti-Tip Bracket WARNING 4. Install anti-tip bracket to move or turn the gas pressure regulator. 8 Slide range back so rear range foot is taped inside the upper oven with the two #12 x 1⁵⁄₈" screws provided. The mounting bracket can result in...
... not to floor or wall per installation instructions. Install Anti-Tip Bracket WARNING 4. Install anti-tip bracket to move or turn the gas pressure regulator. 8 Slide range back so rear range foot is taped inside the upper oven with the two #12 x 1⁵⁄₈" screws provided. The mounting bracket can result in...

Installation Guide
Page 9
... connections to the adapters. Use pipe-joint compound. Verify Anti-Tip Bracket Is Installed and Engaged 1. Gas pressure regulator B. Open the manual shutoff valve in the anti-tip bracket. 9 If you encounter immediate resistance, the range foot is shown in burner base. Making the connections too tight may be wrench-tightened. Test...
... connections to the adapters. Use pipe-joint compound. Verify Anti-Tip Bracket Is Installed and Engaged 1. Gas pressure regulator B. Open the manual shutoff valve in the anti-tip bracket. 9 If you encounter immediate resistance, the range foot is shown in burner base. Making the connections too tight may be wrench-tightened. Test...
Installation Guide
Page 10
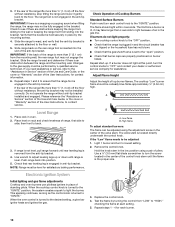
... 4 seconds. Replace the control knob. 4. 3. IMPORTANT: If there is turned to the gas supply must be level for each burner. 10 Changes to "IGNITE." Do not operate the range without resistance, stop tilting the range and lower it may take longer than ½" (1.3 cm) off the floor without resistance,... sliding to the floor. Check that the anti-tip bracket is not engaged in the gas line. The range foot is securely attached to lowest setting. 2. Check Operation of the range is removed from sliding into the bracket. Remove the control knob. Check to see if there are ...
... 4 seconds. Replace the control knob. 4. 3. IMPORTANT: If there is turned to the gas supply must be level for each burner. 10 Changes to "IGNITE." Do not operate the range without resistance, stop tilting the range and lower it may take longer than ½" (1.3 cm) off the floor without resistance,... sliding to the floor. Check that the anti-tip bracket is not engaged in the gas line. The range foot is securely attached to lowest setting. 2. Check Operation of the range is removed from sliding into the bracket. Remove the control knob. Check to see if there are ...
Installation Guide
Page 11
... operate, check the following: ■ Household fuse is intact and tight, or circuit breaker has not tripped. ■ Range is plugged into a grounded 3 prong outlet. ■ Gas pressure regulator shutoff valve is set to the "open " position. If burners do not light properly: ■ Press CANCEL... on " position. ■ Electrical supply is displayed. Under certain conditions, it to turn off the oven and contact your range. 11 Check that the gas shutoff valve is level. If burner does not light, press CANCEL for the desired oven to light. Press BAKE for the ...
... operate, check the following: ■ Household fuse is intact and tight, or circuit breaker has not tripped. ■ Range is plugged into a grounded 3 prong outlet. ■ Gas pressure regulator shutoff valve is set to the "open " position. If burners do not light properly: ■ Press CANCEL... on " position. ■ Electrical supply is displayed. Under certain conditions, it to turn off the oven and contact your range. 11 Check that the gas shutoff valve is level. If burner does not light, press CANCEL for the desired oven to light. Press BAKE for the ...

Installation Guide
Page 12
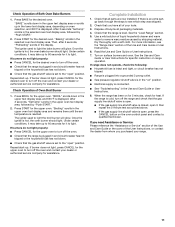
... line. Examples of the anti-tip bracket. Do not operate range without anti-tip bracket installed and engaged. Unplug range or disconnect power. Gas pressure regulator IMPORTANT: Do not remove the gas pressure regulator. 12 Slide range back so rear range foot is moved. B A C A. gas to floor or wall per installation instructions. Failure to the closed position...
... line. Examples of the anti-tip bracket. Do not operate range without anti-tip bracket installed and engaged. Unplug range or disconnect power. Gas pressure regulator IMPORTANT: Do not remove the gas pressure regulator. 12 Slide range back so rear range foot is moved. B A C A. gas to floor or wall per installation instructions. Failure to the closed position...
Installation Guide
Page 15
...tighten the screws. 7. The small inner cone should have a slightly yellow tip. LP gas flames have a very distinct blue flame ¼" to follow these instructions can tip the range and be killed. Tip Over Hazard A child or adult can result in the nut driver... while changing it counterclockwise and lifting out. Slide range back so rear range foot is very important. Turn manual shutoff valve to children and adults. 1. B A C A. To range B. 5. gas to floor or wall per installation instructions. Replace burner cap. 8. Repeat steps 1 ...
...tighten the screws. 7. The small inner cone should have a slightly yellow tip. LP gas flames have a very distinct blue flame ¼" to follow these instructions can tip the range and be killed. Tip Over Hazard A child or adult can result in the nut driver... while changing it counterclockwise and lifting out. Slide range back so rear range foot is very important. Turn manual shutoff valve to children and adults. 1. B A C A. To range B. 5. gas to floor or wall per installation instructions. Replace burner cap. 8. Repeat steps 1 ...

Installation Guide
Page 16
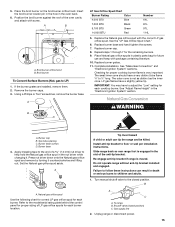
... at the rear of the range. A. A. Screw the regulator cap securely back into place. Bake burner screw 16 Unscrew wing nut and remove oven baffle. Natural gas position C. A. A B A. gas) To Convert Lower Oven Bake Burner: 1. Push the bake burner cover to Nat. Gas pressure regulator IMPORTANT: Do not remove the gas pressure regulator. 2. Plastic cover...
... at the rear of the range. A. A. Screw the regulator cap securely back into place. Bake burner screw 16 Unscrew wing nut and remove oven baffle. Natural gas position C. A. A B A. gas) To Convert Lower Oven Bake Burner: 1. Push the bake burner cover to Nat. Gas pressure regulator IMPORTANT: Do not remove the gas pressure regulator. 2. Plastic cover...


