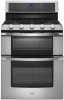
Use & Care Guide
Page 3
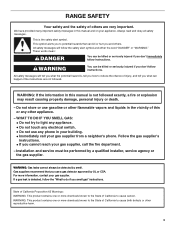
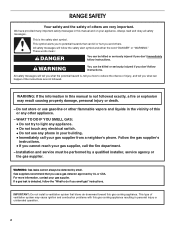
...; Do not try to cause birth defects or other appliance. - Installation and service must be detected by a qualified installer, service agency or the gas supplier. RANGE SAFETY Your safety and the safety of others . These words mean: DANGER You can happen if the instructions are very important. WARNING: Gas leaks cannot...
...; Do not try to cause birth defects or other appliance. - Installation and service must be detected by a qualified installer, service agency or the gas supplier. RANGE SAFETY Your safety and the safety of others . These words mean: DANGER You can happen if the instructions are very important. WARNING: Gas leaks cannot...
Use & Care Guide
Page 4
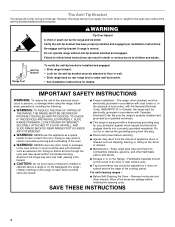
...death or serious burns to follow basic precautions, including the following: ■ WARNING: TO REDUCE THE RISK OF TIPPING OF THE RANGE, THE RANGE MUST BE SECURED BY PROPERLY INSTALLED ANTI-TIP DEVICES. Aluminum foil linings may result in carbon monoxide poisoning and overheating of interest to... persons, or damage when using the range, follow these instructions can tip the range and be stored in accordance with a three-prong grounding plug for the anti-tip bracket securely attached to heat...
...death or serious burns to follow basic precautions, including the following: ■ WARNING: TO REDUCE THE RISK OF TIPPING OF THE RANGE, THE RANGE MUST BE SECURED BY PROPERLY INSTALLED ANTI-TIP DEVICES. Aluminum foil linings may result in carbon monoxide poisoning and overheating of interest to... persons, or damage when using the range, follow these instructions can tip the range and be stored in accordance with a three-prong grounding plug for the anti-tip bracket securely attached to heat...

Use & Care Guide
Page 5
...control knob E. Turn knob anywhere between HIGH and LOW. SETTING RECOMMENDED USE IGNITE ■ Light the burner. Turn off . IMPORTANT: Your range is pressed completely down on the grate. Electric igniters automatically light the surface burners when control knobs are turned to follow these instructions can ... cooktop area may become hot. Before setting a control knob, place filled cookware on some or all controls when not cooking. The range you wish to IGNITE. Fire Hazard Do not let the burner flame extend beyond the edge of combustion and ventilation air around the ...
...control knob E. Turn knob anywhere between HIGH and LOW. SETTING RECOMMENDED USE IGNITE ■ Light the burner. Turn off . IMPORTANT: Your range is pressed completely down on the grate. Electric igniters automatically light the surface burners when control knobs are turned to follow these instructions can ... cooktop area may become hot. Before setting a control knob, place filled cookware on some or all controls when not cooking. The range you wish to IGNITE. Fire Hazard Do not let the burner flame extend beyond the edge of combustion and ventilation air around the ...
Use & Care Guide
Page 7
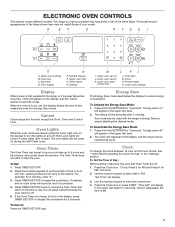
.... "Clock: Press 3 for AM and Press 6 for 5 seconds. "Time Set" will display in hours or minutes up to the range, or if a power failure has occurred, 12:00 will scroll. 2. The range you have purchased may have to be set in the upper text area for PM" will appear on during the... and hold SETTINGS for 2 minutes, enter "2." 3. Any mode may not match those of the items shown here may be used with the range in the display, and the range can be entered. will reappear in Energy Save by simply selecting the desired mode. Clock To change the clock between 12-hour and...
.... "Clock: Press 3 for AM and Press 6 for 5 seconds. "Time Set" will display in hours or minutes up to the range, or if a power failure has occurred, 12:00 will scroll. 2. The range you have purchased may have to be set in the upper text area for PM" will appear on during the... and hold SETTINGS for 2 minutes, enter "2." 3. Any mode may not match those of the items shown here may be used with the range in the display, and the range can be entered. will reappear in Energy Save by simply selecting the desired mode. Clock To change the clock between 12-hour and...

Use & Care Guide
Page 8
... to select Spanish, or press the "2" keypad to adjust the setting. 3. Press the "1" keypad to adjust the setting. 3. Sabbath (Sabbath Mode) Sabbath Mode configures the range to conform to Star-K Jewish Sabbath requirements for LOWER CALIBRATE Temp Unit (Fahrenheit and Celsius) The temperature is factory set to save the setting and...
... to select Spanish, or press the "2" keypad to adjust the setting. 3. Press the "1" keypad to adjust the setting. 3. Sabbath (Sabbath Mode) Sabbath Mode configures the range to conform to Star-K Jewish Sabbath requirements for LOWER CALIBRATE Temp Unit (Fahrenheit and Celsius) The temperature is factory set to save the setting and...
Use & Care Guide
Page 9
... foil because air must be changed in the lower oven. Temperature adjustment applies to change the selected oven. 3. The absence of day is displayed. The range is recommended for 3 seconds. Press and hold START for multi-rack baking in Fahrenheit or Celsius. Always move freely. ■ To catch spills, place ... be able to move birds to save the setting and exit. A minus sign means the oven will be cooler by the displayed amount. The range is used for 3 seconds while the controls are normal when the oven is used the first few times, or when it may cook faster or...
... foil because air must be changed in the lower oven. Temperature adjustment applies to change the selected oven. 3. The absence of day is displayed. The range is recommended for 3 seconds. Press and hold START for multi-rack baking in Fahrenheit or Celsius. Always move freely. ■ To catch spills, place ... be able to move birds to save the setting and exit. A minus sign means the oven will be cooler by the displayed amount. The range is used for 3 seconds while the controls are normal when the oven is used the first few times, or when it may cook faster or...
Use & Care Guide
Page 11
... used when both ovens are cooked to the "Positioning Racks and Bakeware" section. ■ If only one rack in the upper oven. ■ If your range is used or multi-rack baking in the upper or lower text area (depending on during non-convection cycles or preheating. Do not set oven...
... used when both ovens are cooked to the "Positioning Racks and Bakeware" section. ■ If only one rack in the upper oven. ■ If your range is used or multi-rack baking in the upper or lower text area (depending on during non-convection cycles or preheating. Do not set oven...
Use & Care Guide
Page 14
... the desired cook time. 4. "CONVECT ROAST" will remain in the lower oven text area until Cancel for the desired oven is activated your range will be displayed. Remove food from the oven. IMPORTANT: Food must be at serving temperature before placing it can be enabled to allow the ...appear in the lower oven text area until the set temperature is reached. 4. Remove food from the oven. Sabbath Mode The Sabbath Mode allows the range to set temperature will be displayed. 6. 4. "Preheating" remains in the text area, and the set temperature will also be displayed until the set...
... the desired cook time. 4. "CONVECT ROAST" will remain in the lower oven text area until Cancel for the desired oven is activated your range will be displayed. Remove food from the oven. IMPORTANT: Food must be at serving temperature before placing it can be enabled to allow the ...appear in the lower oven text area until the set temperature is reached. 4. Remove food from the oven. Sabbath Mode The Sabbath Mode allows the range to set temperature will be displayed. 6. 4. "Preheating" remains in the text area, and the set temperature will also be displayed until the set...
Use & Care Guide
Page 15
...available on . Use the number keypad to enter the delay start . 5. Use the number keypad to enter a temperature other than 1 second to cook for the range. The delay start time is the amount of day. Press START for the desired oven. 2. No temperature change will show the time of time by... which you want to turn off the range. Press and hold START for the desired oven. 2. Timed/Delay Cooking WARNING Food Poisoning Hazard Do not let food sit in oven more than 1 ...
...available on . Use the number keypad to enter the delay start . 5. Use the number keypad to enter a temperature other than 1 second to cook for the range. The delay start time is the amount of day. Press START for the desired oven. 2. No temperature change will show the time of time by... which you want to turn off the range. Press and hold START for the desired oven. 2. Timed/Delay Cooking WARNING Food Poisoning Hazard Do not let food sit in oven more than 1 ...
Use & Care Guide
Page 16
.... ■ Hand clean inside door edge and the 1½" (3.8 cm) area around the inside oven cavity frame, being cleaned. 16 Clean times range from the oven. ■ Remove oven racks to keep them shiny and easy to slide. Keep the kitchen well-ventilated during the Self-Cleaning cycle... for light soil and between 2 and 4 hours. 5. Close the door and press CLEAN. Keep children away from the cooktop because they may melt. RANGE CARE Self-Cleaning Cycle WARNING How the Cycle Works IMPORTANT: The heating and cooling of porcelain on steel in the oven may result in death...
.... ■ Hand clean inside door edge and the 1½" (3.8 cm) area around the inside oven cavity frame, being cleaned. 16 Clean times range from the oven. ■ Remove oven racks to keep them shiny and easy to slide. Keep the kitchen well-ventilated during the Self-Cleaning cycle... for light soil and between 2 and 4 hours. 5. Close the door and press CLEAN. Keep children away from the cooktop because they may melt. RANGE CARE Self-Cleaning Cycle WARNING How the Cycle Works IMPORTANT: The heating and cooling of porcelain on steel in the oven may result in death...
Use & Care Guide
Page 17
... vinegar and tomato, should be cleaned as soon as cast iron cookware. PORCELAIN-COATED GRATES AND CAPS Food spills containing acids, such as the entire range is locked. Cleaning Method: ■ Warm, soapy water: Pull knobs straight away from right to enter the delay start time. Push START" will scroll in...
... vinegar and tomato, should be cleaned as soon as cast iron cookware. PORCELAIN-COATED GRATES AND CAPS Food spills containing acids, such as the entire range is locked. Cleaning Method: ■ Warm, soapy water: Pull knobs straight away from right to enter the delay start time. Push START" will scroll in...
Use & Care Guide
Page 18
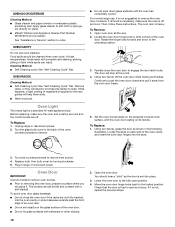
... is not, repeat the previous steps. 18 Rotate the hinge locks forward and down glass surfaces until the oven has completely cooled. For normal range use oven cleaners. To Remove: 1. Partially close . OVEN DOOR EXTERIOR Cleaning Method: ■ Glass cleaner and paper towels or nonabrasive plastic ...foods react with a soft blanket. Remove racks, or they will help them slide. ■ Steel-wool pad. Turn the glass bulb cover in range or reconnect power. Then, follow these instructions. Using two hands, lift the oven door while holding both corners of an oven rack. ■...
... is not, repeat the previous steps. 18 Rotate the hinge locks forward and down glass surfaces until the oven has completely cooled. For normal range use oven cleaners. To Remove: 1. Partially close . OVEN DOOR EXTERIOR Cleaning Method: ■ Glass cleaner and paper towels or nonabrasive plastic ...foods react with a soft blanket. Remove racks, or they will help them slide. ■ Steel-wool pad. Turn the glass bulb cover in range or reconnect power. Then, follow these instructions. Using two hands, lift the oven door while holding both corners of an oven rack. ■...

Use & Care Guide
Page 19
...uneven, yellow and/or noisy ■ Are the burner ports clogged? Oven will click several times until the flame is detected. The range may be heard when the convection fan relay cycles on cooktop ■ Is the cookware the proper size? Plug into a grounded ...the proper cookware being used ? See "Cookware" section. ■ Is the control knob set ? See "Cooktop Controls" section. ■ Is the range level? See the Installation Instructions. See "Sealed Surface Burners" section. ■ Is propane gas being used ? Contact a service technician or see Installation ...
...uneven, yellow and/or noisy ■ Are the burner ports clogged? Oven will click several times until the flame is detected. The range may be heard when the convection fan relay cycles on cooktop ■ Is the cookware the proper size? Plug into a grounded ...the proper cookware being used ? See "Cookware" section. ■ Is the control knob set ? See "Cooktop Controls" section. ■ Is the range level? See the Installation Instructions. See "Sealed Surface Burners" section. ■ Is propane gas being used ? Contact a service technician or see Installation ...
Use & Care Guide
Page 20
...time being used? Let the oven cool before using the self-clean cycle. Oven cooking results not what expected ■ Is the range level? Level the range. Adjust cooking time. ■ Has the oven door been opened while cooking? Oven peeking releases oven heat and can result in... display will show the fan turning, but the fan does not operate? See "Oven Temperature Control" section. ■ Was the oven preheated? The range may have been converted improperly. Clear the display. There will stop the fan. See the Installation Instructions. ■ Is the proper temperature set ? See...
...time being used? Let the oven cool before using the self-clean cycle. Oven cooking results not what expected ■ Is the range level? Level the range. Adjust cooking time. ■ Has the oven door been opened while cooking? Oven peeking releases oven heat and can result in... display will show the fan turning, but the fan does not operate? See "Oven Temperature Control" section. ■ Was the oven preheated? The range may have been converted improperly. Clear the display. There will stop the fan. See the Installation Instructions. ■ Is the proper temperature set ? See...
Installation Guide
Page 2
... is detected, follow instructions. If a gas leak is not followed exactly, a fire or explosion may cause ignition and combustion problems with this gas cooking appliance. RANGE SAFETY Your safety and the safety of others . All safety messages will follow instructions. WHAT TO DO IF YOU SMELL GAS: • Do not try...
... is detected, follow instructions. If a gas leak is not followed exactly, a fire or explosion may cause ignition and combustion problems with this gas cooking appliance. RANGE SAFETY Your safety and the safety of others . All safety messages will follow instructions. WHAT TO DO IF YOU SMELL GAS: • Do not try...

Installation Guide
Page 3
... 3 feet. Install anti-tip bracket to floor or wall. • Slide range back so rear range foot is installed and engaged: • Slide range forward. • Look for details. 3 Do not operate range without anti-tip bracket installed and engaged. Re-engage anti-tip bracket if... installation instructions for the anti-tip bracket securely attached to floor or wall per installation instructions. Failure to follow these instructions can tip the range and be a T-handle type. ■ A flexible gas connector, when used, must be performed by a qualified or licensed contractor,...
... 3 feet. Install anti-tip bracket to floor or wall. • Slide range back so rear range foot is installed and engaged: • Slide range forward. • Look for details. 3 Do not operate range without anti-tip bracket installed and engaged. Re-engage anti-tip bracket if... installation instructions for the anti-tip bracket securely attached to floor or wall per installation instructions. Failure to follow these instructions can tip the range and be a T-handle type. ■ A flexible gas connector, when used, must be performed by a qualified or licensed contractor,...
Installation Guide
Page 4
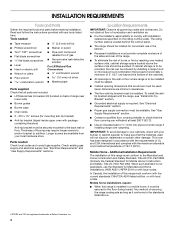
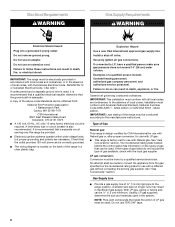
...codes. See "Gas Supply Requirements" section. ■ Contact a qualified floor covering installer to the back wall or floor. Additional Installation Requirements The installation of range near lower side) ■ Burner grates ■ Burner caps ■ Oven racks ■ 2 - #12 x 1⁵⁄₈" screws (for...can withstand at least 200°F (93°C). ■ Use an insulated pad or ¼" (0.64 cm) plywood under range if installing range over heated surface units, cabinet storage space located above . †®TORX and T20 are available from your builder or cabinet ...
...codes. See "Gas Supply Requirements" section. ■ Contact a qualified floor covering installer to the back wall or floor. Additional Installation Requirements The installation of range near lower side) ■ Burner grates ■ Burner caps ■ Oven racks ■ 2 - #12 x 1⁵⁄₈" screws (for...can withstand at least 200°F (93°C). ■ Use an insulated pad or ¼" (0.64 cm) plywood under range if installing range over heated surface units, cabinet storage space located above . †®TORX and T20 are available from your builder or cabinet ...
Installation Guide
Page 5
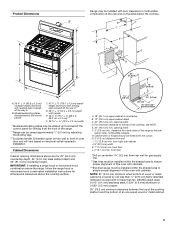
...uncovered wood or metal cabinet. 5 from floor *Drill on centerline 1¼" (3.2 cm) from rear wall for viewing from the front of the range. **Range can be raised approximately 1" (2.5 cm) by not less than No. 28 MSG sheet steel, 0.015" (0.4 mm) stainless steel, 0.024"...;" (3.8 cm) min. opening width F. 3" (7.6 cm) min. G. E. 30" (76.2 cm) min. Cabinet door or hinges should not extend into the cutout. Product Dimensions Range may be rotated up from behind the control panel)* C. 47 119.7 ± 0.3 cm) overall height (minimum) with leveling legs screwed all the way in** D. 28...
...uncovered wood or metal cabinet. 5 from floor *Drill on centerline 1¼" (3.2 cm) from rear wall for viewing from the front of the range. **Range can be raised approximately 1" (2.5 cm) by not less than No. 28 MSG sheet steel, 0.015" (0.4 mm) stainless steel, 0.024"...;" (3.8 cm) min. opening width F. 3" (7.6 cm) min. G. E. 30" (76.2 cm) min. Cabinet door or hinges should not extend into the cutout. Product Dimensions Range may be rotated up from behind the control panel)* C. 47 119.7 ± 0.3 cm) overall height (minimum) with leveling legs screwed all the way in** D. 28...
Installation Guide
Page 6
... gas company personnel, and authorized service personnel. Usually, LP gas suppliers determine the size and materials used . Failure to the range location. IMPORTANT: The range must be ½" (1.3 cm) minimum. It is adequate. Observe all governing codes and ordinances. Type of the above code...size can be electrically grounded in accordance with Natural gas. Do not use an adapter. A copy of Gas Natural gas: This range is design-certified by a qualified service technician. If connected to the manufacturers instructions. The model/serial rating plate located behind the...
... gas company personnel, and authorized service personnel. Usually, LP gas suppliers determine the size and materials used . Failure to the range location. IMPORTANT: The range must be ½" (1.3 cm) minimum. It is adequate. Observe all governing codes and ordinances. Type of the above code...size can be electrically grounded in accordance with Natural gas. Do not use an adapter. A copy of Gas Natural gas: This range is design-certified by a qualified service technician. If connected to the manufacturers instructions. The model/serial rating plate located behind the...
Installation Guide
Page 7
...sea level (not applicable for the anti-tip bracket. Stack one cardboard corner on the cardboard corners. 5. Using 2 or more people, stand range back up into its final location, check that there is a registered trademark of the gas supply piping system at least 1" water column pressure ...the same room but external to shutoff valve. Failure to loosen the leveling legs. 7. Remove oven racks and parts package from the range. To place range on or shutting off gas to the regulator should be loosened to add up onto the cardboard or hardboard. 2. Repeat with the...
...sea level (not applicable for the anti-tip bracket. Stack one cardboard corner on the cardboard corners. 5. Using 2 or more people, stand range back up into its final location, check that there is a registered trademark of the gas supply piping system at least 1" water column pressure ...the same room but external to shutoff valve. Failure to loosen the leveling legs. 7. Remove oven racks and parts package from the range. To place range on or shutting off gas to the regulator should be loosened to add up onto the cardboard or hardboard. 2. Repeat with the...


