
Owners Manual
Page 5
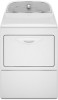
...to 60 or 150 minutes for models with two choices, 90 minutes for a load, select the lower setting rather than the higher setting. Promptly removing clothes at any time before the cycle has ended. Press the WRINKLE SHIELD™ button to turn the dryer on your clothes are approximately 80...the clothes are removed, or the Wrinkle Shield™ setting ends. 5 DAMP DRY SIGNAL (for your load. Gives the best drying in your dryer model. Drying time and temperature will vary based on the fabrics in the shortest time. NOTE: When the Wrinkle Shield™ setting is selected and ...
...to 60 or 150 minutes for models with two choices, 90 minutes for a load, select the lower setting rather than the higher setting. Promptly removing clothes at any time before the cycle has ended. Press the WRINKLE SHIELD™ button to turn the dryer on your clothes are approximately 80...the clothes are removed, or the Wrinkle Shield™ setting ends. 5 DAMP DRY SIGNAL (for your load. Gives the best drying in your dryer model. Drying time and temperature will vary based on the fabrics in the shortest time. NOTE: When the Wrinkle Shield™ setting is selected and ...
Owners Manual
Page 6
... for drying medium-weight items such as sheets, blouses, dresses, underwear, permanent press fabrics, and some knits. TIMED DRY - Depending on model, temperature may be a separate control. If you are unsure of the temperature to the care label directions. 6 Select a drying temperature based...like , select Less Dry next time you are unsure of the temperature to dry: Jeans, heavy work clothes. Will run the dryer for that do not seem as dry as towels and work clothes, towels Cycle: Automatic Drying Temperature: High Work clothes, medium Automatic...
... for drying medium-weight items such as sheets, blouses, dresses, underwear, permanent press fabrics, and some knits. TIMED DRY - Depending on model, temperature may be a separate control. If you are unsure of the temperature to the care label directions. 6 Select a drying temperature based...like , select Less Dry next time you are unsure of the temperature to dry: Jeans, heavy work clothes. Will run the dryer for that do not seem as dry as towels and work clothes, towels Cycle: Automatic Drying Temperature: High Work clothes, medium Automatic...
Owners Manual
Page 10
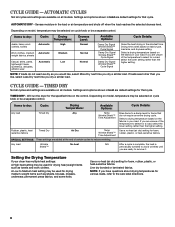
... cycles, not just the current cycle/load. Disconnect power. 2. Unplug dryer or disconnect power. 2. Locate the light bulb cover on some models): NOTE: The settings cannot be changed while the dryer is off) to secure dryer door. Turn bulb counterclockwise. See "Cleaning the Lint Screen." Unplug the... Transport hose separately. 4. Clean lint screen. Remove the hose from faucet, then drain the hose. For direct-wired dryers: 1. Remove the cover. 3. Steam models only: Shut off water faucet. 3. If storing or moving care Install and store your loads on some water may ...
... cycles, not just the current cycle/load. Disconnect power. 2. Unplug dryer or disconnect power. 2. Locate the light bulb cover on some models): NOTE: The settings cannot be changed while the dryer is off) to secure dryer door. Turn bulb counterclockwise. See "Cleaning the Lint Screen." Unplug the... Transport hose separately. 4. Clean lint screen. Remove the hose from faucet, then drain the hose. For direct-wired dryers: 1. Remove the cover. 3. Steam models only: Shut off water faucet. 3. If storing or moving care Install and store your loads on some water may ...

Dimension Guide
Page 1
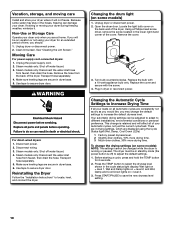
...the path of elbows you will help to achieve the best drying performance. Recessed area B. Wide opening side-swing door C. Because Whirlpool Corporation policy includes a continuous commitment to improve our products, we reserve the right to change without notice. Specifications subject to change ... that will provide the straightest and most direct path outdoors. For complete details, see Installation Instructions packed with vents 3"* (76 mm) *Required spacing 27" Wide Model Dryer dimensions 43 " (1092 mm) 23 ¾" (603 mm) 43 " (1092 mm) 13 ¾" (349 mm) *29 1/2" (749 mm) 27...
...the path of elbows you will help to achieve the best drying performance. Recessed area B. Wide opening side-swing door C. Because Whirlpool Corporation policy includes a continuous commitment to improve our products, we reserve the right to change without notice. Specifications subject to change ... that will provide the straightest and most direct path outdoors. For complete details, see Installation Instructions packed with vents 3"* (76 mm) *Required spacing 27" Wide Model Dryer dimensions 43 " (1092 mm) 23 ¾" (603 mm) 43 " (1092 mm) 13 ¾" (349 mm) *29 1/2" (749 mm) 27...
Installation Instructions
Page 6
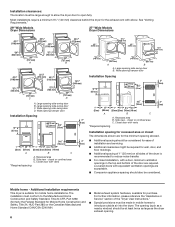
... ventilation openings are required. Installation clearances: The location must be made in mobile homes to introduce outside air into the dryer. Large opening side-swing door C. Recessed area B. Louvered doors with elbow. For further information, please reference the "...nearby window) should also be at least twice as large as the dryer exhaust opening. 6 Most installations require a minimum 5½" (140 mm) clearance behind the dryer for purchase. See "Venting Requirements." 29" Wide Models Dryer Dimensions 27" Wide Models Dryer Dimensions 43 " (1092 mm) 23 ¾" (603 mm) 43...
... ventilation openings are required. Installation clearances: The location must be made in mobile homes to introduce outside air into the dryer. Large opening side-swing door C. Recessed area B. Louvered doors with elbow. For further information, please reference the "...nearby window) should also be at least twice as large as the dryer exhaust opening. 6 Most installations require a minimum 5½" (140 mm) clearance behind the dryer for purchase. See "Venting Requirements." 29" Wide Models Dryer Dimensions 27" Wide Models Dryer Dimensions 43 " (1092 mm) 23 ¾" (603 mm) 43...

Installation Instructions
Page 8
...stand the dryer on the model/serial rating plate for the type of a qualified person include: licensed heating personnel, authorized gas company personnel, and authorized service personnel. Mobile home installations require a Mobile Home Installation Hold-down Kit. GAS DRYER POWER HOOKUP .... The shut off valve. C E A D B A. 3/8" flexible gas connector B. 3/8" pipe to connect the exhaust vent. Screw in your dryer. 2. Leave enough room to flare adapter fitting C. 1/8" NPT minimum plugged tapping D. 1/2" NPT gas supply line E. If this information does not ...
...stand the dryer on the model/serial rating plate for the type of a qualified person include: licensed heating personnel, authorized gas company personnel, and authorized service personnel. Mobile home installations require a Mobile Home Installation Hold-down Kit. GAS DRYER POWER HOOKUP .... The shut off valve. C E A D B A. 3/8" flexible gas connector B. 3/8" pipe to connect the exhaust vent. Screw in your dryer. 2. Leave enough room to flare adapter fitting C. 1/8" NPT minimum plugged tapping D. 1/2" NPT gas supply line E. If this information does not ...
Installation Instructions
Page 9
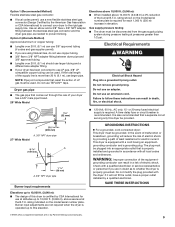
...; tape. A time-delay fuse or circuit breaker is also recommended that a separate circuit serving only this dryer be plugged into a grounded 3 prong outlet. A 9¼" (235 mm) A. 3/8" NPT dryer pipe 27" Wide Model *5 3/4" A (159 mm) 1 1/2" (38 mm) A.A3./83"/8N" PNTPdTrdyeryr eprippeipe Burner input ...; Lengths over 20 ft. (6.1 m) should use larger tubing and a different size adapter fitting. ■■ If your dryer has a 3/8" male pipe thread. 29" Wide Model Elevations above 10,000 ft. (3,048 m): ■■ When installed above sea level at pressures greater than 20 ft. ...
...; tape. A time-delay fuse or circuit breaker is also recommended that a separate circuit serving only this dryer be plugged into a grounded 3 prong outlet. A 9¼" (235 mm) A. 3/8" NPT dryer pipe 27" Wide Model *5 3/4" A (159 mm) 1 1/2" (38 mm) A.A3./83"/8N" PNTPdTrdyeryr eprippeipe Burner input ...; Lengths over 20 ft. (6.1 m) should use larger tubing and a different size adapter fitting. ■■ If your dryer has a 3/8" male pipe thread. 29" Wide Model Elevations above 10,000 ft. (3,048 m): ■■ When installed above sea level at pressures greater than 20 ft. ...
Installation Instructions
Page 11
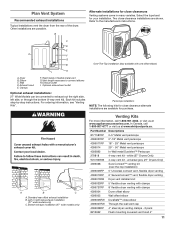
... 4396010RP 6' SecureConnect™ vent, flexible dryer venting 4396013RB Dryer vent installer's kit 4396033RP 5' flexible dryer venting with clamps 4396727RP 8' flexible dryer venting with one offset elbow) I . Exhaust outlet I H A. Periscope installation NOTE: The following kits for your installation. Bottom exhaust installation (27" wide models only) Venting Kits For more information, call 1-800-807-6777 or visit...
... 4396010RP 6' SecureConnect™ vent, flexible dryer venting 4396013RB Dryer vent installer's kit 4396033RP 5' flexible dryer venting with clamps 4396727RP 8' flexible dryer venting with one offset elbow) I . Exhaust outlet I H A. Periscope installation NOTE: The following kits for your installation. Bottom exhaust installation (27" wide models only) Venting Kits For more information, call 1-800-807-6777 or visit...
Installation Instructions
Page 12
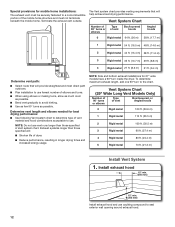
Determine vent length and elbows needed for 27" wide models have a 90º turn to the chart. Exhaust systems longer than those specified will: ■■ Shorten life of dryer. ■■ Reduce performance, resulting in Vent system chart. Install exhaust hood 12" min. (305 mm) 12" min. (305 ..." Wide Long Vent Models Only) Number of 90° turns or elbows Type of the mobile home structure and must not terminate beneath the mobile home. Terminate the exhaust vent outside. To determine maximum exhaust length, add one 90º turn inside the dryer. The Vent system chart...
Determine vent length and elbows needed for 27" wide models have a 90º turn to the chart. Exhaust systems longer than those specified will: ■■ Shorten life of dryer. ■■ Reduce performance, resulting in Vent system chart. Install exhaust hood 12" min. (305 mm) 12" min. (305 ..." Wide Long Vent Models Only) Number of 90° turns or elbows Type of the mobile home structure and must not terminate beneath the mobile home. Terminate the exhaust vent outside. To determine maximum exhaust length, add one 90º turn inside the dryer. The Vent system chart...

Installation Instructions
Page 15
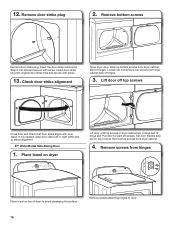
.... Insert screws in large part of slots. Remove top screws from dryer cabinet side of dryer cabinet. 29" Wide Model Large Side-Swing Door 1. Remove and transfer hinge hole plugs Place towel on top of hinges. Remove bottom screws from dryer cabinet side of dryer to gently remove 4 hinge hole plugs on top of door...
.... Insert screws in large part of slots. Remove top screws from dryer cabinet side of dryer cabinet. 29" Wide Model Large Side-Swing Door 1. Remove and transfer hinge hole plugs Place towel on top of hinges. Remove bottom screws from dryer cabinet side of dryer to gently remove 4 hinge hole plugs on top of door...
Installation Instructions
Page 18
... plug into hole and secure with screw. Remove screws from dryer cabinet side of hinge slot. Remove door strike plug 2. Loosen (do not remove) top screws from hinges Place towel on top of dryer to adjust alignment. 27" Wide Model Side-Swing Door 1. Lift door off screws. Place towel on... top of hinges. Remove top screws from dryer cabinet side of dryer. Set door (handle side up) on dryer Lift door until top screws in dryer cabinet are in Step 9 ...
... plug into hole and secure with screw. Remove screws from dryer cabinet side of hinge slot. Remove door strike plug 2. Loosen (do not remove) top screws from hinges Place towel on top of dryer to adjust alignment. 27" Wide Model Side-Swing Door 1. Lift door off screws. Place towel on... top of hinges. Remove top screws from dryer cabinet side of dryer. Set door (handle side up) on dryer Lift door until top screws in dryer cabinet are in Step 9 ...


