
Owners Manual
Page 3
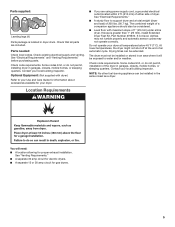
... installation instructions for grounding requirements. SAVE THESE INSTRUCTIONS WARNING: If the information in this Use and Care Guide or in your gas supplier from a neighbor's phone. If a gas leak is detected, follow basic precautions, including the following: ■ Read all instructions before or after each load. ■ Keep area around the exhaust opening and adjacent surrounding areas free from service or discarded, remove the door to the drying...
... installation instructions for grounding requirements. SAVE THESE INSTRUCTIONS WARNING: If the information in this Use and Care Guide or in your gas supplier from a neighbor's phone. If a gas leak is detected, follow basic precautions, including the following: ■ Read all instructions before or after each load. ■ Keep area around the exhaust opening and adjacent surrounding areas free from service or discarded, remove the door to the drying...
Owners Manual
Page 4
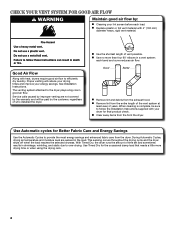
... Installation Instructions. n Use no more drying time or when using the drying rack. 4 Use Automatic cycles for Better Fabric Care and Energy Savings Use the Automatic Cycles to the dryer plays a big role in shrinkage, wrinkling, and static due to over-drying. n Clear away items from the exhaust hood. With Timed Dry, the dryer runs the amount of vent possible. n Use the shortest length of time set and sometimes results in good air flow. n Remove lint from the dryer. Use Timed Dry for final product check. n Replace...
... Installation Instructions. n Use no more drying time or when using the drying rack. 4 Use Automatic cycles for Better Fabric Care and Energy Savings Use the Automatic Cycles to the dryer plays a big role in shrinkage, wrinkling, and static due to over-drying. n Clear away items from the exhaust hood. With Timed Dry, the dryer runs the amount of vent possible. n Use the shortest length of time set and sometimes results in good air flow. n Remove lint from the dryer. Use Timed Dry for final product check. n Replace...

Owners Manual
Page 5
... heat-free, periodic tumbling at the end of the drying cycles. 5 CONTROL PANEL & FEATURES 1 2 3 4 6 5 Not all models. Wrinkle Shield™ Feature When you may need ironing. 6 CYCLE STATUS LIGHTS Lights indicate the progress of a cycle. On models with ACCUDRY™ Control Senses moisture in your dryer model. See "Cycle Guide" for detailed descriptions of the temperature to start a cycle, or press once while a cycle is useful when you are available on fabric type, load size, and dryness setting. 3 START...
... heat-free, periodic tumbling at the end of the drying cycles. 5 CONTROL PANEL & FEATURES 1 2 3 4 6 5 Not all models. Wrinkle Shield™ Feature When you may need ironing. 6 CYCLE STATUS LIGHTS Lights indicate the progress of a cycle. On models with ACCUDRY™ Control Senses moisture in your dryer model. See "Cycle Guide" for detailed descriptions of the temperature to start a cycle, or press once while a cycle is useful when you are available on fabric type, load size, and dryness setting. 3 START...
Owners Manual
Page 6
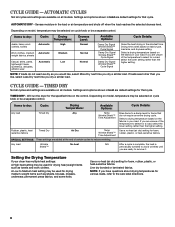
... heat-sensitive fabrics. Use a no heat (air dry) setting for various loads, refer to reduce wrinkling. Select a drying temperature based on all cycles and settings are unsure of certain cycles to the care label directions. 6 CYCLE GUIDE - Settings and options shown in the load or air temperature and shuts off when the load reaches the selected dryness level. AUTOMATIC CYCLES Not all models. AUTOMATIC DRY - Senses moisture in bold are ready to Medium heat setting may be a separate control...
... heat-sensitive fabrics. Use a no heat (air dry) setting for various loads, refer to reduce wrinkling. Select a drying temperature based on all cycles and settings are unsure of certain cycles to the care label directions. 6 CYCLE GUIDE - Settings and options shown in the load or air temperature and shuts off when the load reaches the selected dryness level. AUTOMATIC CYCLES Not all models. AUTOMATIC DRY - Senses moisture in bold are ready to Medium heat setting may be a separate control...

Owners Manual
Page 9
... your fingers. Rinse screen with the brush to a residue buildup. Cleaning the lint screen Every load cleaning The lint screen is in the door opening of clean cloths or towels to avoid drum staining. Cleaning the dryer interior To clean dryer drum 1. Dry these items inside out to dry the drum. Scrub lint screen with hot water. 5. To clean: 1. Wipe drum thoroughly with your fingers. 2. Roll lint off the screen into place. From the Exhaust Vent Lint should be removed every 2 years, or...
... your fingers. Rinse screen with the brush to a residue buildup. Cleaning the lint screen Every load cleaning The lint screen is in the door opening of clean cloths or towels to avoid drum staining. Cleaning the dryer interior To clean dryer drum 1. Dry these items inside out to dry the drum. Scrub lint screen with hot water. 5. To clean: 1. Wipe drum thoroughly with your fingers. 2. Roll lint off the screen into place. From the Exhaust Vent Lint should be removed every 2 years, or...
Owners Manual
Page 10
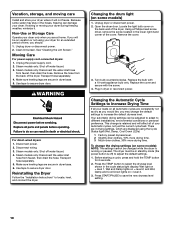
... water may change the default settings to select the dryness level shown in standby mode (the power button is running or paused. Moving Care For power supply cord-connected dryers: 1. Use tape to locate, level, and connect the dryer. Unplug dryer or disconnect power. 2. Remove the cover. 3. If storing or moving care Install and store your dryer during freezing weather, winterize it will not freeze. Clean lint screen. Unplug the power supply cord. 2. Steam models only: Disconnect the water inlet hose...
... water may change the default settings to select the dryness level shown in standby mode (the power button is running or paused. Moving Care For power supply cord-connected dryers: 1. Use tape to locate, level, and connect the dryer. Unplug dryer or disconnect power. 2. Remove the cover. 3. If storing or moving care Install and store your dryer during freezing weather, winterize it will not freeze. Clean lint screen. Unplug the power supply cord. 2. Steam models only: Disconnect the water inlet hose...
Owners Manual
Page 11
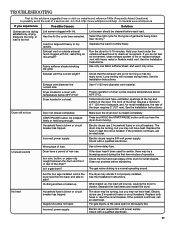
... have a period of dryer cycles requires temperatures above 45ºF (7ºC). The drum may not have ventilation openings at the top and bottom of fuse. Replace both fuses or reset the circuit breaker. Electric dryers require 240-volt power supply. Lint screen should be turning, but you may be cleaned before laundering. Fabric softener sheets blocking the grille. See the Installation Instructions. Exhaust vent the correct length? Exhaust vent diameter the correct size. The front of the dryer requires a minimum of 1" (25...
... have a period of dryer cycles requires temperatures above 45ºF (7ºC). The drum may not have ventilation openings at the top and bottom of fuse. Replace both fuses or reset the circuit breaker. Electric dryers require 240-volt power supply. Lint screen should be turning, but you may be cleaned before laundering. Fabric softener sheets blocking the grille. See the Installation Instructions. Exhaust vent the correct length? Exhaust vent diameter the correct size. The front of the dryer requires a minimum of 1" (25...

Owners Manual
Page 13
... ed Parts and repair labor to published user or operator instructions and/or installation instructions. 2. Service must provide proof of God, improper installation, installation not in materials or workmanship that is intended to you on the duration of implied warranties of the Use & Care Guide. LIMITATION OF REMEDIES; Write down the following information about your major appliance to repair or replace appliance light bulbs, air lters or water lters. Replacement parts or repair...
... ed Parts and repair labor to published user or operator instructions and/or installation instructions. 2. Service must provide proof of God, improper installation, installation not in materials or workmanship that is intended to you on the duration of implied warranties of the Use & Care Guide. LIMITATION OF REMEDIES; Write down the following information about your major appliance to repair or replace appliance light bulbs, air lters or water lters. Replacement parts or repair...
Warranty
Page 1
... EXCLUDED FROM WARRANTY This limited warranty does not cover: 1. Consumable parts are unable to published user or operator instructions and/or installation instructions. 2. Cosmetic damage, including scratches, dents, chips or other than normal, single-family household use your major appliance is located in a remote area where service by a Whirlpool designated service company. Replacement parts or repair labor on the duration of implied warranties of purchase or installation date for...
... EXCLUDED FROM WARRANTY This limited warranty does not cover: 1. Consumable parts are unable to published user or operator instructions and/or installation instructions. 2. Cosmetic damage, including scratches, dents, chips or other than normal, single-family household use your major appliance is located in a remote area where service by a Whirlpool designated service company. Replacement parts or repair labor on the duration of implied warranties of purchase or installation date for...

Dimension Guide
Page 1
... straightest and most direct path outdoors. A time-delay fuse or circuit breaker and a separate circuit are for use with the National Fuel Gas Code ANSI Z223.1. Water (Steam models only): The dryer must be connected to change without notice. Rigid or flexible metal exhaust vent must be used . Louvered hood 4" (102 mm) B. To determine maximum exhaust length, add one 90° turn inside the dryer. Use the fewest 90° turns possible. Do not...
... straightest and most direct path outdoors. A time-delay fuse or circuit breaker and a separate circuit are for use with the National Fuel Gas Code ANSI Z223.1. Water (Steam models only): The dryer must be connected to change without notice. Rigid or flexible metal exhaust vent must be used . Louvered hood 4" (102 mm) B. To determine maximum exhaust length, add one 90° turn inside the dryer. Use the fewest 90° turns possible. Do not...
Installation Instructions
Page 2
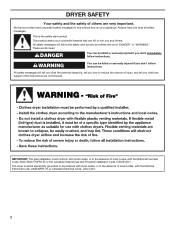
...the chance of local codes, with the National Electrical Code, ANSI/NFPA 70 or Canadian Electrical Code, CSA C22.1. 2 WARNING You can be killed or seriously injured if you don't immediately follow instructions. We have provided ...Natural Gas and Propane Installation Code, CSA B149.1. Always read and obey all safety messages. All safety messages will follow instructions. IMPORTANT: The gas installation must be killed or seriously injured if you don't follow the safety alert symbol and either the word "DANGER" or "WARNING." The dryer must conform with local codes, or in this manual...
...the chance of local codes, with the National Electrical Code, ANSI/NFPA 70 or Canadian Electrical Code, CSA C22.1. 2 WARNING You can be killed or seriously injured if you don't immediately follow instructions. We have provided ...Natural Gas and Propane Installation Code, CSA B149.1. Always read and obey all safety messages. All safety messages will follow instructions. IMPORTANT: The gas installation must be killed or seriously injured if you don't follow the safety alert symbol and either the word "DANGER" or "WARNING." The dryer must conform with local codes, or in this manual...
Installation Instructions
Page 4
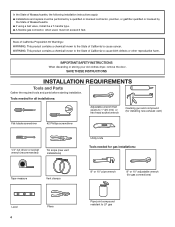
... State of Massachusetts. � If using a ball valve, it shall be a T-handle type. � A flexible gas connector, when used, must not exceed 3 feet. IMPORTANT SAFETY INSTRUCTIONS When discarding or storing your old clothes dryer, remove the door. Tools needed for all installations: Adjustable wrench that opens to 1" (25 mm) or hex-head socket wrench Caulking gun and compound (for installing new exhaust vent) Flat-blade screwdriver #2 Phillips...
... State of Massachusetts. � If using a ball valve, it shall be a T-handle type. � A flexible gas connector, when used, must not exceed 3 feet. IMPORTANT SAFETY INSTRUCTIONS When discarding or storing your old clothes dryer, remove the door. Tools needed for all installations: Adjustable wrench that opens to 1" (25 mm) or hex-head socket wrench Caulking gun and compound (for installing new exhaust vent) Flat-blade screwdriver #2 Phillips...
Installation Instructions
Page 5
... "Venting Requirements." ■■ A separate 30 amp circuit for electric dryers. ■■ A separate 15 or 20 amp circuit for proper exhaust installation. Check code requirements. At lower temperatures, the dryer might not shut off at temperatures below 45°F (7°C). Drying times can be exposed to your Use and Care Guide for information about accessories available for your dryer at the end of the dryer in an area where it will need...
... "Venting Requirements." ■■ A separate 30 amp circuit for electric dryers. ■■ A separate 15 or 20 amp circuit for proper exhaust installation. Check code requirements. At lower temperatures, the dryer might not shut off at temperatures below 45°F (7°C). Drying times can be exposed to your Use and Care Guide for information about accessories available for your dryer at the end of the dryer in an area where it will need...
Installation Instructions
Page 7
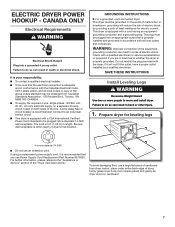
... electric current. Failure to be plugged into a grounded 4 prong outlet. If using a replacement power supply cord, it will reduce the risk of electric shock by a qualified electrician. A time-delay fuse or circuit breaker is 5 ft. (1.52 m) in death or electrical shock. WARNING: Improper connection of least resistance for leveling legs 4-wire receptacle (14-30R) ■■ Do not use Power Supply Cord Replacement Part Number 8579325. The cord is recommended. Electric Dryer Power Hookup - Check with the Canadian Electrical Code...
... electric current. Failure to be plugged into a grounded 4 prong outlet. If using a replacement power supply cord, it will reduce the risk of electric shock by a qualified electrician. A time-delay fuse or circuit breaker is 5 ft. (1.52 m) in death or electrical shock. WARNING: Improper connection of least resistance for leveling legs 4-wire receptacle (14-30R) ■■ Do not use Power Supply Cord Replacement Part Number 8579325. The cord is recommended. Electric Dryer Power Hookup - Check with the Canadian Electrical Code...

Installation Instructions
Page 8
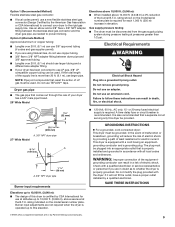
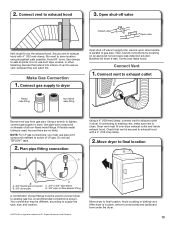
.... Gas supply line ■■ 1/2" NPT pipe is recommended. ■■ 3/8" approved tubing is no longer visible. C E A D B A. 3/8" flexible gas connector B. 3/8" pipe to connect the exhaust vent. Slide the dryer until diamond marking is acceptable for lengths under 20 ft. (6.1 m) if local codes and gas supplier permit. ■■ Must include 1/8" NPT minimum plugged tapping accessible for use Gas dryers must be installed in the door well of the dryer...
.... Gas supply line ■■ 1/2" NPT pipe is recommended. ■■ 3/8" approved tubing is no longer visible. C E A D B A. 3/8" flexible gas connector B. 3/8" pipe to connect the exhaust vent. Slide the dryer until diamond marking is acceptable for lengths under 20 ft. (6.1 m) if local codes and gas supplier permit. ■■ Must include 1/8" NPT minimum plugged tapping accessible for use Gas dryers must be installed in the door well of the dryer...
Installation Instructions
Page 9
... adjustments are not required when the dryer is operated up to the rigid gas supply line. If the total length of this dryer be plugged into a grounded 3 prong outlet. rating shown on the model/serial number plate. It is equipped with all local codes and ordinances. Do not modify the plug provided with a qualified electrician or service representative or personnel if you are using Natural Gas, do not use copper tubing...
... adjustments are not required when the dryer is operated up to the rigid gas supply line. If the total length of this dryer be plugged into a grounded 3 prong outlet. rating shown on the model/serial number plate. It is equipped with all local codes and ordinances. Do not modify the plug provided with a qualified electrician or service representative or personnel if you are using Natural Gas, do not use copper tubing...
Installation Instructions
Page 10
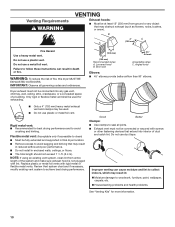
... if accessible to avoid sagging and kinking that may result in reduced airflow and poor performance. ■■ Do not install in final dryer location. ■■ Remove excess to clean) ■■ Must be connected into interior of fire, this dryer MUST BE EXHAUSTED OUTDOORS. B 4" C A (102 mm) Fire Hazard Use a heavy metal vent. IMPORTANT: Observe all joints. ■■ Exhaust vent must...
... if accessible to avoid sagging and kinking that may result in reduced airflow and poor performance. ■■ Do not install in final dryer location. ■■ Remove excess to clean) ■■ Must be connected into interior of fire, this dryer MUST BE EXHAUSTED OUTDOORS. B 4" C A (102 mm) Fire Hazard Use a heavy metal vent. IMPORTANT: Observe all joints. ■■ Exhaust vent must...
Installation Instructions
Page 11
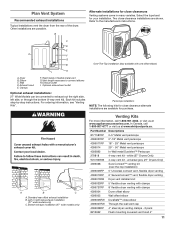
... Venting systems come in many varieties. Each kit includes step-by-step instructions. Plan Vent System Recommended exhaust installations Typical installations vent the dryer from the rear of the dryer. B Alternate installations for your installation. Dryer B. Exhaust hood E. Vent length necessary to the manufacturer's instructions. Optional side exhaust outlet Optional exhaust installations: 27" Wide Models can be converted to exhaust out the right side, left side, or through the bottom (4-way vent kit). Standard rear offset exhaust installation B. white (27" Dryers...
... Venting systems come in many varieties. Each kit includes step-by-step instructions. Plan Vent System Recommended exhaust installations Typical installations vent the dryer from the rear of the dryer. B Alternate installations for your installation. Dryer B. Exhaust hood E. Vent length necessary to the manufacturer's instructions. Optional side exhaust outlet Optional exhaust installations: 27" Wide Models can be converted to exhaust out the right side, left side, or through the bottom (4-way vent kit). Standard rear offset exhaust installation B. white (27" Dryers...
Installation Instructions
Page 13
... catch lint. Secure vent to exhaust hood with a 4" (102 mm) clamp. 2.Move dryer to final location A B A. 3/8" flexible gas connector B. 3/8" dryer pipe C C. 3/8" to 3/8" pipe elbow D. 3/8" pipe-to-flare adapter fitting A combination of vent to supply line type, size, and location. †®TEFLON is shown. NOTE: For LP gas connections, you must fit over the exhaust hood. Run vent to dryer. Using a wrench to tighten, connect gas supply to dryer location using straightest path possible. 2. Open shut-off valve...
... catch lint. Secure vent to exhaust hood with a 4" (102 mm) clamp. 2.Move dryer to final location A B A. 3/8" flexible gas connector B. 3/8" dryer pipe C C. 3/8" to 3/8" pipe elbow D. 3/8" pipe-to-flare adapter fitting A combination of vent to supply line type, size, and location. †®TEFLON is shown. NOTE: For LP gas connections, you must fit over the exhaust hood. Run vent to dryer. Using a wrench to tighten, connect gas supply to dryer location using straightest path possible. 2. Open shut-off valve...
Installation Instructions
Page 14
... running for 5 minutes, open the dryer door and feel for 20 minutes and start , check the following: ■■ Dryer is plugged into a grounded 3 prong outlet. ■■ Electrical supply is connected. ■■ Household fuse is intact and tight, or circuit breaker has not tripped. ■■ Dryer door is open it, then repeat the 5-minute test as outlined above. ■■ If the gas supply line shutoff valve is closed , open...
... running for 5 minutes, open the dryer door and feel for 20 minutes and start , check the following: ■■ Dryer is plugged into a grounded 3 prong outlet. ■■ Electrical supply is connected. ■■ Household fuse is intact and tight, or circuit breaker has not tripped. ■■ Dryer door is open it, then repeat the 5-minute test as outlined above. ■■ If the gas supply line shutoff valve is closed , open...


