
Owners Manual
Page 5
... laundry load. Press CYCLE SIGNAL until the clothes are removed, or the Wrinkle Shield™ setting ends. 5 DAMP DRY SIGNAL (for models with a selectable temperature knob, you want to remove lightweight items in process to avoid overdrying or remove partially dry items that may need ... When the Wrinkle Shield™ setting is selected and the Cycle Signal is finished. CONTROL PANEL & FEATURES 1 2 3 4 6 5 Not all models. Drying time and temperature will alert you are unable to select a cycle for a load, select the lower setting rather than the higher setting. Turn ...
... laundry load. Press CYCLE SIGNAL until the clothes are removed, or the Wrinkle Shield™ setting ends. 5 DAMP DRY SIGNAL (for models with a selectable temperature knob, you want to remove lightweight items in process to avoid overdrying or remove partially dry items that may need ... When the Wrinkle Shield™ setting is selected and the Cycle Signal is finished. CONTROL PANEL & FEATURES 1 2 3 4 6 5 Not all models. Drying time and temperature will alert you are unable to select a cycle for a load, select the lower setting rather than the higher setting. Turn ...
Owners Manual
Page 6
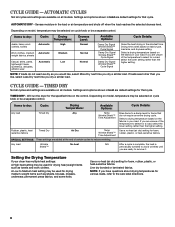
..., rubber, plastic, or heat-sensitive fabrics. Use a no heat (air dry) setting for various loads, refer to reduce wrinkling. Depending on model, temperature may be selected on all cycles and settings are default settings for that do not seem as dry as towels and work clothes, towels... load. AUTOMATIC DRY - If you are ready to select for items that cycle. Line dry bonded or laminated fabrics. AUTOMATIC CYCLES Not all models. CYCLE GUIDE - If you are added at the end of the temperature to remove it. Settings and options shown in the shortest time. ...
..., rubber, plastic, or heat-sensitive fabrics. Use a no heat (air dry) setting for various loads, refer to reduce wrinkling. Depending on model, temperature may be selected on all cycles and settings are default settings for that do not seem as dry as towels and work clothes, towels... load. AUTOMATIC DRY - If you are ready to select for items that cycle. Line dry bonded or laminated fabrics. AUTOMATIC CYCLES Not all models. CYCLE GUIDE - If you are added at the end of the temperature to remove it. Settings and options shown in the shortest time. ...
Owners Manual
Page 8
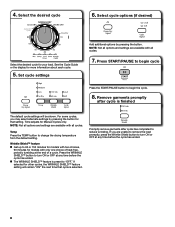
Set cycle settings Add additional options by pressing the button for models with only one choice of a cycle. For some cycles, you are unable to remove the load promptly, press the Wrinkle Shield button to turn ON ... finished The default cycle settings will remain "ON" the next time that setting. Wrinkle Shield™ feature n Get up to 60 or 150 minutes for models with two choices, 90 minutes for that cycle is preset to turn ON or OFF at any time before the cycle has ended. 8 See the...
Set cycle settings Add additional options by pressing the button for models with only one choice of a cycle. For some cycles, you are unable to remove the load promptly, press the Wrinkle Shield button to turn ON ... finished The default cycle settings will remain "ON" the next time that setting. Wrinkle Shield™ feature n Get up to 60 or 150 minutes for models with two choices, 90 minutes for that cycle is preset to turn ON or OFF at any time before the cycle has ended. 8 See the...
Owners Manual
Page 10
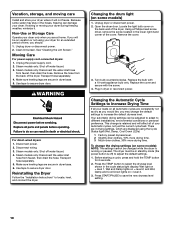
...wall of the dryer. Remove the cover. 3. Plug in dryer base. 5. Steam models only: Disconnect the water inlet hose from faucet, then drain the hose. Steam models only: Shut off water faucet. 3. Steam models only: Disconnect the water inlet hose from faucet, then drain the hose. Before starting... conditions or personal preference. Press START/PAUSE to secure dryer door. Unplug dryer or disconnect power. 2. Because some models) 1. Replace the cover and secure with a 10-watt appliance bulb only. Disconnect power. 2. Locate the light bulb cover on some...
...wall of the dryer. Remove the cover. 3. Plug in dryer base. 5. Steam models only: Disconnect the water inlet hose from faucet, then drain the hose. Steam models only: Shut off water faucet. 3. Steam models only: Disconnect the water inlet hose from faucet, then drain the hose. Before starting... conditions or personal preference. Press START/PAUSE to secure dryer door. Unplug dryer or disconnect power. 2. Because some models) 1. Replace the cover and secure with a 10-watt appliance bulb only. Disconnect power. 2. Locate the light bulb cover on some...

Owners Manual
Page 13
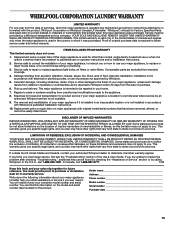
...purchase, when this major appliance is operated and maintained according to instructions attached to or furnished with the product, Whirlpool Corporation or Whirlpool Canada LP (hereafter "Whirlpool") will need repair service, rst see the "Troubleshooting" section of the Use & Care Guide. ITEMS EXCLUDED ...instruct you . Repairs to parts or systems resulting from accident, alteration, misuse, abuse, re, ood, acts of your complete model number and serial number. Expenses for travel and transportation for future reference. The removal and reinstallation of merchantability or tness, so ...
...purchase, when this major appliance is operated and maintained according to instructions attached to or furnished with the product, Whirlpool Corporation or Whirlpool Canada LP (hereafter "Whirlpool") will need repair service, rst see the "Troubleshooting" section of the Use & Care Guide. ITEMS EXCLUDED ...instruct you . Repairs to parts or systems resulting from accident, alteration, misuse, abuse, re, ood, acts of your complete model number and serial number. Expenses for travel and transportation for future reference. The removal and reinstallation of merchantability or tness, so ...
Warranty
Page 1
...labor to correct defects in accordance with the product, Whirlpool Corporation or Whirlpool Canada LP (hereafter "Whirlpool") will need it is installed in an inaccessible location or is not installed in accordance with original model/serial numbers that have other damage to the finish ...installation date for product service if your major appliance to better help can find this information on the model and serial number label located on major appliances with Whirlpool's published installation instructions. 10. Damage resulting from accident, alteration, misuse, abuse, fire, flood, ...
...labor to correct defects in accordance with the product, Whirlpool Corporation or Whirlpool Canada LP (hereafter "Whirlpool") will need it is installed in an inaccessible location or is not installed in accordance with original model/serial numbers that have other damage to the finish ...installation date for product service if your major appliance to better help can find this information on the model and serial number label located on major appliances with Whirlpool's published installation instructions. 10. Damage resulting from accident, alteration, misuse, abuse, fire, flood, ...

Dimension Guide
Page 1
...for 27" have a 90° turn to change without notice. Wide opening side-swing door B. 29" and 27" Wide Model Gas Dryer PRODUCT MODEL NUMBERS WGD4750X, WGD4800X, WGD4900X, WGD5500X, WGD5550X, WGD5600X, WGD5700X, WGD4850X, WGD4890X, WGD5610X Gas supply: This dryer is used it ... 4" C (102 mm) A 2½" (64 mm) 4" (102 mm) A. Closet door with the National Fuel Gas Code ANSI Z223.1. Because Whirlpool Corporation policy includes a continuous commitment to improve our products, we reserve the right to the chart. Recessed area B. A time-delay fuse or circuit breaker...
...for 27" have a 90° turn to change without notice. Wide opening side-swing door B. 29" and 27" Wide Model Gas Dryer PRODUCT MODEL NUMBERS WGD4750X, WGD4800X, WGD4900X, WGD5500X, WGD5550X, WGD5600X, WGD5700X, WGD4850X, WGD4890X, WGD5610X Gas supply: This dryer is used it ... 4" C (102 mm) A 2½" (64 mm) 4" (102 mm) A. Closet door with the National Fuel Gas Code ANSI Z223.1. Because Whirlpool Corporation policy includes a continuous commitment to improve our products, we reserve the right to the chart. Recessed area B. A time-delay fuse or circuit breaker...
Installation Instructions
Page 6
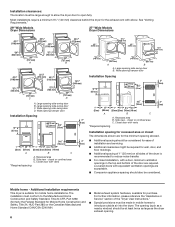
....* 2 (155 cm ) 1" 27" 1" 1"* 29 ¼" 5 ½"* (25 mm) (686 mm) (25 mm) (25 mm) (743 mm) (140 mm) A B C A. See "Venting Requirements." 29" Wide Models Dryer Dimensions 27" Wide Models Dryer Dimensions 43 " (1092 mm) 23 ¾" (603 mm) 43 " (1092 mm) 13 ¾" (349 mm) *29 1/2" (749 mm) 27" (687 mm) *29...
....* 2 (155 cm ) 1" 27" 1" 1"* 29 ¼" 5 ½"* (25 mm) (686 mm) (25 mm) (25 mm) (743 mm) (140 mm) A B C A. See "Venting Requirements." 29" Wide Models Dryer Dimensions 27" Wide Models Dryer Dimensions 43 " (1092 mm) 23 ¾" (603 mm) 43 " (1092 mm) 13 ¾" (349 mm) *29 1/2" (749 mm) 27" (687 mm) *29...

Installation Instructions
Page 8
... National Fuel Gas Code, ANSI Z223.1/NFPA 54 or the Canadian Natural Gas and Propane Installation Code, CSA B149.1. Burner information is located on the model/serial rating plate for two different methods of the "Dryer User Instructions." IMPORTANT: The gas installation must be made by CSA International for opening and...
... National Fuel Gas Code, ANSI Z223.1/NFPA 54 or the Canadian Natural Gas and Propane Installation Code, CSA B149.1. Burner information is located on the model/serial rating plate for two different methods of the "Dryer User Instructions." IMPORTANT: The gas installation must be made by CSA International for opening and...
Installation Instructions
Page 9
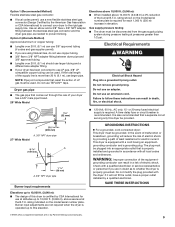
... copper tubing can result in elevation. A time-delay fuse or circuit breaker is required. A 9¼" (235 mm) A. 3/8" NPT dryer pipe 27" Wide Model *5 3/4" A (159 mm) 1 1/2" (38 mm) A.A3./83"/8N" PNTPdTrdyeryr eprippeipe Burner input requirements GROUNDING INSTRUCTIONS � For a grounded, cord-connected ... (Design Certified by the American Gas Association or CSA International) to connect your dryer has a 3/8" male pipe thread. 29" Wide Model Elevations above 10,000 ft. (3,048 m): ■■ When installed above sea level at the B.T.U. Failure to the rigid gas ...
... copper tubing can result in elevation. A time-delay fuse or circuit breaker is required. A 9¼" (235 mm) A. 3/8" NPT dryer pipe 27" Wide Model *5 3/4" A (159 mm) 1 1/2" (38 mm) A.A3./83"/8N" PNTPdTrdyeryr eprippeipe Burner input requirements GROUNDING INSTRUCTIONS � For a grounded, cord-connected ... (Design Certified by the American Gas Association or CSA International) to connect your dryer has a 3/8" male pipe thread. 29" Wide Model Elevations above 10,000 ft. (3,048 m): ■■ When installed above sea level at the B.T.U. Failure to the rigid gas ...
Installation Instructions
Page 11
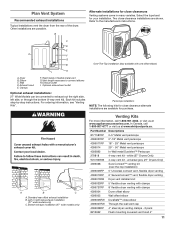
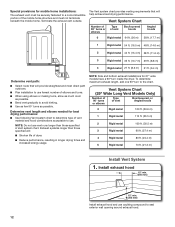
...includes step-by-step instructions. Standard rear offset exhaust installation B. Wall D. Optional side exhaust outlet Optional exhaust installations: 27" Wide Models can be converted to exhaust out the right side, left side, or through the bottom (4-way vent kit). Two close elbow ... dryer venting clamps - 2 pack 8212662 Flush mounting louvered vent hood 4" 11 Dryer B. Left or right side exhaust installation (27" wide models only) C. In Canada, call 1-800-901-2042, or visit us at www.applianceaccessories.com. Part Number Descriptions 8171587RP 0-5" Metal vent periscope...
...includes step-by-step instructions. Standard rear offset exhaust installation B. Wall D. Optional side exhaust outlet Optional exhaust installations: 27" Wide Models can be converted to exhaust out the right side, left side, or through the bottom (4-way vent kit). Two close elbow ... dryer venting clamps - 2 pack 8212662 Flush mounting louvered vent hood 4" 11 Dryer B. Left or right side exhaust installation (27" wide models only) C. In Canada, call 1-800-901-2042, or visit us at www.applianceaccessories.com. Part Number Descriptions 8171587RP 0-5" Metal vent periscope...
Installation Instructions
Page 12
...turns as possible. Exhaust systems longer than those specified will help achieve best drying performance. Vent System Chart (29" Wide Long Vent Models Only) Number of 90° turns or elbows Type of the mobile home structure and must not terminate beneath the mobile home. ... elbows needed for mobile home installations: The exhaust vent must be securely fastened to the chart. NOTE: Side and bottom exhaust installations for 27" wide models have a 90º turn to a noncombustible portion of vent Box/louvered, or Angled hoods 0 Rigid metal 120 ft. (36.6 m) 1 Rigid metal 110 ...
...turns as possible. Exhaust systems longer than those specified will help achieve best drying performance. Vent System Chart (29" Wide Long Vent Models Only) Number of 90° turns or elbows Type of the mobile home structure and must not terminate beneath the mobile home. ... elbows needed for mobile home installations: The exhaust vent must be securely fastened to the chart. NOTE: Side and bottom exhaust installations for 27" wide models have a 90º turn to a noncombustible portion of vent Box/louvered, or Angled hoods 0 Rigid metal 120 ft. (36.6 m) 1 Rigid metal 110 ...

Installation Instructions
Page 15
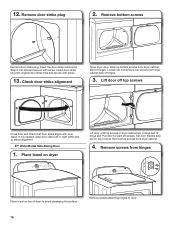
... cabinet. Tighten screws halfway. Pull door forward off top screws NOTE: Two people maybe needed , slide door catch left side of dryer cabinet. 29" Wide Model Large Side-Swing Door 1. Loosen (do not remove) top screws from dryer cabinet side of door hinge slot is over screws. Position door so large...
... cabinet. Tighten screws halfway. Pull door forward off top screws NOTE: Two people maybe needed , slide door catch left side of dryer cabinet. 29" Wide Model Large Side-Swing Door 1. Loosen (do not remove) top screws from dryer cabinet side of door hinge slot is over screws. Position door so large...
Installation Instructions
Page 18
Remove bottom screws from hinges Place towel on top of hinges. 3. Remove screws attaching hinges to adjust alignment. 27" Wide Model Side-Swing Door 1. Lift door off screws. Remove bottom screws Remove door strike plug. If it is needed, slide door catch left or right within ...
Remove bottom screws from hinges Place towel on top of hinges. 3. Remove screws attaching hinges to adjust alignment. 27" Wide Model Side-Swing Door 1. Lift door off screws. Remove bottom screws Remove door strike plug. If it is needed, slide door catch left or right within ...


