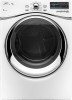
Whirlpool WED95HEXW Support and Manuals
Get Help and Manuals for this Whirlpool item
View All Support Options Below
Free Whirlpool WED95HEXW manuals!
Problems with Whirlpool WED95HEXW?
Ask a Question
Free Whirlpool WED95HEXW manuals!
Problems with Whirlpool WED95HEXW?
Ask a Question
Most Recent Whirlpool WED95HEXW Questions

How To Start The Dryer?
We just bought a new Whirlpool steam dryer and there is power going to the outlet but the unit will ...
We just bought a new Whirlpool steam dryer and there is power going to the outlet but the unit will ...
(Posted by Porthdenise 10 years ago)
Popular Whirlpool WED95HEXW Manual Pages
Installation Instructions - Page 1
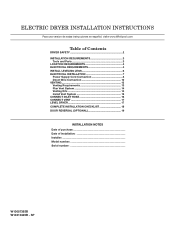
... LEGS 6 ELECTRICAL INSTALLATION 7
Power Supply Cord Connection 8 Direct Wire Connection 10 VENTING 13 Venting Requirements 13 Plan Vent System 14 Venting Kits 14 Install Vent System 15 Connect Inlet Hose 16 Connect Vent 17 Level Dryer 17 Complete Installation Checklist 18 Door reversal (OPTIONAL 19
INSTALLATION NOTES Date of purchase Date of installation Installer Model number...
Installation Instructions - Page 3
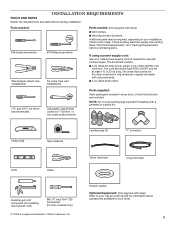
... and ductwork Additional parts may be at least 4 ft. (1.22 m) long. Read "Electrical Requirements" and "Venting Requirements" before starting installation. The wires that connect to your Use and Care Guide for information about accessories available for door reversal only)
® TORX is located in dryer drum. NOTE: Do not use with dryer) Refer to the dryer must end in...
Installation Instructions - Page 4

... longer drying times. If using a pedestal, you will need :
■■A location allowing for your washer using power supply cord, a grounded electrical outlet located within 4 ft. (1.2 m) of the water fill valves, and water pressure of 200 lbs. (90.7 kg). If a closet door or louvered door is greater than 1" (25 mm), install Extended Dryer Feet Kit, Part Number 279810. Some codes...
Installation Instructions - Page 13

...; Use clamps to seal all governing codes and ordinances. Venting Venting Requirements
Exhaust hoods:...;■ Do not install in enclosed walls, ...drying performance and to achieve best drying performance. Flexible metal vent: (Acceptable only if accessible to clean)
■■ Must be fully extended and supported in final dryer...Dryer exhaust must not be connected or secured with lint. Review...
Installation Instructions - Page 18
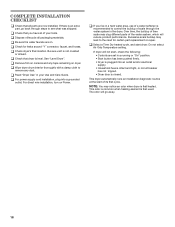
..., plug into an outlet and/or electrical
supply. • Household fuse is intact and tight, or circuit breaker
has not tripped. • Dryer door is an extra part, go away.
18 Do not select Air Only Temperature setting.
q Check dryer's final location.
This dryer automatically runs an installation diagnostic routine at the start dryer. q Be sure the water faucets...
Installation Instructions - Page 19
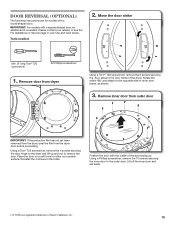
... your Use and Care Guide. Lift off the inner door and set aside.
† ® TORX is needed :
2. Move the door strike
Min. 8" long Torx® T25 screwdriver
#2 Phillips screwdriver
1. Using a Phillips screwdriver, remove the 10 screws securing the inner door to the door frame of the dryer. Door Reversal (optional)
The following instructions are for models with the inside of...
Owners Manual - Page 5
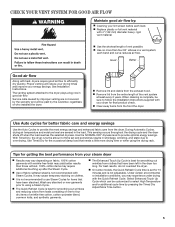
... depending on clothes. n It is not recommended with heat, dryers require good air flow to follow the Installation Instructions supplied with the Quick Refresh Cycle. Good
Better
Good air flow
Along with Steam Cycles. Service calls caused by improper venting are sensed in the dryer too long.
n Replace plastic or foil vent material
with wrinkle-free finish...
Owners Manual - Page 6
... or decrease the length of a Timed Dry or Quick Dry cycle.
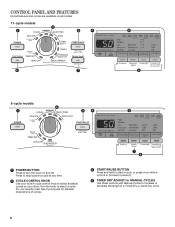
6 Turn the knob to select a cycle for MANUAL CYCLES Use these buttons with Manual Cycles to pause it.
4 TIMED DRY ADJUST for your dryer. CONTROL PANEL AND FEATURES
Not all features and cycles are available on all models.
11-cycle models
2
1
3
4
5
8
7
8-cycle models
2 1
3
4
6 5
1 POWER BUTTON Press to select...
Owners Manual - Page 7
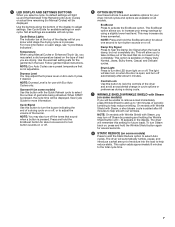
.... Use the warmest setting safe for available settings on the type of load you to lock the controls of a drying cycle on or off . Follow garment label instructions.
See Cycle Guide for your energy savings by pressing and holding the Wrinkle Shield button until -
Cycle Signal Use this button to increase your dryer. Press and hold...
Owners Manual - Page 9
... on some models).
Use to change the time in the dryer too long. Load Size Recommendations For best results, follow the load size recommendations noted for that cycle.
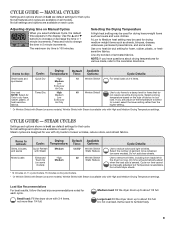
Do not overload. CYCLE GUIDE - PreOss and hold to remove wrinkles, including from loads left in 5 minute increments.
Line dry bonded or laminated fabrics. STEAM CYCLES
Settings and...
Owners Manual - Page 11
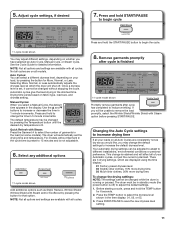
... Static Reduce, Wrinkle Shield/ Wrinkle Shield with Steam and/or EcoBoost by pressing the button for refresh cycles
Quick Refresh with all options and settings are 3 drying settings, which the dryer will automatically set , it cannot be changed by pressing the button for refresh cycles
11-cycle model shown
Wrinkle Shield
Manual Cycles: When you will affect all...
Owners Manual - Page 12
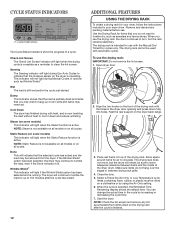
... your dryer, follow the instructions included in the cycle by using the Air Only setting. 6. Cool Down The dryer has finished drying with the holes in the dryer door opening and press down and reduce wrinkling. NOTE: Static Reduce is complete as Wrinkle Shield™. ADDITIONAL FEATURES
USING THE DRYING RACK
To obtain a drying rack for air to circulate. The drying rack is...
Owners Manual - Page 15
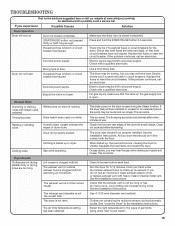
... the drum for the dryer. See the Installation Instructions. Hold your hand under the outside exhaust hood is used in dryer. TROUBLESHOOTING
First try the solutions suggested here or visit our website at www.whirlpool.com/help for the types of garments being dried. Make sure the dryer door is blown or circuit breaker has tripped.
Replace the fuses or...
Owners Manual - Page 16
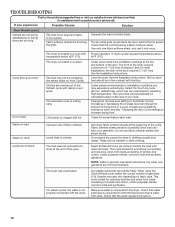
... www.whirlpool.com/help for smoothing out wrinkles and reducing odors from loads consisting of the cycle. When using the Quick Refresh cycle, select the correct number of the dryer requires 5" (127 mm).
This cycle is located in a closet. See the Installation Instructions. For steam cycles, the water is connected to tumble freely.
Closet doors must...
Owners Manual - Page 17
... has blown or circuit breaker has tripped.
If a code beginning with a high temperature setting. Call for details.
When the odors or fumes are left in the Installaton Instructions for service.
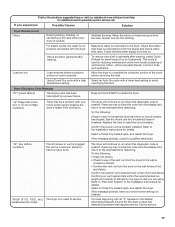
17 Allow the dryer to the Installation Instructions for the type of vent you experience
Possible Causes
Solution
Dryer Results (cont.) Odors
Load too hot
Recent painting, staining...
Whirlpool WED95HEXW Reviews
We have not received any reviews for Whirlpool yet.