

Dimension Guide
Page 1
...shown are for planning purposes only. L. Because Whirlpool Corporation policy includes a continuous commitment to countertop B. 13" (33 cm) max. For complete details, see NOTE*. W10403810 2/17/12 The model/serial rating plate located on the oven frame ... factory set for dimensional clearances above the cooktop surface. A timedelay fuse or circuit breaker is also recommended. A BC F E D A. 27⁷⁄₈" (70.8 cm) max. Model/serial rating plate (located on styling. CABINET OPENING DIMENSIONS D B C A E M K L G H F I . 2" (5.1 cm) J. 4¹⁄₂" (11.4 cm...
...shown are for planning purposes only. L. Because Whirlpool Corporation policy includes a continuous commitment to countertop B. 13" (33 cm) max. For complete details, see NOTE*. W10403810 2/17/12 The model/serial rating plate located on the oven frame ... factory set for dimensional clearances above the cooktop surface. A timedelay fuse or circuit breaker is also recommended. A BC F E D A. 27⁷⁄₈" (70.8 cm) max. Model/serial rating plate (located on styling. CABINET OPENING DIMENSIONS D B C A E M K L G H F I . 2" (5.1 cm) J. 4¹⁄₂" (11.4 cm...

Installation Guide
Page 4
The model/serial rating plate is not recommended. *Range can withstand at least 200°F (93°C). E ■ Use an insulated pad or ¼" (0.64 cm) plywood ... can be sealed. ■ Do not seal the range to comply with leveling legs screwed all governing codes and ordinances. Mobile Home - Model/serial rating plate (located on the model/serial rating plate. To install the antitip bracket shipped with the range, see "Install Anti-Tip Bracket" section. ■ Grounded electrical supply...
The model/serial rating plate is not recommended. *Range can withstand at least 200°F (93°C). E ■ Use an insulated pad or ¼" (0.64 cm) plywood ... can be sealed. ■ Do not seal the range to comply with leveling legs screwed all governing codes and ordinances. Mobile Home - Model/serial rating plate (located on the model/serial rating plate. To install the antitip bracket shipped with the range, see "Install Anti-Tip Bracket" section. ■ Grounded electrical supply...

Installation Guide
Page 6
... such as follows for turning on the types of gas that allows ease of gas available, check with Natural gas. latest edition. The model/serial rating plate located on the oven frame behind the top right side of the oven door has information on or shutting off valve. ... technician. If connected to shutoff valve. In the absence of E.I .D., flexible metal appliance connector may result in line. A smaller size pipe on the model/serial rating plate for connecting range to the gas supply line. The inlet pressure to the regulator should be level with all local codes and...
... such as follows for turning on the types of gas that allows ease of gas available, check with Natural gas. latest edition. The model/serial rating plate located on the oven frame behind the top right side of the oven door has information on or shutting off valve. ... technician. If connected to shutoff valve. In the absence of E.I .D., flexible metal appliance connector may result in line. A smaller size pipe on the model/serial rating plate for connecting range to the gas supply line. The inlet pressure to the regulator should be level with all local codes and...

Installation Guide
Page 7
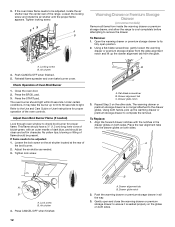
... Testing Gas supply pressure for testing regulator must be at least 1" water column pressure above the manifold pressure shown on the model/serial rating plate are reduced at test pressures in back or other injury. Remove shipping materials, tape and film from the ... remove the shipping base at test pressures equal to move and install range. 4. Wrench or pliers C. Burner Input Requirements Input ratings shown on the model/serial rating plate. Shipping base C B A. ¼" drive ratchet B. Front leveling leg On Ranges Equipped with a Warming Drawer or Premium Storage ...
... Testing Gas supply pressure for testing regulator must be at least 1" water column pressure above the manifold pressure shown on the model/serial rating plate are reduced at test pressures in back or other injury. Remove shipping materials, tape and film from the ... remove the shipping base at test pressures equal to move and install range. 4. Wrench or pliers C. Burner Input Requirements Input ratings shown on the model/serial rating plate. Shipping base C B A. ¼" drive ratchet B. Front leveling leg On Ranges Equipped with a Warming Drawer or Premium Storage ...

Installation Guide
Page 11
... blue, and should have a ½" (1.3 cm) long inner cone of bluish-green, with a pair of the burner. Adjust Oven Bake Burner Flame (if needed) 1. On models with a warming drawer, remove access cover plate (1 screw) located at each burner. This flame should be a steady blue flame approximately ¼" (0.64 cm) high. No...
... blue, and should have a ½" (1.3 cm) long inner cone of bluish-green, with a pair of the burner. Adjust Oven Bake Burner Flame (if needed) 1. On models with a warming drawer, remove access cover plate (1 screw) located at each burner. This flame should be a steady blue flame approximately ¼" (0.64 cm) high. No...
Installation Guide
Page 12
...: 1. Flat-blade screwdriver B. Repeat Step 2 on the air shutter located at the rear of bluish-green, with the notches in the drawer glides on some models) Remove all the way. 3. Air shutter 4. Tighten locking screw. Using a flat-blade screwdriver, gently loosen the warming drawer or premium storage drawer from the glide...
...: 1. Flat-blade screwdriver B. Repeat Step 2 on the air shutter located at the rear of bluish-green, with the notches in the drawer glides on some models) Remove all the way. 3. Air shutter 4. Tighten locking screw. Using a flat-blade screwdriver, gently loosen the warming drawer or premium storage drawer from the glide...

Installation Guide
Page 13
... to the locked position. The oven door is cool and empty. Lower the drawer so that all the way. 2. To Replace: 1. Storage Drawer (on some models) The storage drawer can be removed.
... to the locked position. The oven door is cool and empty. Lower the drawer so that all the way. 2. To Replace: 1. Storage Drawer (on some models) The storage drawer can be removed.
Installation Guide
Page 14
... back so rear range foot is moved. Unplug range or disconnect power. Failure to do so can tip the range and be killed. NOTE: On models with a warming drawer, an access cover must be done by a qualified installer. Install anti-tip bracket to children and adults. 1. Gas supply line 2. To range...
... back so rear range foot is moved. Unplug range or disconnect power. Failure to do so can tip the range and be killed. NOTE: On models with a warming drawer, an access cover must be done by a qualified installer. Install anti-tip bracket to children and adults. 1. Gas supply line 2. To range...

Installation Guide
Page 15
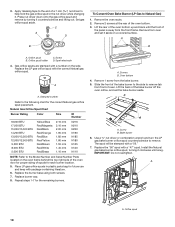
... L70 NOTE: Refer to hold the gas orifice spud in the above drawing. 6. 3. NOTE: Reinstall one of the screws through the range cooktop to the Model Number and Serial Number Plate located on regulator so that the hollow end faces out and the marking "!LP" is facing the direction shown in...
... L70 NOTE: Refer to hold the gas orifice spud in the above drawing. 6. 3. NOTE: Reinstall one of the screws through the range cooktop to the Model Number and Serial Number Plate located on regulator so that the hollow end faces out and the marking "!LP" is facing the direction shown in...

Installation Guide
Page 17
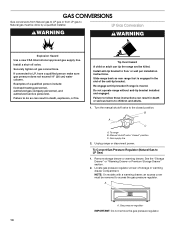
... WARNING To Convert Gas Pressure Regulator (LP Gas to the "Electronic Ignition System" section for properly connecting the range to the closed " position C. NOTE: On models with a ⁵⁄₈" combination wrench to Natural Gas) 1. A A. NOTE: Do not remove the spring beneath the cap. Manual shutoff valve "closed position. Gas supply...
... WARNING To Convert Gas Pressure Regulator (LP Gas to the "Electronic Ignition System" section for properly connecting the range to the closed " position C. NOTE: On models with a ⁵⁄₈" combination wrench to Natural Gas) 1. A A. NOTE: Do not remove the spring beneath the cap. Manual shutoff valve "closed position. Gas supply...
Installation Guide
Page 18
... orifice spuds in the nut driver while changing it counterclockwise and lifting out. Slide the front of the bake burner to the side to the Model Number and Serial Number Plate located on the oven frame behind the top right side of the oven door for each burner location. 5. Orifice spud...
... orifice spuds in the nut driver while changing it counterclockwise and lifting out. Slide the front of the bake burner to the side to the Model Number and Serial Number Plate located on the oven frame behind the top right side of the oven door for each burner location. 5. Orifice spud...
Use & Care Guide
Page 1
... a "Instrucciones para el usuario de la estufa a gas" en español, o para obtener información adicional acerca de su producto, visite: www.whirlpool.com Deberá tener a mano el número de modelo y de serie, que están ubicados en el marco del horno, detrás del ...Cookware 8 Home Canning 8 OVEN USE 9 Electronic Oven Controls 9 Sabbath Mode 10 Aluminum Foil 10 Positioning Racks and Bakeware 11 Split Oven Rack (on some models 11 Oven Vent 12 Baking and Roasting 12 Broiling 12 Convection Cooking 12 Cook Time 13 Warming Drawer 13 RANGE CARE 14 Clean Cycle 14...
... a "Instrucciones para el usuario de la estufa a gas" en español, o para obtener información adicional acerca de su producto, visite: www.whirlpool.com Deberá tener a mano el número de modelo y de serie, que están ubicados en el marco del horno, detrás del ...Cookware 8 Home Canning 8 OVEN USE 9 Electronic Oven Controls 9 Sabbath Mode 10 Aluminum Foil 10 Positioning Racks and Bakeware 11 Split Oven Rack (on some models 11 Oven Vent 12 Baking and Roasting 12 Broiling 12 Convection Cooking 12 Cook Time 13 Warming Drawer 13 RANGE CARE 14 Clean Cycle 14...
Use & Care Guide
Page 4
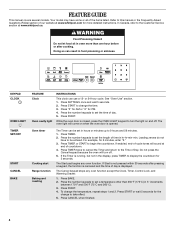
... . Press the number keypads to set in the display, press TIMER to display the countdown for the change to the Customer Service section at www.whirlpool.com for more than 350°F (175°C) in 5° increments between 170°F and 500°F (75°C and 260°C). 3. Press CANCEL when... function is canceled and the time of countdown. 4. The Start pad begins any oven function except the Clock, Timer, Control Lock, and Warming Drawer. 1. Your model may have to 9 hours and 59 minutes. 1. If enabled, end-of Day. FEATURE GUIDE This manual covers several...
... . Press the number keypads to set in the display, press TIMER to display the countdown for the change to the Customer Service section at www.whirlpool.com for more than 350°F (175°C) in 5° increments between 170°F and 500°F (75°C and 260°C). 3. Press CANCEL when... function is canceled and the time of countdown. 4. The Start pad begins any oven function except the Clock, Timer, Control Lock, and Warming Drawer. 1. Your model may have to 9 hours and 59 minutes. 1. If enabled, end-of Day. FEATURE GUIDE This manual covers several...

Use & Care Guide
Page 5
... to begin preheating the warming drawer. 4. Blanks display to preheat for 15 minutes. 5. If Energy Save is off automatically. If Energy Save is on some models) 1. Position the cookware in the warmed oven. 1. For convection roasting, press CONVECT a second time. Hold warm Food must be reduced by 25°F (15°...
... to begin preheating the warming drawer. 4. Blanks display to preheat for 15 minutes. 5. If Energy Save is off automatically. If Energy Save is on some models) 1. Position the cookware in the warmed oven. 1. For convection roasting, press CONVECT a second time. Hold warm Food must be reduced by 25°F (15°...

Use & Care Guide
Page 9
.... To Adjust Oven Temperature: 1. To adjust, see "12/24 Hour Clock" in death to exit. 9 Press CANCEL to certain birds. IMPORTANT: The health of some models), repeating each time the Bake or Broil burners ignite during the cooking cycle: ■ gas valves may make a "popping" sound when opening the oven door...
.... To Adjust Oven Temperature: 1. To adjust, see "12/24 Hour Clock" in death to exit. 9 Press CANCEL to certain birds. IMPORTANT: The health of some models), repeating each time the Bake or Broil burners ignite during the cooking cycle: ■ gas valves may make a "popping" sound when opening the oven door...
Use & Care Guide
Page 11
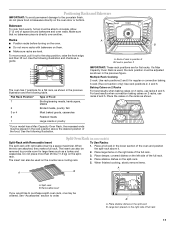
...racks are for large items such as a guide. Make sure that no bakeware piece is used on the counter as shown. *If your model has a Max Capacity Oven Rack, the recessed ends must be placed in the previous figure. Place shallow dishes on the oven door or ... racks with removable insert is a space maximizer. If a Max Capacity Oven Rack is directly over another. For best results when convection baking cakes on some models) Split-Rack with Removable Insert To Use Racks: The split-rack with bakeware on the right side of rack in position 3 B.Food in position 2 7 6 5 ...
...racks are for large items such as a guide. Make sure that no bakeware piece is used on the counter as shown. *If your model has a Max Capacity Oven Rack, the recessed ends must be placed in the previous figure. Place shallow dishes on the oven door or ... racks with removable insert is a space maximizer. If a Max Capacity Oven Rack is directly over another. For best results when convection baking cakes on some models) Split-Rack with Removable Insert To Use Racks: The split-rack with bakeware on the right side of rack in position 3 B.Food in position 2 7 6 5 ...
Use & Care Guide
Page 12
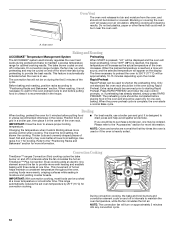
Do not set oven temperature by 25°F (15°C) for convection cooking. A. On convection range models, the fan may run while preheating and may be on and off in intervals while the fan circulates the hot air. The convection fan will ... the oven vent. Only one time. When the power preheat cycle is reached, the display temperature will be approximately 10-15 minutes depending upon the model. Once 100ºF (38ºC) is complete, the oven starts a normal Bake cycle. Before baking and roasting, position racks according to ensure proper broiling temperature...
Do not set oven temperature by 25°F (15°C) for convection cooking. A. On convection range models, the fan may run while preheating and may be on and off in intervals while the fan circulates the hot air. The convection fan will ... the oven vent. Only one time. When the power preheat cycle is reached, the display temperature will be approximately 10-15 minutes depending upon the model. Once 100ºF (38ºC) is complete, the oven starts a normal Bake cycle. Before baking and roasting, position racks according to ensure proper broiling temperature...
Use & Care Guide
Page 15
...can result. Cleaning Method: GRIDDLE To avoid damaging the nonstick surface, do not clean the griddle in direction of our website at www.whirlpool.ca. PORCELAIN-COATED GRATES AND CAPS Food spills containing acids, such as vinegar and tomato, should be cleaned as soon as cooktop,... caps are in the OFF position. In Canada, reference the Customer Service section at www.whirlpool.com. Soap, water and a soft cloth or sponge are cool. EXTERIOR PORCELAIN ENAMEL SURFACES (on some models) Do not use soap-filled scouring pads, abrasive cleaners, Cooktop Cleaner, steel-wool pads...
...can result. Cleaning Method: GRIDDLE To avoid damaging the nonstick surface, do not clean the griddle in direction of our website at www.whirlpool.ca. PORCELAIN-COATED GRATES AND CAPS Food spills containing acids, such as vinegar and tomato, should be cleaned as soon as cooktop,... caps are in the OFF position. In Canada, reference the Customer Service section at www.whirlpool.com. Soap, water and a soft cloth or sponge are cool. EXTERIOR PORCELAIN ENAMEL SURFACES (on some models) Do not use soap-filled scouring pads, abrasive cleaners, Cooktop Cleaner, steel-wool pads...

Use & Care Guide
Page 17
... not turning on when the oven door is closed. The range is normal. See "Cooktop Use" section. This is in the Clean cycle. On some models, reset the clock, if needed. If it reappears, call for contact information. Use distilled or filtered water in the "Feature Guide" section. See the Installation...
... not turning on when the oven door is closed. The range is normal. See "Cooktop Use" section. This is in the Clean cycle. On some models, reset the clock, if needed. If it reappears, call for contact information. Use distilled or filtered water in the "Feature Guide" section. See the Installation...
Use & Care Guide
Page 18
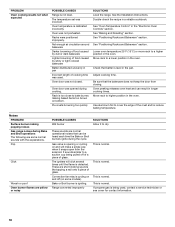
... and Broil operations The following are short clicking sounds like tapping a nail onto a piece of the crust and/or reduce baking temperature. These are some models). Range converted improperly SOLUTIONS Allow it snaps open from closing. See the Installation Instructions. See "Positioning Racks and Bakeware" section. See "Positioning Racks and Bakeware...
... and Broil operations The following are short clicking sounds like tapping a nail onto a piece of the crust and/or reduce baking temperature. These are some models). Range converted improperly SOLUTIONS Allow it snaps open from closing. See the Installation Instructions. See "Positioning Racks and Bakeware" section. See "Positioning Racks and Bakeware...


