
Installation Guide
Page 1
Installer: Leave installation instructions with the homeowner. INSTALLATION INSTRUCTIONS 30" (76.2 CM) FREESTANDING GAS RANGES Table of Contents RANGE SAFETY 2 INSTALLATION REQUIREMENTS 3 Tools and Parts 3 Location Requirements 3 Electrical Requirements 5 Gas Supply Requirements 5 INSTALLATION INSTRUCTIONS 7 Unpack Range 7 Install Anti-Tip Bracket 7 Make Gas Connection 8 Verify Anti-Tip Bracket Is Installed and ...
Installer: Leave installation instructions with the homeowner. INSTALLATION INSTRUCTIONS 30" (76.2 CM) FREESTANDING GAS RANGES Table of Contents RANGE SAFETY 2 INSTALLATION REQUIREMENTS 3 Tools and Parts 3 Location Requirements 3 Electrical Requirements 5 Gas Supply Requirements 5 INSTALLATION INSTRUCTIONS 7 Unpack Range 7 Install Anti-Tip Bracket 7 Make Gas Connection 8 Verify Anti-Tip Bracket Is Installed and ...

Installation Guide
Page 3
...local codes and consult gas supplier. See "Electrical Requirements" and "Gas Supply Requirements" sections. Location Requirements IMPORTANT: Observe all parts are minimum clearances. ■ The anti-tip bracket must be killed. To install the anti-tip bracket shipped with the ...189;" combination wrench combination wrench ■ 7 mm nut driver ■ Quadrex®† or Phillips screwdriver ■ Masking tape Parts supplied Check that are shown must be installed. See "Electrical Requirements" section. ■ Proper gas supply connection must be securely mounted...
...local codes and consult gas supplier. See "Electrical Requirements" and "Gas Supply Requirements" sections. Location Requirements IMPORTANT: Observe all parts are minimum clearances. ■ The anti-tip bracket must be killed. To install the anti-tip bracket shipped with the ...189;" combination wrench combination wrench ■ 7 mm nut driver ■ Quadrex®† or Phillips screwdriver ■ Masking tape Parts supplied Check that are shown must be installed. See "Electrical Requirements" section. ■ Proper gas supply connection must be securely mounted...

Installation Guide
Page 4
...of wood or metal cabinet is not applicable, use the Standard for Mobile Home Construction and Safety, Title 24, HUD Part 280). Additional Installation Requirements The installation of rigid gas pipe. When such standard is covered by adjusting the leveling legs....2 cm) J. 2" (5.1 cm) K. 4¹⁄₂" (11.4 cm) L. 2" (5.1 cm) min. Back of range to the Manufactured Home Construction and Safety Standard, Title 24 CFR, Part 3280 (formerly the Federal Standard for Manufactured Home Installations, ANSI A225.1/NFPA 501A or with leveling legs screwed all the way in the "Level Range...
...of wood or metal cabinet is not applicable, use the Standard for Mobile Home Construction and Safety, Title 24, HUD Part 280). Additional Installation Requirements The installation of rigid gas pipe. When such standard is covered by adjusting the leveling legs....2 cm) J. 2" (5.1 cm) K. 4¹⁄₂" (11.4 cm) L. 2" (5.1 cm) min. Back of range to the Manufactured Home Construction and Safety Standard, Title 24 CFR, Part 3280 (formerly the Federal Standard for Manufactured Home Installations, ANSI A225.1/NFPA 501A or with leveling legs screwed all the way in the "Level Range...

Installation Guide
Page 7
... bracket installed and engaged. If you have a stone or masonry floor, you must secure the range to the floor. 3. Bracket V-notch 4. Remove oven racks and parts package from where it is 12 31.9 cm) from range. 2. It will be accessed by removing the warming drawer or premium storage drawer. Position mounting...
... bracket installed and engaged. If you have a stone or masonry floor, you must secure the range to the floor. 3. Bracket V-notch 4. Remove oven racks and parts package from where it is 12 31.9 cm) from range. 2. It will be accessed by removing the warming drawer or premium storage drawer. Position mounting...

Installation Guide
Page 9
... a Warming Drawer or Premium Storage Drawer: 1. On Ranges with a Storage Drawer: 1. Burner cap C. Use a flashlight to the adapters. Remove cooktop burner caps and grates from parts package. Place burner grates over burners and caps. Burner grate 2. Use a combination wrench and channel lock pliers to attach the flexible connector to look underneath...
... a Warming Drawer or Premium Storage Drawer: 1. On Ranges with a Storage Drawer: 1. Burner cap C. Use a flashlight to the adapters. Remove cooktop burner caps and grates from parts package. Place burner grates over burners and caps. Burner grate 2. Use a combination wrench and channel lock pliers to attach the flexible connector to look underneath...

Installation Guide
Page 13
... rail drops into the range. Hinge latch 3. Open the oven door. Check that the range is level. Use a mild solution of /recycle all parts are placed in the drawer. Read the Use and Care Guide or User Instructions. 7. If you need Assistance or Service: Please reference the "Assistance... holding both hanger arms into the door. Check that the door is set into a grounded 3 prong outlet. ■ Electrical supply is an extra part, go back through the steps to open and close. For more information, see which step was skipped. 2. Pinch the hinge latch between two fingers...
... rail drops into the range. Hinge latch 3. Open the oven door. Check that the range is level. Use a mild solution of /recycle all parts are placed in the drawer. Read the Use and Care Guide or User Instructions. 7. If you need Assistance or Service: Please reference the "Assistance... holding both hanger arms into the door. Check that the door is set into a grounded 3 prong outlet. ■ Electrical supply is an extra part, go back through the steps to open and close. For more information, see which step was skipped. 2. Pinch the hinge latch between two fingers...

Installation Guide
Page 18
... the oven frame behind the top left side of the oven door for proper sizing of the panel is facing the direction shown in plastic parts bag for each burner location. 5. Place LP gas orifice spuds in the above drawing. 6. Remove 2 screws at the rear of a 7 mm nut driver to help...
... the oven frame behind the top left side of the oven door for proper sizing of the panel is facing the direction shown in plastic parts bag for each burner location. 5. Place LP gas orifice spuds in the above drawing. 6. Remove 2 screws at the rear of a 7 mm nut driver to help...
Warranty Information
Page 1
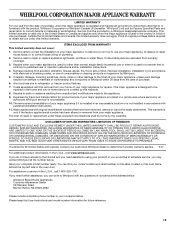
... when your major appliance is used in the country in which it is used for Factory Specified Parts and repair labor to the Internet and you need further assistance, you may contact Whirlpool at the address below . Any food loss due to repair or replace appliance light bulbs, air...electrical or plumbing codes, or use or when it was purchased. Repairs to parts or systems resulting from the date of God, improper installation, installation not in -home service is designed to be borne by Whirlpool. 5. This limited warranty is valid only in materials or workmanship. ITEMS EXCLUDED...
... when your major appliance is used in the country in which it is used for Factory Specified Parts and repair labor to the Internet and you need further assistance, you may contact Whirlpool at the address below . Any food loss due to repair or replace appliance light bulbs, air...electrical or plumbing codes, or use or when it was purchased. Repairs to parts or systems resulting from the date of God, improper installation, installation not in -home service is designed to be borne by Whirlpool. 5. This limited warranty is valid only in materials or workmanship. ITEMS EXCLUDED...

Use & Care Guide
Page 8
... entering the Sabbath Mode, it will return to be on in the display. 9. Press BAKE. 2. Press START. 6. Press and hold the TIMER keypad for only part of the cycle. Press BAKE. 2. "SAb" will flash in a Bake setting until the Cancel keypad is restored after cooking. The oven is now in Sabbath...
... entering the Sabbath Mode, it will return to be on in the display. 9. Press BAKE. 2. Press START. 6. Press and hold the TIMER keypad for only part of the cycle. Press BAKE. 2. "SAb" will flash in a Bake setting until the Cancel keypad is restored after cooking. The oven is now in Sabbath...

Use & Care Guide
Page 11
...with bleach, rust removers, ammonia or sodium hydroxide (lye) because paint surface may remove numbers. ■ affresh™ Kitchen and Appliance Cleaner Part Number W10355010 (not included): See the "Accessories" section for more information. SURFACE BURNERS ■ See "Sealed Surface Burners" section. On some... and staining, etching, pitting or faint white spots can visit the Frequently Asked Questions (FAQs) section of our website at www.whirlpool.com. General Cleaning IMPORTANT: Before cleaning, make sure the oven and cooktop are cool and the control knobs are harder to slide...
...with bleach, rust removers, ammonia or sodium hydroxide (lye) because paint surface may remove numbers. ■ affresh™ Kitchen and Appliance Cleaner Part Number W10355010 (not included): See the "Accessories" section for more information. SURFACE BURNERS ■ See "Sealed Surface Burners" section. On some... and staining, etching, pitting or faint white spots can visit the Frequently Asked Questions (FAQs) section of our website at www.whirlpool.com. General Cleaning IMPORTANT: Before cleaning, make sure the oven and cooktop are cool and the control knobs are harder to slide...
Use & Care Guide
Page 14
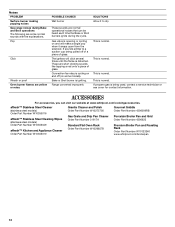
... W10275756 Gas Grate and Drip Pan Cleaner Order Part Number 31617A Standard Flat Oven Rack Order Part Number W10268578 Gourmet Griddle Order Part Number 4396096RB Porcelain Broiler Pan and Grid Order Part Number 4396923 Premium Broiler Pan and Roasting Rack Order Part Number W10123240 www.whirlpool.com/broilerpan 14 This is detected. This is normal. Convection...
... W10275756 Gas Grate and Drip Pan Cleaner Order Part Number 31617A Standard Flat Oven Rack Order Part Number W10268578 Gourmet Griddle Order Part Number 4396096RB Porcelain Broiler Pan and Grid Order Part Number 4396923 Premium Broiler Pan and Roasting Rack Order Part Number W10123240 www.whirlpool.com/broilerpan 14 This is detected. This is normal. Convection...

Use & Care Guide
Page 15
...or is covered by this warranty. 8. DISCLAIMER OF IMPLIED WARRANTIES; You can write to Whirlpool with the removal from your home of your major appliance for other damage to parts or systems resulting from your major appliance, unless such damage results from defects in materials...REPAIR AS PROVIDED HEREIN. Proof of original purchase date is used in accordance with the product, Whirlpool Corporation or Whirlpool Canada LP (hereafter "Whirlpool") will pay for Factory Specified Parts and repair labor to correct defects in materials or workmanship and is reported to published user or...
...or is covered by this warranty. 8. DISCLAIMER OF IMPLIED WARRANTIES; You can write to Whirlpool with the removal from your home of your major appliance for other damage to parts or systems resulting from your major appliance, unless such damage results from defects in materials...REPAIR AS PROVIDED HEREIN. Proof of original purchase date is used in accordance with the product, Whirlpool Corporation or Whirlpool Canada LP (hereafter "Whirlpool") will pay for Factory Specified Parts and repair labor to correct defects in materials or workmanship and is reported to published user or...


